background image

ShoreTel Mobility Router 6000 Series Hardware Installation Guide

7

ShoreTel Mobility Router 6000 Installation

Installing the Mobility Router

1

4

Place the other rack rail on the other side of the rack, making sure of the following:

Sliding rail is at the same level as the rack rail attached in Step 3.

Sliding rail guide faces the inside of the rack.

End of the rail labeled “Front” is at the front of the rack.

End of the rail labeled “Back” is at the back of the rack. 

5

Attach the rack rail to the rack by inserting screws in the brackets at the ends of the rack 
rail.

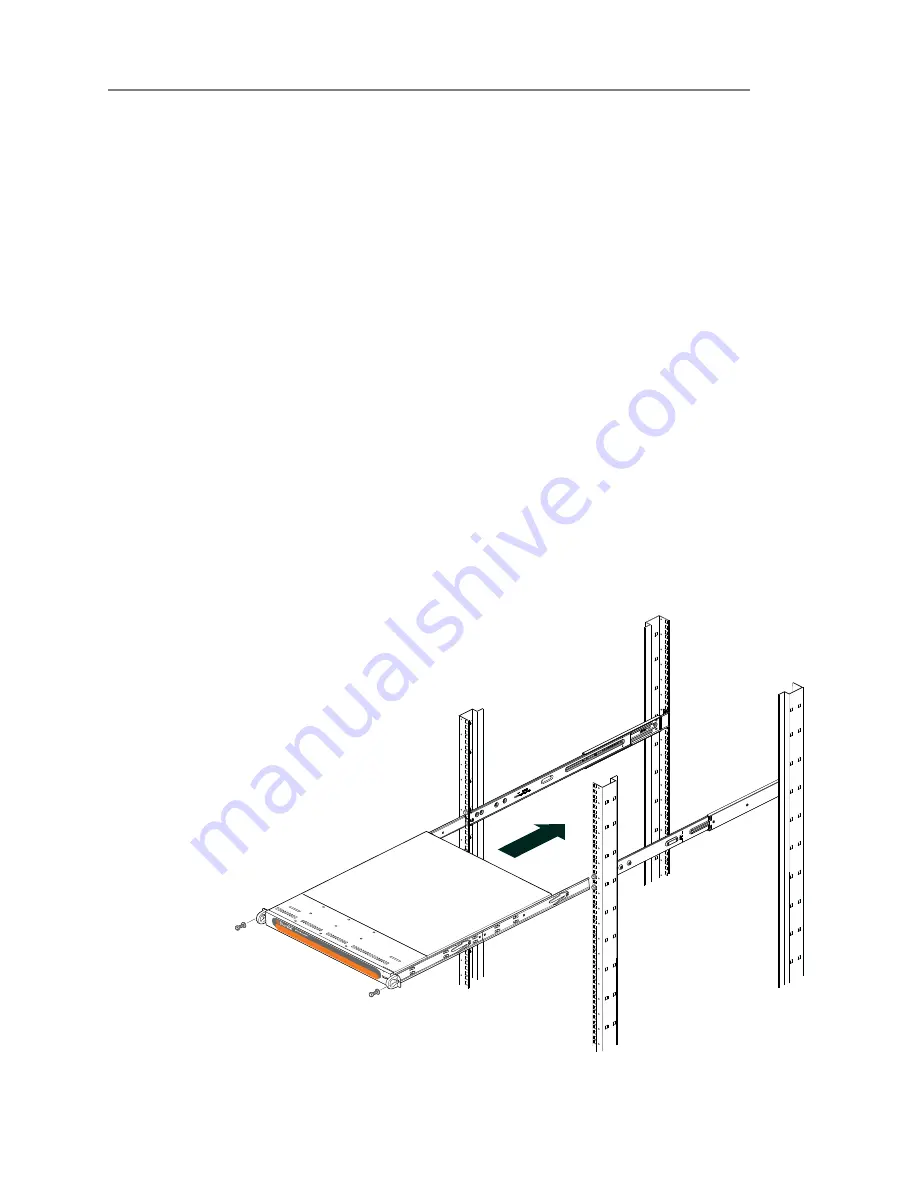
1.5.4 Installing the Mobility Router into the Rack

To install the Mobility Router into the rack:

1

Align the back of the Mobility Router with the front of the rack rails in the rack.

2

Slowly slide the Mobility Router rails into the rack rails, using even pressure on both 
sides. Press on the locking tabs of the Mobility Router rails while sliding it, if necessary. 

3

Keep sliding the Mobility Router until there is an audible click. This indicates the 
Mobility Router has been completely inserted into the rack. 

4

Insert screws in the mounting brackets on the front of the Mobility Router to the rack.

Figure 1-5. Installing the Mobility Router into the Rack

Содержание Mobility Router 6000 Series

Страница 1: ...ShoreTel Mobility Router 6000 Series Hardware Installation Guide...

Страница 2: ...ShoreTel and logo ControlPoint Brilliantly Simple Brilliantly Simple Communication ShoreCare ShoreGear ShorePhone and ShoreWare are registered trademarks of ShoreTel Inc in the United States and or o...

Страница 3: ...Router 6000 This document is intended for network administrators who install and manage network equipment and contains the following sections Specifications on page 2 Unpacking a Mobility Router on pa...

Страница 4: ...led Refer to Installing the Front Panel Cover Optional on page 11 to optionally install the cover Table 1 1 Mobility Router Connection Specifications Table 1 2 Mobility Router Input Specifications Tab...

Страница 5: ...LA Two power cords One serial cable for serial console connection One straight through Ethernet cable Two rack rails with each rack rail consisting of two pieces and requiring assembly Two rear inner...

Страница 6: ...e appliance should be installed in an area that does not exceed the following humidity range 8 90 non condensing 1 4 2 Rack Requirements The Mobility Router must be installed in a 19 inch rack Make su...

Страница 7: ...emble the rack rails that were included with the Mobility Router before attaching them to the rack Each rack rail consists of two rails one short rail and one long rail To assemble the rack rails 1 In...

Страница 8: ...rd the front inner rail so that the holes of the rail line up with the holes on the Mobility Router 4 Attach the rail to the Mobility Router using M4 flat head screws 5 For the other side of the Mobil...

Страница 9: ...ing screws in the brackets at the ends of the rack rail 1 5 4 Installing the Mobility Router into the Rack To install the Mobility Router into the rack 1 Align the back of the Mobility Router with the...

Страница 10: ...ht through Ethernet cable provided with the Mobility Router To connect the Mobility Router to the network 1 Insert one end of the Ethernet cable to the network device 2 Insert the other end of the Eth...

Страница 11: ...ect the management PC or laptop to the serial console port of the Mobility Router If there is no serial port use a 9 pin serial to USB adapter to connect to the serial cable To connect the PC or lapto...

Страница 12: ...l of the Mobility Router 2 Insert the other end of the power cord into an AC power source 3 Repeat Steps 1 and 2 to connect the other power connector with an appropriate separate AC power source for f...

Страница 13: ...over Optional 1 Insert the two pegs on the left side of the front panel in to the screw holes of the left mounting bracket ear Figure 1 10 Insert Left Side of Front Panel 2 Press the front panel again...

Страница 14: ...configuration wizard 1 At the login prompt type admin and press Enter 2 When prompted to accept the End User License Agreement enter YES to accept The initial configuration wizard starts 3 Enter Y to...

Страница 15: ...changed Verify the information and press Enter to save the configuration 14 At the prompt enter enable 15 Enter reload to restart the Mobility Router Wait for the login prompt in the terminal emulati...

Страница 16: ...ShoreTel Mobility Router 6000 Installation Using the Initial Configuration Wizard 1 14 ShoreTel Mobility Router 6000 Series Hardware Installation Guide...

Отзывы: