background image


12/29/2004 

13


BATTERIES AND BATTERY CHARGER 

All Shoprider® Heavy Duty scooters require two maintenance free, sealed lead acid batteries or 
gel batteries.  Battery performance can be affected by temperature, terrain, condition of battery, 
the weight of the user, etc.  The battery level indicator/gauge is only a guide and is most effective 
when the scooter is in drive, only then is the true battery discharge level displayed. 


When the scooter stops the battery level indicator may indicate full (no load on batteries). 


An active user can use up to 30% of battery capacity or more per day. 


Inactive users may only use 50% of battery capacity in a week. 


In both these instances the batteries should be put on charge over night. 


Battery Charger 

Batteries required for your scooter are specially designed.  All Shoprider® scooters require a 
Shoprider® automatic battery charger.  These chargers have an electronic switch that will 
terminate the charge when the batteries are fully charged. All Shoprider® chargers rely on a 
specific minimum feed-back voltage signal from the batteries in order to begin the charging 
cycle. If the batteries are severely discharged, the charger does not receive the required feed-back 
signal and the charger will not charge the batteries. Please contact your authorized Shoprider® 
provider for assistance. 
The battery charger supplied for the Shoprider® Sprinter XL3 Deluxe, Sprinter XL4 Deluxe, and 
Sprinter Jumbo XL scooters are 24 volt 8 amp transformer type off-board chargers. The battery 
charger supplied for the Shoprider® Sprinter XL4 scooter is a 24 volt 3 amp transformer type 
off-board charger. 

 
Charging 

Charge the batteries completely (8-12 hours) prior to first time use.

 To charge the batteries 

connect the plug lead into the battery-charging socket on the scooter tiller and the 3-prong A/C 
plug into the wall socket and switch on (8 amp charger only).  

FOR Sprinter XL:

 the battery 

charger has two lights.  The red light when constant shows the battery charger is connected, if 
the red light flashes; there is a break in the connection. The green light flashes when the batteries 
are receiving charge and is constant when the charge is complete.

 FOR Sprinter XL3 Deluxe, 

XL4 Deluxe and Jumbo XL:

  The battery charger has two lights.  The red light shows the 

battery charger is connected and has power (switched on). The second light will show a gold 
light while charging and a green light when the charge is complete. 

CAUTION: Always ensure that the charging lead is in good condition and has not been 
damaged or stretched. 

 
MAINTENANCE 
Lubrication 

At six-month intervals you should lubricate the following parts with a multipurpose grease or 
similar lubricant: 


Seat pivot post. 


Seat release lever pinion. 


Clean and recoat axles lightly. 


CAUTION – DO NOT USE WD40 TO LUBRICATE PARTS!!  DO NOT LUBRICATE 
TRANSAXLE GEARS!!  In the event of any difficulties please consult your provider. 

Содержание 889-3XLS

Страница 1: ...Heavy Duty Scooters User Manual SPRINTER XL4 889B 4 SPRINTER JUMBO XL 889X SPRINTER XL4 DELUXE 889 4XLS SPRINTER XL3 DELUXE 889 3XLS ...

Страница 2: ... Finger Lever Controls 10 On Off Key Switch 10 Indicator Switch 10 Hazard Warning Switch 10 Electromagnetic Brake 10 FREE WHEEL OPERATION FIG 12A B 11 Anti tip wheels 11 STARTING TO DRIVE YOUR SCOOTER 11 Getting Started 11 Starting Scooter Movement 12 Steering 12 Reversing 12 Dismounting 12 EXTRA GUIDELINES IN THE CONTROL OF YOUR SCOOTER 12 Ramps 12 Grass and Gravel 12 Battery Charger 13 Charging ...

Страница 3: ...DE FIG 1 4 Sprinter XL4 Figure 1 1 Tiller control head 2 Head light 3 Anti Tip wheels 4 Side reflectors 5 Adjustable width armrests 6 Swivel seat 7 Seat height adjustment 8 Fold down seat 9 Foot rest 10 Tiller steering column and steering wheel angle adjustment 11 Front bumper 12 Detachable basket 13 Battery charging inlet Sprinter XL3 Deluxe Figure 2 1 Delta tiller control head 2 Head lights and ...

Страница 4: ...Detachable basket 11 Emergency hand brake 12 Front suspension Sprinter Jumbo XL Figure 4 1 Tiller control head 2 Head light 3 Rear lights 4 Turn signal indicators 5 Adjustable width armrests 6 Swivel and sliding seat 7 Seat height adjustment 8 Black leatherette pillow top reclining captain seat 9 Foot rest 10 Tiller steering column and steering wheel angle adjustment 11 Detachable basket 12 Emerge...

Страница 5: ...DO NOT operate scooter without anti tip wheels installed Do not use an escalator to move a scooter between floors Serious injury could occur Do not drive the scooter on an incline that has oil water or ice film on it Do not try to lift the scooter by its seat tiller rear chassis cover or any removable parts Any of these could cause injury to the user or damage to the scooter Do not use parts or ac...

Страница 6: ...t transmitters radio and TV broadcast antenna towers and amateur HAM radios NOTE Other types of hand held devices such as cordless phones laptop computers AM FM radios TV sets CD players and cassette players and small appliances such as electric shavers and hair dryers so far as we know are not likely to cause problems to the scooter Scooter Electromagnetic Interference EMI Because EM energy rapid...

Страница 7: ... the scooter 5 Report all incidents of unintended movement or braking to your Shoprider provider and note whether there are sources of EMI nearby WARNING Shoprider Mobility Products is not responsible for damage or injury incurred due to improper and unsafe use of our scooter ...

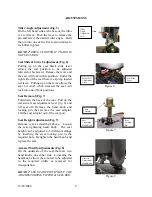
Страница 8: ...k of the seat Pull up the red swivel seat adjustment lever fig 6 and lift seat off Remove the hand knob and locking pin that secures the seat adaptor Lift the seat adaptor out of the seat post Seat Height Adjustment Fig 7 Remove seat as described above Loosen the seat tightening hand knob The seat height can be adjusted to 5 different settings by inserting the steel locking pin in the required hol...

Страница 9: ... nut The armrests are set parallel to the floor at the factory Reclining Seat Fig 10 Sprinter XL4 Deluxe Sprinter XL3 Deluxe The Sprinter XL4 Deluxe and Sprinter XL3 Deluxe come standard with a reclining seat The reclining seat lever is located on the left side below the armrest Simply pull the lever up to adjust This feature also allows the seat to be folded down Figure 9 Locking Nut and Bolt Adj...

Страница 10: ... at Release the lever and the scooter will slowly come to a stop On Off Key Switch Insert the key in the right side of the tiller Turn the key and the LED bars will light up needle gauge will move to the right There is a delay before the thumb finger lever accelerator control can be operated while the controller checks the circuits Indicator Switch Sprinter XL4 XL3 Deluxe Sprinter Jumbo XL Operate...

Страница 11: ... XL4 Fig 12B The scooter should not be used unless the anti tipping wheels are in place Shoprider Mobility Products is not responsible for damage or injury incurred due to improper or misuse of the scooter STARTING TO DRIVE YOUR SCOOTER Getting Started You must charge your scooter completely before first time use 8 12 hours Select a level area with plenty of space Mount the scooter either by lifti...

Страница 12: ...r speed setting to a low setting before you reverse Pull press the left finger thumb lever and steer wide of all corners and obstacles Dismounting Before dismounting ensure that the key is turned to the off position Raise the arm rest to slide off the seat or turn the swivel seat outward CAUTION Please ensure that care is exercised when mounting or dismounting the scooter and that the tiller seat ...

Страница 13: ...plied for the Shoprider Sprinter XL3 Deluxe Sprinter XL4 Deluxe and Sprinter Jumbo XL scooters are 24 volt 8 amp transformer type off board chargers The battery charger supplied for the Shoprider Sprinter XL4 scooter is a 24 volt 3 amp transformer type off board charger Charging Charge the batteries completely 8 12 hours prior to first time use To charge the batteries connect the plug lead into th...

Страница 14: ...rcuit Breaker Your scooter is fitted with the latest in electronic controls that are programmed to protect the electrical system from abnormal overloads Fitted for extra protection is a circuit breaker should there be a situation that your scooter stops for no apparent reason please check that the circuit breaker has not popped out or tripped The circuit breaker can be found under the rear chassis...

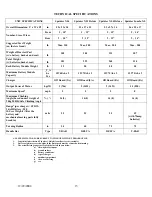
Страница 15: ...mber Size of Tires Rear 2 10 2 12 2 12 2 14 Suggested User Weight on the level road lb Max 350 Max 500 Max 500 Max 500 Weight of Heaviest Part w o battery baskets and seat lb 108 104 115 107 Total Weight w batteries basket seat lb 181 222 240 310 Each Battery Module Weight lb 32 50 50 50 Maximum Battery Module Capacity _V_A h x Pcs 12V40Ah x 2 12V75Ah x 2 12V75Ah x 2 12V75Ah x 2 Charger Off Board ...

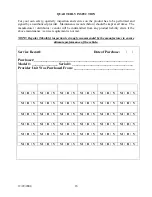
Страница 16: ...Regular Monthly inspection is strongly recommended by the manufacturer to ensure ultimate performance of the vehicle Service Record Date of Purchase Purchaser _________________________________________________________ Model _______________ Serial ___________________________________ Provider Unit Was Purchased From ___________________________________ M D Y M D Y M D Y M D Y M D Y M D Y M D Y M D Y M...

Страница 17: ...disclaims all responsibility for any personal injury or property damage which may occur as a result of improper or unsafe use of its products Mechanical or electrical defects will be dealt with on a contingency liability basis The preceding guidelines are intended to assist you in the safe operation of your powered scooter If you should have any questions about the correct operation of your scoote...

Страница 18: ...12 29 2004 18 Notes ...

Страница 19: ...12 29 2004 19 Notes ...

Страница 20: ...12 29 2004 20 Shoprider Mobility Products Inc 800 743 0772 www shoprider com Provider s Stamp ...

Отзывы: