background image

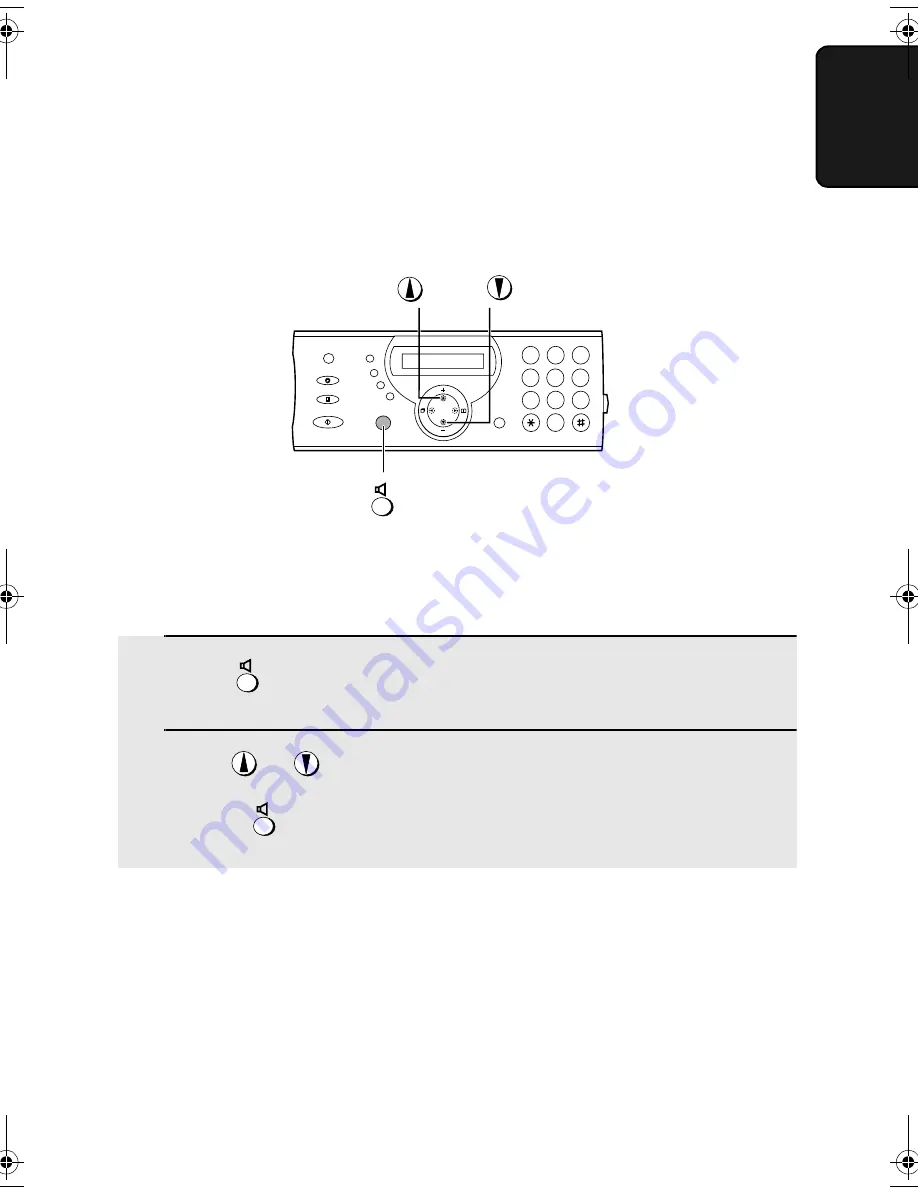
Volume Adjustment

23

1. Ins

tal

lati

on

Volume Adjustment

You can adjust the volume of the speaker and ringer using the up and down 
arrow keys.

1

Press 

2

Press 

 or 

 until the display shows the desired volume level. 

Press 

 again to turn off the speaker.

Speaker

1

9

4

5

6

7

8

0

2

3

all.book

Page 23

Tuesday, July 15, 2003

9:53 AM

Содержание UX-A460

Страница 1: ...ing Copies 6 Special Functions 7 Printing Lists 8 Maintenance 9 Troubleshooting IMPORTANT PLEASE KEEP THE EXTERNAL INTERNAL PACKAGING SAFE PLEASE DO NOT THROW IT AWAY IN THE UNLIKELY EVENT OF A HARDWARE FAILURE OUR REPAIR CENTRE WILL ASK YOU TO PUT YOUR SHARP FACSIMILE IN THIS BOX THANK YOU FOR YOUR ASSISTANCE UX A460 ...

Страница 2: ...een or green and yellow The wire which is coloured BLUE must be connected to the terminal which is marked with the letter N or coloured black The wire which is coloured BROWN must be connected to the terminal which is marked with the letter L or coloured red This apparatus must be protected by a 13A fuse in the mains plug or distribution board WARNING THIS APPARATUS MUST BE EARTHED This equipment ...

Страница 3: ...rox 24 average pages with no voice messages recorded or 20 minutes of voice messages including OGMs with no documents in memory Modem speed 14 400 bps with automatic fallback to lower speeds Transmission time Approx 6 seconds only when ECM is on Resolution Horizontal 8 pels mm Vertical Standard 3 85 lines mm Fine Halftone 7 7 lines mm Super fine 15 4 lines mm Automatic document feeder 10 pages max...

Страница 4: ...CITT G3 mode Input document size Automatic feeding Width 148 to 210 mm Length 140 to 297 mm Manual feeding Width 148 to 210 mm Length 140 to 600 mm Effective scanning width 210 mm max Effective printing width 204 mm max Contrast control Automatic Dark selectable Reception modes TEL FAX TEL FAX A M Copy function Single Multi 99 copies page Telephone function Yes cannot be used if power fails Power ...

Страница 5: ... 3 prong outlet Connecting it to any other kind of outlet will damage the machine and invalidate the warranty Never insert objects of any kind into slots or openings on the machine This could create a risk of fire or electric shock If an object falls into the machine that you cannot remove unplug the machine and consult a qualified service representative Do not place this machine on an unstable ca...

Страница 6: ... Adjustment 23 Flash Select Setting for PBX 25 2 Using the Answering Machine 26 Recording an Outgoing Message 26 Operating the Answering Machine 27 Optional Answering Machine Settings 31 Transfer Function 33 Override Ringing 36 Remote Operations 38 3 Sending Faxes 45 Transmittable Documents 45 Loading the Document 46 Adjusting the Resolution and Contrast 47 Sending a Fax by Normal Dialling 49 Send...

Страница 7: ...on to Memory 69 5 Making Copies 70 6 Special Functions 72 Caller ID Requires Subscription to Service 72 Blocking Reception of Unwanted Faxes 77 Polling Requesting a Fax Transmission 78 PBX operations 79 7 Printing Lists 80 8 Maintenance 83 9 Troubleshooting 86 Problems and Solutions 86 Messages and Signals 90 Clearing Paper Jams 93 Quick Reference Guide 95 Index 96 ...

Страница 8: ... this key to dial out first press the R key and then dial the number page 49 REC MEMO key Press this key to record an outgoing message phone conversation or memo pages 26 and 30 PLAY HOLD key Press this key to play recorded messages page 29 or to place a call on hold page 65 Display This displays messages and prompts to help you operate the machine A Look at the Operation Panel 1 2 3 4 5 6 JKL ABC...

Страница 9: ...o make a copy of a document page 70 This key is also used after dialling to poll request fax transmission from another machine page 78 START MEMORY key Press this key after dialling to begin fax transmission page 49 Press this key before dialling to send a fax through memory page 59 key Press this key to listen to the line and fax tones through the speaker when faxing a document page 49 Left and r...

Страница 10: ...rts to the lowest setting each time the handset is replaced Note that the speaker cannot be used for speaking it is only for listening To avoid feedback a loud howling sound be sure to turn off the speaker press once again before you replace the handset REPEAT key Press this key while listening to a message to play it again page 29 SKIP key Press this key while listening to a message to skip to th...

Страница 11: ...oved from a cold to a warm place it is possible that condensation may form on the scanning glass preventing proper scanning of documents for transmission To remove the condensation turn on the power and wait approximately two hours before using the machine Paper tray Paper tray extension Operation manual Gears 2 Handset Handset cord Telephone line cord Imaging film initial starter roll If any are ...

Страница 12: ...th a handset symbol on the side of the machine Use the handset to make ordinary phone calls or to transmit and receive faxes manually Connecting the power cord Plug the power cord into a 230 V 50 Hz earthed 3 prong AC outlet Caution The power outlet must be installed near the equipment and must be easily accessible The machine does not have a power on off switch so the power is turned on and off b...

Страница 13: ...ny If you attempt to use the fax machine in conjunction with any of these services you may experience errors during transmission and reception of facsimile messages The fax machine is not compatible with digital telephone systems If your area experiences a high incidence of lightning or power surges we recommend that you install surge protectors for the power and telephone lines Surge protectors c...

Страница 14: ...ension Attach the paper tray and paper tray extension Extension phone optional If desired you can connect an extension phone to the TEL SET socket on the fax 1 Remove the seal covering the TEL SET socket 2 Connect the extension phone line to the TEL SET socket using an appropriate adapter please purchase an adapter separately Eire Insert the extension phone line directly into the TEL SET socket TE...

Страница 15: ...ges Important If the wrong type of film is loaded printing will not be possible Near end of film detection At approximately 3 m from the end of the imaging film approximately 10 pages can still be printed NEAR END OF FILM USE SHARP SUPPLY will appear in the display This alerts you that you will soon need to replace the film Correct operation of this function is only guaranteed when SHARP UX 9CR im...

Страница 16: ...nto the print compartment 7 Rotate the front gear as shown until the film is taut 8 Close the operation panel press down on both sides to make sure it clicks into place Fit ends of rolls onto hubs Make sure the gears fit into the slots in the ends of the rolls 1 slot 2 slots Thick roll to rear Ensure that both gears are properly seated by pushing down lightly on the gears ...

Страница 17: ...ady been printed on or paper that is curled Loading Printing Paper You can load up to 50 sheets of A4 size 60 80 g m2 paper in the paper tray at room temperature maximum stack height should not be higher than the line on the tray Note If at any time the display shows the alternating messages at right check the printing paper If the tray is empty add paper If there is paper in the tray take it out ...

Страница 18: ...can change the print contrast setting to LIGHT or DARK 1 Press once and once 2 Press once and twice 3 Press once 4 Select the print contrast NORMAL LIGHT DARK 5 Press to return to the date and time display FUNCTION 1 2 3 STOP Display The display briefly shows your selection then OPTION SETTING PRINT CONTRAST COPY CUT OFF 1 NORMAL ...

Страница 19: ... 2 Press once 3 Press once FUNCTION 1 9 4 5 6 7 8 0 2 3 Display ENTER FAX ENTRY MODE OWN NUMBER SET Once you enter this information it will automatically appear at the top of each fax page you send Before you begin sending faxes enter your name and fax telephone number as explained below and set the date and time as explained on page 19 ...

Страница 20: ...to 24 characters can be entered Example SHARP 7777 44 2 777 7 To enter two letters in succession that require the same key press after entering the first letter To clear a mistake press To enter a lower case letter continue pressing the key for the letter until the lower case letter appears To enter one of the following symbols press or repeatedly _ 7 Press 8 Press to return to the date and time d...

Страница 21: ...elow 1 Press once and 3 times 2 Press once and once 3 Press once 4 Enter a two digit number for the day 01 to 31 Example the 5th To correct a mistake press to move the cursor back to the mistake and then enter the correct number FUNCTION 0 5 Display The currently set date appears example ENTRY MODE DATE TIME SET DATE 15 02 2003 DATE 05 02 2003 FUNCTION START MEMORY STOP 1 9 4 5 6 7 8 0 2 3 ...

Страница 22: ...r the year four digits Example 2003 7 Enter a two digit number for the hour 00 to 23 and a two digit number for the minute 00 to 59 Example 9 25 8 Press to start the clock 9 Press to return to the date and time display 0 1 2 0 0 3 0 9 2 5 START MEMORY STOP The currently set time appears example TIME 12 19 05 JAN 09 25 ANTI JUNK DATE 05 01 2003 ...

Страница 23: ...eceiving both faxes and voice calls When a call comes in the fax will detect whether it is a voice call including manually dialled faxes or an automatically dialled fax If it is a voice call the fax will make a special ringing sound to alert you to answer If it is an automatically dialled fax reception will begin automatically A M mode Select this mode when you go out and want the built in answeri...

Страница 24: ... receiving faxes in FAX and TEL modes see Chapter 4 Receiving Faxes For more information on using A M mode see Chapter 2 Using the Answering Machine FAX TEL A M TEL FAX 01 JAN 10 30 FAX TEL A M TEL FAX 01 JAN 10 30 A M TEL FAX FAX TEL 01 JAN 10 30 A M TEL FAX FAX TEL 01 JAN 10 30 ...

Страница 25: ...n Volume Adjustment You can adjust the volume of the speaker and ringer using the up and down arrow keys 1 Press 2 Press or until the display shows the desired volume level Press again to turn off the speaker Speaker 1 9 4 5 6 7 8 0 2 3 ...

Страница 26: ...The ringer will ring once at the selected level then the date and time will reappear in the display 2 If you selected RINGER OFF OK press Note When the reception mode is set to TEL the ringer will still ring at LOW if turned off START MEMORY Ringer Display RINGER HIGH RINGER MIDDLE RINGER LOW RINGER OFF OK ...

Страница 27: ... line you must select the appropriate Flash Select setting depending on whether your PBX line is a normal telephone line or an ISDN line or other high speed line 1 Press once and once 2 Press once and 4 times 3 Press once 4 Select SHORT TIME if your PBX line is a normal telephone line Select LONG TIME if your PBX line is an ISDN line or other high speed line 5 Press to return to the date and time ...

Страница 28: ... message When you go out turn on the answering machine by setting the reception mode to A M Recording an Outgoing Message The outgoing message OGM is the greeting that the machine plays after answering a call to inform callers that they can leave a message or send a fax Follow the steps below to record a message Example Hello You ve reached ______ No one is available to take your call right now Pl...

Страница 29: ...swering machine so that callers can leave messages press until the arrow in the display points to A M PLAY HOLD RESOLUTION RECEPTION MODE 4 Press and speak into the handset to record a message The outgoing message can be up to 60 seconds long While recording the display will show the time left to record 5 When finished replace the handset or press START MEMORY STOP RESOLUTION RECEPTION MODE The ou...

Страница 30: ...n The number of rings on which the machine answers incoming calls in A M mode depends on whether the Toll Saver function is turned on and if it is on whether you have messages The Toll Saver function is initially turned on ON OFF No received messages 4 Rings Received messages 2 Rings Toll Saver Toll Saver NOTHING Hello Hi Hi Ring Ring Ring Ring Ring Ring Ring Ring Ring Ring Answer according to NUM...

Страница 31: ...s the date and time of recording will appear briefly in the display If no messages were received NO MESSAGES will appear Repeat To listen to a message a second time press before playback of that message ends To move back to the previous message press within 3 seconds of the beginning of the current message Skip To skip forward to the next message press Note Playback will stop if you receive a call...

Страница 32: ...You can record memos for yourself and other users of the machine These will be played back together with incoming messages when the key is pressed PLAY HOLD 1 Press once and once 2 Pick up the handset press and speak into the handset 3 When you have finished speaking replace the handset or press REC MEMO START MEMORY STOP Recording phone conversations 2 way recording To record a phone conversation...

Страница 33: ...tes to leave a message If desired you can change this setting to 15 30 or 60 seconds Display A M SETTING RECORDING TIME 1 2 3 4 The display briefly shows your selection then REMOTE CODE FAX mode on A M failure If the memory for recording incoming messages becomes full while you are out the answering machine will no longer be able to record messages The ON A M FAILURE setting is used to choose the ...

Страница 34: ...m a remote location you can wait until it answers listen to your messages and then erase them see Remote Operations on page 38 The initial setting is NO If you want to change the setting to YES press the panel keys as follows Display A M SETTING 1 YES 2 NO The display briefly shows your selection then OGM ONLY MODE OGM only mode If needed you can turn off recording of incoming messages In this cas...

Страница 35: ...en when you are at a remote location To use the Transfer function you must first program the number that you wish the machine to call the transfer number and record the transfer message that plays when you answer the phone at the remote location When you go out and wish to use the transfer function turn it on When you return and no longer wish to use the transfer function turn it off Programming t...

Страница 36: ...en you answer the telephone and informs you that the call is a transfer call It can be up to 15 seconds long To record a transfer message follow the steps below The following is an example Hello This is a transfer call for YOUR NAME Enter your remote code number now 1 Press once and twice 2 Press once 3 Lift the handset If you have already recorded a message you can press to listen to the message ...

Страница 37: ...r message follow Steps 1 and 2 of the above procedure and then press to check the message or to erase the message PLAY HOLD DELETE Turning the Transfer function on and off When you go out and wish to use the Transfer function turn it on as follows 1 Press once and once 2 Press once and 3 times 3 Press 4 Press to turn on the Transfer function Press to turn the function off 5 Press to return to the ...

Страница 38: ...f you want to hang up during message playback first enter and to stop playback then enter twice 0 Override Ringing This function allows selected callers using a touch tone telephone to override the answering machine s outgoing message and cause the machine to make a special ringing sound alerting you that they are calling This is useful when you are near the machine but only want to talk with cert...

Страница 39: ...ephone When the outgoing message begins they should press the key on their telephone The caller will hear a short beep and the outgoing message will stop 2 The caller should enter the override code and by pressing the appropriate keys on their telephone If an incorrect code is entered the caller will hear four beeps He or she must re enter the correct code within 10 seconds or the line will be dis...

Страница 40: ...e code number To access the machine to perform remote operations you must first enter your remote code number The remote code number has been set to 001 at the factory If you wish to use a different number follow these steps Display A M SETTING REMOTE CODE Toll Saver When you call the machine to listen to your messages it will answer after two rings if it has received at least one message or after...

Страница 41: ...ly shows your selection then RECORDINGTIME Retrieving your messages 1 Call the machine from a tone dial telephone When your outgoing message begins press on the telephone You will hear a short beep and the outgoing message will stop If you do not want to use the Toll Saver function you can turn it off by following the steps below In this case the machine will answer after the number of rings set w...

Страница 42: ...te operations 3 While the messages are playing you can do any of the following Repeat To listen to a message a second time press and on the telephone before that message ends To move back to the previous message press and during the first 3 seconds of the current message Skip forward To skip forward to the next message press and on the telephone Stop To stop playback press and on the telephone Aft...

Страница 43: ... also call the machine and perform remote operations when the reception mode is set to FAX In this case when you call the machine press immediately after it answers before you hear the fax tone and then continue from Step 2 above Comments When a remote command is accepted by the machine you will hear one beep If an incorrect command is entered you will hear four beeps In the latter case re enter t...

Страница 44: ...nd Changing the fax reception mode Select a new reception mode by pressing the keys as follows 0 A M mode and FAX mode and TEL mode and Caution If you select TEL mode you will not be able to change the reception mode again TEL FAX mode and 8 1 8 2 8 3 8 4 Recording a new outgoing message 1 Press and on the telephone 2 When you hear a short beep speak into the telephone to record the new message Th...

Страница 45: ...ep enter the new telephone number When finished press To insert a pause between any two digits of the number press 9 0 Recording a new transfer message 1 Press and on the telephone 2 When you hear a short beep speak into the telephone to record the new message The time for the transfer message is fixed at 15 seconds After 15 seconds or earlier if the machine detects silence after you finish speaki...

Страница 46: ...eep speak into the telephone to record the memo 3 When you are finished press and on the telephone If the machine detects silence it will stop recording automatically 0 OGM only mode To turn on OGM only mode Press and on the telephone Your outgoing message will play but callers will not be able to record a message Faxes sent by automatic dialling will be received To turn off OGM only mode Press an...

Страница 47: ...eral pages at once Note Letters or graphics on the edges of a document will not be scanned 5 mm 5 mm Letters in the shaded area will not be scanned 210 mm 600 mm 52 g m 157 g m 297 mm 210 mm 80 g m Loading one page at a time Minimum size Maximum size Minimum weight Maximum weight Minimum size Maximum size Minimum weight Maximum weight 52 g m Loading up to 10 pages at once 140 mm 148 mm 140 mm 148 ...

Страница 48: ...o 10 pages can be placed in the feeder at one time The pages will automatically feed into the machine starting from the bottom page If you need to send or copy more than 10 pages place the additional pages gently and carefully in the feeder just before the last page is scanned Do not try to force them in as this may cause double feeding or jamming If your document consists of several large or thic...

Страница 49: ...t economical transmission FINE Use FINE for documents containing small letters or fine drawings SUPER FINE Use SUPER FINE for documents containing very small letters or very fine drawings HALF TONE Use HALF TONE for photographs and illustrations The original will be reproduced in 64 shades of gray 3 Adjust the resolution and or contrast settings as explained in Resolution and Contrast below then d...

Страница 50: ... be adjusted 2 Press one or more times until the desired resolution and contrast settings appear in the display The first time you move through the list of resolution settings the contrast setting AUTO will appear next to each resolution setting The second time you move through the list the contrast setting DARK will appear RESOLUTION RECEPTION MODE Display STANDARD AUTO FINE AUTO SUPER FINE AUTO ...

Страница 51: ...nection to the outside line and then dial the number RESOLUTION RECEPTION MODE R or Sending a Fax by Normal Dialling With Normal Dialling you pick up the handset or press and dial by pressing the number keys If a person answers you can talk with them through the handset before sending the fax If you pressed you must pick up the handset to talk Normal Dialling allows you to listen to the line and m...

Страница 52: ... machine to issue a fax tone 5 When you hear the fax tone press Replace the handset If the transmission is completed successfully the fax will beep once If an error occurs the fax will beep three times and print a Transaction Report to inform you of the problem see page 81 START MEMORY Note If the transmission is unsuccessful and DOCUMENT JAMMED appears in the display remove the document as explai...

Страница 53: ...igits to access a special service or an outside line press The pause appears as a hyphen Several pauses can be entered in a row If you are on a Flash type PBX and are storing a number for an outside line press press to insert a pause and then enter the fax or voice number When you dial the auto dial number you will automatically dial out without the need to press the key If you are on a PBX that r...

Страница 54: ... or repeatedly _ 6 Press 7 Return to Step 2 to store another number or press to return to the date and time display To confirm that an auto dial number has been stored correctly print out the Telephone Number List as explained on page 80 START MEMORY START MEMORY STOP A B C D E F G H I J K L M N O P Q R S T U V W X Y Z SPACE Display Note The fax machine uses a lithium battery to keep automatic dia...

Страница 55: ...red changes to the number Press or to move the cursor to the digit or digits you wish to change and then enter the new digit The new digit will replace the old digit If you do not wish to change the number go directly to Step 6 6 Press 7 Make the desired changes to the name Press or to move the cursor to the letter or letters you wish to change and then press the appropriate number key repeatedly ...

Страница 56: ...esired press to set the resolution and or contrast 2 Press or until the name of the other party appears in the display if no name was stored the number will appear 3 If you are sending a fax press Dialling and transmission begins If the transmission is completed successfully the fax will beep once If an error occurs the fax will beep three times and print a Transaction Report to inform you of the ...

Страница 57: ...the digits to access a special service or an outside line press The pause will appear as a hyphen Several pauses can be entered in a row If you are on a Flash type PBX and are dialing out press press to insert a pause and then enter the number of the receiving machine If you are on a PBX and must dial a number to dial out enter the number press to insert a pause and then enter the number of the re...

Страница 58: ... can be used to send a fax or make a phone call Note If a fax transmission is unsuccessful and DOCUMENT JAMMED appears in the display remove the document as explained on page 93 This may occur if the other fax machine doesn t respond properly when you attempt to send the document Automatic redialling If you use automatic dialling including Direct Keypad Dialling to send a fax and the line is busy ...

Страница 59: ...This function is called Error Correction Mode ECM ECM is effective for both transmissions and receptions and is only effective when the other fax machine has ECM as well When there is considerable noise on the line you may find that transmission with ECM turned on takes longer than normal If you prefer a faster transmission time you can try turning ECM off STOP 1 Press once and once 2 Press once a...

Страница 60: ...t locations in just one operation When sending to multiple locations only auto dial numbers can be used to dial the numbers of the receiving machines 1 Load the document s If desired press to set the resolution and or contrast 2 Press 3 Press or until the name of the number appears in the display if no name was stored the number will appear 4 Press to select the number 5 Repeat Steps 3 and 4 for e...

Страница 61: ...emory load the document press and then dial using one of the following methods Press the number keys to enter the fax number and then press Press repeatedly to select an auto dial number and press Press once to select the last number dialled and press START MEMORY START MEMORY START MEMORY START MEMORY If the memory becomes full If the memory becomes full while the document is being scanned MEMORY...

Страница 62: ... tone to the other machine to allow the calling party to send a fax manually if they desire Note Only the fax will alert you to voice calls or manually dialled faxes by pseudo ringing An extension phone connected to the same line will not ring after the connection has been established The handset of a parallel extension telephone can however be picked up to answer the call If pseudo ringing does n...

Страница 63: ...SECONDS FUNCTION STOP 1 2 3 4 Using A M Mode To select A M mode press until the arrow in the display points to A M RESOLUTION RECEPTION MODE In A M mode your fax machine will automatically receive voice messages and faxes See Chapter 2 for more details PSEUDO RING 1 15 SECONDS The display briefly shows your selection then FLASH SELECT RESOLUTION RECEPTION MODE FAX TEL A M TEL FAX Selections appear...

Страница 64: ... explained in Using TEL Mode on page 63 2 rings Fax reception Changing the number of rings If desired you can change the number of rings on which the fax machine answers incoming calls in FAX and TEL FAX mode Any number from 2 to 5 can be selected 1 Press once and once FUNCTION Display FAX TEL A M TEL FAX OPTION SETTING To select FAX mode press until the arrow in the display points to FAX RESOLUTI...

Страница 65: ...Using TEL Mode When the reception mode is set to TEL you must answer all calls by picking up the fax machine s handset or an extension phone connected to the same line FAX TEL A M TEL FAX The display briefly shows your selection then NUMBER OF RING FAX REMOTE ENTER 2 5 2 RESOLUTION RECEPTION MODE To select TEL mode press until the arrow in the display points to TEL RESOLUTION RECEPTION MODE ...

Страница 66: ...he other party first speaks with you and then wants to send a fax press after speaking Press before the sender presses their Start key When RECEIVING appears in the display hang up START MEMORY Answering with the fax s handset Note If you have set the Fax Signal Receive setting page 66 to NO press to begin reception START MEMORY Beep START MEMORY RECEIVING RECEIVING ...

Страница 67: ...step is necessary if you have set the Fax Signal Receive setting see below to NO Your fax will not accept the signal to begin reception 5 if a document is loaded in its feeder 5 Phone goes dead Beep Answering on an extension phone Putting a call on hold To put the other party on hold during a phone conversation press When this is done they cannot hear you You can put the handset back in the cradle...

Страница 68: ...same line you must turn this function off in order to prevent your fax from mistakenly attempting to receive documents from the computer fax modem Follow the steps below to change the setting 1 Press once and once 2 Press once and 5 times 3 Press once 4 Press to turn on the function or to turn it off 5 Press to return to the date and time display FUNCTION 1 2 STOP Display OPTION SETTING FAX SIGNAL...

Страница 69: ...eception from an extension telephone You can select any number from 0 to 9 1 Press once and once 2 Press once and once 3 Press once 4 Enter the desired number any number from 0 to 9 Example 3 5 Press to return to the date and time display FUNCTION 3 STOP Display OPTION SETTING FAX REMOTE The display briefly shows your selection then TRANSACTION ENTER 0 9 5 ...

Страница 70: ...er will be printed on a second page In this case the cut off point may occur in the middle of a line Automatic reduction may not be possible if the received document is too large contains too many fine graphics or images or is sent at high resolution In this case the remainder of the document will be printed on a second page 1 Press once and once 2 Press once and 3 times 3 Press once 4 Press to se...

Страница 71: ...ived to memory When you have received a document in memory FAX RX IN MEMORY will appear in the display alternating with ADD PAPER PRESS START KEY or CHECK FILM CHECK COVER CHECK PAPER JAM When you add paper and press replace the imaging film or clear the jam the stored documents will automatically print out The machine will retain any received faxes in memory until printed even if the power cord i...

Страница 72: ...lt setting is 100 Example Press twice Number of copies per original Press the number keys to enter a number from 1 to 99 The default setting is 1 Example Press for five copies 3 When you are ready to begin copying press RESOLUTION RECEPTION MODE 5 COPY POLL READY TO SEND RATIO 125 5 If MEMORY IS FULL appears If the memory becomes full while a document is being scanned MEMORY IS FULL and SEE MANUAL...

Страница 73: ... to return to the date and time display FUNCTION 1 2 STOP Display The display briefly shows your selection then OPTION SETTING COPY CUT OFF NUMBER OF RING 1 YES 2 NO Copy Cut off When making a copy of a document that is longer than the printing paper use the copy cut off setting to select whether the remaining part of the document will be cut off or printed on a second page The initial setting is ...

Страница 74: ...ile the fax rings Important To use this function you must subscribe to a caller identification service from your telephone company Your fax may not be compatible with some caller identification services 1 Press once and once 2 Press once and 5 times 3 Press once 4 Press YES to turn on Caller ID To turn off Caller ID press 5 Press to return to the date and time display FUNCTION 1 2 STOP Display OPT...

Страница 75: ...he following messages will appear while the fax rings if caller information is not available NO SERVICE No caller information was received from your telephone company Make sure that the telephone company has activated your service CALLER ID ERROR Noise on the telephone line prevented reception of caller information OUT OF AREA The call was made from an area which does not have a caller identificat...

Страница 76: ...power failure occurs Follow the steps below to view the Caller ID List in the display If desired you can immediately dial a number when it appears 1 Press twice 2 Press or to scroll through the list 3 If you want to dial one of the numbers in the list scroll through the list until the number appears in the display Fax If you want to send a fax load the document and then press Dialling and transmis...

Страница 77: ...ant to delete a single call from the caller list press while the call appears in the display If you want to delete all calls from the list hold down for at least 3 seconds while you are viewing any number in the list Priority Call With Caller ID turned on you can set your fax to make a special ringing sound when you receive a call from a designated phone number This lets you know immediately who i...

Страница 78: ...om your specified Anti Junk Number In this case when a voice call or a fax transmission comes in from the number you have specified as a Junk Number your fax will break the connection as soon as it receives the calling phone number from the caller ID service before the second ring To use this function enter the number that you wish to block as explained in Blocking Reception of Unwanted Faxes see ...

Страница 79: ...ber keys max 20 digits 6 Press 7 press to return to the date and time display FUNCTION 1 2 START MEMORY STOP Blocking Reception of Unwanted Faxes The Anti Junk Fax function allows you to block reception of faxes from a party that you specify This saves paper by not printing out unwanted junk faxes To use this function follow the steps below to enter the fax number from which you do not wish to rec...

Страница 80: ... initiates the transmission 1 Dial the fax machine you want to poll using one of the following methods Enter the full number using the numeric keys Pick up the handset or press and dial the full number Wait for the fax answerback tone If the number has been stored for automatic dialling press or until the name or number of the other party appears in the display 2 Press If you used the handset repl...

Страница 81: ...the telephone conversation press This puts the other party on hold 2 When you hear the dial tone dial the number of the third party for the enquiry call 3 When you have finished the enquiry call you will be automatically returned to the original caller as soon as the third party hangs up R Transferring calls 1 During the telephone conversation press This puts the other party on hold 2 When you hea...

Страница 82: ...mbers that have been stored for automatic dialling Setup List This list shows your current selections for the FUNCTION key settings The list also shows your name and fax telephone number as entered in the machine and a sample of the header printed at the top of every page you transmit HEADER PRINT Message List This list shows information about the messages currently recorded in the answering machi...

Страница 83: ...transmitted received NOTE One of the following notes will appear under NOTE in the report to indicate whether the transaction was successful and if not the reason for the failure OK Transmission reception was successful P FAIL A power failure prevented the transaction JAM The printing paper or document jammed preventing the transaction BUSY The fax was not sent because the line was busy COM E X Wh...

Страница 84: ...ted after each transmission reception or error ERROR MEMORY A report will be printed after an error or a memory operation SEND ONLY A report will be printed after each transmission ERROR ONLY A report will be printed only when an error occurs NEVER PRINT A report will never be printed FUNCTION 1 5 STOP Display The display briefly shows your selection then 1 2 3 4 5 OPTION SETTING TRANSACTION PSEUD...

Страница 85: ... open the operation panel press 2 Take the imaging film out of the print compartment and place it on a sheet of paper 3 Wipe the print head with isopropyl alcohol or denatured alcohol Caution Do not use benzene or thinner Avoid touching the print head with hard objects The print head may be hot if your fax machine has just received a large number of documents If this is the case allow the print he...

Страница 86: ...the operation panel press down on both sides to make sure it clicks into place Scanning glass and rollers Clean the scanning glass and rollers frequently to ensure the quality of transmitted images and copies Note Remove the paper from the paper tray before cleaning the scanning glass and rollers 1 Open the operation panel press 1 2 ...

Страница 87: ...ean If you find it difficult to remove dirt from the scanning glass you can try moistening the swab with isopropyl alcohol or denatured alcohol Take care that no alcohol gets on the rollers 4 Flip down the green levers on each side of the white roller Rotate the front gear until the film is taut and then close the operation panel press down on both sides to make sure it clicks into place The housi...

Страница 88: ...d from the TEL LINE socket to the wall socket should be no longer than two meters Make sure there are no modem devices sharing the same telephone line Check with the other party to make sure their fax machine is functioning properly Have your telephone line checked for line noise Try connecting the fax machine to a different telephone line If the problem still occurs your fax machine may need serv...

Страница 89: ...es place Make sure that the receiving machine has paper Make sure that the telephone line cord is plugged into the TEL LINE socket and not the TEL SET socket If the receiving machine is in manual mode with no attendant reception will not be possible Check the display for error messages Pick up the handset and check for a dial tone Nothing is printed at the receiving end Make sure that the document...

Страница 90: ...d a lighter print quality The received document is faint Ask the other party to send higher contrast documents If the contrast is still too low your fax machine may need service Make a copy or print a report to check your machine s printing ability Received images are distorted Noise on the telephone line may cause distortion Have the other party try sending the document again The print head may b...

Страница 91: ...avoid feedback turn off the speaker press before you replace the handset Auto dial numbers cannot be stored in the fax Make sure the fax is plugged in and the imaging film has been loaded Auto dial numbers cannot be stored if the imaging film has not been loaded See Loading the Imaging Film on page 13 Nothing appears in the display Make sure the power cord is properly plugged into a power outlet C...

Страница 92: ...ompartment that prevents printing Check to see if the imaging film is not loaded properly or if it has been used up and needs replacement Make sure the operation panel is completely closed press down on both sides If a paper jam has occurred clear the jam as explained in the following section Clearing Paper Jams CHECK PAPER SIZE An incorrect size of paper has been loaded in the paper tray Remove t...

Страница 93: ... can continue see Substitute Reception to Memory on page 69 If you are attempting to transmit from memory see If the memory becomes full on page 59 If you are copying see If MEMORY IS FULL appears on page 70 MEMORY PRINTING The fax is preparing to or printing out a document from memory NEAR END OF FILM USE SHARP SUPPLY This message appears approximately 3 m from the end of the imaging film approxi...

Страница 94: ... answer Your fax machine will automatically reattempt the call See Automatic redialling on page 56 MESSAGES RCVD XX This indicates that you have received messages in the answering machine XX is the number of messages TOTAL PAGE S 01 Number of pages transmitted received or copied Continuous tone 3 seconds Indicates the end of transmission reception or copying Intermittent tone 3 beeps 5 seconds 1 s...

Страница 95: ...rst try pressing If the document doesn t feed out remove it as explained below Important Do not try to remove a jammed document without releasing it as explained below This may damage the feeder mechanism START MEMORY 1 Press and slowly open the operation panel until it is half open 2 Flip up the green levers on each side of the white roller 3 Gently remove the document Be careful not to tear the ...

Страница 96: ...lers 3 Rotate the front gear until the film is taut and then close the operation panel press down on both sides to make sure it clicks into place Clearing jammed printing paper 4 Flip down the green levers on each side of the white roller Rotate the front gear until the film is taut and then close the operation panel press down on both sides to make sure it clicks into place 1 2 ...

Страница 97: ...lly answers and receives faxes TEL mode Answer all calls even faxes by picking up the handset To begin fax reception press TEL FAX mode The fax machine automatically answers and receives faxes Voice calls are signalled by a special ringing sound A M mode Select this mode when you go out to receive both voice messages and faxes Storing Auto Dial Numbers 1 Press once and twice 2 Enter the full fax p...

Страница 98: ...tension telephone Connecting 12 Using 65 F Fax mode on A M failure 31 FAX reception mode 21 62 Fax Signal Receive 66 Flash Select setting 25 H Halftone setting 47 Handset 10 Hold 65 Housing cleaning 85 I Imaging film replacing 13 J Jams clearing 93 94 L Letters entering 18 52 Line error 86 Loading paper 15 Loading the document 46 M Memory transmission 59 Memory substitute reception to 69 Message L...

Страница 99: ...on Ratio setting 68 Redialling 56 Remote code number 38 Remote operations 38 Resolution 47 Ringer volume 24 S Scanning glass cleaning 84 Sender s name and number entering 17 18 Setup List 80 Speaker volume 23 T TEL reception mode 21 63 TEL LINE socket 11 TEL SET socket 12 TEL FAX reception mode 21 60 Tel Fax Remote Number 67 Telephone line cord 11 Telephone Number List 80 Time setting 19 Toll Save...

Страница 100: ...Index 98 ...

Страница 101: ...r remote code 3 Press 4 After listening to your messages you can either hang up to save them or enter one of the commands on the reverse side REMOTE OPERATION CARD The card below is provided as a quick guide to remote operation Cut it out and carry it with you when you go out Remote Operation Guide ...

Страница 102: ...nsfer number 9 0 Tel No Record transfer OGM 9 3 To quickly disconnect OGM ONLY MODE Turn on 1 1 Turn off 1 2 PLAYBACK Play messages 7 Move backward repeat 2 Skip forward 5 Stop 0 Play new messages only 6 first stop playback ERASING MESSAGES Erase single message 3 Erase all messages 3 3 RECORDING A MEMO Start End 0 RECORDING A NEW OGM Start 4 ...

Страница 103: ...PRINTED IN THAILAND TINSE4369XHTZ SHARP ELECTRONICS UK LTD Sharp House Thorp Road Newton Heath Manchester M40 5BE SHARP CORPORATION ...

Отзывы: