R343M - 13
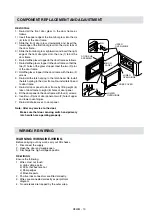
RE-INSTALL
1. Re-install the front door glass to the door frame as
follows.
1) Insert the upper edge of the front door glass into the six
(6) tabs of the door frame.
2) Slide the front door glass downwards and insert the
lower edge of the front door glass into the six (6) tabs of
the door frame.
3) Slide the front door glass rightwards and insert the right
edge of the front door glass into the one (1) tab of the
door frame.
2. Re-install the glass stopper to the door frame as follows.
1) Re-install the glass stopper to the door frame so that the
two (2) holes of the glass stopper meet the two (2) pins
of the door frame.
2) Hold the glass stopper to the door frame with the two (2)
screws.
3. Re-install the latch spring to the latch head. Re-install
the latch spring to the door frame. Re-install latch head
to door frame.
4. Re-install door panel to door frame by fitting eight (8)
tabs of door frame to eight (8) holes of door panel.
5. Fit the door panel to the door frame with four (4) screws.
6. Insert two (2) pins of door panel on two (2) hole of upper
and lower oven hinges.
7. Re-install choke cover to door panel .
Note: After any service to the door;
Make sure that door sensing switch and primary
latch switch are operating properly.
COMPONENT REPLACEMENT AND ADJUSTMENT
PIN
PIN
LOWER
OVEN HINGE
UPPER
OVEN HINGE
LOWER
OVEN HINGE
CHOKE COVER
DOOR
PANEL
DOOR SUB
ASSEMBLY
WARNING: WIRING/RE-WIRING
Before carrying out any work; carry out 3D checks.
1. Disconnect the supply.
2. Open the door and wedge open.
3. Discharge the high voltage capacitor.
RE-WIRING
Ensure the following:
1. Wires must not touch:
a) High voltage parts.
b) Parts that become hot.
c) Sharp edges.
d) Movable parts.
2. Positive lock connectors are fitted correctly.
3. Wires are connected correctly as per pictoral
diagram.
4. No wire leads are trapped by the outer wrap.
WIRING/ RE-WIRING
Содержание R-343GM
Страница 23: ...R343M 23 NOTES ...
Страница 24: ...R343M 24 Sharp Corp 2000 Printed in UK ...


