background image

9

Preparation

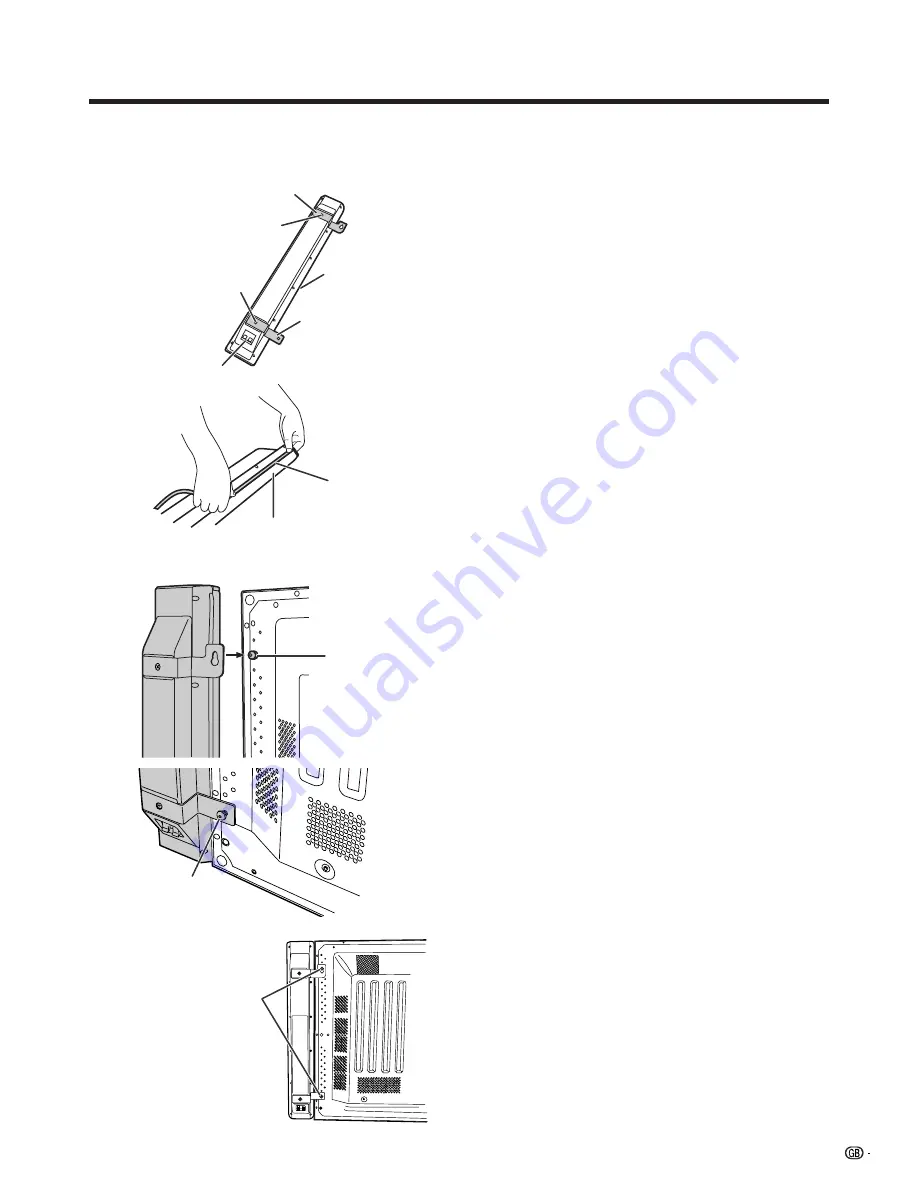
Fixing the speakers

1

Position the speaker brackets (upper and lower
parts) to the speaker, by firmly fastening the 

O

headed screws with a 

O

 screwdriver.

Speaker terminals are located on the lower part
of the speaker.

• The opening between the speaker parts and

Plasma Display TV (Panel Unit) can be filled with
the spacer. Attach the spacer to the speaker before
positioning the speaker brackets.

2

Loosely fasten the 

P

 headed screw to the

upper part of the Plasma Display TV (Panel
Unit) with the hexagon wrench. Hook the
speaker on the screw.

3

Loosely fasten the 

P

 headed screw to the lower

part of the Plasma Display TV (Panel Unit) with
the hexagon wrench.

4

Adjust the position so there is no unnecessary
opening between the speaker and the Plasma
Display TV (Panel Unit). Fasten firmly the screws
which loosely fastened in step 2 and 3 above.
Secure the other speaker by the same steps.

L

• Do not apply force to the front grill net, nor put your fingers

into it.

• Using fittings other than the ones supplied, may cause

reduction in performance or malfunction of the speakers.
Use the supplied fittings to fix the speakers to the unit.

• Do not carry or move the display by holding the speakers.

Hold the bottom of the display when carrying.

A

• For details on the speaker cable connection and the cable

routing, see pages 11 and 12.

Speaker bracket (upper part)

O

 headed screw

O

 headed screw

Speaker terminal

Spacer

Speaker bracket
(lower part)

a

Fixing the right speaker

Grill net

Spacer

A

• Attach the spacer to the speaker along the grill

net.

P

 headed screw

P

 headed screw

Fasten the 

P

 headed

screws with the hexagon

wrench.

Содержание PZ-43HV2E

Страница 1: ...ASMA PLASMA DISPLAY TV Operation Manual Mode d emploi Bedienungsanleitung Please read this operation manual carefully before using the Plasma Display TV Plasma Display TV Panel Unit and AVC system Veuillez lire attentivement ce mode d emploi avant d utiliser le téléviseur avec écran à plasma Téléviseur avec écran à plasma Unité panneau et système AVC Bitte lesen Sie diese Bedienungsanleitung vor d...

Страница 2: ...13A Plasma Display TV Panel Unit fuse Should the fuse need to be replaced a BSI or ASTA approved BS 1362 fuse marked or and of the same rating as above which is also indicated on the pin face of the plug must be used Always refit the fuse cover after replacing the fuse Never use the plug without the fuse cover fitted In the unlikely event of the socket outlet in your home not being compatible with...

Страница 3: ...ting for each channel 31 Additional channels entry 32 Fine tuning 32 Colour system 32 Sound system Broadcasting system 33 Labelling channels 33 Skipping channels 33 Setting the decoder 34 Setting the child lock 34 Sort 35 Language setting for On screen Display 36 Picture adjustments 37 Colour temperature 38 Film mode 38 Black 39 Monochrome 39 I P Setting 39 Sound adjustment 40 Power control 41 Pow...

Страница 4: ...ers to a hazard or unsafe practice which can result in personal injury or property damage CAUTION This symbol refers to a hazard or unsafe practice which can result in severe personal injury or death Safety precautions WARNING DO NOT PLACE ANY NAKED FLAME SOURCES SUCH AS A LIGHTED CANDLE ON TO THIS APPARATUS THERE IS A RISK OF FIRE IF THESE NAKED FLAME SOURCES FALL OVER VENTILATION WHEN INSTALLING...

Страница 5: ...urce specified on the specification label If you are not sure of the type of power supply used in your home consult your dealer or local power company 12 Power cord protection The power cords must be routed properly to prevent people from stepping on them or objects from resting on them Check the cords at the plugs and product 13 The Plasma Display TV Panel Unit used in this product is made of gla...

Страница 6: ...es Keep the product away from heat generating sources such as radiators heaters stoves and amplifiers When preparing to move the product detach all connected cables Failure to do so could damage the power cord and cause hazardous electric shock and fire Avoid using the Plasma Display TV in extremely humid or dusty environments Placing beside a cooking appliance or humidifier could cause hazardous ...

Страница 7: ...nstallation please consult the dealer where the unit was purchased To ensure correct installation experienced and qualified experts must install the unit SHARP will not be held responsible for accident or damage caused by the use of parts and accessories manufactured by other companies To avoid malfunction and overheating make sure that the vents on the main unit are not blocked when installing to...

Страница 8: ...o input terminal Child Lock System AVC System Power cord For Europe except U K and Eire For U K and Eire Remote control unit Two AA size batteries Alkaline battery System cable Two operation manuals Supplied accessories A Always use the power cord supplied with the Plasma Display TV Panel Unit and the one supplied with the AVC System for each respective unit 1 SRS and the symbol are trademarks of ...

Страница 9: ...er bracket Hexagon wrench Plasma Display TV Panel Unit Power cord For Europe except U K and Eire For U K and Eire Four screws for set stand securing bracket Speaker unit System cable clamp Five speaker cable clamps Two screws for preventing the System from falling over Set stand securing bracket Two speakers Two spacers for speakers ...

Страница 10: ...thing on the AVC System Otherwise the AVC System does not receive enough ventilation and does not operate properly A When installing ensure that adequate ventilation space is allowed at the top and rear of the product as shown in the diagram L Operating Environment Operating environment temperature and humidity e0 C e40 C less than 20 80 RH cooling vents not blocked Avoid installing in the followi...

Страница 11: ...essary opening between the speaker and the Plasma Display TV Panel Unit Fasten firmly the screws which loosely fastened in step 2 and 3 above Secure the other speaker by the same steps L Do not apply force to the front grill net nor put your fingers into it Using fittings other than the ones supplied may cause reduction in performance or malfunction of the speakers Use the supplied fittings to fix...

Страница 12: ...TV Panel Unit screen size Preparation 2 1 1 Fixing the Plasma Display TV Panel Unit to a desk or floor The unit can also be secured via the stand 1 Cover a desk with a suitable soft cloth and place the Plasma Display TV Panel Unit on its side 2 Attach the securing bracket as shown using the supplied screws 3 Stand the unit upright and place in position 4 Secure the unit to the desk or floor as sho...

Страница 13: ...C System L TO PREVENT RISK OF ELECTRIC SHOCK DO NOT TOUCH UN INSULATED PARTS OF ANY CABLES WITH THE POWER CORD CONNECTED Preparation Speaker cables GRAYeGRAY with white stripe Speaker cable Speaker cable As you apply pressure to this part insert the speaker cable It is important to match polarity when connecting the speaker cables to the terminals Insert the speaker cable Lift up the snap clip Ins...

Страница 14: ...the system for cable management Follow the diagram below for correct cable management System cable Wedge the power cord and the system cable into the groove on the stand Power cord Speaker cable Stick the speaker cable clamps 2 4 to the surface as shown System cable clamp Speaker cable clamp Speaker cable clamp System cable System cable clamp ...

Страница 15: ... cover Cautions regarding batteries Improper use of batteries can result in chemical leakage or explosion Be sure to follow the instructions below Do not use manganese batteries When you replace the batteries use alkaline ones Place the batteries with their terminals corresponding to the e and f indications Do not mix batteries of different types Different types of batteries have different charact...

Страница 16: ...14 Part names INPUT CH MAIN POWER button STANDBY ON indicator STANDBY ON button INPUT button VOLUME buttons il k CHANNEL buttons CHs r Remote control sensor Plasma Display TV Panel Unit ...

Страница 17: ...ctly it may need resetting In this case press CLEAR on the front of the unit as shown in the diagram Press CLEAR lightly with the end of a ballpoint pen or other pointed object This will reset the System as shown below AV MODE resets to STANDARD TV channel resets to channel 1 Dual screen resets to normal Audio setting initialises SRS resets to Off Image position is initialised A Pressing CLEAR wil...

Страница 18: ...RMATION Display the channel information and time See page 63 for details on the time display 14 b INPUT SOURCE Select an input source TV INPUT 1 INPUT 2 INPUT 3 INPUT 4 PC 15 SLEEP Set the SLEEP TIMER 16 e MUTE Mute the sound 17 0 9 TV External input mode Set the channel TELETEXT mode Set the page 18 o Digit for channel select Change the digits of the selected TV channel 19 Colour RED GREEN YELLOW...

Страница 19: ... TV programme Basic connection Connecting to an antenna To enjoy a clearer picture use an outdoor antenna The following is a brief explanation of the types of connections that are used for coaxial cable Antenna cables commercially available If your outdoor antenna uses a 75 ohm coaxial cable with a standard DIN45325 plug IEC 169 2 plug it into the ANTENNA INPUT terminal at the rear of the AVC Syst...

Страница 20: ... Plasma Display TV Panel Unit The System turns the power on The STANDBY ON indicator on the Plasma Display TV Panel Unit lights up green and the one on the AVC System lights up green If the STANDBY ON indicators still light up red press B on the remote control unit or the Plasma Display TV Panel Unit to turn the System on A System above means the Plasma Display TV Panel Unit and AVC System The ini...

Страница 21: ...rn to the Language menu by pressing RETURN Searching TV channels Auto Installation Setup Auto 01 02 55 25 85 25 03 102 25 04 05 06 07 08 09 10 11 142 25 148 25 Initial auto installation When the Plasma Display TV powers on for the first time after purchase the initial auto installation is invoked You can automatically set language country and channels in successive operations A See page 28 to try ...

Страница 22: ...not provided the system displays on screen Cancel the setting by pressing RETURN and the System automatically returns to the status before programme auto search 5 Automatic channel sorting When channel auto labelling finishes the Plasma Display TV starts sorting the labelled channels A Cancel the setting by pressing RETURN The system automatically returns to the status before programme auto search...

Страница 23: ...channel 1 12 SAT 1 B G PAL Using 0 9 on the remote control unit Select the channels directly by pressing buttons 0 to 9 a To select a 1 digit channel e g channel 2 Press 2 If 2 is indicated and the picture does not change press o to switch over to the 1 digit select mode and press 2 again To select a 2 digit channel e g channel 12 Press o to set the 2 digit select mode Press 1 followed by 2 A Comp...

Страница 24: ... b b 0 9 b or A can also cancel the mute Changing channels can also cancel the mute Mute will be canceled after 8 minutes have elapsed However the system will not suddenly output a loud sound as the volume level is set to 0 automatically 2 Within 8 minutes Press e again to cancel the mute Before 8 minutes the volume level returns to the previous setting After 8 minutes increase the volume level by...

Страница 25: ...and OFF SRS sound options SRS Sound Retrieval System Creates more a natural sound retrieving the spatial information from any stereo recording and restoring the original three dimensional sound field FOCUS Repositions a sound image from two speakers to a more optimal listening position or height without moving them FOCUS e SRS Produces both SRS and FOCUS effects OFF Outputs the normal sound ...

Страница 26: ...switches between NICAM STEREO and MONO When receiving a bilingual signal Each time you press SOUND the mode switches among NICAM CH A NICAM CH B NICAM CH AB and MONO When receiving a monaural signal Each time you press SOUND the mode switches between NICAM MONO and MONO In the TV mode of IGR TV broadcasts When receiving a stereo signal Each time you press SOUND the mode switches between STEREO and...

Страница 27: ...e present in the TELETEXT data you can view information in wide screen mode When you receive a 4 3 or 14 9 mode signal select Normal or Panorama display Adjusts the horizontal vertical position of the image displayed Select the type of audio output You can adjust volume for the main speaker or audio output Demonstration setting for storefront displays Select the colour system of an image current i...

Страница 28: ...n to the factory preset values MENU Description Provides a clear input image Adjusts image H Pos V Pos Clock Phase Select the type of audio output You can adjust volume for the main speaker or audio output PC Input mode menu items List of PC menu items to help you with operations Page 42 First MENU MENU Power Control Picture Audio Option Power Control Energy Save Standard Power Management RETURN O...

Страница 29: ...ot be stored Once the System shuts down or enters standby mode the setting is erased To move the picture around the screen again you must perform the above procedure again The image position setting using the steps on page 50 can be stored Select either according to your objectives TV INPUT1 INPUT2 INPUT3 INPUT4 and PC modes can each adjust the image position setting on this page The same for WIDE...

Страница 30: ...and then press ENTER Password setting menu displays only when the password for the child lock is set See page 58 Setup menu displays when the password for the child lock is not set Skip the step 3 3 Enter your 4 digit password with 0 9 to temporarily lift the child lock when you set it See page 58 for details on temporarily lifting the child lock 4 Press a b to select Auto Installation and then pr...

Страница 31: ...form the procedure below to search TV channels A Cancel the setting by pressing RETURN and the System automatically returns the status before programme auto search If no channels were found you should check your antenna connection and try auto installation again because it is finished See page 17 If the country setting has failed TV channels may not be found Auto labelling After finding new TV cha...

Страница 32: ...e status before programme auto search Don t shut down the System until Sorting channels displays If the country setting has failed TV channels may not be sorted properly Preset download When auto sorting finishes the channels are automatically stored in memory The 10 in Sending programme 10 settings indicates 10 channels Sending programme 10 settings displays during each channel preset download On...

Страница 33: ...each channel You can set some channel items manually They are Fine TV frequency Colour sys Sound sys Label Network name Skip Decoder and Lock Child Lock 1 Press MENU 2 Press a b to select Setup and then press ENTER 3 Press a b to select Programme Setup and then press ENTER 4 Press a b to select Manual Adjust and then press ENTER Programme Setup Manual menu displays A Return to the previous menu by...

Страница 34: ...Channels with Skip set to On are skipped even if you select them by using CHa CHb while watching the image from the TV A Return to the previous menu by pressing RETURN Exit the menu by pressing MENU Fine tuning On Programme Setup Manual menu 1 Press a b c d to select the channel you want to edit and then press ENTER The selected channel information displays 2 Press a b to select Fine and then pres...

Страница 35: ...s Network Name the auto installation detects the information and assigns a name to it However you can change individual channel names On Programme Setup Manual menu 1 Press a b c d to select the channel you want to edit and then press ENTER The selected channel information displays 2 Press a b to select Label and then press ENTER Alphabet and numbers are listed 3 Press a b c d to select each chara...

Страница 36: ... LOCK HAS BEEN ACTIVATED displays and the image and sound of the channel is blocked When pressing ENTER while CHILD LOCK HAS BEEN ACTIVATED displays password input menu will display Inputting the correct password lifts the child lock temporarily until the power is turned off Return to the previous menu by pressing RETURN Exit the menu by pressing MENU Decoder menu Lock menu ENTER MENU Setting the ...

Страница 37: ... positions can be sorted freely 1 Press MENU 2 Press a b to select Setup and then press ENTER 3 Press a b to select Programme Setup and then press ENTER 4 Press a b to select Sort and then press ENTER The channels are listed Black ones are set Skip to Off and blue are set Skip to On 5 Press a b c d to select the channel you want to move and then press ENTER 6 Move it to the desired position by pre...

Страница 38: ...n also select a language from option menu Select from among 12 languages English German French Italian Spanish Dutch Swedish Portuguese Greek Finnish Russian and Turkish ENTER MENU 1 Press MENU 2 Press a b to select Option and then press ENTER Option menu displays 3 Press a b to select Language and then press ENTER Language menu displays 4 Press a b to select the desired language listed on the scr...

Страница 39: ... cbutton For less contrast For less brightness For weaker red For weaker green For weaker blue Selected item Contrast Bright Red Green Blue dbutton For more contrast For more brightness For stronger red For stronger green For stronger blue ENTER MENU AV MODE Picture adjustments Adjust the picture to your preference with the following picture settings 1 Press MENU 2 Press a b to select Picture and ...

Страница 40: ...ct STANDARD with AV MODE on the remote control unit this item will display in gray and not be selectable See page 53 MENU Picture DYNAMIC Advanced Film Mode On Off On Film mode Automatically detects a film based source originally encoded at 24 frames second analyses it then recreates each still film frame for high definition picture quality 1 Press MENU 2 Press a b to select Picture and then press...

Страница 41: ...elect STANDARD with AV MODE on the remote control unit this item will display in gray and not be selectable See page 53 Monochrome For viewing a video in monochrome 1 Press MENU 2 Press a b to select Picture and then press ENTER 3 Press a b to select Advanced and then press ENTER 4 Press a b to select Monochrome and then press ENTER 5 Press a b to select On and then press ENTER 6 Press MENU to exi...

Страница 42: ...le Bass Balance Reset RETURN 0 0 0 15 15 Left 15 15 Right 1 Press MENU 2 Press a b to select Audio and then press ENTER Audio menu displays 3 Press a b to select a specific adjustment item 4 Press c d to adjust the item to your desired position 5 Press MENU to exit the menu A When all adjustments set to factory preset values 1 Press a b to select Reset and then press ENTER 2 Press a b to select Ye...

Страница 43: ... this function may not operate No operation off When set to Enable the power will automatically shut down if the signal stays inactive for 3 hours 1 Press MENU 2 Press a b to select Power Control and then press ENTER 3 Press a b to select No operation off and then press ENTER 4 Press a b to select Enable and then press ENTER 5 Press MENU to exit the menu Five minutes before the power shuts down ha...

Страница 44: ...n Even if you start using the computer and the signal inputs again the System stays off The System turns on again by pressing B on the Plasma Display TV Panel Unit or the remote control unit See page 18 If no signal inputs for 8 seconds the power shuts down When you start using the computer and the signal inputs again the System turns on Selected item Off Mode1 Mode2 ENTER MENU Power control for P...

Страница 45: ...a decoder VCR DVD player computer game console and camcorder To view external source images select the input source from b on the remote control unit or INPUT on the Plasma Display TV Panel Unit L To protect all equipment always turn off the AVC System before connecting to a decoder VCR DVD player computer game console camcorder or other external equipment The S video signal only outputs when Inpu...

Страница 46: ... menu to set the correct input signal type See page 52 The setting is stored and can be selected on the INPUT SOURCE menu To watch a decoder image select INPUT1 from the INPUT SOURCE menu using b on the remote control unit or INPUT on the Plasma Display TV Panel Unit See page 52 A Each time b is pressed the input source toggles If the decoder image does not come in clearly you may need to change t...

Страница 47: ...ton on the VCR the TV automatically turns on from standby and displays a VCR image When you press the system standby button on the VCR the TV also enters standby mode A TV VCR advanced AV Link systems may not compatible with some external sources It is recommended to connect to the INPUT 2 terminal when using a decoder for ground wave signal input with a VCR If INPUT 2 signals preset in auto insta...

Страница 48: ... SCART One Touch Play While the Plasma Display TV is in standby mode it automatically turns on and plays back the image from the audiovisual source e g VCR DVD System Standby When the connected audiovisual equipment e g VCR DVD enters standby mode so does the Plasma Display TV WYSIWYR What You See Is What You Record When the remote control unit of the connected VCR has the WYSIWYR button you can a...

Страница 49: ...er You can use the INPUT 3 terminal when connecting to a DVD player and other audiovisual equipment Displaying a DVD image When connecting to the INPUT 3 terminal select Input 3 on Input Select in the menu to set the correct input signal type See page 52 The setting is stored and can be selected on the INPUT SOURCE menu To watch a DVD image select INPUT3 from INPUT SOURCE menu using b on the remot...

Страница 50: ...diovisual equipment are conveniently connected using the INPUT 4 terminals A The S video terminal has priority over the video terminals Displaying an image of the game player and camcorder When connecting to the INPUT 4 terminals select INPUT4 You only need to select the input source on the INPUT SOURCE menu To connect a game console or view a camcorder select INPUT4 from the INPUT SOURCE menu usi...

Страница 51: ...patible Refer to page 65 for a list of computer signals compatible with the Plasma Display TV Signal names for 15 pin mini D sub connecter A Macintosh adaptor may be required for use for some Macintosh computers Displaying an image from a computer When connecting to a computer the correct input signal type is automatically detected See page 52 If the computer image does not come in clearly you may...

Страница 52: ...ess a b to select Position and then press ENTER 4 Press a b to select H Pos or V Pos 5 Press c d to adjust the item to your desired position 6 Press MENU to exit the menu A For resetting all adjustment items set to the factory preset values 1 Press a b to select Reset and then press ENTER 2 Press a b to select Yes and then press ENTER Return to the previous menu by pressing RETURN Adjustments are ...

Страница 53: ...ENTER Return to the previous menu by pressing RETURN ENTER MENU Description Centres the image by moving it to the left or right Centres the image by moving it to the up or down Adjusts the clock frequency Adjusts the clock phase Selected item H Pos V Pos Clock Phase Auto Sync adjustment PC Input mode only For automatically adjusting the computer image 1 Press MENU 2 Press a b to select Option and ...

Страница 54: ... there are no external sources connected to those terminals INPUT3 COMPONENT or INPUT4 will display in gray and not be selectable Return to the previous menu by pressing RETURN Input signal source Input signal setting For setting the signal type of external equipment 1 Press MENU 2 Press a b to select Option and then press ENTER 3 Press a b to select Input Select and then press ENTER 4 Press a b t...

Страница 55: ...ible with the image on the screen 1 Press MENU 2 Press a b to select Option and then press ENTER 3 Press a b to select Colour System and then press ENTER 4 Press a b to select a compatible video signal system of your equipment and then press ENTER 5 Press MENU to exit the menu A Factory preset value is AUTO If AUTO is selected colour systems for each channel are automatically set If an image does ...

Страница 56: ...ype of the wide screen select Normal or Panorama in the 4 3 Mode menu See page 56 A If the broadcast signal contains no WSS information Auto Selection will not function even when the WSS option is enabled 4 3 Mode set to Normal 4 3 Mode set to Panorama Normal Full 14 9 Zoom 14 9 Panorama Full Cinema 16 9 Cinema 14 9 Selected item Normal Full 14 9 Zoom 14 9 Panorama Full Cinema 16 9 Cinema 14 9 Des...

Страница 57: ...ot by dot When an XGA 1024g768 signal is input selecting Normal enables Dot by Dot display When a WXGA 1280g768 signal is input selecting Dot by Dot W enables Dot by Dot display Normal Full Dot by Dot Normal Full Dot by Dot W Input signal 640g480 800g600 Input signal 1024g768 1280g768 Select either Normal or Full when 1024g768 signal is input Image size varies with signal input Above is example Im...

Страница 58: ... WIDE mode if an image does not switch to the correct screen format When the broadcast signal contains no WSS information the function will not work even if enabled See page 54 Picture aspect ratio AV Input mode only Allows you to select the aspect ratio of a video signal for standard 4 3 or full screen images 1 Press MENU 2 Press a b to select Option and then press ENTER 3 Press a b to select 4 3...

Страница 59: ...n Sound via speakers is adjusted with il k on the remote control unit or the Plasma Display TV Panel Unit Sound via the AV OUTPUT terminal is not adjustable and constantly outputs Sound via the AV OUTPUT terminal is adjusted with il k on the remote control unit or the Plasma Display TV Panel Unit Sound via speakers is muted Selected item Fixed Variable Sleep Timer Remain 120 30 60 90 120 0 Audio o...

Страница 60: ...in Programme Setup Manual is set to On you must enter a password See page 34 When you select a locked channel a password prompt message pops up Press ENTER to display the password input window Clearing the password Allows you to clear your password 1 Press MENU 2 Press a b to select Setup and then press ENTER Password input menu displays 3 Enter your 4 digit password with 0 9 and then press ENTER ...

Страница 61: ...be active z displays on the active screen which has sound output 3 Press b to select another input source on the active screen A selected image displays 4 Press c to exit dual screen A This function does not work under the following input conditions 1PC INPUT mode 2Two pictures from the same source e g INPUT 1 and INPUT 1 3Images from a high frequency signal source 4Two pictures with different ver...

Страница 62: ...is one frame captured from a moving image at the moment you press d 2 Update the still image by pressing ENTER Each time you press ENTER the image on the right screen updates 3 Press d to exit still image A This function does not work under the following input conditions 1PC INPUT mode 2Images from a high frequency signal source When this function is not available No still image display available ...

Страница 63: ...e on the left screen Each time you press m the screen switches as shown left If you select a programme with no Teletext signal No Teletext available displays The same message displays during dual screen or other modes if no Teletext signal is available When viewing the Teletext information Press CHa a a a a w to increase the page number Press CHb b b b b x to decrease the page number Button functi...

Страница 64: ... b b w x the present page will change to the next previous page and simultaneously exit the subpage screen Displaying TOP Overview When receiving TOP Teletext you can read a TOP text overview 1 Press m to display Teletext 2 Press l to display the TOP Overview as shown left 3 Select the desired block or group by using a b c d 4 Press ENTER to display the selected block or group pages 5 Press l to e...

Страница 65: ...text information 2 Press C The channel display will appear on the upper right of the screen 3 Press C again within the three second interval the channel display is on the screen Time information will display on the lower left of the screen for about three seconds 4 Even when you change the TV channel you can display the time information with steps 2 3 above A The time display cannot be stored once...

Страница 66: ... tone See pages 37 to 39 Is the room too bright The picture may look dark in a room that is too bright Check the colour system setting See page 32 and 53 Check the input signal setting See page 52 The unit s internal temperature has increased Remove any objects blocking vent or clean See page 8 Check the power control setting See pages 41 and 42 Check the sleep timer setting See page 57 Is connect...

Страница 67: ... 60 Hz Computer compatibility chart Remarks Macintosh 13 67 Hz Macintosh 16 Macintosh 19 Resolution Frequency Apple and Macintosh are registered trademarks of Apple Computer Inc DDC is a registered trademark of Video Electronics Standards Association Power Management is a registered trademark of Sun Microsystems Inc VGA and XGA are registered trademarks of International Business Machines Co Inc ...

Страница 68: ...ows Baud rate Parity bit Data length Stop bit Flow control 9 600 bps 8 bits None 1 bit None Appendix Command format Communication procedure Send the control commands from the computer via the RS 232C connector The display operates according to the received command and sends a response message to the computer Do not send multiple commands at the same time Wait until the computer receives the OK res...

Страница 69: ...R CONTROL CONTENTS W W W W W W W W W W W W S S S S S T T D C C T T D TOGGLE NORMAL FULL 14 9 ZOOM 14 9 PANORAMA FULL CINEMA 16 9 CINEMA 14 9 NORMAL FULL DOT BY DOT DOT BY DOT W TOGGLE OFF SRS FOCUS SRS FOCUS DUAL SCREEN OFF DUAL SCREEN ON DIRECT CHANNEL 1 99 CHANNEL UP CHANNEL DOWN TEXT OFF TEXT ON DIRECT PAGE JUMP 100 899 WIDE MODE SRS DUAL SCREEN CHANNEL TEXT I I I I I I I I I I I I R R R R R W ...

Страница 70: ...ft input 7 Not used 8 Audio video control 9 Earth 10 AV LINK control 11 Not used 12 Not used 13 Earth 14 Not used 15 Chroma S Video input 16 Not used 17 Earth for video 18 Earth 19 TV Monitor output 20 Video input S video input 21 Plug shield SCART INPUT 3 1 Audio right output 2 Audio right input 3 Audio left output 4 Common earth for audio 5 Earth 6 Audio left input 7 Blue input 8 Audio video con...

Страница 71: ...r VHF UHF in INPUT 4 S VIDEO AV in PC INPUT 15 Pin mini D Sub Audio in Audio Variable Fixed S VIDEO out AV out Power Requirement AC 220 240 V 50 60 Hz 40 W 0 8 W Standby Dimensions 430 W 70 H 330 D mm Weight 4 4 kg Accessories Power cord Remote control unit Two AA size batteries System cable Two operation manuals Receiving System Tuner Rear INPUT 1 Front Design and specifications are subject to ch...

Страница 72: ...e following steps 1 Turn on the power of the Plasma Display TV Panel Unit and the AVC System 2 Press MENU Make sure the menu screen displays 3 Press b to select Setup 4 Press ENTER A If the password setting screen displays you need to enter your password If you forget your password refer to HOW TO SET THE FACTORY PRESETS above 5 Press a b to select Auto Installation 6 Press ENTER Auto Installation...

Страница 73: ...SHARP CORPORATION Printed in Japan Imprimé au Japon In Japan gedruckt TINS 7622CEZZ ...

Отзывы: