background image

Setup and Connections

-23

1

DVI to 15-pin

D-sub adaptor

(sold separately)

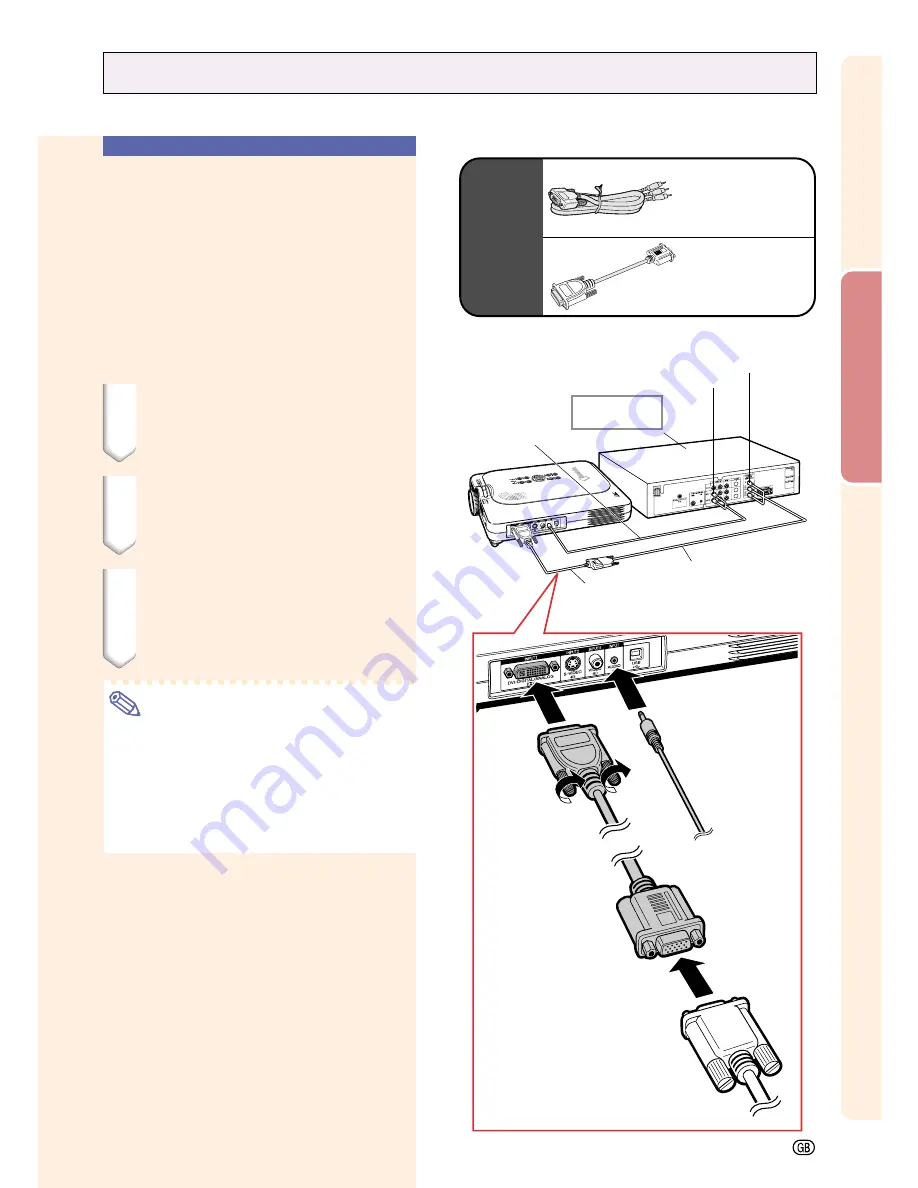
Connecting to Video Equipment

Connecting to
Component Video
Equipment

Use a 3 RCA to 15-pin D-sub cable and DVI to
15-pin D-sub adaptor when connecting to the
INPUT 1 terminal, component video equipment
such as DVD players and DTV* decoders.

*DTV is the umbrella term used to describe
the new digital television system in the United
States.

1

Connect the 3 RCA to 15-pin D-
sub cable using the DVI to 15-
pin D-sub adaptor.

2

Use the above cables to con-
nect the projector and the
video equipment.

3

Connect the projector and the
video equipment using a
ø3.5mm to RCA cable (com-
mercially available).

Note

When connecting the projector to the
video equipment in this way, select “Com-
ponent” for “Signal Type” in the “Picture”
menu. See page 

40

.

A ø3.5 mm stereo minijack to RCA audio
cable (commercially available) is required
for audio input.

Optional
cables

3RCA to 15-pin
D-sub cable
Type: AN-C3CP
(9'10" (3.0 m))

DVI to 15-pin
D-sub adaptor
Model: AN-A1DV
(7.9" (20 cm))

To analog component
output terminal

To audio output terminal

DVD player or
DTV* decoder

3

ø3.5mm to RCA cable
(commercially available)

2

3 RCA to 15-pin
D-sub cable
(sold separately)

Содержание PG-M20S - Notevision SVGA DLP Projector

Страница 1: ...DIGITAL MULTIMEDIA PROJECTOR OPERATION MANUAL MODEL PG M20S Introduction Setup and Connections Basic Operation Easy to Use Functions Appendix ...

Страница 2: ...νονισµοί αυτοί συµπληρώθηκαν απ την οδηγία 93 68 ΕΟΚ Este equipamento obedece às exigências das directivas 89 336 CEE e 73 23 CEE na sua versão corrigida pela directiva 93 68 CEE Este aparato satisface las exigencias de las Directivas 89 336 CEE y 73 23 CEE modificadas por medio de la 93 68 CEE Denna utrustning uppfyller kraven enligt riktlinjerna 89 336 EEC och 73 23 EEC så som kompletteras av 93...

Страница 3: ...serious electric shock may occur To fit an appropriate plug to the mains lead follow the instructions below IMPORTANT The wires in the mains lead are coloured in accordance with the following code Blue Neutral Brown Live As the colours of the wires in the mains lead of this product may not correspond with the coloured markings identifying the terminals in your plug proceed as follows The wire whic...

Страница 4: ...tugisiska kinesiska traditionell kinesiska och förenklad kinesiska koreanska och arabiska Läs noga igenom bruksanvisningen innan projektorn tas i bruk El CD ROM suministrado contiene instrucciones de operación en inglés alemán francés sueco español italiano holandés portugués chino chino tradicional y chino simplificado coreano y árabe Lea cuidadosamente las instrucciones de operación antes de uti...

Страница 5: ...ended to alert the user to the presence of uninsulated dangerous voltage within the product s enclosure that may be of sufficient magnitude to constitute a risk or electric shock to persons The exclamation point within a triangle is intended to alert the user to the presence of important operating and maintenance servicing instructions in the literature accompanying the product Introduction ENGLIS...

Страница 6: ...n the United States of America the Electronic Industries Alliance www eiae org PRECAUTIONS A OBSERVER LORS DU REMPLACEMENT DE LA LAMPE DEBRANCHER LE CORDON D ALIMENTATION AVANT DE RETIRER LES VIS L INTERIEUR DU BOITIER ETANT EXTREMEMENT CHAUD ATTENDRE 1 HEURE AVANT DE PROCEDER AU REMPLACEMENT DE LA LAMPE NE REMPLACER QUE PAR UNE LAMPE SHARP DE TYPE BQC PGM20X 1 RAYONS ULTRAVIOLETS PEUVENT ENDOMMAG...

Страница 7: ...s signals Using Advanced Intelligent CompressionTechnology computer screens of SXGA 1 400 1 050 resolution can be displayed with minimal dis tortion 4 Advanced Computer Video lntegrated Composer Technology Realizes vivid images using the latest high image quality circuitry New I P conversion algorithm enhances the performance of the motion detect I P conversion Extensive improvements on the jagged...

Страница 8: ...ng the Operation Buttons on the Projector 60 Setting up the Keylock 60 Canceling the Keylock Setting 61 Setting up a Password 61 Entering the Password 61 Changing the Password 62 If You Forget Your Password 62 Introduction Outstanding Features 3 Contents 4 IMPORTANT SAFEGUARDS 6 How to Access the PDF Operation Manuals 9 Part Names 10 Projector Front and Top View 10 Projector Side View 11 Remote Co...

Страница 9: ...ing the Projector 68 Maintenance 69 Maintenance Indicators 70 Regarding the Lamp 71 Lamp 71 Caution Concerning the Lamp 71 Replacing the Lamp 71 Removing and Installing the Lamp Unit 72 Resetting the Lamp Timer 73 Connecting Pin Assignments 74 Computer Compatibility Chart 75 Troubleshooting 76 For SHARP Assistance 78 Specifications 79 Dimensions 80 Glossary 81 Index 82 ...

Страница 10: ...cated on the marking label If you are not sure of the type of power supply to your home consult your product dealer or local power company For products intended to operate from battery power or other sources refer to the operating instructions 12 Grounding or Polarization This product is provided with one of the following types of plugs If the plug should fail to fit into the power outlet please c...

Страница 11: ...are licensed under the GNU General Public License To obtain such source code send email to embedix support lineo com OS Embedix Embedded Linux EmbedixTM is a registered trademark of U S A LINEO Inc DLP Digital Light Processing and DMD Digital Micromirror Device are trademarks of Texas Instru ments Inc Microsoft and Windows are registered trademarks of Microsoft Corporation in the United States and...

Страница 12: ...t are not obstructed If the cooling fan becomes obstructed a protection cir cuit will automatically turn off the projector This does not indicate a malfunction Remove the projector power cord from the wall outlet and wait at least 10 minutes Place the projector where the intake and exhaust vents are not blocked plug the power cord back in and turn on the projector This will return the projector to...

Страница 13: ...se download Acrobat Reader from the Internet http www adobe com For other languages If you prefer using Acrobat Reader for languages other than those included in the CD ROM please download the appropriate version from the Internet Accessing the PDF Manuals For Windows 1 Insert the CD ROM in the CD ROM drive 2 Double click on the My Computer icon 3 Double click on the CD ROM drive 4 Double click on...

Страница 14: ...ENS button For adjusting Keystone or Digital Shift setting POWER button Turns the power on or off POWER indicator Illuminates in red when the projector is in standby When the power is turned on this indicator will illuminate green LAMP REPLACEMENT indicator Illuminates green indicating normal function Replace the lamp when the indicator illuminates red AUTO SYNC button For automatically adjusting ...

Страница 15: ...cure the projector Attaching the lens cap After putting the lens cap strap on the lens cap pass the other end of the strap through the hole under the projector next to the lens as shown in the illustration Bottom View INPUT 2 terminal Terminal for connecting video equipment with an S VIDEO terminal INPUT 1 terminal Port for DVI digital computer RGB and COMPONENT signals INPUT 3 terminal For connec...

Страница 16: ...or adjusting Keystone or Digital Shift setting ENTER button For setting items selected or adjusted on the menu POWER button Turns the power on or off ENLARGE Enlarge Reduce buttons For enlarging or reducing part of the image FREEZE button For freezing images INPUT 3 button For switching the input mode to INPUT 3 RESIZE button For switching the screen size NORMAL BORDER etc GAMMA button For correct...

Страница 17: ...er in the direction of the arrow to close it Available Range of the Remote Control Incorrect use of the batteries may cause them to leak or explode Please follow the precautions below Caution Insert the batteries making sure the polarities correctly match the and marks inside the battery compart ment Batteries of different types have different properties therefore do not mix batteries of different...

Страница 18: ... Optional cables Supplied accessories DVI cable 9 10 3 0 m AN C3DV 3 RCA to 15 pin D sub cable 9 10 3 0 m AN C3CP Computer RGB cable 32 10 10 0 m AN C10BM for IBM PC PC9821 and PC98NX series AN C10MC for Macintosh series AN C10PC for PC98 series Except PC9821 and PC98NX series 5 BNC to 15 pin D sub cable 9 10 3 0 m AN C3BN RGB monitor loop out adaptor 7 9 20 cm AN A1MY DVI to 15 pin D sub adaptor ...

Страница 19: ...Setup and Connections Setup and Connections ...

Страница 20: ...eight and remove your hands from the foot releases 3 Rotate the adjustment feet to make minor changes Note When returning the projector to its origi nal position hold the projector firmly press the foot releases and then lower it The projector is adjustable up to approxi mately 5 5 degrees from the standard po sition Info Do not press the foot releases when the feet are extended without firmly hol...

Страница 21: ...olors making viewing difficult Close the curtains and dim the lights when setting up the screen in a sunny or bright room A polarizing screen cannot be used with this projector Standard Setup Front Projection Place the projector at the required distance from the screen according to the desired picture size See page 18 Side View Top View The distance from the screen to the projec tor may vary depen...

Страница 22: ...64 8 6 cm STRETCH Mode 16 9 Picture Screen size Projection distance L Diag X Width Height Maximum L1 Minimum L2 250 635 cm 218 554 cm 123 312 cm 45 10 14 0 m 43 34 64 110 6 cm 225 572 cm 196 498 cm 110 279 cm 49 10 15 2 m 41 3 12 6 m 39 11 64 99 5 cm 200 508 cm 174 442 cm 98 249 cm 44 3 13 5 m 36 8 11 2 m 34 52 64 88 4 cm 150 381 cm 131 333 cm 74 188 cm 33 2 10 1 m 27 6 8 4 m 26 7 64 66 3 cm 133 3...

Страница 23: ... Before mounting the projector contact your nearest Sharp Authorized Projector Dealer or Service Center to obtain the recommended ceiling mount bracket sold separately AN PGCM90 ceiling mount bracket its AN EP101B extension tube and AN JT200 universal bracket adaptor for non level ceiling installation for U S A BB M20T ceiling adaptor its BB NVHOLDER280 BB NVHOLDER550 BB NVHOLDER900 ceiling mount ...

Страница 24: ...ng the Power Cord 1 Plug in the supplied power cord into the AC socket on the rear of the projector This projector can be connected to A computer using A DVI to 15 pin D sub cable See page 21 A DVI cable type AN C3DV sold separately See page 22 Component video or audio visual equipment A DVD player or DTV decoder See page 23 A VCR Laser disc player or other audio visual equipment See page 24 DTV i...

Страница 25: ...those listed may cause some of the functions not to work When connecting the projector to a com puter in this way select RGB for Signal Type in the Picture menu See page 40 A Macintosh adaptor may be required for use with some Macintosh computers Con tact your nearest Sharp Authorized Projector Dealer or Service Center Connecting the thumbscrew cables Connect the thumbscrew cable making sure that ...

Страница 26: ...m copy guard system compatible DVI version 2 0 equipment no signal will be received Plug and Play function when connecting to a 15 pin terminal This projector is compatible with VESA standard DDC 1 DDC 2B The projector and a VESA DDC compatible computer will communicate their setting requirements allowing for quick and easy setup Before using the Plug and Play function be sure to turn on the proje...

Страница 27: ...the above cables to con nect the projector and the video equipment 3 Connect the projector and the video equipment using a ø3 5mm to RCA cable com mercially available Note When connecting the projector to the video equipment in this way select Com ponent for Signal Type in the Picture menu See page 40 A ø3 5 mm stereo minijack to RCA audio cable commercially available is required for audio input O...

Страница 28: ...sing a ø3 5mm to RCA cable com mercially available Note The S VIDEO INPUT terminal uses a video signal system in which the picture is separated into color and luminance sig nals to realize a higher quality image For realizing a higher quality image use a commercially available S VIDEO cable to connect the S VIDEO terminal on the pro jector and the S VIDEO output terminal on the video equipment A ø...

Страница 29: ...details see page 58 Note When using an RGB monitor loop out adaptor sold separately make sure that the cable is connected to the monitor Analog RGB signals as well as Component signals can be output to the monitor Info Only analog RGB Component signals entered into the DVI port can be output Signals from equipment connected to the DVI digital port cannot be output Using INPUT 1 Terminal with the T...

Страница 30: ...Using the Wireless Pre sentation Function 1 Connect the projector to the computer using the supplied USB cable Note This function only works with Microsoft Windows OS and Mac OS However this function does not work with the following operating systems that do not support USB Versions earlier than Windows 95 Versions earlier thanWindows NT 4 0 Versions earlier than Mac OS 8 5 2 Press while using pre...

Страница 31: ...Basic Operation Basic Operation ...

Страница 32: ...LAMP REPLACEMENT indica tor illuminates indicating the status of the lamp Green The lamp is ready Green blinking The lamp is warming up Red The lamp should be replaced If the power is turned off and immediately switched on again the LAMP REPLACE MENTindicatormaytaketimetoilluminate When Anti Theft is set the keycode input box will appear Enter the keycode Note When entering the keycode press the b...

Страница 33: ...s or on the remote control to adjust the volume of the speaker Note Pressing will raise the volume Pressing will lower the volume On the projector the volume can be adjusted by pressing or on the projector operate as cursor buttons when selecting setup or adjustment functions while adjusting menus or the lens VOLUME buttons Used for projecting im ages from equipment that sends RGB signals or Compo...

Страница 34: ...ot unplug the power cord dur ing projection or cooling fan opera tion This can cause damage due to the rise in internal temperature as the cooling fan also stops When connected to equipment such as an amplifier be sure to turn off the power to the equipment con nected first and then to the projec tor Selecting the On screen Display Language The on screen display language of the projector can be se...

Страница 35: ... The desired language will be set as the on screen display Adjusting the Lens The image is focused and adjusted to the desired size using the focus ring or zoom knob on the projector 1 The focus is adjusted by rotat ing the focus ring 2 Zooming is adjusted by mov ing the zoom knob Zoom knob Focus ring ...

Страница 36: ...ge 33 2 Press or to ad just the Keystone correction If you want to make more detailed cor rections press to display the test pattern and then press or to make the adjustments Note Since the trapezoidal distortion of the image can be corrected up to an angle of approximately 35 de grees the actual screen can be di agonally set up to that angle as well For more details on the settings see page 8 Pre...

Страница 37: ...ction shifts the entire image projected on the screen up or down when projecting 16 9 images from DVD players and DTV decoders DTV is the umbrella term used to describe the new digital television system in the United States UNDO button Press to move the projected image upwards Press to reset the image Press to move the projected image downwards Press to reset the image ...

Страница 38: ...Hz English Deutsch Español Nederlands Français Italiano Svenska Português Picture Page 40 Contrast Bright Color Tint Sharp Red Blue CLR Temp Reset Signal Type Progressive Mode Fine Sync Clock Phase H Pos V Pos Reset Save Setting Select Setting Special Modes Signal Info Auto Sync Auto Sync Disp ON OFF RGB Component 2D Progressive 3D Progressive Film Mode Resolution Vert Freq Resolution Vert Freq Re...

Страница 39: ...d Startup Image Auto Power Off ON OFF 2D Progressive 3D Progressive Film Mode OFF Level 1 Level 3 Normal Level A Level B Auto PAL 50 60Hz SECAM NTSC4 43 NTSC3 58 PAL M PAL N Sharp Custom Blue None Sharp Custom None Options 2 Lamp Timer Break Timer PRJ Mode Keylock Level Password Anti Theft All Reset Front Ceiling Front Rear Ceiling Rear Normal Level A Level B Old Password New Password Reconfirm Ol...

Страница 40: ...he Menu Screen On screen menu for INPUT 1 RGB mode On screen menu for INPUT 2 or INPUT 3 Mode Menu Bar Main Menu MENU button buttons ENTER button MENU button buttons ENTER button On screen Display Basic Operations Adjustments 1 Press Note The Picture menu screen for the selected input mode is displayed The on screen display shown on the right is displayed when the INPUT 1 mode is selected Menu Bar...

Страница 41: ... Note To display a single adjustment item press after selecting the item Only the menu bar and the selected adjustment item will be displayed Then if you press or the fol lowing item Phase is after Clock will be displayed Press to return to the previous screen 4 Press or to adjust the item selected When you release or the ad justment is stored 5 Press The on screen display is cleared ...

Страница 42: ... displayed The on screen display shown on the right is displayed when INPUT 1 mode is selected 2 Press or to select the menu you want to adjust Note For details on the menus see the tree charts on pages 34 and 35 3 Press or to select the item you want to set Note Press to return to the previous screen In some menus select the icon us ing Using the Menu Screen cont Sub menu 38 ...

Страница 43: ...ss or to select the setting of the item displayed in the sub menu 6 Press The item selected is set Note Some adjustment items will display a confirmation message When setting an item press or to select Yes or OK and then press 7 Press The menu will disappear Sub menu ...

Страница 44: ...t like images For more contrast For more brightness For more color intensity Skin tones become greenish For more sharpness For stronger red For stronger blue Increases color temperature for cooler bluish fluorescent like images Adjusting Image Preferences Adjust the Picture menu For adjustments see page 36 Note Color Tint and Sharp are not dis played when selecting INPUT 1 and the Signal Type is R...

Страница 45: ...ansformed with three two pull down NTSC and PAL60Hz or two two pull down PAL50Hz and SECAM enhance ment to progressive mode images The film source is a digital video record ing with the original encoded as is at 24 frames second The projector can con vert this film source to progressive video at 60 frames second with NTSC and PAL60Hz or at 50 frames second with PAL50Hz and SECAM to play back a hig...

Страница 46: ...hase H Pos or V Pos in the Fine Sync menu For adjustments see page 36 Note Computer image adjustments can be made easily by pressing See page 44 for details Saving Adjustment Settings This projector allows you to store up to seven adjustment settings for use with various com puters Select Save Setting in the Fine Sync menu For saving see page 38 Selected Item Description Clock Phase H Pos V Pos Ad...

Страница 47: ...es on the Fine Sync menu screen may need to be selected to match the computer display mode Set the resolution by selecting Special Modes in the Fine Sync menu For details see page 38 Note Avoid displaying computer patterns which repeat every other line horizontal stripes Flickering may occur making the image hard to see When a DVD player or Digital Video is connected select 480P as the input sig n...

Страница 48: ...stment may take some time to complete depending on the im age of the computer connected to the pro jector When setting Auto Sync to OFF or High Speed and if is pressed Auto Sync will be executed in High Speed mode If the button is pressed again within one minute Auto Sync will be ex ecuted in Normal mode Auto Sync Display Function Used to set the screen displayed during Auto Sync Select Auto Sync ...

Страница 49: ...Easy to Use Functions Easy to Use Functions ...

Страница 50: ...layed in the original resolution therefore they will not be enlarged To return to the standard image press while RESIZE is displayed on the screen This function allows you to modify or customize the picture display mode to enhance the input image Depending on the input signal you can choose NORMAL FULL DOT BY DOT BORDER STRETCH or SMART STRETCH image RESIZE button Screen display of the picture dis...

Страница 51: ...mage 4 3 aspect ratio Input Signal Output screen image SVGA Resolution higher than SVGA 480I 480P NTSC PAL SECAM 4 3 aspect ratio Input Signal Output screen image 720P 1080I Letter box Squeeze 16 9 aspect ratio COMPUTER VIDEO NORMAL is fixed when SVGA 800 600 signals are entered STRETCH is fixed when 720P or 1080I signals are entered The Digital Shift function can be used with these images 4 3 asp...

Страница 52: ...he moving image from the cur rently connected device Displaying a Still Image This function allows you to instantly freeze a moving image This is useful when you want to display a still image from a computer or video giving you more time to explain the image to the audience FREEZE button On screen Display 48 ...

Страница 53: ...ed 2 Press to cancel the opera tion then the magnification returns to 1 Note In the following cases the image will return to the normal size 1 When the input mode is changed When has been pressed When the input signal is changed When the input signal resolution and refresh rate vertical frequency change This function allows you to enlarge a specific portion of an image This is useful when you want...

Страница 54: ...ter portions When you are displaying images with frequent dark scenes such as a film or concert or when you are displaying images in a bright room this feature makes the dark scenes easier to see and gives the impression of greater depth in the image GAMMA button UNDO button STANDARD GAME PRESENTATION CINEMA 50 INPUT mode INPUT signal GAMMA mode INPUT1 RGB PRESENTATION Component CINEMA INPUT2 S Vi...

Страница 55: ...me from mov ing or to make the frame disappear 4 Press to move the inset pic ture The inset picture will be moved to the inset picture frame Note The inset picture can only be displayed with composite video NTSC PAL SECAM or S Video signal The Freeze function works only with the inset picture when the Pict in Pict mode is in operation When the signal entered into INPUT 1 is as follows Pict in Pict...

Страница 56: ... is 100 Power consumption is 290W Select Power Save in the Options 1 menu For settings see page 36 Note Power Save mode is factory preset to OFF Automatic Power Shutoff Function When no input signal is detected for more than 15 minutes the projector will automatically shut off if set to On The Auto Power Off function will be disabled when it has been set to Off Select Auto Power Off in the Options...

Страница 57: ...ver or on the re mote control is pressed the input mode is switched to the respective one Even while the function is searching for input signals pressing any buttons besides and returns to the previous input mode Auto Search Function This function automatically searches for and switches to the input mode in which signals are being received when the projector is turned on or when the INPUT button i...

Страница 58: ...ty images with minimal dot crawl and cross color noise This function allows you to turn on or off the on screen messages When setting Level A or Level B in OSD Display the input mode display e g INPUT 1 will not appear even if the INPUT button is pressed Turning Off the On screen Display Select OSD Display in the Options 1 menu For settings see page 38 Setting the On screen Display Selected Item N...

Страница 59: ... PAL N or PAL M input signals are received When connected to PAL video equipment When connected to SECAM video equipment When reproducing NTSC signals in PAL video equipment When connected to NTSC video equipment PAL SECAM NTSC4 43 NTSC3 58 The video input system mode is preset to Auto however a clear picture from the con nected audio visual equipment may not be received depending on the video sig...

Страница 60: ...ge Capture in the Options 1 menu For details see page 38 1 Press or to select Save Image and press The projected image is captured It may take some time for capturing 2 1 1 1 1 1 Press or to select Yes 2 2 2 2 2 Press Note This function only works in 800 x 600 SVGA non interlace mode The saved image is reduced to 256 col ors Images from equipment connected to IN PUT 2 or INPUT 3 cannot be captured...

Страница 61: ... Custom image is preset as a black screen Selecting a Startup Image This function allows you to specify the image to be displayed upon the projector s startup You can set a captured image as a startup image by selecting Custom Selecting a Startup Image Select Startup Image in the Options 1 menu For settings see page 38 Note When Custom is selected an image saved using Image Capture can be dis play...

Страница 62: ...t adaptor If the setting is not correct the image may be dark too bright or whitish This does not indicate malfunction Make sure to set to Yes Y Cable when using the RGB monitor loop out adaptor Using an RGB Monitor Loop out Adaptor Confirming the Lamp Usage Time This function allows you to check the lamp us age time Select Options 2 menu to see the lamp usage time Note It is recommended that the ...

Страница 63: ...t anywhere between 1 and 60 minutes in 1 minute units 2 Press to cancel the Break Timer Note Auto Power Off will be temporarily dis abled during the Break Timer If no signal transmission occurs for more than 15 minutes after the BreakTimer has completed the projector will turn off The Break Timer will be displayed on the startup image To change the screen dis played during the Break Timer change t...

Страница 64: ...jector This function can be used to lock the use of certain operation buttons on the projector The following are the three keylock levels Setting up the Keylock Select Keylock Level in the Options 2 menu For settings see page 38 Note If a password has been set the password input box will be displayed when select ing the Keylock Level Selected Item Front Ceiling Front Rear Ceiling Rear Description ...

Страница 65: ...l be necessary before changing the Keylock Level Setting up a Password A password can be set by the user to prevent adjustments to certain settings on the Options 2 menu Using a password together with the Keylock Level page 60 is more effective Entering the Password Select Password in the Options 2 menu For details see page 38 1 Press or to select the desired number and then press 2 Enter the 3 re...

Страница 66: ...w password and press 3 Enter the new 4 digit password again in Reconfirm and press Note If you do not want to set a password leave the fields in procedures 2 and 3 blank and press To cancel the password settings click If You Forget Your Password If you forget the password delete it and set a new password using the following procedure 1 Press Setting up a Password cont 62 ...

Страница 67: ...ing the Keycode Anti Theft cannot be selected unless Password is set See page 61 When Anti Theft is selected the password input box will appear Enter the keycode af ter the right password is entered Select Anti Theft in the Options 2 menu For details see page 38 1 Press any button you like on the remote control or projec tor to set the first digit in New Code Note The following buttons on the remo...

Страница 68: ...e you will need to contact your nearest Sharp Authorized Projector Dealer or Service Center see page 78 You may need to bring your projector to them to restore the projector to original factory condition password and keycode reset Changing the Keycode When Anti Theft is selected the password input box is displayed After the password has been entered you can change the keycode Select Anti Theft in ...

Страница 69: ...ing to the Default Settings Select All Reset in the Options 2 menu For resetting see page 36 Note If a password has been set the pass word input box will be displayed when selecting All Reset The following items cannot be initialized Fine Sync Special Modes Signal Info Options Lamp Timer Anti Theft Language Image stored using Image Capture ...

Страница 70: ... function can be used to display all the adjusted settings as a list on the screen Displaying the Adjustment Settings Overview of All Menu Setting Select the Status menu and press For details see page 36 66 ...

Страница 71: ...Appendix Appendix ...

Страница 72: ...rrying case Info Be sure to attach the lens cap to protect the lens Be sure the projector has cooled down enough before placing it in the case Info This carrying case is only for storing and carrying the projector Sending the projector in the carrying case as a parcel may cause damage to the projector If you send the projector in the carrying case as a parcel be sure to place it in a sturdy case a...

Страница 73: ...ration panel is made of plastic Avoid using benzene or thinner as these can damage the finish on the cabinet Do not use volatile agents such as insecticides on the projector Do not attach rubber or plastic items on the pro jector for long time The effects of some of the agents in the plastic may cause damage to the quality or finish of the projector Wipe off dirt gently with a soft flannel cloth W...

Страница 74: ...tor If a problem occurs either the TEMPERATURE WARNING indicator or the LAMP REPLACEMENT indicator will illuminate red and the power will turn off After the power has been turned off follow the procedures given below About the LAMP REPLACEMENT indicator When the lamp exceeds 1 900 cumulative hours of use will be displayed on the screen in yellow When the cumulative hours of use reach 2 000 will ch...

Страница 75: ...luminated or flash it is recommended that the lamp be replaced with a new one immediately even if the lamp appears to be operating normally Should the lamp break the glass particles may spread inside the lamp cage or gas contained in the lamp may be vented into the room from the exhaust vent Because the gas in this lamp includes mercury ventilate the room well if the lamp breaks and avoid all expo...

Страница 76: ...pt for the lamp unit cover and lamp unit Please refer to the installation manual included with the lamp unit 1 Press on the projector to turn off the power Wait until the cooling fan stops 2 Disconnect the power cord Unplug the power cord from the AC socket Leave the lamp until it has fully cooled down about 1 hour 3 Remove the lamp unit cover Turn over the projector and loosen the user service sc...

Страница 77: ...n the user service screw Info If the lamp unit and lamp cover are not cor rectly installed the power will not turn on even if the power cord is connected to the projector Resetting the Lamp Timer Reset the lamp timer after replacing the lamp 1 Connect the power cord Plug the power cord into the AC socket of the projector 2 Reset the lamp timer While pressing simultaneously and on the projec tor pr...

Страница 78: ...connected 5 Not connected 20 Not connected 6 DDC clock 21 Not connected 7 DDC data 22 Not connected 8 Vertical sync 23 Not connected 9 Not connected 24 Not connected 10 Not connected C1 Analog input Red 11 Not connected C2 Analog input Green 12 Not connected C3 Analog input Blue 13 Not connected C4 Horizontal sync 14 5V power C5 Ground 15 Ground DVI Analog Component Input Pin No Signal Pin No Sign...

Страница 79: ...andards Upscale True 640 350 720 350 640 400 720 400 640 480 800 600 1 024 768 31 5 37 9 27 0 31 5 27 0 31 5 37 9 27 0 31 5 37 9 26 2 31 5 34 7 37 9 37 5 43 3 47 9 53 0 61 8 78 5 80 9 31 4 35 1 37 9 44 5 48 1 46 9 53 7 56 8 64 0 77 2 98 3 102 1 70 85 60 70 60 70 85 60 70 85 60 70 72 75 85 90 100 120 160 50 56 60 70 72 75 85 90 100 120 150 160 PC XGA SVGA VGA 50 150 35 5 40 3 48 4 56 5 58 1 60 0 68...

Страница 80: ...n the computer The DNR Digital Noise Reduction setting is not correct Cables incorrectly connected to side panel of projector Volume is set to minimum If the picture is normal the sound is due to cabinet shrinkage caused by a room temperature changes This will not affect operation or performance See Maintenance Indicators The signal in INPUT 1 is not an analog RGB Digital RGB SVGA 800 600 signal I...

Страница 81: ...able when the RGB monitor loop out adaptor is not connected to Monitor Out Picture adjustments are incorrectly set The VOLUME buttons do not work when try the VOL on the remote control when the menu is displayed when the lens menu is displayed when Pict in Pict is working during Enlarge More than double size a dot by dot screen resolution larger the panel resolution 60 40 72 73 58 58 40 Power cann...

Страница 82: ... fr Spain Sharp Electronica Espana S A 93 5819700 sharplcd sees sharp eu com http www sharp es Switzerland Sharp Electronics Schweiz AG 0041 1 846 63 11 cattaneo sez sharp eu com http www sharp ch Sweden Sharp Electronics Nordic AB 46 8 6343600 vision support sen sharp eu com http www sharp se Austria Sharp Electronics Austria Ges m b H 0043 1 727 19 123 pogats sea sharp eu com http www sharp at A...

Страница 83: ...ap attached Lens cap strap Terminal cover attached CD ROM Operation manual Quick reference guides Lamp unit Lamp cage module BQC PGM20X 1 Remote control RRMCGA013WJSA Two R 03 batteries AAA size UM SUM 4 HP 16 or similar Power cord for U S Canada etc QACCDA007WJPZ Power cord for Europe except U K QACCV4002CEZZ Power cord for U K Hong Kong and Singapore QACCBA012WJPZ Power cord for Australia New Ze...

Страница 84: ...View Bottom View 11 15 16 303 1 1 2 38 7 1 3 8 34 2 3 9 32 83 3 76 10 5 16 261 5 4 1 8 104 3 1 8 80 5 16 7 5 12 17 32 318 8 5 8 219 5 1 16 128 4 9 16 115 5 ø54 8 3 4 223 7 11 16 195 2 3 8 60 3 1 4 82 5 1 31 64 37 5 M3 M3 M3 Units inches mm Dimensions ...

Страница 85: ... four different modes STANDARD PRESENTATION CINEMA and GAME Keylock Level Mode that can lock the operation of projector but tons to prevent mischief Keystone correction Function to digitally correct a distorted image when the projector is set up at an angle smoothens out jaggies on keystone images and compresses the image not only horizontally but vertically keeping the 4 3 aspect ratio Password A...

Страница 86: ...e vent 69 Kensington Security Standard connector 11 Keylock level 60 Keystone correction adjustment 32 Lamp 71 LAMP REPLACEMENT indicator 70 Lamp Timer 58 Language selection 30 Index Lens adjustment 31 LENS button 32 Lens cap 68 Lens cap strap 11 MENU button 36 Monitor Out 58 NORMAL 47 Optional accessories 14 OSD Display On screen display 54 Password 61 PDF 9 Phase 42 Pict in Pict 51 Picture adjus...

Страница 87: ...SHARP CORPORATION ...

Отзывы: