background image

ADJUSTMENTS 10 - 5

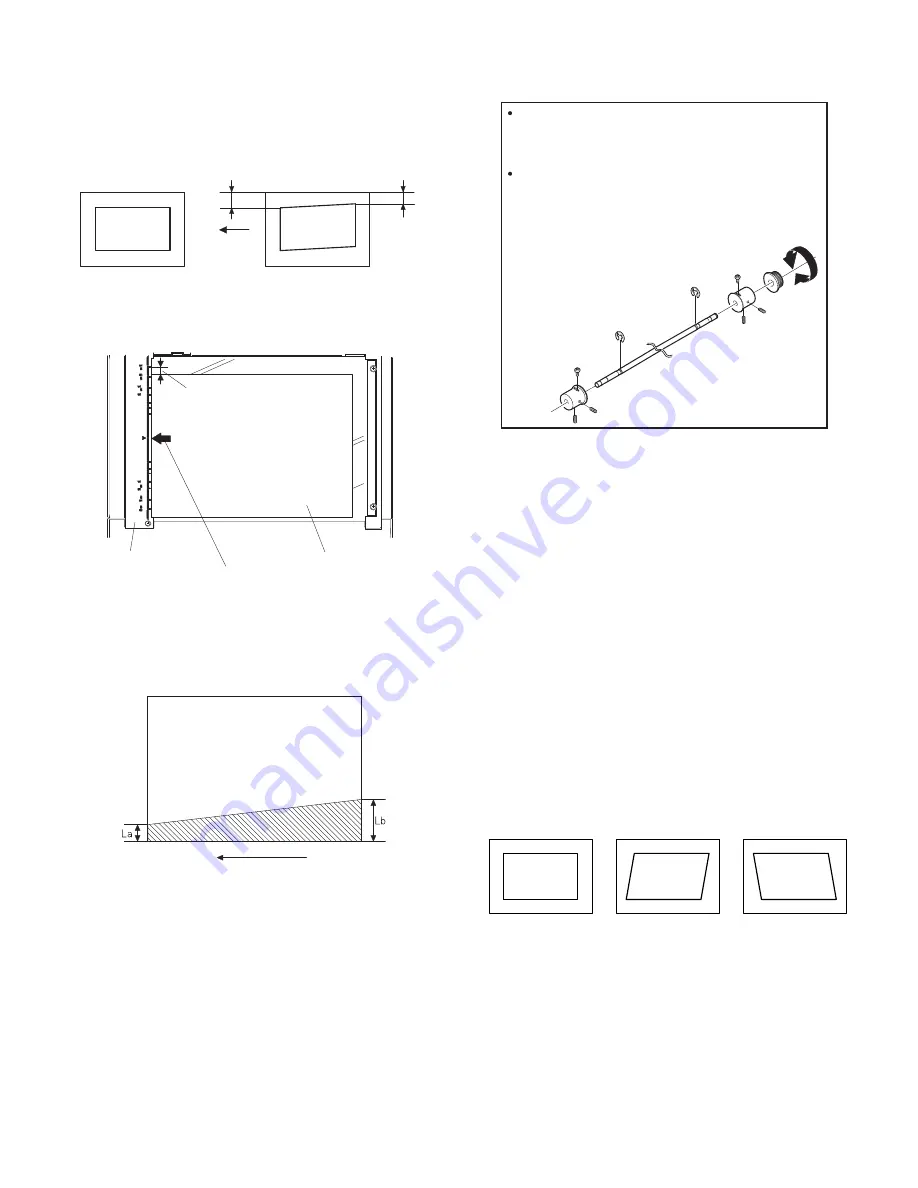
(3) Main scanning direction (FR direction) distortion 

adjustment

This adjustment must be performed in the following cases:
•When the mirror base drive wire is replaced.
•When the lamp unit, or No. 2/3 mirror holder is replaced.
•When a copy as shown is made.

1) Set A3 (11" x 17") white paper on the original table as shown below.

2) Open the original cover and make a normal (100%) copy. 
3) Measure the width of the black background at the lead edge and at 

the rear edge. 

If the width (La) of the black background at the lead edge is equal that 
(Lb) at the rear edge, there is no need to execute the following 
procedures of 4) ~ 7).

4) Loosen the mirror base drive pulley fixing screw on the front frame 

side or on the rear frame side. 

5)Tighten the mirror base drive pulley fixing screw. 

<Adjustment specification>

La = Lb

6) Execute the main scanning direction (FR) distartion balance 

adjustment previously described in 2) again.

(4) Sub scanning direction (scanning direction) distortion 

adjustment

When there is no skew copy in the mirror base scanning direction and 
there is no horizontal error (right angle to the scanning direction), the 
adjustment can be made by adjusting the No. 2/3 mirror base unit rail 
height.
Before performing this adjustment, be sure to perform the horizontal 
image distortion adjustment in the laser scanner section. 
This adjustment must be performed in the following cases:
•When the mirror base wire is replaced.
•When the copy lamp unit or No. 2/3 mirror unit is replaced. 
•When the mirror unit rail is replaced or moved.
•When a following copy is made.

Lb

La

Original

Copy

Paper exit 
direction

Fit th

e


p

a

per


e

d

ge

 a

n

d

 th

e


g

la

ss

 holdi

ng


p

lat

e


e

d

ge

 A3 

(11" 

x

 17") 

w

hit

e


p

a

per

Gla

ss

 holdi

ng


p

lat

e

Allo

w

 a littl

e


sp

a

ce

Paper exit direction

La: Lead edge black background width
Lb: Rear edge black background width

A

B

Rear side

Front side

When La < Lb

Turn the mirror base drive pulley on the front frame side in the
arrow direction A.
(Do not move the mirror base drive pulley shaft.)

When La > Lb

Turn the mirror base drive pulley on the front frame side in the
arrow direction A.
(Do not move the mirror base drive pulley shaft.)

Original

Copy A

Copy B

Содержание MX-M160

Страница 1: ...MX M200D MX M160D MX M160 3 1 4 AR SP10 AR RP10 4 1 5 AR D34 AR D35 5 1 6 MX FX10 AR MM9 6 1 7 MX NB10 7 1 8 MX TR10 8 1 9 CHANGING THE COPY PAPER SIZE IN THE TRAY 9 1 10 ADJUSTMENTS 10 1 11 AR PF1 BARCODE FONT KIT AR PF2 MACRO FONT FLASH ROM KIT 11 1 12 MX PK10 PS EXPANSION KIT 12 1 13 AR SM5 256Mb EXPANSION MEMORY 13 1 DIGITAL MULTIFUNCTIONAL SYSTEM MX M200D MX M200DK MX M160D MX M160DK MX M160 ...

Страница 2: ...to the switch slot The following cautions must be observed to avoid exposure of the laser beam to your eyes at the time of servicing This laser radiation is not a danger to the skin but when an exact focusing of the laser beam is achieved on the eye s retina there is the danger of spot damage to the retina This means that this machine does not produce hazardous laser radiation The use of controls ...

Страница 3: ... those specified herein may result in hazardous laser radiation exposure The socket outlet shall be installed near the machine and shall be easily accessible C Note for installation place Improper installation may damage the machine Please note the following during initial installation and whenever the machine is moved Caution If the machine is moved from a cool place to a warm place condensation ...

Страница 4: ... static electricity 1 When in transit or storing put the parts in an anti static bag or an anti static case and do not touch them with bare hands 2 When and after removing the parts from an anti static bag case use an earth band as shown below Put an earth band to your arm and connect it to the machine 3 When repairing or replacing an electronic part perform the procedure on an anti static mat ...

Страница 5: ...NG SINGLE PASS FEEDER AR SP10 AR VR7 MX NB10 SINGLE PASS FEEDER DOCUMENT COVER JOB SEPARATOR MX FX10 FACSIMILE EXPANSION KIT NEWORK PRINTING SCANNING EXPANSION KIT Standard for North America only MX M200D MX M160D MX M160 Copy STD STD STD Color scanner STD STD STD SPLC printer STD STD STD PCL printer OPT OPT OPT Fax OPT OPT OPT Network OPT OPT OPT Duplex STD STD N A Sort STD STD STD Paper tray 2 s...

Страница 6: ...T OPT AR VR7 DOCUMENT COVER North South America N A Europe Australia Agency OPT OPT STD AR D34 250 SHEET PAPER FEED UNIT OPT OPT OPT AR D35 2X250 SHEET PAPER FEED UNIT OPT OPT OPT MX TR10 JOB SEPARATOR TRAY KIT OPT OPT OPT MX NB10 NEWORK PRINTING SCANNING EXPANSION KIT OPT OPT OPT MX FX10 FACSIMILE EXPANSION KIT OPT OPT OPT AR SM5 256MB EXPANTION MEMORY BOARD OPT OPT OPT AR MM9 FAX EXPANTION MEMOR...

Страница 7: ... If no grounding wire is connected and a leakage occurs a fire or an electric shock may be result 2 Removal of protective material and fixing screw 1 Remove all tapes and protective material Remove all tapes then open the document cover and remove the protective material of sheet shape 2 Remove the fixing screw Use a coin to remove the fixing screw The fixing screw is required when transporting th...

Страница 8: ...n mode if the front cover is closed and the machine power is turned ON toner may be supplied from the toner cartridge to the developer cartridge Under this state the toner density reference control level adjustment cannot be made properly Therefore if the front cover is closed and the machine power is turned ON with the machine not in the simulation mode dispose developer and supply new developer ...

Страница 9: ...ocument cover from the copier and tilt it to the rear side to remove it 2 Remove the right cabinet Remove the screws and remove the right cabinet 3 Remove the document glass and the right document glass holder Remove the screws remove the document glass from the copier and then remove the right document glass holder 4 Attach the SPF glass holder Fit the SPF glass holder to the document glass Attac...

Страница 10: ...o that the cut plane of the rear cabinet is flat 7 Attach the automatic document feeder Insert the hinge portions of the document feeder into the mounting por tions of the copier by holding the feeder at an angle toward the rear side 8 Connect the relay connector Connect the harness of the automatic document feeder to the connec tor of the copier and tighten the screws on the connector 9 Remove th...

Страница 11: ...ent cover Lift the document cover from the copier and tilt it to the rear side to remove it 2 Remove the rear cabinet Remove the screw and remove the cover Then remove the five screws and remove the rear cabinet Part name Quantity Screw M4 x 12 Fixing plate 8 Screw M4 x 10 2 Fixing plate 4 Paper size label 1 ...

Страница 12: ... the like to remove it 5 Remove the second cassette rear cover Remove the rear cover which is attached to the 250 sheet paper feed unit Remove the rear cover upper stage from the 500 sheet paper feed unit 6 Install the copier onto the 250 sheet paper feed unit Put the copier on the 250 sheet paper feed unit and fix with the fixing plates and the screws Use the small fixed plate for front side of t...

Страница 13: ...t 7 Remove the connection gear lock Remove the connection gear lock with the red tug after setting 8 Connect the connector Connect the optional relay harness contained in the 1 tray model 2 tray model paper feed unit to the PWB of the copier Optional relay harness Copier 1 tray model 250 sheet paper feed unit ...

Страница 14: ... model 500 sheet paper feed unit Copier 2 tray model 500 sheet paper feed unit 9 Remove the cassette packing fixtures Pull the cassette until it stops Turn and remove the packing lock fixture which is fixing the paper pres sure plate inside the cassette in the direction of arrow ...

Страница 15: ...erting direction Make sure that it is securely inserted 3 Install FAX Expansion Unit 1 Hook the attaching parts of FAX Expansion Unit two on the right onto the copier frame as shown 2 Hook the attaching part of FAX Expansion Unit one on the left onto the copier frame as shown 3 Push the lower left side of the unit to make sure that connectors of FAX Expansion Unit and the copier are connected 4 Se...

Страница 16: ...own and remove the back cover 6 Remove dummy panel 1 Unscrew from the dummy panel 2 Disengage the pawls and remove it from the copier 7 Attach FAX keyboard 1 Connect the copier flat cable to FAX keyboard 2 Place the FAX keyboard onto the copier while engaging the pawls 3 Secure the keyboard using a screw 8 Reattach keyboard back cover 1 Insert the claw lock of the keyboard back cover into the copi...

Страница 17: ...memory using the Simulation 66 10 If no additional memory is installed there is no need for this memory clear process 12 Connect line cable Connect the line cable to the FAX Expansion Kit Even when connecting the telephone line to TEL line attach the core to the telephone line USA Canada only In order to manifest the compliance with FCC Part 68 and IC CS 03 it is required to provide the machine wi...

Страница 18: ...arness into the cut out portion in the main unit Engage the two pawls on the rear of the network expansion kit with the cut out portions of the main unit and network expansion kit using the supplied screw 3 x 14 3 Connect the USB cable and the network cable 1 Attach the supplied cable clamp to the position shown in the illustra tion 2 Connect the USB cable to the network expansion kit and the main...

Страница 19: ...P address may change automatically If this happens printing will no longer be possible In this event use a WINS server or do not use the machine in a DHCP environment 2 2 CHECKING THE IP ADDRESS There are several settings where the IP address must be entered or checked To check the IP address of the machine hold down the status button on the network expansion kit at least 2 seconds to print out a ...

Страница 20: ...w and then remove the right front cabinet 2 2 Attach the separator motor unit 1 Connect the connector 2 Insert the two bosses of the copier into the positioning holes of the separator motor unit and secure it with the supplied screw 2 3 Arrange the wiring of the separator motor unit 1 Insert the excessive cord into the clamp attached on the separator motor unit and arrange the wiring as shown in t...

Страница 21: ... the rear and front sides of the separator tray to the separator levers on the rear and front sides of the copier 2 7 Secure the separator tray 1 Taking care that the projection indicated with of the separator tray pin is up push the separator tray pin until it clicks 2 8 Reattach the right front cabinet and the right cab inet 1 Reattach the right front cabinet to its orginal position and secure i...

Страница 22: ...imulation 26 1 1 2 Press the CA key to exit the simulation 2 11 Check the operation of the job separator 1 Use the keys on the copier to execute simulation 3 4 2 The separator tray will move up and down and then stop automati cally after simulation is complete Note Step out noise may be caused only at initial operation but it is not a malfunction 3 Press the CA key to exit the simulation Installat...

Страница 23: ...CTION key 3 Press the or key to select PAPER SIZE SET 4 Press the OK key 5 Press the or key to select the paper tray for which the paper size is being changed 6 Press the key The cursor moves to the paper size selection position on the right 7 Press the or key to select the paper size To change the size of another paper tray press the key and then repeat steps 5 to 7 8 Press the OK key A message a...

Страница 24: ...ub scanning magnification ratio adjustment must be performed 1 Set a scale on the OC table as shown below 2 Make a copy 3 Check the copy output If necessary perform the following adjustment procedures 4 Execute SIM 50 1 5 Set the OC lead edge position set value PHOTO indicator ON to 1 The OC image scanning start position is shifted inside the document edge 6 Set the 1st tray lead edge void adjustm...

Страница 25: ... surface lead edge position adjustment in advance and be sure to perform the 2nd print surface lead edge position adjustment and then the lead edge void adjustment in this sequence Adjustment specification Set to S D mode for before execution b SPF image lead edge position adjustment SIM50 6 1 Set a scale on the OC table as shown below Note Since the printed copy is used as a test chart put the sc...

Страница 26: ...stment SIM50 10 TEXT 1st tray indicator Adjustment specification e Side edge void area adjustment SIM26 43 Note Before performing this adjustment be sure to check that the paper off center adjustment SIM 50 10 is completed 1 Set a test chart UKOG 0089CSZZ on the document table 2 Select a paper feed port and make two copies Compare the 2nd copy and the test chart If necessary perform the following ...

Страница 27: ...tact with the positioning plate perform the adjustment of 4 4 Loosen the set screw of the scanner drive pulley which is not in contact with No 2 3 mirror base unit positioning plate 5 Without moving the scanner drive pulley shaft manually turn the scanner drive pulley until the positioning plate is brought into contact with No 2 3 mirror base unit then fix the scanner drive pulley 6 Put No 2 3 mir...

Страница 28: ...djustment When there is no skew copy in the mirror base scanning direction and there is no horizontal error right angle to the scanning direction the adjustment can be made by adjusting the No 2 3 mirror base unit rail height Before performing this adjustment be sure to perform the horizontal image distortion adjustment in the laser scanner section This adjustment must be performed in the followin...

Страница 29: ...he original glass Be careful to avoid this 5 Main scanning direction FR direction magnification ratio adjustment SIM 48 1 Note Before performing this adjustment be sure to check that the CCD unit is properly installed 1 Put a scale on the original table as shown below 2 Execute SIM 48 1 3 After warm up shading is performed and the current set value of the main scanning direction magnification rati...

Страница 30: ...urface sub scanning direction magnification ratio correction value is displayed in two digits on the display section 6 Enter the set value and press the START key The set value is stored and a copy is made 7 Change the mode from the duplex original mode to the simplex original mode TEXT indicator lights up and the current back surface sub scanning direction magnification ratio is displayed in two ...

Страница 31: ...box 3 Slide the lens unit toward the front side and attach it then execute SIM When the display is 143 or below 1 Remove the table glass 2 Remove the dark box 3 Slide the lens unit toward the rear side and attach it then execute SIM When the lens unit is moved execute the OC main scanning magnification ratio auto adjustment SIM 48 1 1 SIM48 3 and the PF original off center adjustment This adjustme...

Страница 32: ...o screws and remove the cover of the network box C Install the ROM PWB to an empty slot in the area shown below D Install the cover of the network box E Turn on the main power switch of the main unit F Check the printer setting list that is printed when the button of the network expansion kit MX NB10 is pressed down for 2 sec or more and confirm that the barcode font or the micro font is printed N...

Страница 33: ...t MX NB10 in advance A Turn on the main power switch of the main unit B Entering the product key 1 Visit the web page click the Admin mode 2 Enter the user name and the password 3 Click the Product Key Setting 4 Enter the product key and click the Submit S No Packed part names Quantity 1 CD ROM 1 2 Product key sheet With Application Number 1 1 2 ...

Страница 34: ...at the Printer Test Page screen check to confirm that the list is normally printed Note Very important information is described below Please keep this description in a safe place where it will not be lost Uses this information in other model APPLICATION NUMBER MACHINE SERIAL NUMBER PRODUCT KEY ...

Страница 35: ...2 part to disengage the pawl slide the rear cabinet and remove it C If the FAX unit is installed remove four screws to remove the FAX unit D Insert the memory to the empty socket of the IMC2 PWB E Install the FAX unit and secure it with four screws F Install the rear cabinet and secure it with two screws No Packed part names Quantity 1 256Mb expansion memory 1 1 ...

Страница 36: ...bout 220 C which is about 40 C higher than that of conventional lead solder and its soldering capacity is inferior to conventional one it is apt to keep the soldering iron in contact with the PWB for longer time This may cause land separation or may exceed the heat resistive temperature of components Use enough care to separate the soldering iron from the PWB when completion of soldering is confir...

Страница 37: ...sfara vid felaktigt batteribyte Använd samma batterityp eller en ekvivalent typ som rekommenderas av apparattillverkaren Kassera använt batteri enligt fabrikantens instruktion German Achtung Explosionsgefahr bei Verwendung inkorrekter Batterien Als Ersatzbatterien dürfen nur Batterien vom gleichen Typ oder vom Hersteller empfohlene Batterien verwendet werden Entsorgung der gebrauchten Batterien nu...

Страница 38: ...mark or copyright of Microsoft Corporation in the U S A and other countries Windows 95 Windows 98 Windows Me Windows NT 4 0 Windows 2000 Windows XP Windows Vista Windows 2000 Server Windows Server 2003 and Internet Explorer are trademarks or copyrights of Microsoft Corporation in the U S A and other countries IBM and PC AT are trademarks of International Business Machines Corporation Acrobat Reade...

Отзывы: