background image

Connected TV

What is Connected TV?

Internet setup

Connected TV

 set to play easily digital media 

contents coming from the Network (Internet or Home). 

Connected TV

 offers up to two different modes:


E

Internet services support (BBC iPlayer (Only LE731 
for UK), YouTube, and HbbTV). 


E

Media Streaming support for existing DLNA 
servers on your Home Network. In fact, user can 
play movies, listen to music or view pictures in the 
easiest way, even from playlist fi les (Media Player).

Connected TV provides a variety of services for each 
country.

NOTE

• 

Because Connected TV is an online system, it can be 
modifi ed over time to better serve its purpose.

• 

Some Connected TV services may be added, changed or 
discontinued after some time.

• 

You cannot download and save neither fi les nor install 
plugins.

• 

Home Media (DLNA) requires external streaming media 
software installed on a PC, inside the HOME Network, that 
is not included with Connected TV.

• 

Home Media (DLNA) server software as Windows Media 
Player 11 (Windows Vista included) or Windows Media 
Player 12 (Windows 7 included), TVersity (www.tversity.
com), Nero Media Home (www.nero.com), or Twonky Media 
Manager (www.twonky.com) are preferred but other can be 
used also. Visit the DLNA website (www.dlna.org) to see the 
certifi ed media server list. Follow the server software’s user 
manual for setup, share and stream media contents.

• 

Home Media (DLNA) (Video, Music and Photo) data is 
organized in folders depending on the Server hierarchy; 
options such as Artist, Genre, Composer, Ratings, Playlist 
or Watch Folders may be present for sorting content, but 
can be different depending of the selected Media Server.

• 

The “Play To” function of some PC Media Players may result 
in very compressed video quality. For best video quality, 
please use the USB Media Player function of the TV.

DISCLAIMERS

• 

SHARP corporation bears no responsibility regarding 
the content and quality of the content provided by the 
content service provider.

NOTE

• 

If you choose a wired connection to the router, you need 
an ETHERNET cable (not included, commercially available).

• 

If you do not have a broadband internet connection, consult 
the store where you purchased your TV or ask your internet 
service provider or telephone company.

• 

An ETHERNET and wireless connection cannot be used at 
the same time. Use only one of the connection types.

• 

A wireless LAN connection and performance cannot be 
guaranteed for all residential environments. In the following 
cases, the wireless LAN signal may be poor or drop, or the 
connection speed may become slower.
- When used in buildings made with concrete, reinforced 

steel, or metal.

- When placed near objects that obstruct the signal.

- When used with other wireless devices that emit the same 

frequency.

- When used in the vicinity of microwave ovens and other 

devices that emit a magnetic fi eld, electrostatic charge, or 
electromagnetic interference.

• 

A stable connection speed is required to play back streaming 
content. Use an ETHERNET connection if the wireless LAN 
speed is unstable.

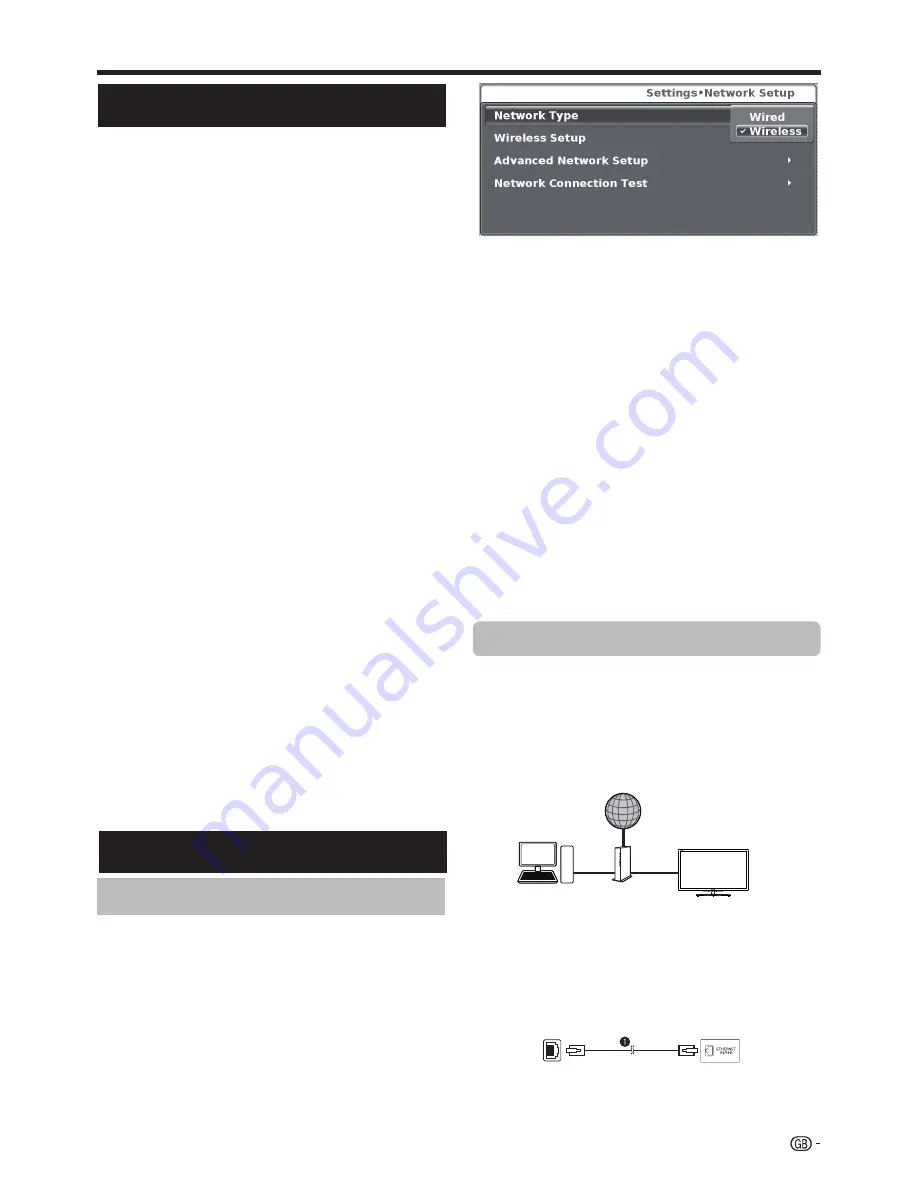
Use an ETHERNET cable to connect the ETHERNET 
terminal on the TV to your broadcast router as shown 
below. This is recommended when enjoying services 
which require stable connection speeds, such as 
streaming media.


Wired connection overview


PC (Home Media Server)


Router (commercially available)


ETHERNET cable (commercially available)


Network (Internet)


How to connect



ETHERNET cable

1

 Switch on the router (commercially available). Refer to 

the router’s operation manual for switching on. 

Wired installation

Connecting to the internet

To enjoy Connected TV, you need to connect the TV to 
a router with a high speed connection to the internet. 
The TV connection to the router can either be wired or 
wireless.

To access to the TV internet confi guration go to 

Settings

Network setup.

 The next screen is shown:

 31


l

a

n

i

m

r

e

T

E

N

R

E

H

T

E

r

e

t

u

o

R

LAN

Содержание LC-40LE730E

Страница 1: ...EURENTELEVISIE TELEVISIÓN EN COLOR LCD TELEVISOR DE CRISTAL LÍQUIDO OPERATION MANUAL BEDIENUNGSANLEITUNG MODE D EMPLOI MANUALE DI ISTRUZIONI F204WJZZ OPERATION MANUAL BEDIENUNGSANLEITUNG MODE D EMPLOI MANUALE DI ISTRUZIONI GEBRUIKSAANWIJZING MANUAL DE INSTRUCCIONES MANUAL DE OPERAÇÃO ENGLISH DEUTSCH FRANÇAIS ITALIANO NEDERLANDS ESPAÑOL PORTUGUÊS LC 40LE730E LC 46LE730E LC 40LE731E LC 46LE731E ...

Страница 2: ... plug proceed as follows The wire which is coloured blue must be connected to the plug terminal which is marked N or coloured black The wire which is coloured brown must be connected to the plug terminal which is marked L or coloured red Ensure that neither the brown nor the blue wire is connected to the earth terminal in your three pin plug Before replacing the plug cover make sure that If the ne...

Страница 3: ...el you want display 25 Channel information display DTV CADTV only 25 Useful viewing functions 26 Selecting the picture format 26 Selecting the picture format manually 26 Setting when using external devices 26 Source list 26 Connecting a USB device Media Player 26 MEDIA PLAYER Function 27 Picture mode 27 Music mode 27 Video mode 28 USB HOME MEDIA device compatibility 28 Power save settings 28 HDMI ...

Страница 4: ...nerating products including amplifiers Headphones Do not set the volume at a high level Hearing experts advise against extended listening at high volume levels To prevent fire never place any type of candle or naked flames on the top or near the TV set To prevent fire or shock hazard do not place the AC cord under the TV set or other heavy items Do not display a still picture for a long time as th...

Страница 5: ...E a b c d Cursor Select a desired item USB REC Media Player Home Media S V Rewind and fast forward T L Rewind and forward in units of 5 minutes Execute a command U b Source List Page 10 Select an input source I Page 19 Select audio video settings ECO On Off Page 28 Select Power save setting O m Teletext Page 12 ATV Display analogue teletext DTV SAT Select MHEG 5 or teletext for DTV SAT P r s ATV D...

Страница 6: ...SCART AV RGB Y C Input terminal 6 PC Input 7 Antenna input terminal 8 OPTICAL DIGITAL AUDIO OUTPUT terminal SPDIF 9 SERVICE connector jack 3 5 mm 10 HDMI 1 HDMI DVI ARC 11 HDMI 2 HDMI DVI 12 HDMI 3 HDMI DVI 13 HDMI 4 HDMI DVI 14 AUDIO input for DVI and PC Jack 3 5mm connector 15 COMMON INTERFACE slot 16 AC INPUT terminal 17 SAT Satellite antenna input Only LE732 series 18 ETHERNET 10 100 terminal ...

Страница 7: ...al accessories may be available in the near future When purchasing please read the newest catalogue for compatibility and check the availability No Part name Part number 1 Wall mount bracket AN 37AG5 2 Wi Fi adapter AN WUD630 3 3D glasses AN 3DG20 B Stand unit x1 This TV should be fixed on a wall only with the wall fix bracket available from SHARP above table The use of other wall fix brackets may...

Страница 8: ...e remote control unit for an extended period of time remove the batteries from it When replacing the batteries use zinc carbon batteries instead of alkaline ones Note on disposing batteries The batteries provided contain no harmful materials such as cadmium lead or mercury Regulations concerning used batteries stipulate that batteries may no longer be thrown out with the household rubbish Deposit ...

Страница 9: ...varies in some countries Turn on the power using a on the TV Page 10 Run the initial auto installation Page 9 Language country tuner type settings and TV Location setting Go to Next Congratulations Now you can watch TV If necessary adjust the antenna to attain maximum signal reception Page 9 7 Preparation Power on and run the auto installation Watch TV Connect external devices Connect external dev...

Страница 10: ... Module displays Menu Adjustment parameters of each CA Card displays Enquiry You can input numerical values such as passwords here NOTE The content of each screen depends on the provider of the CI Module Inserting a CA Card NOTE Make sure that the CI module is properly inserted This menu is only available for digital stations It takes about 30 seconds to certify the license key when you insert a C...

Страница 11: ...rom the menu CHANNEL Page 22 To watch both analogue broadcasts and digital broadcasts you should perform the channel search setting DTV ATV or CADTV ATV Is not possible to search digital and cable digital broadcasts at the same time 8 The TV searches for sorts and stores all the receivable TV stations according to their settings and the connected antenna To cancel the initial auto installation in ...

Страница 12: ...ange between modes Daily operation Switching on off Press a on the TV to switch it on Switch it off by pressing a on the TV Standby mode E Switching to standby mode If the TV is switched on BLUE LED you can switch it to standby by pressing TVa on the remote control unit E Switching on from standby From standby RED LED press TVa on the remote control unit TV indicator status LED indicator Status Of...

Страница 13: ...eck the schedule of digital channels view detailed information about it tune to an event currently on air and set a timer for future events Other EPG functions 3 Revise the program information 1 Press to select the program you want to revise 2 Press p 3 Press p to return to EPG 4 Reminder function 1 Select the broadcasting emitting the program which you want to remember 2 Press the BLUE key on the...

Страница 14: ...n it disappears Note that with this menu on the screen the linked pages cannot be selected TV mode Display the time Using the MHEG 5 application UK only Some services bring you programmes with the MHEG application encoded letting you experience DTV CADTV interactively When provided the MHEG 5 application will start when you press m NOTE MHEG may not be displayed in 3D mode Watching TV Teletext Wha...

Страница 15: ...ed with the terminals as shown below Find the cable corresponding the TV s terminal and connect the device NOTE The cables illustrated in pages 13 14 and 15 are commercially available items 13 VIDEO Pr Pb Y R L AUDIO HDMI 4 SCART AV RGB S VIDEO SERVICE USB WIFI PC IN HDMI PC ANALOG AUDIO INPUT HDMI 1 ARC HDMI 2 HDMI 3 DIGITAL AUDIO OUTPUT Audio device Page 15 Video recording device Pages 14 and 15...

Страница 16: ...e used it may appear a video noise Be sure to use a certified HDMI cable On reproducing HDMI picture the best format is automatically detected and adjusted for the picture Compatible video signal 576i 576p 480i 480p 1080i 720p 1080p Component connection You will enjoy accurate colour reproduction and high quality images through the INPUT COMPONENTS AV terminal when connecting a DVD player recorder...

Страница 17: ...connecting Digital audio output setting After connecting an amplifier with optical digital audio input as shown you should set an audio output format compatible with the programme you are watching or the device connected Go to MENU Sound SPDIF Mode select PCM or Dolby Digital NOTE When you set this to Dolby Digital and you receive the Dolby Digital or Dolby Digital Plus audio formats Dolby Digital...

Страница 18: ...size may vary with input signal type The Aspect ratio adjustment is only available for analogue signals through the PC IN terminal NOTE When using the PC IN terminal is necessary to connect a audio cable Normal Full Example DVI VGA Conversion cable ø 3 5 mm stereo mini jack cable After connection If after connecting a PC to the TV through a HDMI cable the audio does not run connect a mini stereo c...

Страница 19: ...ted automatically Auto adjustment may fail if the PC image has low resolution has unclear black edges or is moved while executing Auto adjustment Be sure to connect the PC to the TV and switch it on before starting Auto adjustment Auto adjustment can be executed only when inputting analogue signals through the PC IN terminal Adjusting the PC image automatically Adjusting the PC image manually Ordi...

Страница 20: ...of the screen shows the operations with the OSD The bar above is an operational guide for the remote control unit The bar will change in accordance with each menu setting screen This function is useful when there is no remote control unit within your reach 1 Press MENU to display initial MENU screen or to return to previous MENU screen 2 Press CHr s instead of a b or ik l instead of c d to select ...

Страница 21: ...ral viewing options to choose from to best match the system environment which can vary due to factors like room brightness type of programme watched or the type of image input from external equipment 1 Press AV MODE 2 Every time AV MODE is pressed the TV changes the mode as follows STANDARD SOFT ECO CINEMA USER DYNAMIC 6 Selected setting Button Button Advanced Video Aspect Ratio Changes between di...

Страница 22: ...on is available only when the TV is connected to Internet Media Player Access to Multimedia Menu See page 27 Media Player Settings This TV allows play video on demand DivX VOD You need to register the TV before playing the DivX content This is the function to confirm your registration code DivX VOD Register To activate this option you need to register the code at www divx com vod download the VOD ...

Страница 23: ...time zone Summer time Allows you to change automatically to summer time auto off on Time Time adjustments This function allows you to use a password to lock certain programs and adjustments The password is always needed to access to this menu by default the password is 3001 Parental guidance This function allows you to restrict DTV CADTV SADTV only LE732 model programs depending on the age classif...

Страница 24: ...tton to rename it NOTE If you press FAV when you are not in any adjustment menu the favourite channel list will appear Satellite edit Only LE732 model series Allows you to adjust the satellite propierties Signal information Shows the signal power and quality CI information Allows to see the CA card information Conditional Access Module name supplier and OSD Auto channel number Automatic channel so...

Страница 25: ...press OK to start searching Satellite edit This option allows you to adjust manually the satellite properties Press to select Satellite Edit and then press OK Select Satellite Set You can choose between the following options Consult your dealers before using a method other than Single Satellite 1 Select Single Satellite and then press OK 2 Press to select Satellite 1 and press OK 3 Select Satellit...

Страница 26: ... providers including catch up TV video on demand VoD interactive advertising personalisation voting games and social networking See page 33 NOTE When the Audio description is set to On the audio description sound is superimposed on the main audio when you select a broadcast compatible with audio description This function is available only for DTV broadcasts This Audio description menu is not displ...

Страница 27: ... of tuned channels will be displayed 2 Use to select the channel you want to watch and press OK CLEARING THE PIN If you lose or forget your PIN you can clear the PIN following these steps 1 Go to MENU LOCK 2 Enter 3001 to cancel out the current PIN The current PIN is reset to 3001 4 Press to select Yes and press OK The software update will start The updated percentage appears 5 When software updat...

Страница 28: ...Press f on the remote control unit to change between different kinds of pictures NOTE Some items do not appear depending on the type of received signal Normal 4 3 Keeps the original aspect ratio in a full screen display Zoom 14 9 For 14 9 letterbox pictures A thin side bar appears on each side and you may also see bars on the top and bottom with some programs Panorama In this mode picture is stret...

Страница 29: ...rward on reproduction mode END button Go back to the previous screen RED button x1 Reproduce the selected file indefinitely x2 Reproduce all the files on the folder indefinitely OK button Play Pause reproduction Music mode Buttons for music reproduction Useful viewing functions After selecting Media Player the TV loads USB device files and shows the following screen 1 Pressing buttons you can chan...

Страница 30: ...start the reproduction 4 Press END to exit the Video mode Buttons Description Cursor Go to the previous next chapter Cursor Backward Fast forward END button Go back to the previous screen RED button Allows you to repeat a fragment of a film indefinitely The first keystroke defines initial point the second keystroke defines final point The third keystroke restarts the normal reproduction BLUE butto...

Страница 31: ...l unit toward the TV not to the connected HDMI device Video noise may occur depending on the type of HDMI cable used Make sure to use a certified HDMI cable Up to three HDMI recording devices one AV amplifier and three players can be connected using this system These operations affect the HDMI device selected as the current external source If the device does not operate turn on the device and sele...

Страница 32: ...nel Device List HDMI CEC allows you to operate the HDMI connected device with a single remote control unit 1 Press I to start playback of a title 2 Press J to fast forward Press G to reverse Press REC E to start recording Press REC STOP H to stop recording Press H to stop Press F to pause Press SOURCE a to turn the HDMI connected device on off Operating a HDMI CEC device Device Scan Search all HDM...

Страница 33: ...ars no responsibility regarding the content and quality of the content provided by the content service provider NOTE If you choose a wired connection to the router you need an ETHERNET cable not included commercially available If you do not have a broadband internet connection consult the store where you purchased your TV or ask your internet service provider or telephone company An ETHERNET and w...

Страница 34: ... select PIN press OK select Start scan and press OK Follow the on screen instructions and the operation manual of the router access point AP Assisted setup Shows the network name list SSID 1 Select the network you want to connect 2 If network is protected introduce the encryption key using the software keyboard and press Green button 3 Select Done and press OK The TV will connects to the network y...

Страница 35: ... its directors officers employees agents contractors and affiliates shall not be liable to you or any third party with respect to such failures or maintenance outages regardless of cause or whether or not it could have been avoided ALL THIRD PARTY CONTENT OR SERVICES ACCESSIBLE VIA THIS DEVICE IS PROVIDED TO YOU ON AN AS IS AND AS AVAILABLE BASIS AND SHARP AND ITS AFFILIATES MAKE NO WARRANTY OR RE...

Страница 36: ...g USB REC on the remote control or with a timer using data taken from EPG or programming an event manually To use either method follow the instructions below Immediate recording The recording starts when user decides 1 Press USB REC on the remote control to start recording the current programme REC symbol appears in the bottom left corner of the screen 2 To stop recording the current programme pre...

Страница 37: ...continue with the recording until the end of the USB REC Manual programming In case it is an Immediate recording you pressed USB REC button you can decide to switch off completely or continue with the recording during the time you decide or stop the recording In both cases if you choose to continue with the recording the TV will switch off but continue showing the pyramid icon lighting in purple I...

Страница 38: ...al that cannot be detected automatically When the TV receives a 3D image signal that cannot be detected automatically you can select between 3D and 2D image viewing 1 Select the 3D source HDMI 2 Press 3D button on Remote Control The following screen appears 3 Press c d to select Top Bottom Side by Side or Off 2D and then press E To view in 3D mode Top Bottom or Side by Side 1 Press a b to select t...

Страница 39: ...played sequentially to create a 3D image Top and Bottom Creates 3D images from 3D images displayed on the top and bottom The image is split into a top and bottom image and then the images are stretched and displayed sequentially to create a 3D image 2D mode without using the 3D glasses Side by Side s 2D Creates 2D images from 3D images displayed side by side Only the left image is stretched and di...

Страница 40: ...ng Do not use devices that emit strong electromagnetic waves such as cellular phones or wireless transceivers near the 3D glasses Doing so may cause the 3D glasses to malfunction The 3D glasses cannot operate fully at extreme high or low temperatures Use them within the specified usage temperature range If the 3D glasses are used in a room with fluorescent lighting 50 60 Hz the light within the ro...

Страница 41: ... product also makes use of freely distributed software and software components whose copyrights are held by third parties Abbreviation list Abbreviated term Stands for ATV Analogue TV CEC Consumer Electronics Control DNR Digital Noise Reduction DTV Digital TV CADTV Cable Digital TV DVB T Digital Video Broadcasting Terrestrial DVB C Digital Video Broadcasting Cable DVI Digital Visual Interface EPG ...

Страница 42: ...u Page 21 Is No Signal Off or No operation Off activated No picture Are connections to external equipment correct Pages 13 14 and 15 Is the input signal type selected correctly after connection Page 10 Is the correct input source selected Page 10 Is the picture adjustment correct Pages 19 Is the antenna connected properly Page 8 No sound Is the volume too low Make sure that headphones are not conn...

Страница 43: ...Sub 15pin Ø 3 5 mm jack shared with HDMI COMPONENTS COMPONENT IN Y PB CB PR CR RCA AUDIO R L HDMI1 HDMI Ø 3 5 mm jack shared with PC INPUT ARC 3D HDMI2 HDMI Ø 3 5 mm jack shared with PC INPUT 3D HDMI3 HDMI Ø 3 5 mm jack shared with PC INPUT 3D HDMI4 Rear HDMI Ø 3 5 mm jack shared with PC INPUT 3D USB 1 USB REC Media Player HDD Ready 3D Glasses charge USB 2 0 HOST A Type USB 2 Media Player HDD Read...

Страница 44: ...lains the information included For further information please visit the Sharp internet homepage http www sharp eu The retailer or online shop where you purchased your television from would have displayed the label and its corresponding rating If in doubt please consult them In addition to saving energy many Sharp LCD televisions also carry the EU Ecolabel a voluntary environmental label that is aw...

Страница 45: ...h the chemical requirements of the EU Eco label A minimum of two year functionality are granted in all EU states Spare parts will be available after ceasing the production of this model for seven years for electrical components five years for mechanical parts four years for decorative parts This product has been designed for easy disassembly recovery and recycling and should not be discarded with ...

Страница 46: ... the costs arising from take back and recycling Small products and small amounts might be taken back by your local collection facilities For Spain Please contact the established collection system or your local authority for take back of your used products 2 In other Countries outside the EU If you wish to discard of this product please contact your local authorities and ask for the correct method ...

Страница 47: ...LC 40LE730E LC 40LE731E LC 40LE732E LC 46LE730E LC 46LE731E LC 46LE732E 40 46 40 46 457 484 6 947 1081 350 5 388 5 500 574 5 887 1020 1 560 635 70 630 705 400 400 196 187 2 18 8 40 111 4 115 2 242 265 ...

Страница 48: ...STRUZIONI GEBRUIKSAANWIJZING MANUAL DE INSTRUCCIONES MANUAL DE OPERAÇÃO F204WJZZ SHARP MANUFACTURING POLAND Sp z o o Ostaszewo 57b 87 148 Łysomice Poland SHARP CORPORATION http www sharp eu com LC 40LE730E LC 46LE730E LC 40LE731E LC 46LE731E LC 40LE732E LC 46LE732E ...

Отзывы: