background image


12

Menu operations

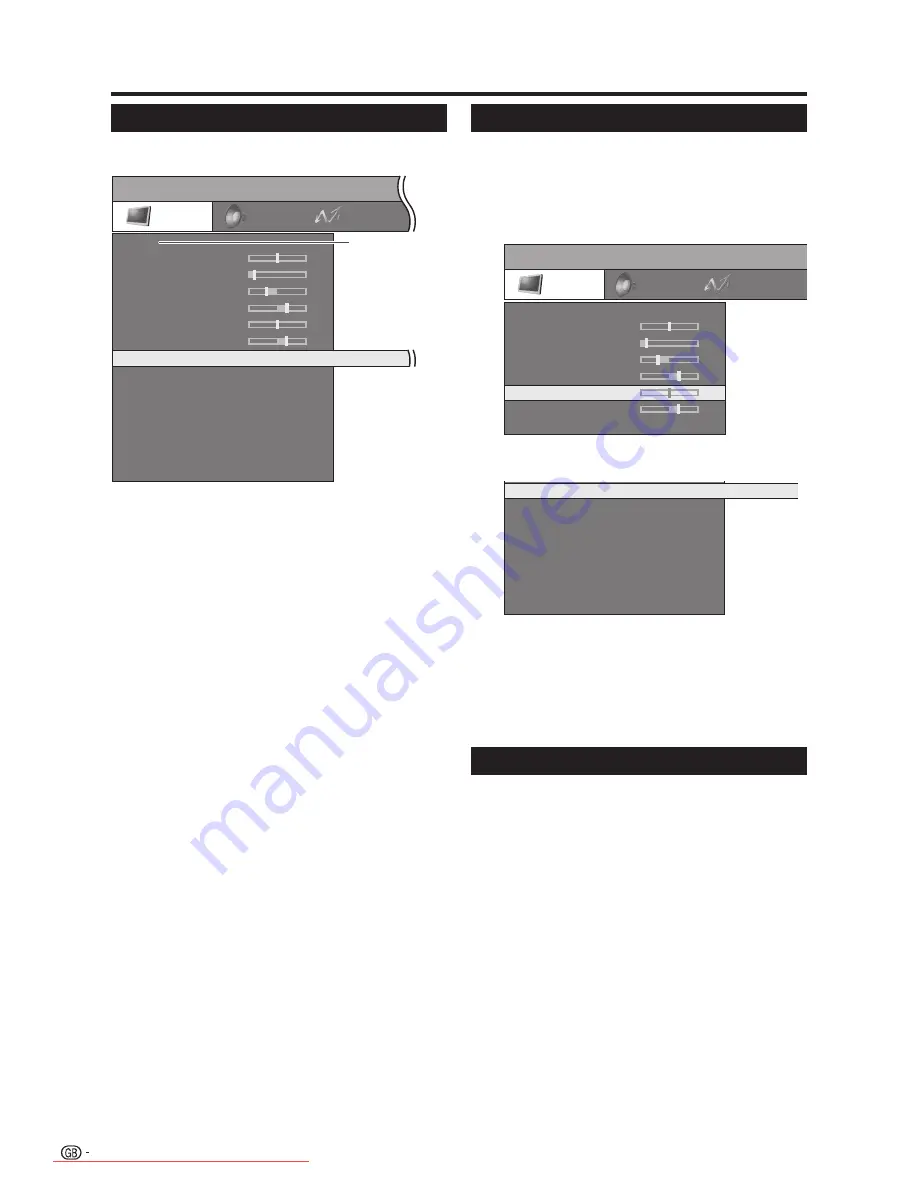
On-Screen Display

Example


Item highlighted in yellow

•  This indicates the item currently selected.


Item displayed in white

•  This indicates an item can be selected.

NOTE

•  Some menu items do not appear as explained in this 

manual depending on the selected parameter, input mode 
or the type of signal received.

•  The screens in the operation manual are for explanation 

purposes (some are enlarged, others cropped) and may 
vary slightly from the actual screens.

Common operations

Press 

MENU

 and the TV menu screen displays.

Press 

c

/

d

 to select the desired menu, and 

then press 

OK

.

Press 

a

/

b

 to select the desired menu item. 

Press 

OK

 to proceed if necessary.


1
2

3

Menu operation without a remote control

This function is useful when there is no remote control 
within your reach.

Adjusting frequently adjusted items 

Press 

MENU 

briefl y to display the direct control 

screen.

•  You can adjust the following items: “INPUT 

SOURCE”, “Brightness”, “Contrast”, “Wide modes” 
and “Service”.

•  “Service” is the item reserved only for service 

personnel.

Select the item by pressing 

P


r

/

s

.

Select or adjust by pressing 

i


k

/

l

.

NOTE

•  The direct control menu screen will disappear if left 

unattended for several seconds.

1

2
3

Picture

TV menu

Sound

SOFT

Backlight

Contrast

Brightness

Colour

Tint

Sharpness

more ...

0

3

-12

9

0

3

Connections

High

off

off

off

Interlace

off

no

Mid-High

Middle

Colour temp.

Black

3D-Y/C

DNR

I/P setting

Film mode

off

truD(R)

Reset

• Press 

a

/

b

 to select “more...” and then press 

OK

, if 

the item you want to adjust is not displayed.

Press 

c

/

d

 to select the desired item or move 

the item to the desired position. Press 

OK

 if 

necessary.

Press 

RETURN

 repeatedly to return to the 

last menus, or press 

END

 or 

MENU

 to exit the 

menu.

4

5

Picture

TV menu

Sound

SOFT

Backlight

Contrast

Brightness

Colour

Tint

Sharpness

High

off

off

off

Interlace

off

no

Mid-High

Middle

0

3

-12

9

0

3

Colour temp.

Black

3D-Y/C

DNR

I/P setting

Film mode

off

truD(R)

Reset

Connections

Current AV 
mode is shown 
here. (Page 19)

LC-42XD1E_gb_b.indd   12

LC-42XD1E_gb_b.indd   12

2006/10/27   10:22:01

2006/10/27   10:22:01

Downloaded From TV-Manual.com Manuals

Содержание LC-37XD1E

Страница 1: ...ELEVISIÓN EN COLOR LCD ENGLISH DEUTSCH FRANÇAIS LC 37XD1E LC 42XD1E OPERATION MANUAL BEDIENUNGSANLEITUNG MODE D EMPLOI MANUALE DI ISTRUZIONI GEBRUIKSAANWIJZING MANUAL DE MANEJO ITALIANO NEDERLANDS ESPAÑOL C723WJZZ 1 OPERATION MANUAL BEDIENUNGSANLEITUNG MODE D EMPLOI MANUALE DI ISTRUZIONI GEBRUIKSAANWIJZING MANUAL DE MANEJO Downloaded From TV Manual com Manuals ...

Страница 2: ...hock may occur To fit an appropriate plug to the mains lead follow the instructions below IMPORTANT The wires in the mains lead are coloured in accordance with the following code Blue Neutral Brown Live As the colours of the wires in the mains lead of this product may not correspond with the coloured markings identifying the terminals in your plug proceed as follows The wire which is coloured blue ...

Страница 3: ...mat 17 Language 17 Factory settings 17 Miscellaneous 18 Contents Geometry menu 18 Picture horizontal 18 Picture vertical 18 Phase position 18 Other menu items 19 AV mode 19 Status display 19 INPUT SOURCE 19 Still image 19 OPC 19 Wide modes 20 Analogue teletext 21 Using analogue teletext menu 21 Newsflash 21 Reveal Conceal 21 Setup 22 DTV menu operations 23 DTV menu operation buttons 23 DTV On Scree...

Страница 4: ...ned for built in installation do not place the product in an enclosed place such as a bookcase or rack unless proper ventilation is provided or the manufacturer s instructions are followed The LCD panel used in this product is made of glass Therefore it can break when the product is dropped or impact applied If the LCD panel is broken be careful not to be injured by broken glass Heat sources Keep ...

Страница 5: ... g1 Large g1 Page 4 Cable tie g1 Page 4 3 RCA to 15 pin D sub adapter g1 Page 10 Operation manual This publication Quick guide Stand unit g1 Page 3 Attaching the stand Before attaching or detaching stand unplug the AC cord from the AC INPUT terminal CAUTION Attach the stand in the correct direction Be sure to follow the instructions Incorrect installation of the stand may result in the TV falling ...

Страница 6: ...ed from the AC cord Setting the TV on the wall This TV should be mounted on the wall only with the wall mount bracket available from SHARP See page 36 The use of other wall mount brackets may result in an unstable installation and may cause serious injuries Installing the LCD Colour TV requires special skill that should only be performed by qualified service personnel Customers should not attempt t...

Страница 7: ...ndicator a Power button MENU button i l k Volume buttons P s r Programme channel buttons SLEEP indicator EXT 2 AV terminal EXT 3 terminals Headphone jack EXT 1 RGB terminal EXT 5 HDMI AUDIO terminals Antenna input terminal DVB T 5V 80 mA OUTPUT Audio terminals EXT 4 terminals RS 232C terminal COMMON INTERFACE slot EXT 6 HDMI terminal Rear panel LC 42XD1E Rear panel LC 37XD1E Downloaded From TV Man...

Страница 8: ...onding to the e and f indications in the battery compartment Close the battery cover 1 2 3 Inserting the batteries Before using the TV for the first time insert two AAA size batteries supplied When the batteries become depleted and the remote control unit fails to operate replace the batteries with new AAA size batteries Using the remote control unit Use the remote control unit by pointing it towar...

Страница 9: ...e Guide screen ESG DTV To display ESG Electronic Service Guide screen RADIO DTV Switch between RADIO and DTV mode 21 AV MODE Select a video setting Page 19 22 SURROUND Surround effects on off 23 P r s Select the channel In analogue TV mode external input sources EXT 1 6 can also be selected 24 p Display information Pages 18 19 30 and 31 25 MENU MENU screen on off Page 12 26 a b c d Cursor Select a...

Страница 10: ...ly turn off the power to the TV unplug the AC cord from the AC outlet However do not unplug the AC cord unless otherwise instructed Off Display status indicator Power off Initial auto installation DTV Digital Video Broadcasting is a transmission scheme It is much more than a simple replacement for existing analogue television transmission DVB provides more stations clearer picture quality and othe...

Страница 11: ... Press any of the numeric buttons to select the desired character Remember to press and toggle the numeric button quickly for the transition to the next digit is rather quick Repeat until the new name is fully spelt out Confirm with OK or cancel with Blue The name can be up to 8 characters 2 Quick guide Channel selection using the station list Analogue This section explains how to change delete mov...

Страница 12: ...RT cable SCART cable EXT 2 recommended VIDEO S VIDEO L AUDIO R AV OUTPUT Connecting a DVD player You can use the EXT 3 4 5 HDMI or 6 HDMI terminals when connecting to a DVD player and other audiovisual equipment DVD player EXT 3 A game console camcorder and some other audiovisual equipment are conveniently connected using the EXT 3 terminals NOTE EXT 3 The S VIDEO terminal has priority over the VI...

Страница 13: ... connected audiovisual equipment e g VCR via the EXT 2 terminal NOTE Refer to operation manuals of each external equipment for the details Only works when the audiovisual equipment is connected to the EXT 2 terminal on the TV with AV Link via a fully wired SCART The use of the AV Link function is only possible if the TV set has enforced a complete auto installation with the connected audiovisual e...

Страница 14: ...g items INPUT SOURCE Brightness Contrast Wide modes and Service Service is the item reserved only for service personnel Select the item by pressing P r s Select or adjust by pressing i k l NOTE The direct control menu screen will disappear if left unattended for several seconds 1 2 3 Picture TV menu Sound SOFT Backlight Contrast Brightness Colour Tint Sharpness more 0 3 12 9 0 3 Connections High o...

Страница 15: ... Intermediate tone between High and Middle Middle Natural tone Mid Low Intermediate tone between Middle and Low Low White with reddish tone Item Picture TV menu Sound SOFT Backlight Contrast Brightness Colour Tint Sharpness more 0 3 12 9 0 3 Connections PC only PC only PC only Colour temp Adjust the colour temperature to give the best white image Black For easier viewing change the viewing depth b...

Страница 16: ...related items to the factory presets Sound menu Various sound related settings can be optimised NOTE Items with can be adjusted and reset for each individual AV mode Press a b to select more and then press OK if the item you want to adjust is not displayed Treble For weaker or stronger treble Bass For weaker or stronger bass Loudness Boosts low and high frequencies to give added punch to playback ...

Страница 17: ...ect Connections and then press OK Press a b to select HDMI setup and then press OK Press a b to select EXT5 or EXT6 and then press OK Press a b to select the desired item Press c d to select the desired setting 1 2 3 4 5 6 NOTE Refer to your external equipment operation manual for the signal type Items with may be greyed out depending on the type of signal input from the external equipment Item ma...

Страница 18: ...re sort stations enter and change station names and delete stations E Search wizard Use this menu to search for stations automatically once certain settings have been made See page 8 Initial auto installation Analogue for details Press MENU and the TV menu screen displays Press c d to select Setup and then press OK Press a b to select Channels and then press OK Press a b to select Search wizard an...

Страница 19: ...ild lock With the child lock you can bar access to all stations immediately or daily for a certain time period To use this function you have first to define your PIN NOTE To view a locked channel you must enter the PIN See page 28 for locking channels from viewing in DTV mode The TV power will be turned off if no PIN is entered for several seconds E Lock immediately You can lock out all stations imm...

Страница 20: ... automatically by the set If you do not receive teletext you should set the Date and Time manually Also you have additional items you can adjust as outlined below NOTE Time and date information configured manually cannot be overridden automatically by the set If the power to the set is cut off disconnection of AC cord power outage etc the auto time acquisition mode through teletext reactivates Item...

Страница 21: ...depending on signal condition 1 2 OPC Automatically adjusts the brightness of the screen Press OPC on the remote control unit to switch the Optical Picture Control on and off NOTE When set to on the TV senses the surrounding light and automatically adjusts the backlight brightness Make sure no object obstructs the OPC sensor which could affect its ability to sense surrounding light Under the facto...

Страница 22: ...s A side bar appears on each side Panorama In this mode the picture is progressively stretched toward each side of the screen Cinema 16 9 For 16 9 letterbox pictures Bars may appear on the top and bottom with some programmes Cinema 14 9 For 14 9 letterbox pictures Bars may appear on the top and bottom with some programmes Item for SD Standard signal Full Display with the Overscan image Crop all si...

Страница 23: ...100 100 ARD Text 10 09 04 14 14 42 ARD TEXT Teletext im Ersten Bulmahn Bildung statt Eigenheim 120 Wird auch der Nahverkehr teurer 121 Australien Keine Zugeständnisse 122 Tote bei Zugunglück in Schweden 532 Tennis Haas unterliegt Hewitt 204 Formel 1 Schumacher erneut vorne 213 Tagesschau 110 112 Kultur 500 Wetter 170 Gesellschaft 530 Sport 200 600 Lotto Toto 666 TV Guide 300 400 Wirtschaft 700 Int...

Страница 24: ... displayed when the service does not contain the subtitle information Reveal or hide subpages c d button Select subpage Red button Move to the previous page Green button Move to the following page These two buttons are shown on the screen by the signs l and k Setup E Sub title pages Some stations provide teletext subtitles for the hearing impaired For every station you can enter the teletext page ...

Страница 25: ...el is set too high 2 Press to open the multi audio screen DTV MENU Press to open or close the DTV Menu screen LIST Press to open the Programme List p Press to open the service banner or view detailed information from the EPG ESG screen a b c d Press to select a desired item on the screen or adjust a selected item OK Press to go to the next step or complete the setting Press to open the Programme l...

Страница 26: ...ss YELLOW Select to move the cursor back to the input area Press OK A confirmation message displays Press c d to select Yes and then press OK 1 2 3 4 5 6 Programme Setup Configure various settings for each service Press the preassigned numeric buttons to access each of the functions explained below Press OK while the cursor is on Programme Setup Sample Programme Setup screen Programme Setup S No Ser...

Страница 27: ...e icon on and off Move the selected service to the desired position using a b and then press OK Do not press END to exit the screen here if you wish to register the change Press OK to register the change EXAMPLE Moving 002 ZDF ahead of 001 ARD Default order Press a b to select the desired service in 001rs002rs003rs004 Sorted order Press a b to select the desired service in 002rs001rs003rs004 1 2 3...

Страница 28: ... the number using numeric buttons and then press OK Use c d to move between the digits After performing Carrier Scan the order stored by using the Move function will revert to the default order See page 17 for setting the PIN 3 4 5 Select Use this function to jump to the specific service in one step This is useful when there are many services displayed on screen to scroll through Press on the remot...

Страница 29: ... for the carrier See page 24 for details on using the character set screen 2 To erase the selected carrier Select the carrier and then press GREEN Erase An icon displays indicating the carrier to be erased Pressing GREEN will turn the erase icon on and off Press OK A confirmation message displays Press c d to select Yes and then press OK 3 To re scan the selected carrier Select the carrier and then...

Страница 30: ...nfirmation message appears asking you to accept the upgrade or not To download now press c d to select Yes and then press OK After the upgrade is completed the TV restarts automatically with the new software version installed To postpone the download press c d to select No and then press OK Enter the download time for more convenient time as instructed The software upgrade will not be carried out i...

Страница 31: ...card The caution screen appears 2 Insert the compatible CA card The caution screen disappears and you can view the programme CA system supported by Crypto Works Aston CAM VIAccess Nagra Vision Irdeto MR CAM NOTE To view paid TV broadcasting you need to make a contract with a service provider Please contact a service provider for details The Common Interface Module and the CA card are neither suppl...

Страница 32: ...hile recording using this function This function cannot be set for locked services or when Child Lock applies Pages 25 and 28 Up to 8 events can be preset using the Timer function If the TV is in standby mode when the preset on air time nears it will output signals for recording without image displayed on the screen If you are watching another event an alarm message displays on the screen a few se...

Страница 33: ...dures are similar to EPG operations ESG does not provide information about future events or access to Timer function 2 1 Logical channel number 2 Service name 3 Carrier name 4 Favourite type 5 Teletext available 6 Subtitle available 7 Lock status 8 Scrambled service 9 Multi audio status 10 Current event name 11 Current date and time 12 MHEG5 service available To display more detailed information p...

Страница 34: ...ntaining both MHEG5 and subtitle data the subtitle takes priority and subtitle presentation starts automatically In this case press m to start the MHEG5 presentation Subtitle English On Language Subtitle Select OK END DTV MENU Press c d to select the desired audio mode Left Right L R Stereo and then press b to move down Press a b to select the desired language available for the service and then pr...

Страница 35: ... Is non compatible signal being input Page 34 Is picture adjustment correct Page 13 Is the antenna connected properly Page 4 Is the volume too low Make sure that headphones are not connected Check if you pressed e on the remote control unit Troubleshooting Appendix IMPORTANT NOTE ON RESETTING THE PIN We suggest that you remove the following instruction from the operation manual to prevent children...

Страница 36: ... using the RS 232C terminal The input signal PC video can be selected the volume can be adjusted and various other adjustments and settings can be made enabling automatic programmed playing Attach an RS 232C cable cross type commercially available to a 9 pin D sub MINI DIN optional AN A1RS for the connections NOTE This operation system should be used by a person who is accustomed to using PCs Comm...

Страница 37: ... NORMAL PC 1 to 9 MUTE Toggle MUTE ON MUTE OFF 1 to 2 SURROUND Toggle SURROUND ON SURROUND OFF 1 to 2 SOUND SELECT ST Bilingual mono OFF 30 m 1 h 00 m 1 h 30 m 2 h 00 m 2 h 30 m 0 to 150 TEXT OFF TEXT CHANGE 0 to 1 DIRECT PAGE JUMP 100 899 100 to 899 P P P P H H I I I I I I I I I I I U U U U C C C C C F F F F F F F E E E C C O O O O S S D D D D D D D D D D D T T T T S S S S H T T T T T T T X X X P...

Страница 38: ...eset 999 ch Auto Label Auto Sort STEREO BILINGUAL NICAM A2 Receiving Channel Brightness 450 cd m2 Backlight life 60 000 hours at Backlight Standard position Viewing angles H 176 V 176 Audio amplifier 10W g 2 Speaker 100 mm g 40 mm g 2 Ø 20 mm g 2 9 pin MINI DIN male connector EXT 2 EXT 3 S VIDEO Y C input RCA pin AV input RS 232C UHF VHF 75 q Din type Analogue Digital SCART AV input monitor output ...

Страница 39: ... arise due to inappropriate waste handling 2 In other Countries outside the EU If you wish to discard this product please contact your local authorities and ask for the correct method of disposal For Switzerland Used electrical or electronic equipment can be returned free of charge to the dealer even if you don t purchase a new product Further collection facilities are listed on the homepage of ww...

Страница 40: ...38 Note Downloaded From TV Manual com Manuals ...

Страница 41: ... 1031 0 920 0 1031 0 99 9 95 9 99 9 95 9 120 9 139 5 120 9 139 5 823 0 933 0 823 0 933 0 377 0 420 5 377 0 420 5 57 0 58 0 57 0 58 0 657 0 733 0 657 0 733 0 600 0 675 0 600 0 675 0 464 0 526 0 464 0 526 0 LC 37XD1E LC 42XD1E LC 37XD1E LC 42XD1E LC 37XD1E LC 42XD1E Downloaded From TV Manual com Manuals ...

Страница 42: ...in Spanje Impreso en España TINS C723WJZZ 06P10 SP NG LC 37XD1E LC 42XD1E OPERATION MANUAL BEDIENUNGSANLEITUNG MODE D EMPLOI MANUALE DI ISTRUZIONI GEBRUIKSAANWIJZING MANUAL DE MANEJO Printed on environmentally friendly paper Auf ökologischem Papier gedruckt Imprimé sur papier écologique Stampato su carta ecologica Afgedrukt op ecologisch papier Impreso en papel ecológico C723WJZZ 1 PIN Downloaded ...

Отзывы: