background image

49

Useful adjustment settings

Description

Centres the image by moving it to the left or
right.

Centres the image by moving it up or down.

Selected item

H-Pos.

V-Pos.

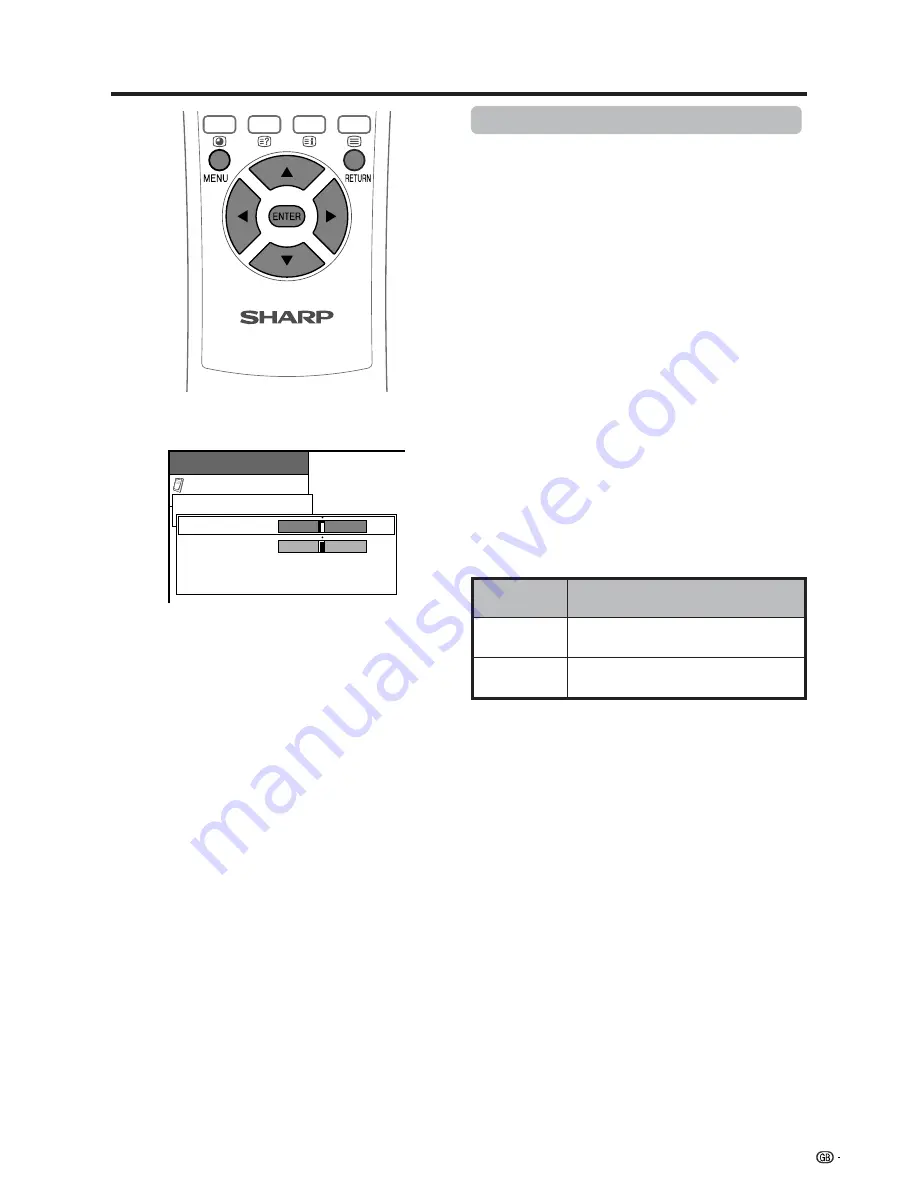
Image position (AV Input mode only)

For adjusting a picture’s horizontal and vertical
position.

1

Press 

MENU

.

2

Press 

a

/

b

  to select “Option”, and then press

ENTER

.

3

Press 

a

/

b

  to select “Position”, and then press

ENTER

.

4

Press 

a

/

b

 to select “H-Pos.” or “V-Pos.”.

5

Press 

c

/

d

  to adjust the item to your desired

position.

6

Press 

MENU

 to exit the menu.

A

• For resetting all adjustment items set to the factory preset

values,

1

 Press 

a

/

b

 to select “Reset”, and then press 

ENTER

.

2

 Press 

a

/

b

 to select “Yes”, and then press 

ENTER

.

• Return to the previous menu by pressing 

RETURN

.

Adjustments are stored separately according to input
source.

• You can easily move the image position as shown on page

50, but when the power is switched off the image will return
to the previously memorised position.

Option

MENU

Position

H-Pos.

V-Pos.

Reset

RETURN

[0]

[0]

–15

–30

+15

+30

Содержание LC-30HV2M

Страница 1: ...LCD COLOUR TELEVISION OPERATION MANUAL LC 30HV2M ENGLISH LC 30HV2M Printed on post consumer recycled paper Printed in Japan TINS A244WJZZ 02P06 JKG OPERATION MANUAL ...

Страница 2: ...ate 37 Vivid Colour 37 Sound adjustment 38 Power control 39 Power control for AV source 39 Power control for PC source 41 Using external equipment 42 Watching a DVD image 43 Connecting a DVD player 43 Displaying a DVD image 43 Watching a VCR image 44 Connecting a VCR 44 Displaying a VCR image 44 Watching broadcasts via an HDTV tuner 45 Connecting an HDTV tuner 45 Displaying broadcasts via an HDTV ...

Страница 3: ... do not spill water or liquid on the product 10 Servicing Do not attempt to service the product yourself Removing covers can expose you to high voltage and other dangerous conditions Request a qualified service person to perform servicing 11 Repair If any of the following conditions occurs unplug the AC cord from the AC outlet and request a qualified service person to perform repairs a When the AC...

Страница 4: ...r shorten the life of the product Do not place the product on a bed sofa rug or other similar surface since they can block ventilation openings This product is not designed for built in installation do not place the product in an enclosed place such as a bookcase or rack unless proper ventilation is provided or the manufacturer s instructions are followed The LCD panel used in this product is made...

Страница 5: ...ccessories Make sure the following accessories are provided with the product Remote control unit g1 AA size battery Alkaline battery g2 System cable g1 AC cord g2 Antenna cable g1 Operation manual g1 Cable clamp g1 ...

Страница 6: ... System cable WHITE Connect the plug into the terminal and secure it by tightning the thumb screws GRAY Connect the plug firmly until the hooks on both sides click GRAY WHITE Setting the system Removing the terminal cover 2 Connecting the system cable and the AC cord to the AVC System L TO PREVENT RISK OF ELECTRIC SHOCK DO NOTTOUCH UN INSULATED PARTS OF ANY CABLESWITHTHE AC CORD CONNECTED Preparat...

Страница 7: ... Display AC INPUT 110V 240V DISPLAY INPUT2 DISPLAY INPUT1 HEADPHONE How to route the system cable A cable clamp is included with the system for cable management 1 Attaching the clamp to the leg of the Display 2 Bundling the cables with the clamp ...

Страница 8: ...the battery cover Cautions regarding batteries Improper use of batteries can result in chemical leakage or explosion Be sure to follow the instructions below Do not use manganese batteries When you replace the batteries use alkaline ones Place the batteries with their terminals corresponding to the e and f indicators Do not mix batteries of different types Different types of batteries have differe...

Страница 9: ...icator See pages 39 and 41 POWER indicator MAIN POWER button OPC sensor Sleep timer indicator Display POWER button INPUT button VOLUME buttons VOLl k CHANNEL buttons CHs r Remote control sensor OPC Optical Picture Control ...

Страница 10: ...ess CLEAR lightly with the end of a ballpoint pen or other pointed object This will reset the System as shown below AV MODE resets to STANDARD TV channel resets to channel 1 Dual screen resets to normal Audio setting initialises SRS resets to OFF Image position is initialised A Pressing CLEAR will not work if the System is in standby mode indicator lights red Pressing CLEAR will not delete channel...

Страница 11: ...RCE Select an input source TV INPUT 1 INPUT 2 INPUT 3 INPUT 4 PC 15 SLEEP Set the SLEEP TIMER 16 e MUTE Mute the sound 17 0 9 TV External input mode Set the channel TELETEXT mode Set the page 18 o Digit for channel select Change the digits of the selected TV channel 19 Colour RED GREEN YELLOW BLUE TELETEXT mode Select a page 20 CHa CHb w x TV External input mode Select the channel TELETEXT mode Se...

Страница 12: ...e Simple operations for watching a TV programme Basic connection Connecting to an antenna To enjoy a clearer picture use an outdoor antenna The following is a brief explanation of the types of connections that are used for a coaxial cable Antenna cables commercially available If your outdoor antenna uses a 75 ohm coaxial cable with a standard DIN45325 plug IEC169 2 plug it into the ANTENNA INPUT t...

Страница 13: ...r of headphones 3 5 ø mm mini jack to listen to the sound AC INPUT 110V 240V DISPLAY INPUT2 DISPLAY INPUT1 HEADPHONE HEADPHONE Headphones 3 5 ø mm mini jack commercially available A When connecting headphones the sound from the display speakers is muted ...

Страница 14: ...up green and the STANDBY ON indicator on the AVC System lights up green If the STANDBY ON indicator on the AVC system and the POWER indicator on the Display still light up red press B on the remote control unit or POWER button on the Display to turn the System on A In this manual System above means the Display and AVC System The initial auto installation starts when the System powers on for the fi...

Страница 15: ...o the status before programme auto search 4 Automatic channel sorting When channel auto labelling finishes the System starts sorting the labelled channels A Cancel the setting by pressing RETURN and the TV automatically returns to the status before programme auto search Initial auto installation When the System powers on for the first time after purchase the initial auto installation is invoked Yo...

Страница 16: ...again to switch back to the currently tuned channel Using 0 9 on the remote control unit Select the channels directly by pressing buttons 0 to 9 a To select a 1 digit channel e g channel 2 Press 2 If 2 is indicated and the picture does not change press o to switch over to the 1 digit select mode and press 2 again To select a 2 digit channel e g channel 12 Press o to set the 2 digit select mode Pre...

Страница 17: ... CHa a a a a CHb b b b b b or A can also cancel the mute Changing channels by pressing 0 9 button can also cancel the mute Mute will be canceled after 8 minutes have elapsed However the system will not suddenly output a loud sound as the volume level is set to 0 automatically A See page 58 for details on the audio out function Speaker MONITOR OUTPUT Simple button operation for changing volume soun...

Страница 18: ...ns SRS Sound Retrieval System Creates more natural sound retrieving the spatial information from any stereo recording and restoring the original three dimensional sound field FOCUS Repositions a sound image from two speakers to a more optimal listening position or height without moving them FOCUS e SRS Produces both SRS and FOCUS effects OFF Outputs the normal sound OFF SRS FOCUS FOCUS SRS ...

Страница 19: ...OUND the mode switches between NICAM STEREO and MONO When receiving a bilingual signal Each time you press SOUND the mode switches among NICAM CH A NICAM CH B NICAM CH AB and MONO When receiving a monaural signal Each time you press SOUND the mode switches between NICAM MONO and MONO In the TV mode of IGR TV broadcasts When receiving a stereo signal Each time you press SOUND the mode switches betw...

Страница 20: ... can view information in wide screen mode When you receive a 4 3 or 14 9 mode signal select Normal or Panorama display Selects Full mode display setting Adjusts the horizontal vertical position of the image displayed Selects the type of audio output You can adjust volume for the main speaker or audio output Selects the colour system of an image currently input Selects the on screen display languag...

Страница 21: ... to the factory preset values MENU Description Provides a clear input image Adjusts image H Pos V Pos Clock Phase After selecting type of monitor output adjusts the volume of the main speaker or monitor output PC Input mode menu items List of PC menu items to help you with operations Page 41 First MENU MENU Power Control Picture Audio Option Page 33 Page 38 Page 51 58 MENU Power Save Power Managem...

Страница 22: ...kip step 3 3 Enter your 4 digit password with 0 9 to temporarily lift the child lock See page 59 for details on temporarily lifting the child lock 4 Press a b to select Auto Installation and then press ENTER Language menu displays 5 Press a b to select the desired language listed on the screen and then press ENTER English Español Português Auto Installation Language Searching TV Programmes Display...

Страница 23: ...ng new TV channels each network name is searched and displayed A Cancel the setting by pressing RETURN and the System automatically returns the status before programme auto search Auto sorting Automatically sorts TV channels A Cancel the setting by pressing RETURN and the System automatically returns the status before programme auto search Do not shut down the System until Auto Installation comple...

Страница 24: ...g new TV channels each network name is searched and displayed A Cancel the setting by pressing RETURN and the System automatically returns the status before programme auto search Setup MENU Programme Setup Auto Installation Child Lock RETURN Setup MENU Programme Setup Auto Search Manual Adjust RETURN Sort Auto search You can also automatically search TV channels by performing the procedure below 1...

Страница 25: ...g Automatically sorts TV channels A Cancel the setting by pressing RETURN and the System automatically returns the status before programme auto search Do not shut down the System until Sorts channels displays When Programme auto search is completed the display is returned to the menu shown left Setup MENU Programme Setup Auto Search Manual Adjust RETURN Sort ...

Страница 26: ...nu displays A Return to the previous menu by pressing RETURN Exit the menu by pressing MENU Programme Setup Manual 01 02 Search Fine Colour sys Sound sys Label Skip Lock 47 25MHz AUTO SAT 1 B G Off Off 03 04 05 06 07 08 09 11 12 10 13 14 15 16 17 18 19 21 22 20 23 24 25 26 27 28 29 31 32 30 33 34 35 36 37 38 39 41 42 40 43 44 45 46 47 48 49 NEXT Please select channel to be edited SAT 1 PRO7 KABEL ...

Страница 27: ...k 47 25MHz AUTO SAT 1 B G On Off 01 02 03 04 05 06 07 11 12 10 13 14 15 16 17 21 22 20 23 24 25 26 27 31 32 30 33 34 35 36 37 41 42 40 43 44 45 46 47 SAT 1 PRO7 KABEL Programme Setup Manual Search 57 25 MHz NEXT CANCEL STORE 01 02 03 04 05 06 11 12 10 13 14 15 16 21 22 20 23 24 25 26 31 32 30 33 34 35 36 41 42 40 43 44 45 46 SAT 1 PRO7 KABEL Programme Setup Manual Search Fine Colour sys Sound sys ...

Страница 28: ...el you want to edit and then press ENTER The selected channel information displays 2 Press a b to select Fine and then press ENTER Fine tuning bar displays 3 Press c d to adjust the frequency and then press ENTER Adjust with checking the back image as a reference Instead of the above you can also set by directly entering the frequency number of the channel with 0 9 a 179 75 MHz Press 1 7 9 7 5 ENT...

Страница 29: ...abel and then press ENTER Alphabet and numbers are listed 3 Press a b c d to select each character of the new name for the channel and then press ENTER 4 Repeat the above until the name is fully spelt out The name can be 5 characters or less A Return to the previous menu by pressing RETURN Exit the menu by pressing MENU Skipping channels Channels with Skip set to On are passed over when using CHa ...

Страница 30: ...y channel On Programme Setup Manual menu 1 Press a b c d to select the channel you want to edit and then press ENTER The selected channel information displays 2 Press a b to select Lock and then press ENTER Child lock menu displays 3 Press a b to set Lock to On and then press ENTER A Even if set to On this function never works if not setting password See page 59 for the details on password setting...

Страница 31: ...s can be sorted freely 1 Press MENU 2 Press a b to select Setup and then press ENTER 3 Press a b to select Programme Setup and then press ENTER 4 Press a b to select Sort and then press ENTER The channels are listed Black ones are set Skip to Off and blue are set Skip to On 5 Press a b c d to select the channel you want to move and then press ENTER 6 Move it to the desired position by pressing a b...

Страница 32: ...e setting 1 Press MENU 2 Press a b to select Option and then press ENTER Option menu displays 3 Press a b to select Language and then press ENTER Language menu displays 4 Press a b to select the desired language listed on the screen and then press ENTER 5 Press MENU to exit the menu A Return to the previous menu by pressing RETURN You can also select a language from option menu Select from among 4...

Страница 33: ...ed language and then press ENTER West Europe English French Skandinavian Czech German Spanish Italian East Europe Polish French Skandinavian Czech German Slovenian Croatian Italian Rumanian Greek Turkish English French Skandinavian Turkish German Spanish Italian Greek Cyrillic English Russian Estonian Czech German Spanish Ukrainian Lettish A Teletext can display only when it is sent by a network N...

Страница 34: ...ss cbutton For less contrast For less brightness For weaker red For weaker green For weaker blue Selected item Contrast Bright Red Green Blue dbutton For more contrast For more brightness For stronger red For stronger green For stronger blue Picture adjustments Adjust the picture to your preference with the following picture settings 1 Press MENU 2 Press a b to select Picture and then press ENTER ...

Страница 35: ...age 53 MENU Picture USER Advanced Film Mode On Off On Film mode Automatically detects a film based source originally encoded at 24 frames second analyses it then recreates each still film frame for high definition picture quality 1 Press MENU 2 Press a b to select Picture and then press ENTER 3 Press a b to select Advanced and then press ENTER 4 Press a b to select Film Mode and then press ENTER 5...

Страница 36: ... to the previous menu by pressing RETURN If you select STANDARD with AV MODE on the remote control unit this item will display in grey and not be selectable See page 53 Description No adjustment For high detail in black portions For low detail in black portions Selected item Off High Low Monochrome For viewing a video in monochrome 1 Press MENU 2 Press a b to select Picture and then press ENTER 3 ...

Страница 37: ... b to select I P Setting and then press ENTER 5 Press a b to select Interlace or Progressive and then press ENTER 6 Press MENU to exit the menu A Return to the previous menu by pressing RETURN If you select STANDARD with AV MODE on the remote control unit this item will display in grey and not be selectable See page 53 Selected item Interlace Progressive Description Use this setting when you canno...

Страница 38: ...the function Off Return to the previous menu by pressing RETURN If you select STANDARD with AV MODE on the remote control unit this item will display in grey and not be selectable See page 53 Vivid Colour Sets a more brilliant colour reproduction 1 Press MENU 2 Press a b to select Picture and then press ENTER 3 Press a b to select Advanced and then press ENTER 4 Press a b to select Vivid Colour an...

Страница 39: ...ect Audio and then press ENTER Audio menu displays 3 Press a b to select a specific adjustment item 4 Press c d to adjust the item to your desired position 5 Press MENU to exit the menu A When all adjustments set to factory preset values 1 Press a b to select Reset and then press ENTER 2 Press a b to select Yes and then press ENTER Return to the previous menu by pressing RETURN If you select STAND...

Страница 40: ...o conserve power consumption The screen darkens more significantly to conserve power consumption Screen brightness adjusts according to the ambient light of the room to conserve power consumption Selected item Save1 Save2 AUTO OPC MENU Power control Power Save Save1 Standard Save1 Save2 Auto MENU Power control No Signal off Enable Disable Enable No signal off When set to Enable the power will auto...

Страница 41: ...tion for 3 hours 1 Press MENU 2 Press a b to select Power control and then press ENTER 3 Press a b to select No Operation off and then press ENTER 4 Press a b to select Enable and then press ENTER 5 Press MENU to exit the menu Five minutes before the power shuts down a warning will display every minute A Disable is factory preset value Return to the previous menu by pressing RETURN ...

Страница 42: ...l inputs again the System stays off The System turns on again by pressing POWER button on the Display or B on the remote control unit See page 13 If no signal inputs for 8 seconds the power shuts down When you start using the computer and the signal inputs again the System turns on Selected item Off Mode1 Mode2 Power control for PC source Power control allows you to reduce display brightness and s...

Страница 43: ...ment always turn off the AVC System before connecting a DVD player VCR HDTV tuner computer game player camcorder or other external equipment A Please refer to the relevant operation manual DVD player computer etc carefully before making connections S VIDEO AV S VIDEO Y PB PR AV Y PB PR AV S VIDEO AV S VIDEO PC AUDIO ANALOG RGB AV S VIDEO You can connect many types of external equipment to your Sys...

Страница 44: ...can use the INPUT 1 terminal when connecting a DVD player and other audiovisual equipment Displaying a DVD image When connecting to the INPUT 1 terminals select INPUT1 and set the correct input signal type on Input Select in the menu See page 52 The setting is stored and can be selected on the INPUT SOURCE menu To watch a DVD image select INPUT1 from INPUT SOURCE menu using b on the remote control...

Страница 45: ...ecting a VCR You can use the INPUT 2 terminal when connecting a VCR and other audiovisual equipment Displaying a VCR image When connecting to the INPUT 2 terminals select INPUT2 You only need to select the input source on the INPUT SOURCE menu To watch a VCR image select INPUT2 from the INPUT SOURCE menu using b on the remote control unit or INPUT on the Display See page 52 A Each time b is presse...

Страница 46: ...roadcasts via an HDTV tuner When connecting to the INPUT 3 terminals select INPUT3 and set the correct input signal type on Input Select in the menu See page 52 Component video cable commercially available AV cable commercially available S video cable commercially available When using component video cable select COMPONENT for Input Select in the menu The setting is stored and can be selected on t...

Страница 47: ... audiovisual equipment are conveniently connected using the INPUT 4 terminals A The S video terminal has priority over the video terminals Displaying an image of the game player or camcorder When connecting to the INPUT 4 terminals select INPUT4 You only need to select the input source on the INPUT SOURCE menu To connect a game player or view a camcorder select INPUT4 from the INPUT SOURCE menu us...

Страница 48: ...Refer to page 66 for a list of computer signals compatible with the System Signal names for 15 pin mini D sub connecter A Macintosh adaptor may be required for use for some Macintosh computers Displaying an image from a computer When connecting to a computer the correct input signal type is automatically detected If the computer image does not come in clearly you may need to set the Auto Sync adju...

Страница 49: ...rs Do not connect any third party plug or speaker to the terminal Insert the speaker plug completely into the terminal Do not handle or move the display by the speakers A Perform the same steps for both left and right speakers To attach the speakers perform the above steps in reverse order Unfasten the screws used to secure the speakers in place Take hold of the speaker and slowly slide it sideway...

Страница 50: ...ct H Pos or V Pos 5 Press c d to adjust the item to your desired position 6 Press MENU to exit the menu A For resetting all adjustment items set to the factory preset values 1 Press a b to select Reset and then press ENTER 2 Press a b to select Yes and then press ENTER Return to the previous menu by pressing RETURN Adjustments are stored separately according to input source You can easily move the...

Страница 51: ...not be stored Once the System shuts down or enters standby mode the setting is erased To move the picture around the screen again you must perform the above procedure again The image position setting using the steps on page 49 can be stored Select either according to your objectives TV INPUT1 INPUT2 INPUT3 INPUT4 and PC modes can each adjust the image position setting on this page The same for WID...

Страница 52: ...Description Centres the image by moving it to the left or right Centres the image by moving it to the up or down Adjusts the clock frequency Adjusts the clock phase Selected item H Pos V Pos Clock Phase Auto Sync adjustment PC Input mode only For automatically adjusting the computer image 1 Press MENU 2 Press a b to select Option and then press ENTER 3 Press a b to select Auto Sync and then press ...

Страница 53: ...etting For setting the signal type of external equipment 1 Press MENU 2 Press a b to select Option and then press ENTER 3 Press a b to select Input Select and then press ENTER 4 Press a b to select an input source you want to set and then press ENTER 5 Press a b to select a signal type and then press ENTER If the selected signal type is incorrect an image does not display or no colour image displa...

Страница 54: ... is compatible with the image on the screen 1 Press MENU 2 Press a b to select Option and then press ENTER 3 Press a b to select Colour System and then press ENTER 4 Press a b to select a compatible video signal system of your equipment and then press ENTER 5 Press MENU to exit the menu A Factory preset value is AUTO If AUTO is selected colour systems for each channel are automatically set If an i...

Страница 55: ...norama in the 4 3 Mode menu See page 56 A If the broadcast signal contains no WSS information Auto Selection will not function even when the WSS option is enabled 4 3 Mode set to Normal 4 3 Mode set to Panorama Normal Full 14 9 Zoom 14 9 Panorama Full Cinema 16 9 Cinema 14 9 Selected item Normal Full 14 9 Zoom 14 9 Panorama Full Cinema 16 9 Cinema 14 9 Description For 4 3 standard pictures A side ...

Страница 56: ...the resolution of the signal from a computer and displays an image with the same number of pixels dot by dot Normal Full Dot by Dot Full Dot by Dot Dot by Dot W Input signal 640g480 800g600 Input signal 1024g768 1280g768 Image size varies with signal input Image fully fills the screen Image with the same number of pixels as input resolution Image with the same number of pixels as input resolution ...

Страница 57: ...mode if an image does not switch to the correct screen format When the broadcast signal contains no WSS information the function will not work even if enabled See page 54 Picture aspect ratio AV Input mode only Allows you to select the aspect ratio of a video signal for standard 4 3 or full screen images 1 Press MENU 2 Press a b to select Option and then press ENTER 3 Press a b to select 4 3 Mode ...

Страница 58: ... and bottom Selected item Mode1 Mode2 Selecting Full Mode display AV Input mode only Select the display type in Full Mode 1 Press MENU 2 Press a b to select Option and then press ENTER 3 Press a b to select Full Mode and then press ENTER 4 Press a b to select Mode1 or Mode2 and then press ENTER 5 Press MENU to exit the menu A Return to the previous menu by pressing RETURN Full Mode screen Full mod...

Страница 59: ...dio Out and then press ENTER 4 Press a b to select Fixed or Variable and then press ENTER 5 Press MENU to exit the menu A Return to the previous menu by pressing RETURN Sleep timer Allows you to set a time when the TV automatically switches to standby 1 Press SLEEP Remaining time displays when sleep timer has been set 2 Each time you press SLEEP the remaining time switches as shown below When set ...

Страница 60: ...Programme Setup Manual is set to On you must enter a password See page 29 When you select a locked channel a password prompt message pops up Press ENTER to display the password input window Clearing the password Allows you to clear your password 1 Press MENU 2 Press a b to select Setup and then press ENTER Password input menu displays 3 Enter your 4 digit password with 0 9 and then press ENTER Set...

Страница 61: ...e active z displays on the active screen which has sound output 3 Press b to select another input source on the active screen A selected image displays 4 Press c to exit dual screen A This function does not work under the following input conditions 1PC INPUT mode 2Two pictures from the same source e g INPUT 1 and INPUT 1 3Images from a high frequency signal source 4Two pictures with different vert...

Страница 62: ...one frame captured from a moving image at the moment you press d 2 Update the still image by pressing ENTER Each time you press ENTER the image on the right screen updates 3 Press d to exit still image A This function does not work under the following input conditions 1PC INPUT mode 2Images from a high frequency signal source When this function is not available No still image display available wil...

Страница 63: ... characters Teletext mode Teletext is turned on off with m on the remote control unit You can operate your system in Teletext mode directly by inputting commands with the remote control unit A You can select the Language setting at Teletext mode See page 32 Turning on and off Teletext 1 Select a TV channel or external input source providing the Teletext programme 2 Press m to display the Teletext ...

Страница 64: ...will change to the next previous page and simultaneously exit the subpage screen Displaying TOP Overview When receiving TOP Teletext you can read a TOP text overview 1 Press m to display Teletext 2 Press l to display the TOP Overview as shown left 3 Select the desired block or group by using a b c d 4 Press ENTER to display the selected block or group pages 5 Press l to exit the TOP Overview scree...

Страница 65: ... Press C The channel display will appear on the upper right of the screen 3 Press C again within the three second interval the channel display is on the screen Time information will display on the lower left of the screen for about three seconds 4 When you change the TV channel you can display the time information using steps 2 3 if that channel carries Teletext information A The time display cann...

Страница 66: ...ages 33 to 37 Is the room too bright The picture may look dark in a room that is too bright Check the colour system setting See page 27 and 53 Check the input signal setting See page 52 Is the sleep timer set See page 58 Check the power control setting See pages 39 and 40 Is connection to other components correct See pages 42 to 47 Has setup been done correctly after connection See page 52 Is the ...

Страница 67: ... 60 Hz Computer compatibility chart Apple and Macintosh are registered trademarks of Apple Computer Inc DDC is a registered trademark of Video Electronics Standards Association Power Management is a registered trademark of Sun Microsystems Inc VGA and XGA are registered trademarks of International Business Machines Co Inc Remarks Macintosh 13 67 Hz Macintosh 16 Macintosh 19 Resolution Frequency ...

Страница 68: ...ate Parity bit Data length Stop bit Flow control 9 600 bps 8 bits None 1 bit None Appendix Command format Communication procedure Send the control commands from the computer via the RS 232C connector The display operates according to the received command and sends a response message to the computer Do not send multiple commands at the same time Wait until the computer receives the OK response befo...

Страница 69: ...NPUT SELECTION B AV MODE SELECTION VOLUME POSITION O T T T A P N N N N N N V V V V V V O P P P P L H W G V V V C P P P P P P M M M M M M L O O O O C S R D D D D D 1 1 1 3 3 3 D D D D D D M S S S S K E 0 x 0 x 0 1 2 0 1 2 0 1 2 3 4 5 _ _ _ _ _ _ _ _ _ _ _ _ _ _ _ _ _ _ _ _ _ _ _ _ _ _ _ _ _ _ _ _ _ _ _ _ _ _ _ _ _ _ _ _ _ _ _ _ _ _ _ _ _ _ _ CONTROL ITEM COMMAND PARAMETER CONTROL CONTENTS W W W W W...

Страница 70: ...ntrol unit m1 System cable m1 AC cord m2 AA size battery Alkaline battery m2 Cable clamp m1 Antenna Cable m1 TV standard CCIR Receiving Channel Rear INPUT 1 Front As a part of policy of continuous improvement SHARP reserves the right to make design and specification changes for product improvement without prior notice The performance specification figures indicated are nominal values of production...

Страница 71: ...70 Dimensional drawings DISPLAY OUTPUT 2 DISPLAY OUTPUT 1 AC INPUT 110V 240V 497 304 5 101 598 354 1002 4 766 4 545 84 5 304 5 Unit mm Display ...

Страница 72: ...71 Dimensional drawings 430 326 70 47 5 235 330 10 8 23 Unit mm AVC System ...

Страница 73: ...llowing steps 1 Turn on the power of the Display and the AVC System 2 Press MENU Make sure the menu screen displays 3 Press b to select Setup 4 Press ENTER A If the password setting screen displays you need to enter your password If you forget your password refer to HOW TO SET THE FACTORY PRESETS above 5 Press a b to select Auto Installation 6 Press ENTER Auto Installation completed displays After...

Страница 74: ...SHARP CORPORATION ...

Отзывы: