background image

English

   - 9 -

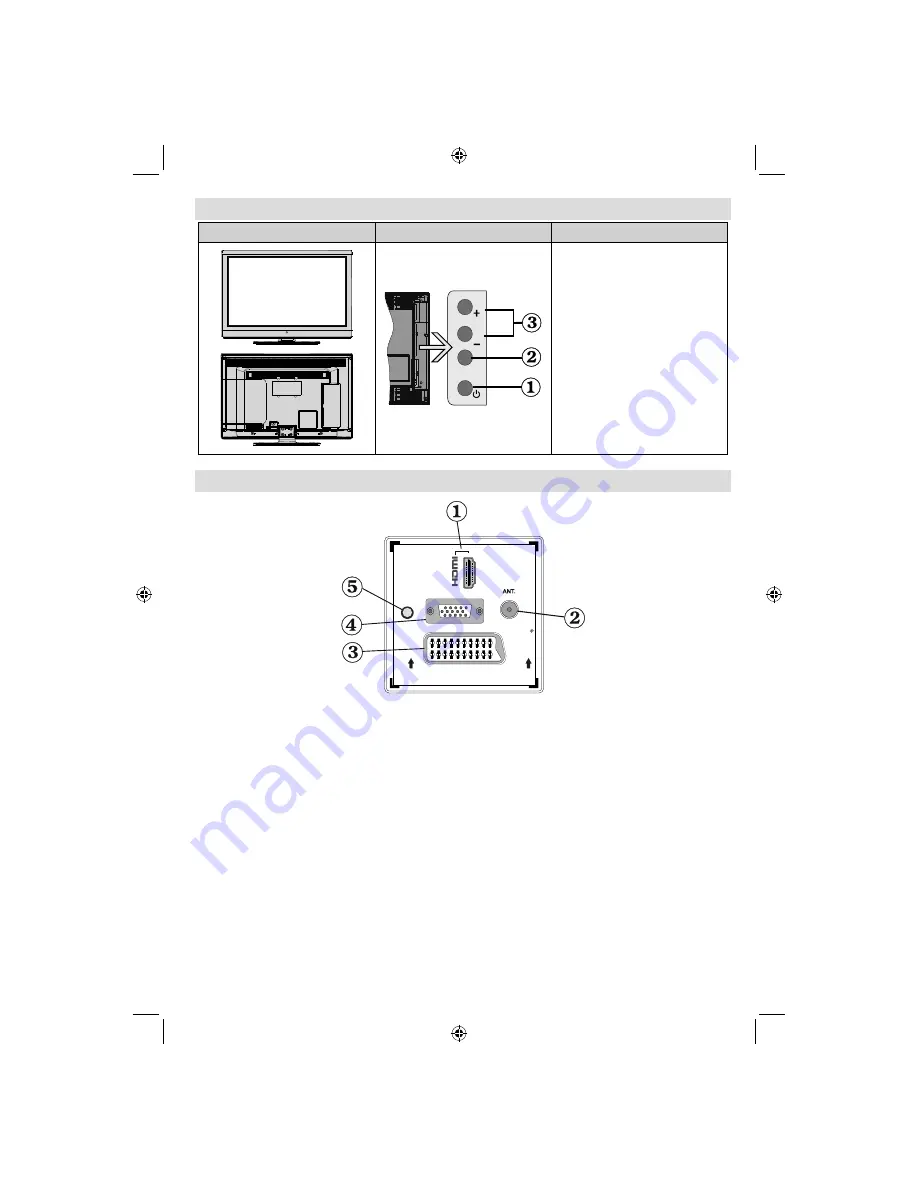
LCD TV and Operating Buttons

FRONT and REAR VIEW

Control buttons VIEW

Control Buttons

P\V-AV

1.

 Standby Off/On button

2. 

TV/AV button

3. 

Programme Up/Down buttons-

Volume Up/Down buttons

Note

:You can use +/- buttons 

to change volume. If you want 
to change channels, press P/V/
AV button once and then use 
+/- buttons. If you hold the P/V/
AV button about a few seconds,  
source OSD will be displayed. 
Main menu OSD cannot be 
displayed via control buttons.

Viewing the Connections - Back Connectors

SPDIF

SCART

VGA

Coax.OUT

1

HDMI 1: HDMI Input

1. 

HDMI Inputs

 are for connecting a device that has an 

HDMI

 socket. Your LCD TV is capable of 

displaying High De

fi

 nition pictures from devices such as a High De

fi

 nition Satellite Receiver or DVD 

Player. These devices must be connected via the HDMI sockets or Component Socket. These sockets 
can accept either 720p or 1080i signals. No sound connection is needed for an HDMI to HDMI 
connection.

RF Input

2. 

 connects to an aerial antenna system.

Note that if you use a decoder or a media recorder, you should connect the aerial cable through the device 
to the television with an appropriate antenna cable, as shown in the illustration in the following pages.

SCART 

3. 

 input or output for external devices. Connect the SCART cable between SCART socket on TV and 

SCART socket on your external device (such as a decoder, a VCR or a DVD player). 

Note: 

If an external device is connected via the SCART socket, the TV will automatically switch to AV mode.


Note

: S-VHS signal is supported via the scart socket.

PC Input

4. 

 is for connecting a personal computer to the TV set. 

Connect the PC cable between the 

PC INPUT

 on the TV and the PC output on your PC. 

SPDIF Coaxial Out

5. 

 outputs digital audio signals of the currently watched source. 

Use an 

SPDIF coaxial cable

 to trasfer audio signals to a device that has SPDIF input

00_MB60_[GB]_(01_TV)_1910UK_IDTV_PVR_BRONZE17_24942LED_YPBPR_ROCKER_10072636_50186854.indd   9

00_MB60_[GB]_(01_TV)_1910UK_IDTV_PVR_BRONZE17_24942LED_YPBPR_ROCKER_10072636_50186854.indd   9

17.08.2011   14:10:09

17.08.2011   14:10:09

Содержание LC-24DV510K

Страница 1: ...LC 24DV510K LCD COLOUR TELEVISION OPERATION MANUAL ENGLISH 50186854 SHARP ELECTRONICS Europe GmbH Sonninstraße 3 D 20097 Hamburg SHARP CORPORATION http www sharp eu com ...

Страница 2: ...unctions 19 Managing Stations Sorting Channel List 20 On Screen Information 20 Media Playback Using Media Browser 20 Viewing Videos via USB 20 Viewing Photos via USB 21 Slideshow Options 21 Playing Music via USB 21 Recordings Library 22 Media Browser Settings 22 Timeshift Recording 22 Instant Recording 23 Watching Recorded Programmes 23 Changing Image Size Picture Formats 23 Configuring Picture Se...

Страница 3: ... IMPORTANT The wires in the mains lead are coloured in accordance with the following code Blue Neutral Brown Live As the colours of the wires in the mains lead of this product may not correspond with the coloured markings identifying the terminals in your plug proceed as follows The wire which is coloured blue must be connected to the plug terminal which is marked N or coloured black The wire whic...

Страница 4: ...f the device even when the usage of electronic devices is familiar to you Please take notice of the chapter SAFETY PRECAUTIONS Carefully keep the handbook as future reference When selling the device or giving it away provide these direction for use Thank you for choosing this product This manual will guide you for the proper operation of your TV Before operating the TV please read this manual thor...

Страница 5: ...h as a bookcase or rack unless proper ventilation is provided or the manufacturer s instructions are followed The LCD panel used in this product is made of glass Therefore it can break when the product is dropped or impact applied If the LCD panel is broken be careful not to be injured by broken glass Heat sources Keep the product away from heat sources such as radiators heaters stoves and other h...

Страница 6: ...t such as sunshine fire or the like Lightning In case of storm and lightning or when going on holiday disconnect the power cord from the wall outlet Replacement Parts When replacement parts are required make sure that the service technician has used replacement parts which are specified by the manufacturer or have the same specifications as the original one Unauthorized substitutions may result in...

Страница 7: ...In order to separate the device completely from mains the mains plug has to be pulled from the mains socket Because of that the device should be set up in a way that an unobstructed access to mains socket is guaranteed so that in case of emergency the mains plug can be pulled immediately To exclude the danger of fire the power cord should principally be separated from the mains socket prior to a l...

Страница 8: ... be decreased to optimum level Note that some picture settings will be unavailable to be changed when the TV is in Power Save Mode When the TV is not used please switch off at the rear rocker switch to further reduce power consumption Disconnect the TV from the mains socket when it will not be used for prolonged periods When the TV is left in stand by it consumes a small amount of power switching ...

Страница 9: ...r Loop Shuffle in Media Browser Picture mode selection Changes picture mode 21 in Media Browser video mode No function 22 Teletext Mix in TXT mode 23 Subtitle on off in DVB channels 24 Previous programme 25 AV Source selection 26 Menu on off 27 Okay Confirm Hold in TXT mode Edit 28 Channel List Exit Return Index page in TXT mode 29 No function 30 Info Reveal in TXT mode 31 Volume Up Down 32 No fun...

Страница 10: ...nput 2 connects to an aerial antenna system Note that if you use a decoder or a media recorder you should connect the aerial cable through the device to the television with an appropriate antenna cable as shown in the illustration in the following pages SCART 3 input or output for external devices Connect the SCART cable between SCART socket on TV and SCART socket on your external device such as a...

Страница 11: ... the YELLOW input located on the plural side of the supplied AV connection cable Colours of the connected jacks should match To enable audio connection you must use RED and WHITE inputs of the side AV connection cable Afterwards insert your device s audio cable s connectors into the RED and WHITE jack of the supplied side AV connection cable Colours of the connected jacks should match Note You sho...

Страница 12: ...physical damage to the USB player and especially the USB device itself Do not pull out USB module while playing or recording a file Programme Recording To record a programme you should first connect a USB disk to your TV while the TV is switched off You should then switch on the TV to enable recording feature IMPORTANT When using a new USB hard disk drive it is recommended that you first format th...

Страница 13: ...hods Do not plug out the USB HDD during the recording This may harm the connected USB HDD Only two partitions on a HDD unit can be supported Some stream packets may not be recorded because of signal problems so sometimes video may freezes during playback Record Play Pause Display for PlayListDialog keys could not be used when teletext is ON If a recording starts from timer when teletext is ON tele...

Страница 14: ...cover located on the back of the handset by gently pulling backwards from the indicated part Insert two AAA R3 or equivalent type batteries inside Observe the correct polarity when inserting batteries and replace the battery cover Note Remove the battery from remote control handset when it is not to be used for a long period Otherwise it can be damaged due to any leakage of batteries Remote range ...

Страница 15: ...utton to decrease the volume Avolume level scale slider will be displayed on the screen Programme Selection Previous or Next Programme Press CH button to select the previous programme Press CH button to select the next programme Programme Selection Direct Access Press numeric buttons on the remote control to select programmes between 0 and 9 The TV will switch to the selected programme To select p...

Страница 16: ...sing this feature you can search the programme guide database in accordance with the genre Info available in the programme guide will be searched and results matching your criteria will be listed SWAP Now Shows the current programme Recording via EPG Screen IMPORTANT To record a programme you should first connect a USB disk to your TV while the TV is switched off You should then switch on the TV t...

Страница 17: ...d Teletext Language Press button after setting Teletext Language option Scan Encrypted will be then highlighted You can set Scan Encrypted as Yes if you want to scan coded stations Afterwards select the desired Teletext Language Press OK button on the remote control to continue and the following message will be displayed on the screen To select the Yes or No option highlight the item by using or b...

Страница 18: ...using and OK buttons Automatic Channel Scan Retune Menu Operation Digital Searches and stores aerial DVB stations Analogue Searches and stores analogue stations Full Searches and stores both analogue and aerial DVB stations Whenever you select an automatic search type and press OK button a confirmation screen will appear on the screen To start installation process select Yes to cancel select No by...

Страница 19: ...tallation menu by using or and OK buttons Analogue fine tune screen will be displayed Analogue Fine Tune feature will not be available if there are no analogue channels digital channels and external sources stored Press OK button to proceed Use or button to set Fine Tune When finished press OK button again Clear Service List This setting is visible only when the Country option is set to Denmark Sw...

Страница 20: ...eric buttons 0 9 replaces the highlighted character with the characters printed above the button one by one as the button is pressed When finished press OK button to save Press MENU to cancel Locking a Channel You can press GREEN button to tag untag all channels YELLOW button to tag untag a single channel Select the channel that you want to lock and select Lock option Press OK button to continue Y...

Страница 21: ... press either MENU button on the remote control and then select Media Browser by pressing or button Press OK button to continue Media Browser menu options will be displayed Also when you plug USB devices media browser screen will be displayed automatically You can play music picture and video files from the connected USB memory stick Use or button to select Videos Photos Music Recording Library or...

Страница 22: ...uffle GREEN button Press once to disable Loop Press again to disable both Loop and Shuffle Press once more to enable only Shuffle Press again to enable all You can follow the disabled functions with the change of the icons Previous Next Left Right buttons Jumps to previous or next file on slideshow Rotate Up Down buttons Rotates the image using up down buttons RETURN Back to file list INFO Display...

Страница 23: ...item and use or button to set View Style Sets default browsing mode Music FF FR Speed Sets forwarding advancing speed Slide Show Interval Sets slide show interval time Show Subtitle Sets subtitle enabling preference Subtitle Position Sets subtitle position as up or down Subtitle Font Size Sets subtitle font size max 54pt Timeshift Recording IMPORTANT To record a programme you should first connect ...

Страница 24: ... first connect a USB disk to your TV while the TV is switched off You should then switch on the TV to enable recording feature Otherwise recording feature will not be available Select a recorded item from the list if previously recorded by using button Press OK button to view Play Options Select an option by using or OK buttons Available playback options Play from start Plays the recording from th...

Страница 25: ...creen up or down by pressing buttons while picture zoom is selected as panaromic 14 9 Zoom Cinema or Subtitle 14 9 This zooms up the wide picture 14 9 aspect ratio to the upper and lower limits of the screen 14 9 Zoom This option zooms to the 14 9 picture 4 3 Use to view a normal picture 4 3 aspect ratio as this is its original size Panoramic This stretches the left and right sides of a normal pic...

Страница 26: ...Zoom Sets the picture size to Auto 16 9 Subtitle 14 9 14 9 Zoom 4 3 Panoramic or Cinema Reset Resets the picture settings to factory default settings While in VGA PC mode some items in Picture menu will be unavailable Instead VGA mode settings will be added to the Picture Settings while in PC mode PC Picture Settings For adjusting PC picture items do the following Press or button to select Picture...

Страница 27: ...es For instance volume level of advertisements tend to be louder than programmes Dynamic Bass Dynamic Bass is used to increase bass effect of the TV set Digital Out Sets digital out audio type Configuring Your TV s Settings Detailed settings can be configured to suit your personal preferences Press MENU button and select Settings ikon by using or button Press OK button to view Settings menu Operat...

Страница 28: ...o view Settings menu Use or button to highlight Conditional Access and press OK to view menu items Configuring Language Preferences You can operate the TV s language settings using this menu Press MENU button and select the fifth icon by using or button Press OK button to view Settings menu Use or button to highlight Language and press OK to continue Use or button to set an item Settings are store...

Страница 29: ...You can disable access to the installation menu or the whole menu system Maturity Lock optional When set this option gets the maturity information from the broadcast and if this maturity level is disabled disables access to the broadcast Child Lock optional When Child Lock is set the TV can only be controlled by the remote control In this case the control panel buttons will not work except for the...

Страница 30: ...ttings menu to configure recording settings The following menu is displayed for recording configuration The following options are available for adjustments Start Early You set recording timer s starting time to start earlier by using this setting Available only for EU country options End Late You set recording timer s end time to end later by using this settings Available only for EU country optio...

Страница 31: ...2 Date Time on the top of the menu list will then change according to the selected Time Zone Changes are automatically stored Press MENU to exit Configuring Source Settings You can enables or disable selected source options The TV will not switch to the disabled source options when SOURCE button is pressed Select Sources in the Settings menu and press OK button Press or buttons to select a source ...

Страница 32: ...t Standby Search as On If the Standby Search is set to On when the TV is in standby mode available broadcasts will be searched If the TV locates any new or missing broadcasts a menu screen will be displayed asking you whether or not to execute these changes Other Features Displaying TV Information Programme Number Programme Name Sound Indicator time teletext channel type and resolution information...

Страница 33: ... Sound You can not hear any sound Did you perhaps interrupt the sound pressing the button Sound is coming from only one of the speakers Is the balance set to one extreme See Sound Menu Remote Control Your TV no longer responds to the remote control Perhaps the batteries are exhausted If so you can still use the local buttons on the TV Input Sources If you cannot select an input source it is possib...

Страница 34: ...s Available EXT SCART PAL 50 60 O NTSC 60 O RGB 50 O RGB 60 O Side AV PAL 50 60 O NTSC 60 O YPbPr 480I 60Hz O 480P 60Hz O 576I 50Hz O 576P 50Hz O 720P 50Hz O 720P 60Hz O 1080I 50Hz O 1080I 60Hz O 1080P 50Hz O 1080P 60Hz O HDMI1 480I 60Hz O 480P 60Hz O 576I 50Hz O 576P 50Hz O 720P 50Hz O 720P 60Hz O 1080I 50Hz O 1080I 60Hz O 1080P 50Hz O 1080P 60Hz O 1080P 24 HZ O X Not Available O Available In som...

Страница 35: ...or USB Mode Supported Players Player Stream Video Decoder MSVD Audio Decoder MSAD Audio MP3 None MP3 Audio WAV AIFF None LPCM MPEG1 Program Stream MPEG 1 MPEG1 MP3 AC 3 and PCM MPEG2 Program Stream MPEG 2 MPEG2 MP3 AC 3 and PCM AVI Xvid XVID MPEG2 MP3 AC 3 and PCM 00_MB60_ GB _ 01_TV _1910UK_IDTV_PVR_BRONZE17_24942LED_YPBPR_ROCKER_10072636_50186854 indd 34 00_MB60_ GB _ 01_TV _1910UK_IDTV_PVR_BRON...

Страница 36: ...on Reboot is the last step in software upgrade operation if download of new software is finished successfully During reboot TV makes final initializations In reboot sequence panel power is closed and front led indicates the activity with blinking Around 5 minutes later TV restarts with new software activated If your TV fails to restart in 10 minutes unplug power for 10 minutes and re plug again TV...

Страница 37: ... 25 DxLxH Without foot 35 5 x 580 4 x 379 6 Weight Kg 5 65 Digital Reception MHEG 5 ENGINE compliant with ISO IEC 13522 5 UK engine Profile 1 for UK Object carousel support compliant with ISO IEC 135818 6 and UK DTT profile Frequency range 474 850 MHz for UK models 170 862 MHz for EU models Transmission standard DVB T MPEG 2 Demodulation COFDM with 2K 8K FFT mode FEC all DVB modes Video MP ML PAL ...

Страница 38: ...gs 00_MB60_ GB _ 01_TV _1910UK_IDTV_PVR_BRONZE17_24942LED_YPBPR_ROCKER_10072636_50186854 indd 37 00_MB60_ GB _ 01_TV _1910UK_IDTV_PVR_BRONZE17_24942LED_YPBPR_ROCKER_10072636_50186854 indd 37 17 08 2011 14 10 38 17 08 2011 14 10 38 ...

Страница 39: ...al 00_MB60_ GB _ 01_TV _1910UK_IDTV_PVR_BRONZE17_24942LED_YPBPR_ROCKER_10072636_50186854 indd 38 00_MB60_ GB _ 01_TV _1910UK_IDTV_PVR_BRONZE17_24942LED_YPBPR_ROCKER_10072636_50186854 indd 38 17 08 2011 14 10 44 17 08 2011 14 10 44 ...

Страница 40: ...rew the 4 screws that attach the foot assembly to the panel and remove the foot assembly from the panel 00_MB60_ GB _ 01_TV _1910UK_IDTV_PVR_BRONZE17_24942LED_YPBPR_ROCKER_10072636_50186854 indd 39 00_MB60_ GB _ 01_TV _1910UK_IDTV_PVR_BRONZE17_24942LED_YPBPR_ROCKER_10072636_50186854 indd 39 17 08 2011 14 10 45 17 08 2011 14 10 45 ...

Страница 41: ...ct LC 32LE510E LC 32LE530E Ø4 30 8 200 x 100 W x H To the wall M4 18 4 To the product LC 40LE510E LC 40LE530E Ø4 30 8 400 x 400 W x H To the wall M8 30 4 To the product LC 32SH130E LC 32SH130K LC 32SH340E Ø4 30 8 200 x 100 W x H To the wall M6 30 4 To the product LC 40SH340E LC 40SH340K Ø4 30 8 400 x 400 W x H To the wall M6 30 4 To the product 00_MB60_ GB _ 01_TV _1910UK_IDTV_PVR_BRONZE17_24942LE...

Страница 42: ... output optional Multi Audio up to 8 support According to disc content Multi Subtitle up to 32 support According to disc content 8 level parental control Fast forward and rewind in 5 different speeds 2x 4x 8x 16x 32x Slow motion playback in 4 different speeds 1 2x 1 4x 1 8x 1 16x forward Frame by frame forward playback Search Mode Repeat Coaxial audio output optional Copied disks may be incompatib...

Страница 43: ...n a car parked in direct sunlight as the temperature can rise quickly and damage the disc After playing store the disc in its case On cleaning Before playing clean the disc with a cleaning cloth Wipe the disc from the center out Do not use solvents such as benzine thinner commercially available cleaners or anti static spray intended for vinyl LPs Licence Notification This product incorporates copy...

Страница 44: ...guage selection Set language 2 Numeric buttons 3 Navigation buttons Up Down Left Right 4 Clear 5 Display time DVD menu 6 Mute 7 Pause 8 Rapid reverse 9 Play 10 Zoom 11 Repeat 12 Subtitle 13 AV Source selection 14 Menu 15 OK 16 Return 17 Search Mode 18 Info 19 Volume Up Down 20 Skip Previous 21 Skip Next 22 Rapid advance 23 Stop 24 Title 25 Root 26 Note Buttons not indicated with a number are not f...

Страница 45: ...OK SELECT Enter View Play REPEAT Displays repeat options RETURN Returns back to the previous menu if available ROOT Goes back to the root folder if available SEARCH MODE Direct selection of scenes or time Selects the desired file Selects the desired file SUBTITLE Subtitle on off Press repeatedly to switch between subtitle options X X TITLE Displays disc menu if available Displays disc menu if avai...

Страница 46: ...the subtitle language will automatically be set to the disc s priority language Usually a circulation will happen while switching 8 to another language that is you can cancel the subtitle by pressing this button a number of times until Subtitle Off appears on the screen When the power is turned on or the disc is 9 removed the language heard is the one selected at the initial settings If this langu...

Страница 47: ...t PCM from SPDIF Output in DVD menu and play DVD with Dolby audio you can get audio output with two channels via the speakers and the SPDIF Out If you select RAW from SPDIF Output in DVD menu and play DVD with Dolby audio speakers will be muted and you can get 5 1 Dolby audio via the SPDIF Out Troubleshooting The picture quality is poor DVD Make sure the DVD disc surface is not damaged Scratch fin...

Страница 48: ... whole movie can be recorded DVD has a structure consisting of two 0 6 mm thin discs which are adhered to each other Since the thinner the disc the higher the density at which the information can be recorded a DVD disc has a greater capacity than a single 1 2 mm thick disc Since the two thin discs are adhered to each other there is the potential to achieve double sided play sometime in the future ...

Страница 49: ...d au dio fu nctio n s ca n b e easily selected throu gh th e on scr een m enu A n LP is record ed as an an alo g sig n al w ith m ore d isto rtio n C D is re cord e d as a D ig ita l S ig n al w ith better au dio q u ality less d istortio n and less d eterio ration o f au d io q u ality ove r tim e 12 cm 12 cm Specifications Types of Discs Supported DVD SS SL 4 7 DVD 5 SS DL 4 7 DVD 9 DS SL 4 7 DV...

Отзывы: