background image

4  

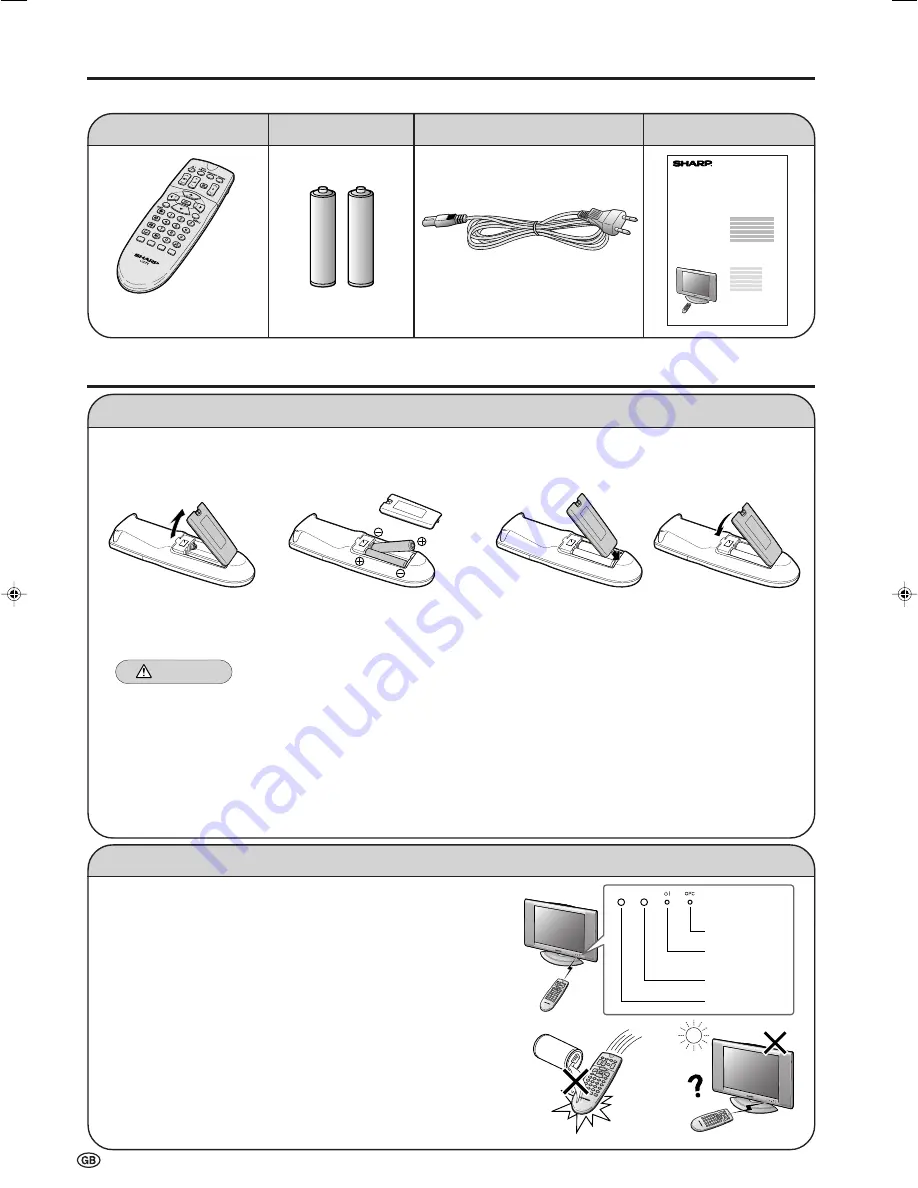
Make sure the following accessories are provided with the LCD TV set.

Supplied Accessories

Wireless remote control

Operation manual

“AA” size batteries (

×

2)

AC cord

* Product shape may vary

from country to country.

pages 4 and 9

page 4

page 5

Installing Batteries in the Remote Control

Before using the LCD TV set for the first time, install the two “AA” size batteries (supplied) in the remote control. When the
batteries become depleted and the remote control fails to operate, replace the batteries with new “AA” size batteries.

1

Open the battery cover.

2

Insert two “AA” size batteries.

3

Close the battery cover.

• Place batteries with their

terminals corresponding
to the (+) and (–)
indications in the battery
compartment.

Caution!

Precautions regarding batteries

Improper use of batteries can result in a leakage of chemicals and/or explosion. Be sure to follow the instructions below.
• Place batteries with their terminals corresponding to the (+) and (–) indications.
• Different types of batteries have different characteristics. Do not mix batteries of different types.
• Do not mix old and new batteries. Mixing old and new batteries can shorten the life of new batteries and/or cause old

batteries to leak chemicals.

• Remove batteries as soon as they are depleted. Chemicals that leak from batteries can cause a rash. If chemical

leakage is found, wipe it off with a cloth.

• The batteries supplied with the LCD TV set may have a shorter operating time due to storage conditions.
• If the remote control is not to be used for an extended period of time, remove the batteries from the remote control.

• Align the tab on the battery cover (

1

) and place

it while pressing the tab (

2

) to close it.

Using the Remote Control

Use the remote control by pointing it towards the remote sensor
window of the main unit. Objects between the remote control and
sensor window may prevent proper operation.

Cautions regarding use of the remote control

• Do not apply shock to the remote control. In addition, do not

expose the remote control to liquids, and do not place it in an area
with high humidity.

• Do not install or place the remote control under direct sunlight. The

heat may cause deformation of the unit.

• The remote control may not work properly if the remote sensor

window is under direct sunlight or strong lighting. In such a case,
change the angle of the lighting or main unit, or operate the remote
control closer to the remote sensor window.

• Detach the cover

while pressing the
(

"

) part.

STANDBY/ON 
indicator

OPC indicator

Remote sensor

OPC sensor

2

Preparation

1

LC-15SH2E
LC-20SH2E

LC-15_20SH2E_E_P01-09.p65

05.1.29, 10:59 AM

4

Содержание LC-15SH2E

Страница 1: ...IÓN EN COLOR LCD LCD KLEURENTELEVISIE LC 15SH2E LC 20SH2E OPERATION MANUAL BEDIENUNGSANLEITUNG MODE D EMPLOI MANUALE DI ISTRUZIONI MANUAL DE MANEJO GEBRUIKSAANWIJZING ENGLISH DEUTSCH FRANÇAIS NEDERLANDS ITALIANO OPERATION MANUAL BEDIENUNGSANLEITUNG MODE D EMPLOI MANUALE DI ISTRUZIONI MANUAL DE MANEJO GEBRUIKSAANWIJZING ESPAÑOL B708WJN1 1 ...

Страница 2: ...a serious electric shock may occur To fit an appropriate plug to the mains lead follow the instructions below IMPORTANT The wires in the mains lead are coloured in accordance with the following code Blue Neutral Brown Live As the colours of the wires in the mains lead of this product may not correspond with the coloured markings identifying the terminals in your plug proceed as follows The wire wh...

Страница 3: ...EXT1 EXT2 TV 10 Sound Volume 11 Changing Channels 11 Selecting Menu Items 12 Useful Features 14 Picture Adjustments 14 Sound Adjustments 14 Sound Mode Settings 15 Programmes 16 Using the Programme Table 18 Rotate 18 EXT Connections 19 Clock Setup 20 Language 20 Teletext Language 20 Backlight 21 Sleep Timer 21 Auto Power Off 21 On Screen Display 22 Child Lock 22 NICAM Broadcast Selection 24 A2 Ster...

Страница 4: ...t internal parts For the same reason do not spill water or liquid on the product 10 Servicing Do not attempt to service the product yourself Removing covers can expose you to high voltage and other dangerous conditions Request a qualified service person to perform servicing 11 Repair If any of the following conditions occurs unplug the AC cord from the AC outlet and request a qualified service per...

Страница 5: ...entilation openings This product is not designed for built in installation do not place the product in an enclosed place such as a bookcase or rack unless proper ventilation is provided or the manufacturer s instructions are followed The LCD panel used in this product is made of glass Therefore it can break when the product is dropped or applied with impact Be careful not to be injured by broken g...

Страница 6: ...tteries to leak chemicals Remove batteries as soon as they are depleted Chemicals that leak from batteries can cause a rash If chemical leakage is found wipe it off with a cloth The batteries supplied with the LCD TV set may have a shorter operating time due to storage conditions If the remote control is not to be used for an extended period of time remove the batteries from the remote control Ali...

Страница 7: ...g i on the remote control NOTE Headphones are not included in the supplied accessories No sound is heard from the main unit speakers when a headphone mini plug is connected into the headphone jack Do not set the volume at a high level Hearing experts advise against extended listening at high volume levels Headphones MAIN POWER AC INPUT terminal 220 240V Connect to the AC input terminal of the LCD ...

Страница 8: ...S u o m i S v e n s k a P o l s k i N e d e r l a n d s Press to set the time and press OK The time you set is automatically updated via Teletext time information SELECT O K ENTER M BACK E EXIT 0 0 0 0 0 0 Preparation Continued Control panel of the main unit MAIN POWER 1 2 3 4 5 6 Press to select the desired item and press to make the setting C o u n t r y U K C o l o u r s y s t e m P A L S o u n...

Страница 9: ...e 21 STANDBY ON indicator STANDBY ON indicator lights up green when the power is on and red when in the standby mode the indicator will not light when the main power is off MAIN POWER Upper control panel Input MENU P Channel i Volume Speaker The examples used throughout this manual are based on the LC 20SH2E model Speaker Tilt the display by holding the upper part while securely holding down the s...

Страница 10: ...Kensington Security Standard slot Rear View Antenna terminal EXT1 Headphone jack RGB 21 pin Euro SCART AUDIO OUT AUDIO OUT EXT2 L R VIDEO AUDIO L AUDIO R S VIDEO How to Fix the Cables Pull the cables connected to each terminal Insert it to the stand hole and fix the cables Stand hole ...

Страница 11: ...age P 25 Blue Status Display Turns on the status display when the menu is not displayed P 22 25 Yellow P 25 Volume P 11 Input Switches the input source between EXT1 EXT2 and TV modes P 10 OK Programme Table P 6 18 END Returns to normal screen P 6 Right Left Selection P 6 Teletext Displays the Teletext mode screen P 25 Reveal Displays hidden information such as solutions to riddles and puzzles P 26...

Страница 12: ...dicator MAIN POWER Basic Operation Switching the Input Mode EXT1 EXT2 TV Turn on the power of the connected devices Press Input to select the applicable input source The screen changes in order of EXT1 EXT2 and TV mode each time Input is pressed NOTE EXT1 Select this mode when viewing the signals from the video equipment connected to the EXT1 21 pin Euro SCART RGB terminal EXT2 Select this mode wh...

Страница 13: ... 3 2 1 NOTE Channel 0 is reserved for RF output of VCR Channels not set with Automatic search or via Setup are set to be skipped and therefore cannot be displayed using P Channel 1 Using A A A A A Flashback Press A A A A A to switch the currently tuned channel to the previously tuned channel Press A A A A A again to switch back to the currently tuned channel Sound Volume To adjust the volume Press...

Страница 14: ... Selecting Menu Items The menus can be used to adjust the various settings of your LCD TV set Select the desired menu item by following the steps below See the next page for each Menu screen NOTE Settings most recently adjusted will be saved in memory Using the remote control Press MENU to display the Menu screen Press to select the desired menu item The cursor moves left or right The cursor indic...

Страница 15: ...age Backlight 21 Sleep timer 21 Auto power off 21 On screen disp 22 Child lock 22 23 Sound Setup Features 0 0 0 0 M e n u S o u n d P i c t u r e S o u n d S e t u p F e a t u r e s S o u n d v i a T V T r e b l e B a s s B a l a n c e L R L o u d s p s o u n d A V a u d i o s i g S o u n d w i d e R e s e t M e n u S e t u p P i c t u r e S o u n d S e t u p F e a t u r e s P r o g r a m m e s F ...

Страница 16: ...eenish For more sharpness button For less contrast For less brightness For less colour intensity Skin tones become purplish For less sharpness 4 5 Sound Adjustments Adjust the sound quality and volume to suit your preference See the table below for the adjustment items Press MENU to display the Menu screen The Sound Menu screen can be displayed directly by pressing the Green button Press to select...

Страница 17: ... spread of the sound Off NOTE For the Sound via setting When setting Sound via to Hi fi in the Sound Menu screen the sound from the built in speakers will be turned off To exit this mode switch Sound via from Hi fi to TV in the Sound Menu screen Pressing i will display the volume indicator shown below You can adjust the volume by pressing i Hi fi Volume 20 For the Loudsp sound setting The sound ou...

Страница 18: ...rch and press OK A u t o m a t i c s e a r c h M a n u a l a d j u s t m e n t S o r t E r a s e p r o g r a m m e r a n g e E n t e r C h a n g e n a m e Press to select the desired item and press to make the setting C o u n t r y U K C o l o u r s y s t e m P A L S o u n d s y s t e m I S t o r e p r o g f r o m S t a r t s e a r c h NOTE You can change Colour system and Sound system only when O...

Страница 19: ...rammes can be changed freely Perform steps 1 to 3 in 1 Automatic Search to display the Programmes screen Press to select Sort and press OK A u t o m a t i c s e a r c h M a n u a l a d j u s t m e n t S o r t E r a s e p r o g r a m m e r a n g e E n t e r C h a n g e n a m e Press to select the desired programme and press OK to sort When OK is pressed the Move mode is activated Press to move the ...

Страница 20: ... for special uses Normal Normal image orientation Rotate Upside down Rotate Normal Rotate Mirror Rotate Rotate 2 3 5 4 Using the Programme Table The Programme table shows a list of all receivable pro grammes They are located in channels 0 to 199 To select the desired programme Press OK to display the Programme table Press to select the desired programme To display the next or previous list of the ...

Страница 21: ... EXT1 is selected for the EXT connections setting 2 This item works only when CVBS is selected for the Signal type 1 2 3 4 5 Selected item Signal type 1 AFC Colour system 2 Description To select the signal type of external equipment To select frequency control modes Mode 1 is suitable for DVD players or decoders and Mode 2 is suitable for VCRs or Camcorders Colour norm Choice Auto CVBS RGB Mode 1 ...

Страница 22: ...edish Dutch Russian Portuguese Turkish Greek Finnish and Polish Perform steps 1 and 2 in Clock Setup to display the Setup Menu screen Press to select Language and press OK Press to select the desired language and press OK E n g l i s h R u s s i a n E s p a ñ o l P o r t u g u ê s D e u t s c h T ü r k ç e F r a n ç a i s G r e e k I t a l i a n o S u o m i S v e n s k a P o l s k i N e d e r l a ...

Страница 23: ...display the Features Menu screen Press to select Sleep timer and press OK Press Channel Select or to select the time and press Press to set On H H M M O n 0 0 0 0 0 0 Press END to exit NOTE Be sure to adjust the clock with Clock setup in the Setup Menu before setting Sleep timer The time is automatically set corrected via the Teletext broadcast when available When not using the LCD TV set for a lo...

Страница 24: ...lock function blocks the viewing of any channels To use this function you need to define your PIN Personal Identification Number first 1 Defining a PIN Press MENU to display the Menu screen Press to select Features Press to select Child lock and press OK to display the PIN input screen Input the desired four digit PIN e g 1234 with Channel Select and press OK P l e a s e d e f i n e y o u r P I N ...

Страница 25: ...ess END to exit 3 Changing Cancelling a PIN To change a PIN Perform steps 1 and 2 in 2 Setting a Child Lock to display the Child lock screen Press to select Change PIN and press OK The currently defined PIN is displayed F o r a l l p r o g r a m m e s F o r i n d i v i d u a l p r o g o n l y C h a n g e P I N C a n c e l P I N Input the new four digit PIN e g 5678 with Channel Select and press OK...

Страница 26: ... the LCD TV set returns to normal mode NICAM Broadcast Selection This enables the selection of the reception mode when receiving a NICAM I or NICAM B G signal To let you enjoy NICAM broadcasting this LCD TV set receives NICAM stereo system bilingual and monaural broadcasts Stereo The LCD TV set is receiving a stereo broadcast Each time you press Sound the mode changes between Stereo and Mono When ...

Страница 27: ... by some TV stations in addition to regular television broadcasting Your LCD TV set receives special Teletext signals broadcast by a TV station processes the information and displays it graphically on the screen News weather and sports information stock exchange prices programme reviews and closed captioning for people hard of hearing are among the many services available through Teletext Teletext...

Страница 28: ...ures for Teletext Hold on the remote control can be used to hold the current teletext page Press the button again to cancel the Hold mode can be used to zoom the current Teletext page as shown below The screen is displayed in each mode each time is pressed ABC DEF ABC DEF Subtitle can be used to quickly activate subtitles Press Teletext to deactivate subtitles Reveal can be used to display hidden ...

Страница 29: ...t anything to the S VIDEO input terminal For more information about external device connections see the operation manuals of your external devices Example of external devices that can be connected You can enjoy picture and sound by connecting devices such as a VCR or home video game system to the terminals located on the rear of the LCD TV set When connecting an external device turn off the power ...

Страница 30: ... EXT2 Terminals Camcorder VCR 2 4 6 8 10 12 14 16 18 20 1 3 5 7 9 11 13 15 17 19 21 Decoder Audio Video cable commercially available S Video cable commercially available 21 pin Euro SCART connector commercially available Video Audio L Audio R S Video Connecting External Devices Continued 11 GREEN input 12 Not used 13 Earth for red 14 Earth 15 RED input 16 RED GREEN BLUE control 17 Earth for video ...

Страница 31: ...oper operation In this case operate the unit after turning the power off or unplugging the AC cord and re plugging it in 1 or 2 minutes Reference page Picture There is no picture or sound There is no picture There is no picture from EXT2 There is no sound The picture is not clear The picture is too light or improperly tinted The picture is too dark Remote control does not work There is no picture ...

Страница 32: ...ystem PAL SECAM NTSC TV TV Standard CCIR B G I D K L L TV Tuning System Auto preset 200 ch STEREO BILINGUAL NICAM A2 stereo AUTO PRESET YES CATV Hyper Band Brightness 430 cd m2 Lamp life 60 000 hours Viewing angles H 170 V 170 Audio amplifier 2 1 W 2 Speakers 11 cm 4 cm 2 pcs Terminals EXT1 21 pin Euro SCART EXT2 S VIDEO VIDEO AUDIO OUT AUDIO Antenna DIN Headphones 3 5 mm ø jack side OSD language ...

Страница 33: ... http www el kretsen se Please use the Dutch electronics recycling system called ICT Milieu and see the website at http www nederlandict nl index php Please use the Belgian electronics recycling system called Recupel and see the website at http www recupel be Please use the Swiss electronics recycling system called SWICO and see the website at http www swico ch 2 For our customers in United Kingdo...

Страница 34: ...e and sound measured according to IEC 62087 2002 Standby The energy consumption W of the set when in standby no picture or sound measured according to IEC 62087 2002 An estimated annual energy consumption kWh based on a duty cycle of 4 hours on and 20 hours in standby for 365 days Note The IEC 62087 2002 measurement standard sets brightness and sound levels that may not be the same as the TV in sh...

Страница 35: ...Unit mm Dimensional Drawings LC 15SH2E LC 20SH2E 307 403 3 231 300 8 358 5 432 40 5 41 4 208 246 40 5 41 4 100 300 5 436 2 473 584 100 37 4 47 79 85 43 4 49 8 122 4 134 8 176 199 2 ...

Страница 36: ...mpato su carta ecologica Impreso en papel ecológico Afgedrukt op ecologisch papier Printed in Spain Gedruckt in Spanien Imprimé en Espagne Stampato in Spagna Impreso en España Gedrukt in Spanje TINS B708WJN1 1 05P01 SP NM OPERATION MANUAL BEDIENUNGSANLEITUNG MODE D EMPLOI MANUALE DI ISTRUZIONI MANUAL DE MANEJO GEBRUIKSAANWIJZING B708WJN1 1 ...

Отзывы: