background image


  27

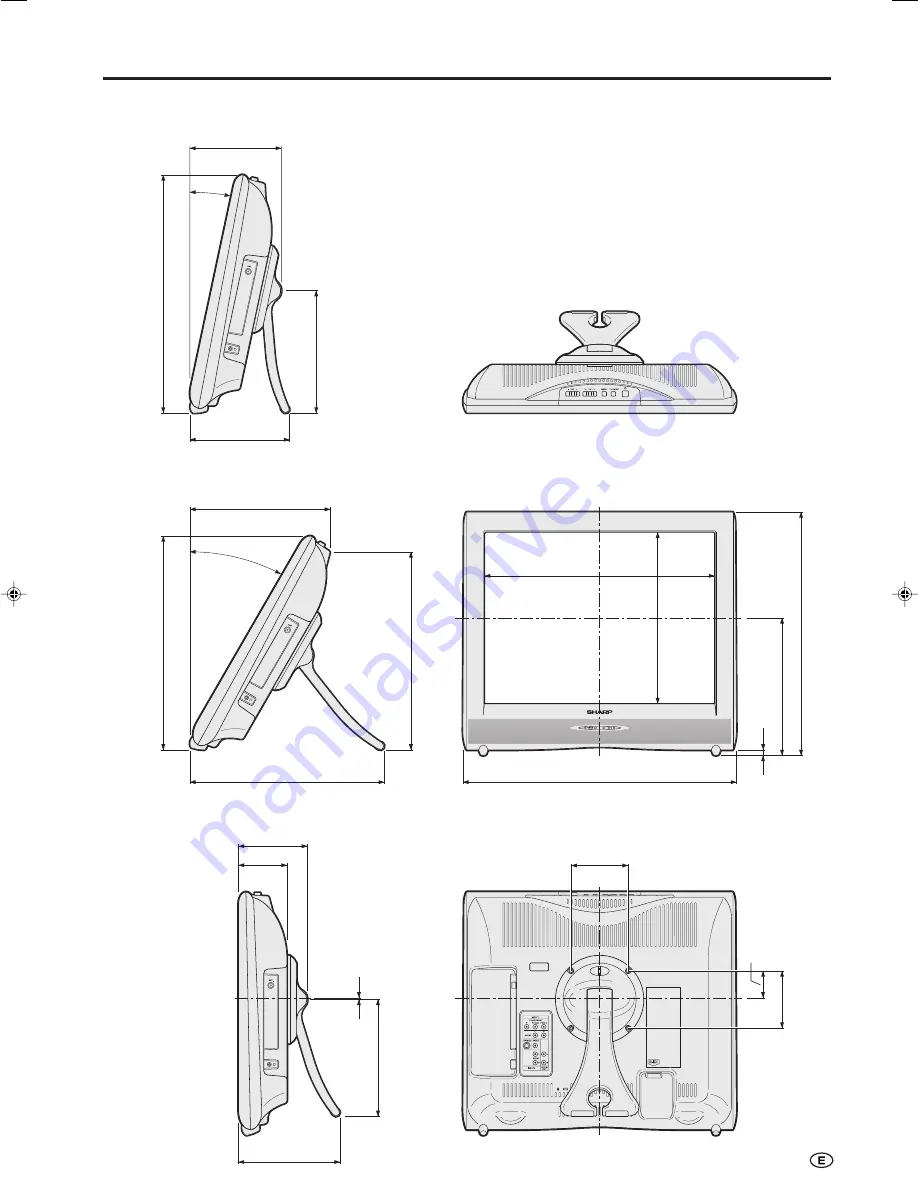
Unit: mm

Dimensional Drawings

LC-15SH1M/LC-15SH1X / LC-20SH1M/LC-20SH1X

384/480

307/403.3

351/427

201/242

231/300.8

10

311/375

30

°

282/346

344/418

100

100

158/178

158/205

3

167/215

281/342

155/175

79/85

115/121

205/246

145/161

12

°

37.4/47

LC15_20SH1M_X_E_P25-28.p65

04.12.22, 2:41 PM

27

Содержание LC-15SH1M

Страница 1: ...LC 15SH1M LC 15SH1X LC 20SH1M LC 20SH1X ENGLISH Printed in Japan TINS B645WJN1 05P02 JA MM OPERATION MANUAL LCD COLOUR TELEVISION Printed on 100 post consumer recycled paper ...

Страница 2: ...0 Turning On and Off the Main Power 10 STANDBY ON 10 Switching the Input Mode INPUT1 INPUT2 TV 10 Sound Volume 11 Changing Channels 11 Channel Setting Auto 12 Channel Setting Manual 12 Selecting Menu Items 13 Useful Features 15 Picture Adjustments 15 Sound Adjustments 15 Sound Mode Settings 16 DISPLAY MODE 16 LANGUAGE 17 TELETEXT LANGUAGE 17 BACKLIGHT 17 SLEEP TIMER 18 AUTO POWER OFF 18 ON SCREEN ...

Страница 3: ...t internal parts For the same reason do not spill water or liquid on the product 10 Servicing Do not attempt to service the product yourself Removing covers can expose you to high voltage and other dangerous conditions Request a qualified service person to perform servicing 11 Repair If any of the following conditions occurs unplug the AC cord from the AC outlet and request a qualified service per...

Страница 4: ...ned for built in installation do not place the product in an enclosed place such as a bookcase or rack unless proper ventilation is provided or the manufacturer s instructions are followed The LCD panel used in this product is made of glass Therefore it can break when the product is dropped or applied with impact Be careful not to be injured by broken glass pieces in case the LCD panel breaks Heat...

Страница 5: ...ies as soon as they are depleted Chemicals that leak from batteries can cause a rash If chemical leakage is found wipe it off with a cloth The batteries supplied with the LCD TV set may have a shorter operating time due to storage conditions If the remote control is not to be used for an extended period of time remove the batteries from the remote control Align the tab on the battery cover 1 and p...

Страница 6: ...in unit speakers when the headphone mini plug is connected into the headphone jack Do not set the volume at a high level Hearing experts advise against extended listening at high volume levels Headphones MAIN POWER AC INPUT terminal 110 240V Connect to the AC input terminal of the LCD TV set using the AC cord supplied To AC INPUT terminal Plug into an AC outlet AC cord Product shape may vary from ...

Страница 7: ...reen For selecting the menu items see pages 13 and 14 Preparation Continued Upper control panel of the main unit MAIN POWER Press MAIN POWER on the LCD TV set The FIRST INSTALLATION screen with a list of the languages for the on screen display is displayed Press to select the desired language and press OK E N G L I S H Press OK to execute the automatic programme search S T A R T S E A R C H After ...

Страница 8: ...een when the BACKLIGHT is set to AUTO OPC See page 17 POWER indicator POWER indicator lights up green when the power is on and red when in the standby mode the indicator will not light when the main power is off The screen angle can be tilted backwards between 12 and 30 degrees It cannot be set to vertical When changing the angle make sure to hold the stand and adjust the screen to the best viewab...

Страница 9: ...rminal Insert the cables into the stand hole and fix the cables Stand hole How to Prevent the LCD TV Set from Falling Over To prevent the LCD TV set from falling over in case of earthquakes and so on strap it onto the wall by threading one end of the string through the loop of the stand 1 and fastening the LCD TV set with the string attached to the hook on the wall or the post etc 2 An example of ...

Страница 10: ...lay when the menu screen is not displayed P 18 21 Yellow SLEEP TIMER Menu P 18 21 VOL Volume P 11 TV VIDEO Switches the input source between INPUT1 INPUT2 and TV mode P 10 OK P 6 RETURN Returns to the previous screen P 13 Right Left Selection P 12 TEXT Displays the Teletext mode screen P 21 REVEAL Displays hidden information such as solutions to riddles and puzzles P 22 HOLD Temporarily holds the ...

Страница 11: ...dicator MAIN POWER Basic Operation Switching the Input Mode INPUT1 INPUT2 TV Turn on the power of the connected device Press TV VIDEO to select the applicable input source The screen changes in order of INPUT1 INPUT2 and TV mode each time TV VIDEO is pressed NOTE INPUT1 Select this mode when viewing the signals from the video equipment connected to the INPUT1 COMPONENT terminals INPUT2 Select this...

Страница 12: ...can be input for the first digit Using A A A A A Flashback Press A A A A A to switch the currently tuned channel to the previously tuned channel Press A A A A A again to switch back to the currently tuned channel 2 1 Sound Volume To adjust the volume Press VOL to increase the sound volume The bar indicator shifts right TV VOLUME 50 Press VOL to decrease the sound volume The bar indicator shifts le...

Страница 13: ...ble on the right Press MENU to exit 1 2 4 5 NOTE Switching COLOUR SYSTEM Set the system to Auto for normal TV reception The Auto mode automatically detects the receiving signal system and changes the reception system of the LCD TV set When the picture or sound is not stable switching to an appropriate system may improve the picture or sound quality Selected item POSITION FINE COLOUR SYSTEM SOUND S...

Страница 14: ...various settings of your LCD TV set Select the desired menu item by following the steps below See the next page for each Menu screen NOTE Settings most recently made will be saved in memory Using the remote control Press MENU to display the Menu screen Press to select the desired menu item The cursor moves left or right The cursor indicates the selected menu item Press to select the desired item a...

Страница 15: ... D E R E S E T M E N U S E T U P P I C T U R E S O U N D S E T U P F E A T U R E S C H S E T U P F I R S T I N S T A L L A T I O N D I S P L A Y M O D E L A N G U A G E T E L E T E X T L A N G U A G E M E N U F E A T U R E S P I C T U R E S O U N D S E T U P F E A T U R E S B A C K L I G H T S L E E P T I M E R A U T O P O W E R O F F O N S C R E E N D I S P M E N U P I C T U R E C O N T R A S T 5...

Страница 16: ...und Adjustments Adjust the sound quality and volume to suit your preference See the table below for the adjustment items Press MENU to display the Menu screen The SOUND Menu screen can be displayed directly by pressing the Green button Press to select SOUND Press to select a specific adjustment item S O U N D V I A T V T R E B L E B A S S B A L A N C E L R S O U N D W I D E R E S E T S O U N D S E...

Страница 17: ...hown below You can adjust the volume by pressing VOL HIFI VOLUME 20 For the SOUND WIDE setting SOUND WIDE cannot be set when SOUND VIA is set to HIFI 3 4 5 Selected item SOUND VIA SOUND WIDE Choice TV HIFI ON For increasing the spread of the sound OFF Useful Features Continued 1 2 DISPLAY MODE You can set the orientation of the picture Press MENU to display the Menu screen Press to select SETUP Pr...

Страница 18: ...ct BACKLIGHT and press OK Press to select the desired mode and press OK Press MENU to exit Factory setting BRIGHT Maximum brightness Selected item BACKLIGHT 1 2 3 4 5 OPC is an abbreviation of Optical Picture Control NOTE The Backlight setting can be directly selected using the remote control see below Directly setting the Backlight You can change the Backlight setting directly Press BACKLIGHT to ...

Страница 19: ...ess MENU to exit NOTE AUTO POWER OFF is set to OFF at the factory setting 4 5 1 2 3 4 Useful Features Continued 3 1 2 ON SCREEN DISPLAY You can adjust various settings for on screen displays Perform steps 1 and 2 in SLEEP TIMER to display the FEATURES Menu screen Press to select ON SCREEN DISP and press OK Press to select the desired item P O S I T I O N B O T T O M S O U N D I N F O Y E S S L E E...

Страница 20: ...d and the LCD TV set returns to the normal mode The setting can be selected individually for each channel number NICAM Broadcast Selection If the sound quality is poor due to a weak signal or other problems during NICAM broadcast reception set the OFF position of the NICAM to change the TV sound to monaural Press MENU to display the Menu screen Press to select SETUP Press to select CH SETUP and pr...

Страница 21: ...lly for each channel number If the sound quality is poor due to a weak signal or other problems during A2 stereo broadcast reception set the OFF position of the A2 to change the TV sound to monaural Press MENU to display the Menu screen Press to select SETUP Press to select CH SETUP and press OK Press to select MANUAL and press OK Press to select A2 and press to select OFF P O S I T I O N 1 F I N ...

Страница 22: ...y some TV stations in addition to regular television broadcasting Your LCD TV set receives special Teletext signals broadcast by a TV station processes the information and displays it graphically on the screen News weather and sports information stock exchange prices programme reviews and closed captioning for people hard of hearing are among the many services available through Teletext Teletext m...

Страница 23: ... HOLD on the remote control can be used to hold the current teletext page Press the button again to cancel the Hold mode can be used to zoom the current Teletext page as shown below The screen is displayed in each mode each time is pressed ABC DEF ABC DEF SUBTITLE can be used to quickly activate subtitles Press TEXT to deactivate subtitles REVEAL can be used to display hidden information such as s...

Страница 24: ...ct anything to the S VIDEO input terminal For more information about external device connections see the operation manuals of your external devices Example of external devices that can be connected You can enjoy picture and sound by connecting external devices such as a VCR or a home video game system to the terminals located on the rear of the LCD TV set When connecting an external device turn of...

Страница 25: ...ting an external device make sure to connect the video and audio cable to the corresponding terminals Only when 480I 576I 480P signal is received through the INPUT1 terminals picture can be displayed This LCD TV set does not support HD signal 1080I 720P 576P even though it may display it in some circumstances When connecting the DVD player VCR or other external devices to each input terminal the s...

Страница 26: ...lugging the AC cord and re plugging it in 1 or 2 minutes When a problem has occurred such as no picture or no sound either turn off the main power and then turn it back on again or unplug the AC cord and then plug it in again Reference page Picture There is no picture or sound There is no picture There is no picture from INPUT2 There is no sound The picture is not clear The picture is too light or...

Страница 27: ...iew BLACK TFT LCD Number of dots 921 600 dots Video colour system World multi system TV Standard CCIR PAL B G I D K NTSC M SECAM B G D K TV Tuning System Auto preset tuning TV STEREO BILINGUAL NICAM B G I D K A2 stereo B G AUTO PRESET Yes CATV S1 S41 ch Hyper Band 4 LINE DIGITAL COMB FILTER Yes Brightness 430 cd m2 Lamp life 60 000 hours Viewing angles H 170 V 170 Audio amplifier 2 1 W 2 Speakers ...

Страница 28: ...ional Drawings LC 15SH1M LC 15SH1X LC 20SH1M LC 20SH1X 384 480 307 403 3 351 427 201 242 231 300 8 10 311 375 30 282 346 344 418 100 100 158 178 158 205 3 167 215 281 342 155 175 79 85 115 121 205 246 145 161 12 37 4 47 ...

Страница 29: ...SHARP CORPORATION ...

Отзывы: