background image

04/10/16

HT-X1H(H)E5.fm

E-43

ENGLISH

TINSZA030SJZZ

HT-X1H

Radio

Listening to the radio (continued)

!

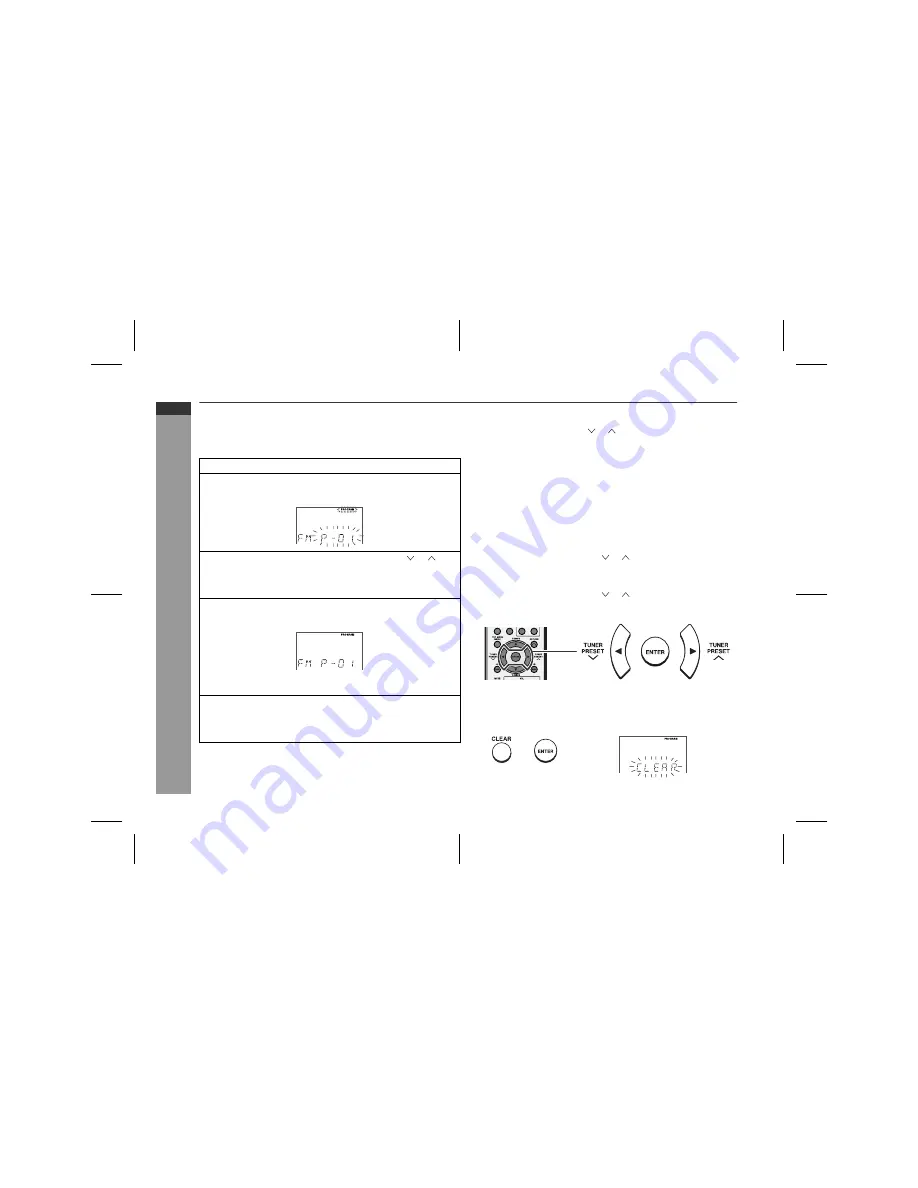
Memorising a station

You can store 40 AM and FM stations in memory and recall them at
the push of a button. (Preset tuning)

Note:
The backup function protects the memorised stations for a few
hours should there be a power failure or the AC power lead get dis-
connected.

!

To recall a memorised station

To select a preset station with the direct number buttons:

Example:
To select 28, press "2", "8" and "ENTER".
 

!

To scan the preset stations

The stations saved in memory can be scanned automatically. (Pre-
set memory scan)

!

To erase entire preset memory

1

Perform steps 1 - 3 in "Tuning" on page 42.

2

Press the ENTER button to enter the preset tuning saving
mode.

3

Within 5 seconds, press the TUNER PRESET (  or  ) but-
ton to select the preset channel number.
Store the stations in memory, in order, starting with preset 
channel 1.

4

Within 5 seconds, press the ENTER button to store that
station in memory.

If the "PROGRAM" and preset number indicators go out before 
the station is memorised, repeat the operation from step 2.

5

Repeat steps 1 - 4 to set other stations, or to change a pre-
set station.
When a new station is stored in memory, the station previously 
memorised will be erased.

Press the TUNER PRESET (  or  ) button for less than 0.5 sec-
onds to select the desired station.

1

Press the corresponding number ("0" - "9").

2

Press the ENTER button.

1

Press the TUNER PRESET (  or  ) button for more than 0.5 
seconds.
The preset number will flash and the programmed stations will be 
tuned in sequentially, for 5 seconds each.

2

Press the TUNER PRESET (  or  ) button again when the de-
sired station is located.

1

Hold the CLEAR button down for 4 seconds or more.

2

Within 10 seconds, press the ENTER button.

Содержание HT-X1H

Страница 1: ...iten i bis vi und D 1 bis D 68 Se reporter aux pages i à vi et F 1 à F 68 Consulte las páginas i a vi y S 1 a S 68 Hänvisa till sidorna i till vi och V 1 till V 68 Leggere le pagine i a vi e I 1 a I 68 Raadpleeg de bladzijden i t m vi en N 1 t m N 68 Favor consultar as páginas i a vi e P 1 a P 68 Please refer to pages i to vi and E 1 to E 68 HEIMKINO MIT DVD HOME CINEMA AVEC DVD HOME CINEMA CON DV...

Страница 2: ... appareil contient des pièces non réparables par l utilisateur Personne non qualifiée n enlèvera jamais les couvercles L appareil contenant des organes portés à haute tension débrancher l appareil avant toute réparation ou en période de non utilisation Dieses Gerät entspricht den Anforderungen der EG Richtlinien 89 336 EWG und 73 23 EWG mit Änderung 93 68 EWG Ce matériel répond aux exigences conte...

Страница 3: ...l cavo d alimentazione dalla presa di corrente prima di qualsiasi intervento di manutenzione e quando non si usa l apparecchio per un lungo periodo di tempo Wanneer de ON STAND BY toets in de STAND BY stand staat loopt er nog steeds stroom netspanning in het toestel Wanneer de ON STAND BY toets in de STAND BY stand staat kan het toestel ingeschakeld worden via de afstandsbediening Waarschuwing Dit...

Страница 4: ... eau éclaboussure goutte Ne pas poser sur l appareil un récipient contenant du liquide Advertencia Para evitar incendios y descargas eléctricas no exponga el aparato a goteo o salpicadura de líquidos No deberán ponerse encima del aparato objetos que estén llenos de líquido como por ejemplo un florero Varning Utsätt inte enheten för dropp eller stänk för att förhindra brand eller elektriska stötar ...

Страница 5: ...la Nestettä sisältäviä astioita kuten esim kukkamaljakoita ei saa asettaa laitteen päälle Dieses Produkt ist ein Laserprodukt der Klasse 1 Ce produit est classifié comme étant un LASER DE CLASSE 1 Este producto está clasificado como un PRODUCTO LÁSER DE CLASE 1 Denna produkt klassificeras som KLASS 1 LASERPRODUKT Questo prodotto è classificato come CLASS 1 LASER PRODUCT Dit product is geclassifice...

Страница 6: ... Försök inte ta isär höljet eftersom enhetens laserstråle är skadlig för ögonen Överlåt service endast till kvalificerad personal ATTENZIONE L uso dei comandi e l effettuazione di regolazioni e procedimenti diversi da quelli specificati nel manuale possono provocare una pericolosa esposizione alle radiazioni Poiché il raggio laser usato in questo apparecchio può danneggiare gli occhi non smontare ...

Страница 7: ...seruitgang max 0 6 mW Propriedades do diodo de laser Material AlGaAs AlGaInP Comprimento de onda 785 nm 650 nm Duração da emissão contínua Saída de laser máx 0 6 mW Laser Diode Properties Material AIGaAs AIGaInP Wavelength 785 nm 650 nm Emission Duration continuous Laser Output max 0 6 mW 0403 0408_A5 3A_DVD CD VAROITUS LAITTEEN KÄYTTÄMINEN MUULLA KUIN TÄSSÄ KÄYTTÖOHJEESSA MAINITULLA TAVALLA SAATT...

Страница 8: ... Dolby Pro Logic and the double D symbol are trademarks of Dolby Laboratories Copyright Information Unauthorised copying broadcast public display transmission public performance and rental regardless of whether or not such activities are for profit of disc contents are prohibited by law This system is equipped with copy protection technology that causes substantial degradation of images when the c...

Страница 9: ... the above accessories are included Remote control 1 AAA size battery UM 4 R03 HP 16 or similar 2 AM loop aerial 1 FM aerial 1 SCART cable 1 AC power lead 1 System connection cable 1 Pattern paper for main unit 1 Button name label 1 Speaker connection lead 5 Green for centre speaker approx 5 m White for left front speaker approx 5 m Red for right front speaker approx 5 m Blue for left surround spe...

Страница 10: ...play in the desired order programmed playback 33 To play repeatedly repeat play 34 To play the contents between the specified points repeatedly A B repeat 35 To change the display on the main unit 35 To change the display on TV screen 36 Page Audio CD Operation Playing an audio CD To play in random order random play 37 To start playback from the desired point direct play 38 Super Video CD Video CD...

Страница 11: ...he components of the system Attention should be drawn to the environmental aspects of bat tery disposal The system is designed for use in moderate climate This system should only be used within the range of 5 C 35 C Warning The voltage used must be the same as that specified by this sys tem Using this product with a higher voltage other than that speci fied is dangerous and may result in a fire or...

Страница 12: ...isc Compartment 23 10 Main Unit Stand 14 11 Remote Sensor 21 12 Volume Control 22 13 Headphone Socket 19 Rear panel 1 FM 75 Ohm Aerial Socket 15 16 2 Aerial Earth Terminal 15 16 3 AM Aerial Terminal 15 16 4 Auxiliary Audio Signal Input Sockets 62 5 SCART Output Socket 18 6 S video Output Socket 18 7 Video Output Socket 19 8 System Connection Sockets to subwoofer amplifier unit 15 16 9 Optical Digi...

Страница 13: ...cator 49 8 Dolby Digital Signal Indicator 49 9 Dolby Pro Logic Indicator 49 10 Audio Signal Speaker Indicators 50 11 Track Indicator 35 12 Chapter Indicator 35 13 Title Indicator 35 14 Pause Indicator 24 15 Play Indicator 24 16 Total Indicator 35 17 Angle Indicator 32 18 RDS Indicator 46 19 Traffic Programme Indicator 44 20 Traffic Announcement Indicator 44 21 Dynamic PTY Indicator 44 22 FM Stereo...

Страница 14: ...nnel Select Button 52 14 Return Button 53 56 15 Stereo 2 channel Select Button 51 16 Chapter Track Skip Up or Fast Forward Button 26 17 Angle Button 32 18 DVD Audio Language Select or CD Audio Output Select Button 29 19 Gamma Button 29 20 RDS Programme Type Traffic Information Search Button 48 21 RDS Display Mode Select Button 44 22 Direct Button 27 23 Subtitle Button 28 24 Super Picture Button 30...

Страница 15: ...s 22 9 Play Button 24 10 Stop Button 23 24 4 3 5 6 7 8 9 10 1 2 TV Operation Buttons You can operate some functions of SHARP TVs with the remote control of this system However some models cannot be operated TV Channel Up Button TV Channel Down Button Switches the TV channel up Switches the TV channel down TV On Stand by Button TV Volume Up Button Sets the TV power to ON or STAND BY Turns up the TV...

Страница 16: ... Centre speaker Reference page 1 Speaker 2 Speaker Stand 3 Speaker Terminals 15 17 4 Colour Label Green Subwoofer amplifier unit Reference page 1 Bass Reflex Duct 2 Woofer 3 Cooling Fan 20 4 AC Power Input Socket 20 5 System Connection Sockets to main unit 15 16 6 Speaker Terminals 15 17 1 1 2 1 2 4 3 5 6 2 4 3 3 4 White Left Front Speaker Red Right Front Speaker Blue Left Surround Speaker Grey Ri...

Страница 17: ...D Video CD 4 7 CD Audio CD Audio CD R Audio CD RW Or CDV 1 CD R RW recorded in MP3 WMA JPEG format 2 1 Only the audio on the CDV can be played 2 Some discs may not play properly due to the status of the equipment used for recording characteristics of the discs scratches dirt or dirty optical pickup lens Icons used in this operation manual Some functions may not be available depending on discs The ...

Страница 18: ... JPEG format on CD R CD RW An MP3 file is an audio data compressed in the MPEG 1 audio layer 3 format MP3 files have the extension mp3 Files with the exten sion mp3 may not play or noise may occur during playback if not recorded in the MP3 format WMA is an audio file format developed by Microsoft with the wma extension This type of audio file is recorded through Microsoft Win dows operating system...

Страница 19: ...orded on the DVD To adopt the video format to the connected TVs wide screen TV or 4 3 size TV Type of subtitles recorded Recorded subtitle languages Example You can select a subtitle lan guage 1 English 2 German Number of camera angles Number of angles recorded on the DVD You can view scenes from dif ferent angles Number of audio tracks and au dio recording systems The number of audio tracks and a...

Страница 20: ...rom the listening position It is recommended to arrange the speakers as shown below Notes The default distance is set to 2 m If speakers cannot be placed at equal distances refer to Speaker delay setting see page 54 Place the TV halfway between the front speakers It is recommended that the centre speaker be placed near the television Place the surround speakers at a position just above the height ...

Страница 21: ...he button name label carefully It is difficult to peel off The stand is attached to the main unit at the factory Make sure to unplug the AC power lead before installing the main unit or change the position You can also place the main unit horizontally or mount it on the wall without the stand See page 63 for mounting it on the wall Do not change the installation direction when the main unit is tur...

Страница 22: ... Aerial connection see page 16 Connecting the AC power lead see page 20 TV connection see page 18 Speaker connection see page 17 Surround speaker left Surround speaker right Front speaker left Centre speaker Front speaker right White Red Green Blue Grey White Grey Blue Green Red Main unit Connecting the system connection cable see page 16 AM loop aerial FM aerial 31 SHARP TINSZA030SJZZ H ...

Страница 23: ...re to keep the wire of the AM loop aerial connected Subwoofer amplifier unit 1 2 Main unit 1 2 Black Blue Blue Black Aerial terminals Supplied FM aerial Connect the FM aerial wire to the FM 75 OHMS socket and position the FM aerial wire in the direction where the strongest signal can be received Supplied AM loop aerial Connect the AM loop aerial wire to the AM and GND terminals Position the AM loo...

Страница 24: ...allow any objects to fall into or to be placed in the bass reflex ducts Attaching the optional floor speaker stand The front speakers and surround speakers support the optional floor speaker stand see page 66 Remove the original stand for each speaker using a screwdriver first For details refer to the manual for the floor speaker stand Note Keep the removed speaker stands or screw in a safe place ...

Страница 25: ... can enjoy higher quality images by connecting it with an S video cable not supplied Note When the video and S video cables are both connected the images from the S video input socket appears on your TV Set the video output mode to SCART default setting For the procedure refer to Changing the initial setting of DVD on pages 56 58 TV Main unit To SCART input socket To SCART AV TV output socket Vide...

Страница 26: ...mm diameter plug and are between 16 ohms and 50 ohms impedance The recommended impedance is 32 ohms Plugging in the headphones disconnects the speakers automati cally Adjust the volume using the VOLUME control Set the video output mode to S Video For the procedure refer to Changing the initial setting of DVD on pages 56 58 Notes Change the TV input in accordance with the connected socket Do not co...

Страница 27: ...l not be in use for a prolonged period of time To turn the power on Press the ON STAND BY button If the power does not turn on check if the AC power lead and sys tem connection cable are plugged in properly To set the system to stand by mode Press the ON STAND BY button again Note After the system enters the power stand by mode wait a few sec onds to turn on again Cooling fan A cooling fan is buil...

Страница 28: ...cally clean the transmitter on the remote control and the sensor on the main unit with a soft cloth Exposing the sensor on the main unit to strong light may interfere with operation Change the lighting or the direction of the main unit if this occurs Keep the remote control away from moisture heat shock and vibrations Test of the remote control Check the remote control after checking all the conne...

Страница 29: ...volume will increase When it is turned anti clockwise the volume will decrease Remote control operation Press the VOL or button to in crease or decrease the volume The volume is muted temporarily when pressing the MUTE button Press again to restore the vol ume The mute status is cancelled when you adjust the volume After approx 5 seconds of DVD playback the display dims and the original brightness...

Страница 30: ...Press the button to set the in put to DVD 3 Insert a disc into the disc insertion slot with the label side toward you The disc enters automatically Notes Do not push in the disc Damage may result Load an 8 cm disc gently in the middle of the insertion slot do not use an adaptor Some discs play automatically DVD VideoCD CD No Disc Audio Visual Entertainment Disc insertion slot Label side Disc inser...

Страница 31: ...To resume playback from the same point press the DVD CD button Chapter or track number The sound mode in use appears during DVD playback Play indicator Playing time Caution when inserting disc Do not touch the playback side Do not insert two or more discs in the disc insertion slot Discs with labels stickers or glue attached may cause damage to the main unit Do not use discs of special shapes hear...

Страница 32: ...inserting or removing it A disc does not play if damaged dirty or loaded upside down Make sure to remove the disc before transporting the main unit Otherwise the disc inside may cause malfunction Do not let coins clips etc get into the disc insertion slot Mal function may occur When attempting to play discs with scratches or of a different region number or unplayable or restricted 1 discs an error...

Страница 33: ... is performed during the playback pictures may not be forwarded or reversed in the search speed specified in this manual depending on the disc or the scene being played Whilst a disc is playing press the or button Press the button to skip to the next chapter track On DVD Super Video CD Video CD Audio CD Press the button to skip to the beginning of the current chapter track Press the button again t...

Страница 34: ...conds press the ENTER button 1 Perform steps 1 3 of To select and play the desired title above 2 Within 10 seconds select the chapter by pressing the cur sor or button 3 Enter the desired chapter number by using the direct number buttons Chapter number 4 Within 10 seconds press the ENTER button 08 01 001 010 Entering title or chapter numbers using the direct number buttons If the number is 2 digit...

Страница 35: ...ck Notes Some DVDs prohibit changing the subtitle language If no subtitles are recorded on the disc is displayed It may take a little time to switch the subtitle language to the selected one When you set the unit to the stand by mode or replace the disc settings return to the default 1 Whilst a disc is playing press the SHIFT button and then the SUBTITLE button 2 Repeat step 1 to select the de sir...

Страница 36: ...utton and then the AUDIO button Audio language information 2 Repeat step 1 to select the desired audio number When playing DVD the language changes as follows When playing super video CD video CD audio CD and MP3 the sound changes as follows Audio 1 3 AC 3 5 1 English 1 Original English Dolby Digital 5 1 ch Surround 2 English Dolby Digital 2 ch Surround Audio 1 3 AC 3 5 1 English Audio 2 3 AC 3 2 ...

Страница 37: ...quality In step 1 select OFF 1 During playback press the SHIFT button and then the S PICTURE button to select ON ON and OFF will be switched by each press of these but tons 2 Within 10 seconds press the cursor or button to set the level Level Setting Level Setting OFF Normal ON Clearer ON Slightly clearer ON A lot clearer OFF S ON S ...

Страница 38: ...bled on some discs Slow motion play You can slow down the playback speed Note On some discs slow motion play functions are disabled 1 In the stop mode or during play back press the SHIFT button and then the TOP MENU MENU button Example 2 Press the cursor or button to change the setting and press the ENTER button The selected title is played You can also use the direct number buttons for some discs...

Страница 39: ...n the ZOOM button Repeat this to select Zoom off When you cancel the zoom function you cannot shift the view Notes An image may become distorted when zoomed Subtitles cannot be zoomed The position of the current part is indicated in the lower left of the screen 1 When appears on the TV during playback press the SHIFT button and then the ANGLE button TV screen Unit display 2 Repeat step 1 to select...

Страница 40: ...pter 2 Chapter 1 Menu Program List No Program Info Select 1 T 1 C 1 06 03 2 T 3 C 5 05 06 3 T 5 C Chapter 5 Chapter 4 Chapter 3 Chapter 2 Chapter 1 Menu 6 Press the cursor button to finish programming To delete the wrong number press the cursor or button to select it and press the CLEAR button 7 Use the cursor or button to select a number to start with and press the DVD CD button Playback starts f...

Страница 41: ...t play mode changes in the following order TV screen Unit display Chapter Repeat on Title Repeat on Repeat off Repeats the chapter currently playing Repeats the title currently playing The normal playback File Rep Folder Rep Disc Rep Rep off 1 Disappear Repeats the file currently playing Repeats the folder directory currently playing Repeat play of all of the files The normal playback Track Repeat...

Страница 42: ...time of the disc specified on the jacket etc may not include silence between tracks and may differ from that dis played on the main unit Elapsed time on the display does not indicate the actual time When operating super video CD or video CD with the P B C function set the P B C to off see page 39 1 Whilst a disc is playing press the SHIFT button and then the A B REPEAT button TV screen Unit displa...

Страница 43: ...l playing time appears when P B C is off see page 39 Title playing time Total number of chapters Current chapter number Total number of titles Current title number Disc type Chapter playing time Remaining playing time of the current title Remaining playing time of the current chapter Angle information Repeat mode information Audio language information Subtitle information 1 8 2 10 00 38 58 1 8 2 1...

Страница 44: ...een 36 To play in random order random play The tracks on the disc can be played in random order automatically To cancel random play Press the button Notes On some discs this function cannot be used You cannot set the random play whilst in the playback or pause mode Random play is not allowed during programmed playback In random play the unit will select and play tracks automatically You cannot sel...

Страница 45: ...disabled on some discs Whilst in the stop or playback mode press the direct number buttons to select the track number TV screen Unit display If the track number is 2 digits or more press 10 and enter the number Example To select track 14 press 10 and 4 To select track 24 press 10 10 and 4 To select track 112 press 10 eleven times and press 2 Select 14 1 Whilst the disc is playing press the DIRECT ...

Страница 46: ...P B C playback control To scroll the menu screen menu screen with more than 1 page Press the or button To stop playback Press the button To play without activating the playback control function You can play a super video CD video CD with P B C without acti vating the playback control function In this case the menu screen will not appear and the disc will play in the same way as a super video CD vi...

Страница 47: ...NTER button Caution If you convert MP3 data to audio CD data when recording on a CD R RW play it as an audio CD The MP3 operation cannot be performed Notes Up to 20 characters can be displayed for a folder name and a file name Underlines asterisks and spaces may not be displayed Due to the structure of its disc information it takes longer to read an MP3 WMA or JPEG disc than a normal CD Insert a d...

Страница 48: ...2 Hold down the or button for 2 seconds or more Use the or button to switch the zoom setting as follows 3 To shift the view and display the desired part of a zoomed image press the cursor or button repeatedly Zoom on Zoom 150 Pct Zoom 025 Pct Zoom 050 Pct Zoom 100 Pct Zoom 150 Pct Zoom 200 Pct Press the button Press the button Press the button Press the button After pressing the STILL button press...

Страница 49: ... BAND button to display the STEREO indica tor will appear when an FM broadcast is in stereo If the FM reception is weak press the TUNER BAND button to extinguish the STEREO indicator The reception changes to monaural and the sound becomes clearer 1 Press the ON STAND BY button to turn the power on 2 Press the TUNER BAND button repeatedly to select the desired frequency band FM or AM 3 Press the TU...

Страница 50: ...ER PRESET or but ton to select the preset channel number Store the stations in memory in order starting with preset channel 1 4 Within 5 seconds press the ENTER button to store that station in memory If the PROGRAM and preset number indicators go out before the station is memorised repeat the operation from step 2 5 Repeat steps 1 4 to set other stations or to change a pre set station When a new s...

Страница 51: ...ppear on the display when the received broadcast carries traffic information and TA Traffic Announcement will appear whilst a traffic information is on air PTYI Dynamic PTY Indicator will appear whilst the Dynamic PTY station is received You can control the RDS by using the remote control only Information provided by RDS Press the SHIFT button and then the DISPLAY button The dis play changes as fo...

Страница 52: ... specialised music styles Jazz Folk or Country Music in this category is often but not always vocal and usually of short duration LIGHT M Classical music for general rather than specialist appreciation Examples of music in this category are instrumental music and vocal or choral works CLASSICS Performances of major orchestral works sympho nies chamber music etc and including Grand Op era OTHER M M...

Страница 53: ...ation usually played on acoustic instru ments The narrative or story may be based on his torical events or people DOCUMENT Programme concerned with factual matters pre sented in an investigative style TEST Broadcast when testing emergency broadcast equipment or receivers ALARM Emergency announcement made under exception al circumstances to give warning of events causing danger of a general nature ...

Страница 54: ...ion if there is lots of noise or if the signal is too weak In this case perform as follows Notes The same station name can be stored in different channels In a certain area or during certain time periods the station names may temporarily be different Notes for RDS operation If any of the following events occur it does not mean that the unit is faulty PS NO PS and a station name appear alternately ...

Страница 55: ...mation at that time When the traffic information is broadcast TA will appear To specify station names and select stations manually You can select a station by specifying the name BBC R1 BBC R2 etc from the stations stored in memory Before starting this operation you must store one or more station names in memory 1 Press the TUNER BAND button to select the FM 2 Press the SHIFT button and press the ...

Страница 56: ...n Dolby Digital the DIGITAL indicator lights up see page 29 DTS Digital Theater Systems Disc with this trademark One of the digital audio systems for theatrical use As the sound quality is emphasised you can enjoy the realistic sound effect in the home theatre system When you set the audio output to DTS for a disc recorded in DTS the indicator lights up see page 29 Dolby Pro Logic Stereo recorded ...

Страница 57: ... from the subwoofer amplifier unit depending on the disc You cannot change the multi channel mode or stereo mode whilst listening to the radio If sound is unpleasant to listen to change the multi channel mode or stereo mode Settings for the multi channel mode and stereo mode are retained by input DVD AUX DIGITAL and AUX ANALOG When Dolby Pro Logic is activated 2 1 3 4 6 5 8 10 11 9 7 12 13 Audio s...

Страница 58: ...patible player and signals are digitally AUX DIGITAL IN sent to this unit the sound mode is changed to STEREO automatically The sound mode cannot be changed during playback Whilst the disc is playing press the STEREO button Example DTS format You can enjoy 2 channel ste reo sound When you press once the last used setting appears To change it press the button repeatedly within 3 seconds STEREO You ...

Страница 59: ... MOVIE The bass level is increased for powerful sound ef fect MUSIC You can enjoy lively sound by producing the artic ulate sound NIGHT Soft but powerful sound is achieved even at low volumes Note When listening to Dolby Digital or DTS sound you cannot select STADIUM and HALL STANDARD MOVIE MUSIC NIGHT 2 channel stereo sound CD videotapes etc Whilst the disc is playing press the MULTI CH button Ex...

Страница 60: ... surround speaker SR to 3 3 m 2 In Speaker level setting slightly increase the level of the right surround speaker as it is a little farther than others see page 55 3 In Test tone check the sound from each speaker see page 55 FL FR SL Default setting 2 m SR SW CT FL FR SL SR SW CT 3 3 m Speaker type Delay range Level range FL Front speaker Left 0 1 to 9 0 m 6 db to 6 db CT Centre speaker 0 1 to 9 ...

Страница 61: ...n depends on the setting item To change other settings begin from step 2 4 Press the RETURN button twice The setting is complete Speaker Delay Amplifier Setup Speaker Level Test Tone Select Enter Return ENTER Crossover Front Speaker Delay Center Front Select Change Return Surround Surround L 2 0 M R 2 0 M R 2 0 M 2 0 M L 2 0 M 1 Press the SET UP AMP button 2 Within 10 seconds press the or button t...

Страница 62: ...aker flashes 4 Within 10 seconds press the or button to adjust the level You can adjust the level at 1 dB in tervals To set the distance of other speak ers repeat the operation from step 3 5 Press the RETURN button twice The setting is complete Speaker Delay Amplifier Setup Speaker Level Test Tone Select Enter Return ENTER Crossover Front Speaker Level Select Change Return L 0 dB Center 0 dB Front...

Страница 63: ...and press the ENTER button To return to the previous display press the RETURN button For details on submenu items see pages 57 58 Submenu 4 Press the cursor or button to change the setting and press the ENTER button To return to the previous display press the RETURN but ton To change other settings begin from step 2 5 Press the SET UP DVD button The new setting is memorised Language Setup DVD Setu...

Страница 64: ... 4 3 PS 4 3 LB 16 9 The screen mode should be set according to the connected TV type 4 3 LB When playing a wide image 16 9 disc the left and right sides of the image are cut pan scan to display a natural looking 4 3 size image A 4 3 disc is played in 4 3 4 3 PS When playing a wide image 16 9 disc black bands are inserted at the top and bottom and you can enjoy full wide images 16 9 on a 4 3 size T...

Страница 65: ...D video CD etc Smart Optimise special effects for progressive video output Display Setup Angle mark On Off Select whether to display On or not Off P 32 Screen sav er On Off Select whether to use a screen saver On or not Off On Press the button After 5 minutes or more of inactivity a screen saver ap pears To turn off the screen saver on the screen press any button on the main unit or remote control...

Страница 66: ...or or button to select OTHER and press the ENTER button 3 Press the or button to select H for the first letter 4 Press the or button to move cursor for entering the second letter 5 Press the or button to select U for the second letter 6 Press the ENTER button 7 Press the RETURN button twice The new setting is memorised OSD Language Language Setup Audio Subtitle Disc menu Japanese Other A A Chinese...

Страница 67: ...ean ES Spanish KS Kashmiri ET Estonian KU Kurdish EU Basque KY Kirghiz FA Persian LA Latin FI Finnish LN Lingala FJ Fiji LO Laotian FO Faroese LT Lithuanian FR French LV Latvian Lettish Code Language name Code Language name MG Malagasy SN Shona MI Maori SO Somali MK Macedonian SQ Albanian ML Malayalam SR Serbian MN Mongolian SS Siswati MO Moldavian ST Sesotho MR Marathi SU Sundanese MS Malay SV Sw...

Страница 68: ...n Press the ON STAND BY button whilst the sleep timer is set 1 Play back the desired sound source 2 Press the SLEEP button and within 8 seconds press the ENTER button To change the sleep time Whilst the sleep time is displayed press the or button Maximum 3 hours Minimum 5 minutes 3 Within 30 seconds press the ENTER button 4 The system will enter the power stand by mode automati cally after the pre...

Страница 69: ...igital equipment such as an MD player If the digital equipment has an optical output socket you can enjoy better sound by connecting it to the optical digital input socket of the main unit using the optical digital cable Note When connecting with an optical digital cable set the digital output of the digital tuner to PCM Refer to the operation manual of the dig ital tuner To audio output sockets T...

Страница 70: ...ater tank sink and hallway wall SHARP is not responsible for accidents resulting from improper installation Sharp has designed the main unit so you can hang it on the wall Use appropriate screws not supplied See the il lustration on the right for size and type 1 Make a hole in the wall using a drill 2 Drive a wall mount plug into the hole using a hammer until it is flush with the wall surface 3 Dr...

Страница 71: ...it is dark Is the display in the dimmer mode No images are displayed Is TV turned on Is the TV input switched on Symptom Possible cause Even though a disc is loaded No Disc is dis played Is the disc loaded upside down Is the disc very dirty Does the disc satisfy the standards Is the system located near excessive vibra tions Playback sounds are skipped Is condensation formed inside the system The c...

Страница 72: ... restores the system clear all the memory by resetting it Clearing all the memory reset 1 Press the ON STAND BY button to enter the power stand by mode 2 Whilst pressing down the button and the FUNCTION button press the ON STAND BY button until SYS RESTORE appears Caution When you reset all data is deleted and the settings return to the default DVD initial settings are retained Symptom Possible ca...

Страница 73: ... and excessive moisture Always hold the discs by the edges Fingerprints dirt or water on the discs can cause noise or mistracking If a disc is dirty or does not play properly clean it with a soft dry cloth wiping straight out from the centre along the radius Error indicators and warnings When you load an unplayable disc or fail to perform operations properly the following messages are displayed on...

Страница 74: ... output S terminal 1 Audio output terminal Headphones 16 50 ohms recommended 32 ohms Audio input terminals Audio input AUX RCA type 2 Optical digital input Square type 1 Other terminal System control 2 Signal system PAL Supported disc types DVD region number 2 or ALL DVD R RW video mode DVD R RW video mode super video CD video CD audio CD CD R CD RW Video signal Horizontal resolution 500 lines S N...

Страница 75: ...pedance 4 ohms Dimensions Width 185 mm Height 123 mm Depth 115 mm Weight 0 9 kg Power source AC 230 V 50 Hz Power consumption Power on 158 W Power stand by 0 6 W Dimensions Width 200 mm Height 380 mm Depth 443 mm Weight 10 6 kg Speaker terminals Front speakers centre speaker and surround speakers more than 4 ohms Other terminals System control 2 Rated power output Front speakers RMS 100 W 50 W 50 ...

Страница 76: ...04 10 12 HT X1H H _BA fm TINSZA030SJZZ TINSZA030SJZZ 04K N HK 1 SHARP CORPORATION 0401_A5 ...

Страница 77: ...HT X1H HOME CINEMA WITH DVD U P DOWN 04 10 12 HT X1H H _SP fm TINSZA030SJZZ ...

Отзывы: