background image

9

1

7

6

5

4

3

2

1

9

2012 November 28

HT-SB60

E-11

General control (continued)

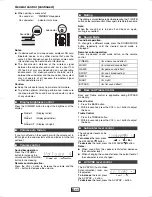
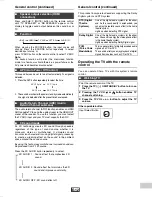
When pairing is successful:

Notes:

If a device such as microwave oven, wireless LAN card,
Bluetooth device or any other device that uses the
same 2.4GHz frequency near the system, some sound
interruption may be heard due to interference.

The transmission distance of the wireless signal
between the subwoofer and sound bar is about 10m
(32 feet), but may vary depending on your operating
environment. If a steel-concrete or metallic wall is
between the subwoofer and the sound bar, the system
may not operate at all, because the wireless signal
cannot penetrate metal.

Caution:

Keep the subwoofer away from water and moisture.

To get the optimum listening performance, make sure
the area around the sound bar and subwoofer is clear
of any obstacles.

Press the DIMMER button to adjust the brightness of the
display.

If you turn off and on the sound bar with the volume set to
80 or higher, the volume starts at 40 and fades in to the last
set level.

Remote control operation:

Press the VOL + button to increase the volume and the
VOL – button to decrease the volume.

Note:

When the sound bar is turned off and back on again,
muting is cancelled.

Sound bar operation:

To change to a different mode, press the SOUND MODE
button repeatedly until the desired sound mode is
displayed.

Remote control operation:

Press the desired sound mode button on the remote
control.


Bass Control

Treble Control

Notes:

When sound from the speaker is distorted, decrease
the subwoofer level.

When changing the subwoofer level, the output level of
the subwoofer is also changed.

On sound bar:

“PAIRING” disappears.

On subwoofer:

indicator turns blue.

Display brightness control

Volume auto fade-in

Volume control

Sound bar operation:

Press the  
button to increase the 
volume and the VOLUME – 
button for decreasing.

PAIRING    

Sound Bar

Subwoofer

(Display is dim)

(Display gets dimmer)

(Display is bright)

Dimmer 1

Dimmer 2

Dimmer Off

Min

M

a

x

2

99

.....

1

Muting

The volume is muted temporarily when pressing the   (MUTE)
button on the remote control. Press again to restore the volume.

Sound Mode

CINEMA

(for cinema sound effect)

MUSIC 

(for standard sound effect)

GAME

(for game sound effect)

SPORT

(for sport broadcasting)

NEWS

(for news)

NIGHT

(for night)

BYPASS

(for flat sound effect)

Bass and Treble Control

Bass and Treble control is applicable during BYPASS
mode only.

1. Press the BASS button.
2. Within 5 seconds, press the VOL (+ or –) button to adjust 

the bass.

1. Press the TREBLE button.
2. Within 5 seconds, press the VOL (+ or –) button to adjust 

the bass.

Subwoofer level control

The subwoofer level can be
adjusted.

To increase

 the level, press

the SW LEVEL 


button. 

To decrease

 the level, press the SW LEVEL 


button.

AV SYNC level control

The AV SYNC (Audio Video
Synchronization) level can
be adjusted.

To increase

 the level, press

the AV SYNC +  button.

To decrease

 the level, press the AV SYNC – button.

+5

–5

–4

+4

.....

0

+1


+

3

.....

Содержание HT-SB60

Страница 1: ... EMPLOI MANUAL DE MANEJO BRUKSANVISNING MANUALE DI ISTRUZIONI GEBRUIKSAANWIJZING MANUAL DE OPERAÇÃO KÄYTTÖOHJE OPERATION MANUAL DEUTSCH PORTUGUÊS FRANÇAIS ESPAÑOL SVENSKA ITALIANO NEDERLANDS SUOMI ENGLISH Siehe Seiten i bis viii und D 1 bis D 14 Se reporter aux pages i à viii et F 1 à F 14 Consulte las páginas i a viii y S 1 a S 14 Hänvisa till sidorna i till viii och V 1 till V 14 Leggere le pagi...

Страница 2: ... Sistema Home Theater per Sound Bar HT SB60 è con forme ai requisiti essenziali ed alle altre disposizioni pertinenti stabilite dalla direttiva 1999 5 CE La dichiarazione di conformità può essere consultata sul sito http www sharp de doc HT SB60 pdf Dichiarazione di conformità La società SHARP Electronics Europe GmbH dichiara che il prodotto SHARP Sistema Home Theater per Sound Bar HT SB60 è costr...

Страница 3: ...nsioni pericolose per cui si deve sempre staccare la spina del cavo d alimentazione dalla presa di corrente prima di qualsiasi intervento di manutenzione e quando non si usa l apparecchio per un lungo periodo di tempo Wanneer de ON STAND BY toets in de STAND BY stand staat loopt er nog steeds stroom netspanning in het toestel Wanneer de ON STAND BY toets in de STAND BY stand staat kan het toestel ...

Страница 4: ...vaere med at undsaette denne indretning for drypning eller overstaenkning Der må ikke anbringes nogen genstande fyldt med vand som for eksempel vaser på dette apparat Advarsel For å unngå brann eller kortslutning utsett ikke produktet for vann eller fuktighet Gjenstander som inneholder vaeske feks en blomstervase må ikke plasseres oppå apparatet Varoitus Älä vie laitetta sateeseen tai kosteisiin t...

Страница 5: ...boratories Prodotti su licenza di DolbyLaboratories Dolby e il simbolo doppia D sono marchi di Dolby Laboratories Vervaardigdonderlicentie van Dolby Laboratories Dolby en het symbool met de dubbele D zijnhandelsmerken van Dolby Laboratories Fabricado soblicença dos DolbyLaboratories Dolby e o símbolo D duplo são marcas comerciais da DolbyLaboratories Valmistettu Dolby Laboratoriesinlisenssillä Dol...

Страница 6: ...l organisation de collecte existante ou votre administration locale pour les modalités de reprise de vos produits usagés 2 Pays hors de l Union européenne Si vous souhaitez mettre ce produit au rebut veuillez contacter votre administration locale qui vous renseignera sur la méthode d élimination correcte de cet appareil Attention votre produit comporte ce symbole Il signifiequeles produits électri...

Страница 7: ...en 2 In andere landen buiten de Europese Unie Als u dit product wilt weggooien neem dan contact op met de plaatselijke autoriteiten voor informatie omtrent de juiste verwijderingsprocedure Let op Uw product is van dit merkteken voorzien Dit betekent dat afgedankte elektrische en elektronische apparatuur niet samen met het normale huisafval mogen worden weggegooid Er bestaat een afzonderlijk inzame...

Страница 8: ...rie kann an der Verkaufsstelle zurückgegeben werden Für andere Nicht EU Staaten Bitte erkundigen Sie sich bei Bedarf bei Ihrer Gemeindeverwaltung nach weiteren Informationen zur Entsorgung von gebrauchten Batterien Information sur la mise au rebut de la pile Les piles accus fournies avec ce produit peuvent contenir des traces de Plomb Au sein de l Union Européenne Le symbole de la poubelle sur rou...

Страница 9: ...to de venda Para os outros países fora da União Europeia Por favor contacte a sua autoridade local para o método correcto de disposição das baterias usadas Tietoja paristojen hävittämisestä Tämän tuotteen mukana oleva paristo akku saattaa sisältää jäänteitä Lyijy EU maat Paristo akku on merkitty yliviivatun roskasäiliön symbolilla mikä tarkoittaa että sitä ei saa hävittää kotitalouden yleisjätteid...

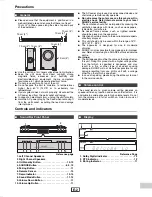
Страница 10: ...ge General Information Precautions 2 Controls and indicators 2 4 Preparation for Use System preparation 5 Falling prevention 6 Placing the system 7 System connections 7 8 Audio connections to TVs DVD players VCRs etc 9 Remote control 10 Page Basic Operation General control 10 12 Operating the TV with the remote control 12 References Troubleshooting chart 13 Maintenance 14 Error indicators and warn...

Страница 11: ...erate climates SHARP is not responsible for damage due to improper use Refer all servicing to a SHARP authorised service centre Warnings The voltage used must be the same as that specified on this unit Using this product with a higher voltage other than that which is specified is dangerous and may result in a fire or other type of accident causing damage SHARP will not be held responsible for any ...

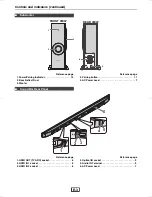
Страница 12: ...fer Reference page 4 Pairing button 11 5 AC Power Lead 7 Reference page 1 HDMI OUT TV ARC socket 8 2 HDMI IN 1 socket 8 3 HDMI IN 2 socket 8 Reference page 4 Optical IN socket 9 5 Audio IN Terminal 9 6 AC Power Lead 7 Subwoofer AC INPUT PAIRING 4 2 3 1 5 FRONT VIEW REAR VIEW Sound Bar Rear Panel 6 3 5 4 2 1 ...

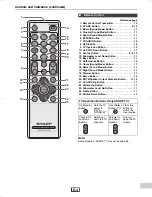
Страница 13: ...utton 11 17 Night Sound Mode Button 11 18 Dimmer Button 11 19 Demo Button 10 20 MUTE Speaker Output Selection Button 11 12 21 AV SYNC Up Button 11 22 Volume Up Button 11 23 Subwoofer Level Up Button 11 24 Treble Button 11 25 Volume Down Button 11 Note Some models of SHARP TV may not be operable 2 3 4 5 7 8 10 12 13 1 9 11 6 15 16 17 18 19 20 21 23 22 24 25 14 AUDIO Remote Control TV Operation Butt...

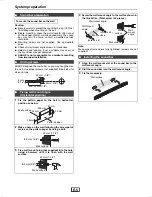
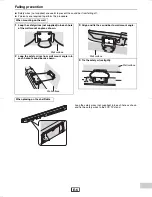
Страница 14: ...ed Sound bar preparation To mount the sound bar on the wall Driving screws Fixing wall mount angle Horizontal position 1 Fix the pattern paper to the wall in horizontal position as below 2 Make a hole on the wall following the screw point marks on the pattern paper by using a drill 3 Fix a wall mount plug not supplied into the hole using a hammer until it is flush with the wall surface 3 2 mm 1 8 ...

Страница 15: ...upplied into each hole of the wall mount angle as shown 2 Loop the safety wires from wall mount angle into each hole of sound bar as shown Wall surface Wall surface 3 Align and fix the sound bar to wall mount angle 4 Tie the safety wires tightly Wall surface Wall surface When placing on the shelf table Loop the safety wires not supplied into each hole as shown and tie the safety wires to the LCD T...

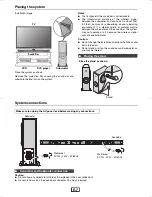
Страница 16: ...e at all because the wireless signal cannot penetrate metal Caution Do not change the installation direction when the sound bar is turned on Do not stand or sit on the sound bar and subwoofer as you may be injured System connections Caution Do not allow any objects to fall into or to be placed in the bass reflex duct Do not stand or sit on the sound bar subwoofer You may be injured TV VCR DVD play...

Страница 17: ...e To listen to the sound from this system you will need to press and hold the MUTE button refer page 12 or adjust the speaker output settings within the TV menu For details refer to the operation manual of the TV If you are unable to select external speaker setting from the TV menu E g For SHARP LCD TV it is named as AQUOS AUDIO SP turn the CEC OFF and ON again To enjoy 3D images this system must ...

Страница 18: ... quality matter from the sound bar Connect to the TV using an optical digital cable or an audio cable Other connection without HDMI DVD Blu ray Disc Player Digital tuner etc TV Audio signal Video signal Connecting a TV or DVD player etc To select OPTICAL function Press SOURCE button repeatedly until OPTICAL appears on the display To select AUDIO IN function Press SOURCE button repeatedly until AUD...

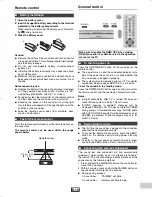
Страница 19: ...ontrol and the subwoofer indicator turns red Notes A slight audio delay after TV is turned ON does not mean that the system is faulty This is normal AQUOS speaker is enabled message will be displayed if SHARP LCD TV does not detect HT SB60 during power on However the message AQUOS audio with AQUOS LINK is enabled will be displayed soon as HT SB60 is detected These messages may vary for other TV mo...

Страница 20: ...desired sound mode button on the remote control Bass Control Treble Control Notes When sound from the speaker is distorted decrease the subwoofer level When changing the subwoofer level the output level of the subwoofer is also changed On sound bar PAIRING disappears On subwoofer indicator turns blue Display brightness control Volume auto fade in Volume control Sound bar operation Press the VOLUME...

Страница 21: ...change Press the SOURCE button repeatedly to select desired input source or press TV ARC button on the remote control to select TV ARC APC Auto Power Off Control This sound bar can be set to turn off automatically if no signal is detected 1 Press the APC button repeatedly to select the time 2 Thesoundbarwill enterthepowerstand bymodeautomatically if no signal is detected after the preset time has ...

Страница 22: ...bwooferisnotwell balanced Is the subwoofer level set to the minimum or maximum level Power turns off suddenly Is the HDMI cable connected correctly Connect the HDMI cable correctly and then perform the reset procedure Noise is heard during playback Move the speaker away from any computers or mobile phones When a button is pressed the sound bar does not respond Set the sound bar to the stand by mod...

Страница 23: ...d bar and check if the cable is connected properly Demo indicator blinks red When the protection circuit is activated Sound Bar Power source AC 220 240 V 50 60 Hz Power consumption Power on 38 W Power standby 0 4 W Dimension Width 1385 mm 54 1 2 Height 73 mm 2 7 8 Depth 68 mm 2 11 16 Weight 3 6 kg 7 92 lbs Output power RMS Total 160 watts RMS 160 W 80 W 80 W 10 T H D RMS 120 W 60 W 60 W 1 T H D Ou...

Страница 24: ...13A R AS 1 TINSZB522AWZZ ...

Страница 25: ...HT SB60 SOUND BAR HOME THEATER SYSTEM U P DOWN ...

Отзывы: