Sharp GX-CD5200V Скачать руководство пользователя страница 13


04/1/28

GX-CD5200V_EN1.fm


E-12


ENGLISH


GX-CD5200V


Preparation for Use


Remote control


Battery installation


Precautions for battery use:


Replace all old batteries with new ones at the same time.


Do not mix old and new batteries.


Remove the batteries if the unit will not be used for long periods
of time. This will prevent potential damage due to battery leakage.


Caution:


Do not use rechargeable batteries (nickel-cadmium battery, etc.).


Installing the batteries incorrectly may cause the unit to
malfunction.


Battery removal:


Open the battery cover and pull up the battery to take out.


Notes concerning use:


Replace the batteries if the operating distance is reduced or if the
operation becomes erratic. Purchase 2 "AA" size batteries (UM/
SUM-3, R6, HP-7 or similar)


Periodically clean the transmitter on the remote control and the
sensor on the unit with a soft cloth.


Exposing the sensor on the unit to strong light may interfere with
operation. Change the lighting or the direction of the unit.


Keep the remote control away from moisture, heat, shock, and
vibrations.


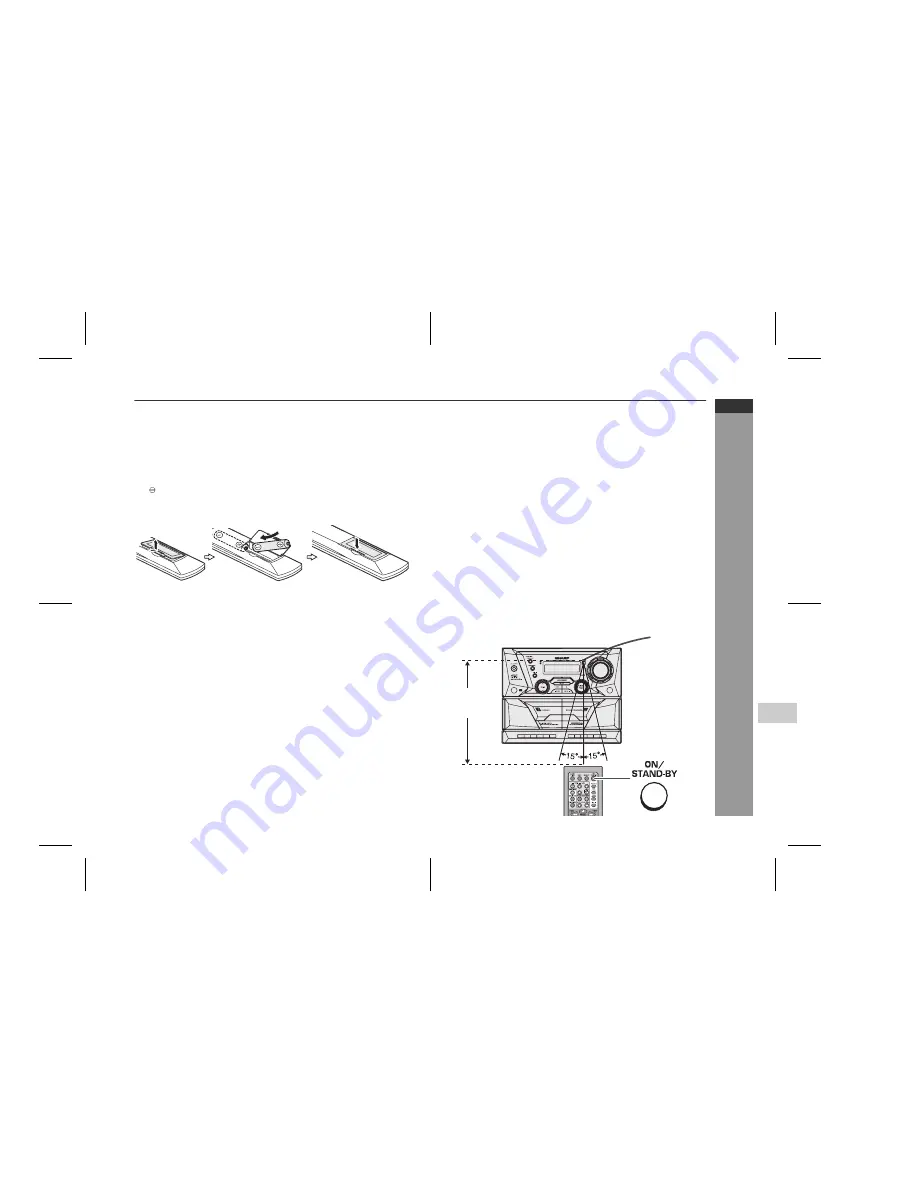
Test of the remote control


Check the remote control after checking all the connections (see
pages 8 - 11).
Point the remote control directly at the remote sensor on the unit.


The remote control can be used within the range shown below:


Press the ON/STAND-BY button. Does the power turn on? Now, you
can enjoy music.


1

Open the battery cover.

2

Insert the supplied batteries according to the direction
indicated in the battery compartment (back of the battery
cover).


When inserting or removing the batteries, push them towards the

 battery terminals.


3

Close the cover.

Remote 
sensor

0.2 m - 6 m

(8" - 20')

Содержание GX-CD5200V

Страница 1: ...ire ce mode d emploi très attentivement Muchas gracias por haber adquirido este producto SHARP Lea atentamente este manual para conseguir el mejor rendimiento del aparato Le servirá también como guía operativa de este producto SHARP 深謝惠購夏普 SHARP 產品 為發揮本產品的最佳性能 請仔細閱讀 本手冊 它是此夏普 SHARP 產品的操作指南 SHARP CORPORATION PORTABLE VIDEO CD STEREO MODEL MODÈLE MODELO GX CD5200V OPERATION MANUAL MODE D EMPLOI MANU...

Страница 2: ...copyright Please refer to the relevant laws in your country CAUTION This product is classified as a CLASS 1 LASER product Use of controls adjustments or performance of procedures other than those specified herein may result in hazardous radiation exposure As the laser beam used in this compact disc player is harmful to the eyes do not attempt to disassemble the cabinet Refer servicing to qualified...

Страница 3: ...14 Disc Playback Video CD 15 Preparation for video CD playback 16 Video CD playback 17 19 Advanced video CD playback 20 24 CD playback 25 28 Radio Listening to the radio 28 29 Setting the FM MW interval 30 Tape Playback Listening to a cassette tape TAPE 1 or TAPE 2 30 32 Tape Recording Recording to a cassette tape 32 35 Advanced Features Timer and sleep operation Remote control only 35 38 Enhancin...

Страница 4: ...d only be used within the range of 5 C 35 C 41 F 95 F Warning The voltage used must be the same as that specified on this unit Using this product with a higher voltage other than that which is specified is dangerous and may result in a fire or other type of acci dent causing damage SHARP will not be held responsible for any damage resulting from use of this unit with a voltage other than that whic...

Страница 5: ...23 25 13 CD Video CD MP3 Button 17 14 Video CD Stop or Return CD MP3 Disc Stop Button 18 15 Video CD Skip or Next CD MP3 disc Track Up or Fast Forward Button 18 16 Remote Sensor 12 17 Volume Control 13 18 Simba Mode Demo Button 13 19 Mixing Microphone Socket 32 34 20 Tape 2 Cassette Compartment 30 21 Tape 1 Play Button 30 22 Tape 1 Stop Button 30 23 Tape 1 Rewind Button 30 24 Tape 1 Fast Forward B...

Страница 6: ...l Reference page 1 AM Loop Aerial Socket 9 2 Beat Cancel 34 3 Video Output Socket 16 4 Line Input Sockets 39 5 Speaker Terminals 8 6 AC Power Lead 10 7 Voltage Selector 10 8 Battery Compartment 11 9 DC Power Terminal 11 Speaker system 1 Tweeter 2 Bass Reflex Hole 3 Woofer 4 Speaker Wire 1 2 3 4 5 6 7 8 9 4 1 2 3 ...

Страница 7: ...8 CD Indicator 25 26 9 MP3 Indicator 27 10 High Speed Dubbing Indicator 35 11 Random Indicator 25 12 Sleep Indicator 38 13 Tape 2 Record Indicator 33 35 14 Timer Play Indicator 36 15 Timer Recording Indicator 36 16 Tape 2 Reverse Mode Indicator 31 17 FM Stereo Receiving Indicator 29 18 Daily Timer Indicator 36 19 FM Stereo Mode Indicator 29 20 Tape 1 Play or Tape 2 Forward Play Indicator 31 21 Tap...

Страница 8: ...Button 30 17 Video CD CD MP3 Disc Button 17 18 Tape 1 2 Button 30 19 Tuner Band Button 28 20 Line In Button 39 21 Disc Random Button 25 22 Video CD Play or Repeat or Select or Resume CD MP3 Disc Play or Repeat Button 23 25 23 Video CD Stop or Return CD MP3 Disc Stop Button 18 24 Disc Pause Button 18 25 Video CD Skip or Previous CD MP3 Disc Track Down or Fast Reverse Tape Rewind Tuner Preset Down T...

Страница 9: ...ection Connect each speaker wire to the SPEAKER terminals as shown Use speakers with an impedance of 8 ohms or more as lower im pedance speakers can damage the unit Caution Set the FUNCTION switch to STAND BY before connecting or disconnecting the speakers Connect the black wire to the minus terminal and the red wire to the plus terminal Do not mix the right channel and left channel wiring when co...

Страница 10: ...Supplied AM Loop aerial Aerial Adjustment FM SW1 SW2 MW SW1 Connect the AM loop aerial to the AM LOOP socket Position the AM loop aerial for optimum reception Note Placing the aerial on the unit or near the AC power lead may cause noise pickup Place the aerial away from the unit for better reception ...

Страница 11: ...nd will be heard and the unit cannot be turned on Wait until the process is finished Unplug the AC power lead from the wall socket if the unit will not be in use for a prolonged period of time Demonstration mode To the wall socket 110 127 220 240 V 50 60 Hz AC 220V 240V VOLTAGE SELECTOR AC 110V 127V AC 220V 240V VOLTAGE SELECTOR AC 110V 127V The first time the unit is plugged in the unit will ente...

Страница 12: ...x old and new batteries Caution Do not use rechargeable batteries nickel cadmium battery etc Battery replacement Replace the batteries when they become weak and or recording or playback is impaired This may occur even though radio broadcasts are audible Attention connection of DC lead and battery terminals ª Connect the red battery clip to on the battery terminal Connect the black battery clip to ...

Страница 13: ...teries UM SUM 3 R6 HP 7 or similar Periodically clean the transmitter on the remote control and the sensor on the unit with a soft cloth Exposing the sensor on the unit to strong light may interfere with operation Change the lighting or the direction of the unit Keep the remote control away from moisture heat shock and vibrations Test of the remote control Check the remote control after checking a...

Страница 14: ... EQUALIZER MODE button repeatedly until the desired sound mode appears After use Press the ON STAND BY button to enter the power stand by mode Main unit operation When the VOLUME control is turned clockwise the volume will increase When it is turned anti clockwise the volume will decrease Remote control operation Press the VOLUME or button to increase or decrease the volume When the power is first...

Страница 15: ...hour or 12 hour display will be skipped To change the 24 hour or 12 hour display 1 Press the ON STAND BY button to turn the power on 2 Press the CLOCK TIMER button 3 Within 10 seconds press the or button to select CLOCK and press the MEMORY button 4 Press the or button to select 24 hour or 12 hour display and then press the MEMORY button 0 00 The 24 hour display will appear 0 00 23 59 AM 12 00 The...

Страница 16: ...Playback control You can enjoy the following two types of playback depending on the disc Notes Video CDs are recorded in PAL or NTSC format Analogue system CDVs 12 cm cannot be played Photo CDs and CD ROMs cannot be played Symbol Size 8 cm 3 12 cm 5 Label sides 1 side 1 side Audio recording format Digital max 20 min Digital max 74 min Video recording format MPEG 1 Disc type Features Video CDs with...

Страница 17: ...c in the PAL mode the vertical size of the picture will not be modified If a multi mode TV is equipped with an input selector switch set the switch to MULTI MODE For the details refer to the TV operation manual Do not change the video output format during playback If you do the picture signal may not be output properly Picture may be distorted when the setting is switched This is not the malfuncti...

Страница 18: ... control allows a video CD to be played back according to instructions recorded on the disc The previous next re turn and select operations may function differently depending on the P B C CDs Some video CDs with playback control may have an auto pause recorded on them When such a disc is played the screen will stop automatically at the point where an auto pause signal has been inserted If the pict...

Страница 19: ...in individual discs Operations may be different from the above in the P B C mode During fast forward fast reverse no sound is produced Images may be distorted or become noisy or discolouration may occur Function Main Unit Remote Control Operation Play Press in the stop mode Stop Press in the playback mode Pause Press in the playback mode Press the SELECT RESUME button to resume playback from the p...

Страница 20: ...activating the playback control function In this case the menu screen will not appear and the disc will be played in the same way as a video CD without P B C Notes The P B C function can also be cancelled whilst in the playback mode Some video CDs with P B C cannot be played back when the P B C mode is off 1 Press the SELECT RESUME button A menu will appear on the TV and playback will be paused 2 ...

Страница 21: ... video CD to play it back easily Up to 9 scenes per disc can be marked Use the direct search buttons on the remote control to select the desired track whilst playing the selected disc Selected track number The direct search buttons allow you to select up to number 9 When selecting number 10 or more use the 10 button A For example to choose 13 1 Press the 10 button once 2 Press the 3 button B For e...

Страница 22: ...n The bookmark function will not work during P B C play Cancel the P B C mode before using this function on a video CD with P B C This function will not work during programmed play 1 Whilst in the stop or playback mode hold down the BOOK MARK button on the remote control for more than 1 sec ond BOOKMARK DIGEST will appear before the marked scenes and numbers are displayed on the TV screen Each tim...

Страница 23: ...t Press the RETURN button Notes The disc digest function is available only in the stop mode This function is not available with an audio CD or MP3 disc Caution This function does not work in the P B C mode which will auto matically cancelled when you press the DIGEST TIME SEARCH button This function does not work during programmed play 1 Whilst in the playback mode hold down the DIGEST TIME SEARCH...

Страница 24: ...on a video CD with P B C This function does not work during programmed play Resume play This function is to restart playback from the point where it has stopped Notes Resume play cannot be activated when the function is changed from CD VIDEO CD to another or the unit is set to the power stand by mode This function does not work during P B C play Cancel the P B C mode when playing video CDs with P ...

Страница 25: ... disc playback Changing the TV screen display You can check the operation of the main unit by the on screen dis play During stop mode During playback Note The displays may differ depending on the discs 1 Press and hold the VCD AUTO VCD AUDIO MODE button for 3 seconds until VCD ON appears on the TV screen 2 Press the SELECT RESUME button Press and hold the VCD AUTO VCD AUDIO MODE button for 3 secon...

Страница 26: ...order automatically Notes If you press the button during random play you can move to the track selected next by the random operation On the other hand the button does not allow you to move to the previ ous track The beginning of the track being played will be located In random play the unit will select and play tracks automatically You cannot select the order of the tracks This function also works...

Страница 27: ...EO CD to another the programmed selections will not be cleared During programme operation random play is not possible When the MEMORY button is pressed in P B C mode it will be cancelled automatically and the unit will be switched to the pro gramme mode 1 Whilst in the stop mode press the MEMORY button to enter the pro gramming save mode 2 Press the direct search buttons on the remote control to s...

Страница 28: ...ounter in the FL display may differ from its actual playback time Bitrate which is supported by MP3 is 32 320 kbps To change the display MP3 discs only Whilst in the stop mode or playback mode press the DIMMER DIS PLAY button Each time the button is pressed the display will change as follows When in the stop mode When in the playback mode To select the desired folder or track by name MP3 discs onl...

Страница 29: ... Press the VCD AUTO VCD AUDIO MODE button on the remote control until the desired audio mode is displayed Each time the VCD AUTO VCD AUDIO MODE button is pressed the mode will change as follows STEREO Sounds on the left and right channels are played L CH Sounds on the left channel only are played R CH Sounds on the right channel only are played V CANCEL The main vocal is lowered STEREO L CH R CH V...

Страница 30: ...Tuning on page 28 2 Press the MEMORY button to enter the preset tuning sav ing mode 3 Within 30 seconds press the PRESET or button to select the preset channel number Store the stations in memory in order starting with preset channel 1 4 Within 30 seconds press the MEMORY button to store that station in memory If the MEMORY and preset number indicators disappear be fore the station is memorised re...

Страница 31: ... a few hours after the span has been switched and the AC power lead disconnected the FM span will be automatically returned to 50 kHz MW span to 9 kHz If this happens set the span again When the span is switched all the memorised stations will be can celled Listening to a cassette tape TAPE 1 or TAPE 2 Auto power off function In the stop mode of tape operation the main unit enters the stand by mod...

Страница 32: ...ack Tape play indicator 1 Press the area marked and load cassettes into the TAPE 1 and TAPE 2 cassette compartments 2 Press the TAPE 1 2 button to select TAPE 1 3 Press the CONTINUOUS PLAYBACK button 4 Press the TAPE 1 button to start playback Playback begins from side A on TAPE 1 the playback se quence will be as follows TAPE 1 side A TAPE 2 side A TAPE 2 side B stop 1 Press the ON STAND BY butto...

Страница 33: ...e adap tor 2 Connect the microphone plug to the Mixing Mic socket 3 Press the TAPE 1 2 button 4 Load a cassette into the TAPE 1 or TAPE 2 cassette com partment 5 Press the button of the TAPE 1 or TAPE 2 6 Adjust the volume of the audio source and the microphone using the VOLUME control Before recording When recording important selections make a preliminary test to ensure that the desired material ...

Страница 34: ...PE 2 cassette compartment with side A facing you Wind past the leader of the tape on which recording cannot be performed 3 Press the VCD CD VCD CD button and load the desired disc 4 Press the button to choose one side or both sides To record on both sides To record on only one side 5 Press the button Recording will be paused 6 Press the button to record on side A or the button for side B CD playba...

Страница 35: ...rom tape to tape You can record from TAPE 1 to TAPE 2 1 Press the TAPE 1 2 button until TAPE 2 appears on the display 2 Load a cassette into the TAPE 2 cassette compartment with the side A facing you Wind past the leader of the tape on which recording cannot be performed 3 Press the button to choose one side or both sides To record on both sides To record on only one side 4 Press the button Record...

Страница 36: ... at the preset time Timer recording The unit turns on and starts recording from the tuner at the preset time Using the once timer and daily timer in combination For example use the once timer to record a radio programme and use the daily timer to wake up Note When the setting times for the daily timer and once timer overlap the once timer takes priority Allow an interval of at least 1 minute betwe...

Страница 37: ...e or button to select ONCE SET or DAILY SET and press the MEMORY button 5 Press the or button to select PLAY or REC and press the MEMORY button The illustrations show the daily timer setting 6 Press the or button to adjust the hour and then press the MEMORY button The illustrations show the timer playback setting in the daily timer mode 7 Press the or button to adjust the minutes and then press th...

Страница 38: ... the daily timer setting is cancelled Cancel the daily timer when it is not used When performing timer playback or recording using another unit connected to the LINE INPUT sockets select LINE IN in step 9 This unit will turn on or enter the power stand by mode automati cally however the connected unit will not turn on or off 1 Press the CLOCK TIMER button 2 Within 10 seconds press the or button to...

Страница 39: ...on 3 Within 10 seconds press the or button to select SLEEP and press the MEMORY button 4 Press the or button to select the time Maximum 3 hours Minimum 1 minute 3 hours 5 minutes 5 minute intervals 5 minutes 1 minute 1 minute intervals 5 Press the MEMORY button SLEEP will appear 6 The unit will enter the power stand by mode automatically after the preset time has elapsed The volume will be turned ...

Страница 40: ...16 and 50 ohms The recommended impedance is 32 ohms Plugging in the headphones disconnects the speakers automati cally Adjust the volume using the VOLUME control 1 Connect a VCR DVD etc to the LINE INPUT sockets 2 Press the ON STAND BY button to turn the power on 3 Press the LINE IN button 4 Play the connected equipment You can enjoy sounds from the supplied speakers LINE INPUT RIGHT LEFT VCR DVD ...

Страница 41: ...start Playback stops in the middle or is not per formed properly Is the disc loaded upside down Does the disc satisfy the standards Is the disc distorted or scratched Playback sounds are skipped or stopped in the middle of a track Is the unit located near excessive vi brations Is the disc very dirty Has condensation formed inside the unit Symptom Possible cause The radio makes unusual noises conti...

Страница 42: ...function If this happens leave the power on with no disc or cassette in the unit until normal playback is possible about 1 hour Wipe off any condensation on the transmitter with a soft cloth before operating the unit Before transporting the unit Remove CDs from the unit Make sure there is no CD in the disc spin dle Then set the unit to the power stand by mode Carrying the unit with discs left insi...

Страница 43: ... 16 50 ohms recommended 32 ohms Input terminals Mixing microphone 600 ohms Line input 350 mV 47 kohms Dimensions Width 300 mm 11 4 5 Height 252 mm 9 9 10 Depth 260 mm 10 1 4 Weight 4 12 kg 9 08 lbs without batteries Type Compact disc Signal readout Non contact 3 beam semiconductor laser pickup Audio channels 2 Filter 8 times over sampling digital filter D A converter 1 bit D A converter Wow and fl...

Страница 44: ......

Отзывы: