background image

5

ENGLISH

FRANÇAIS

ESPAÑOL

Connecting Devices to your TV 

You have several options for connecting your TV to different devices. The method in which you connect will be based 
upon the type of cables you have and the available outputs on your device.

Connecting an antenna, cable set-top box or satellite receiver

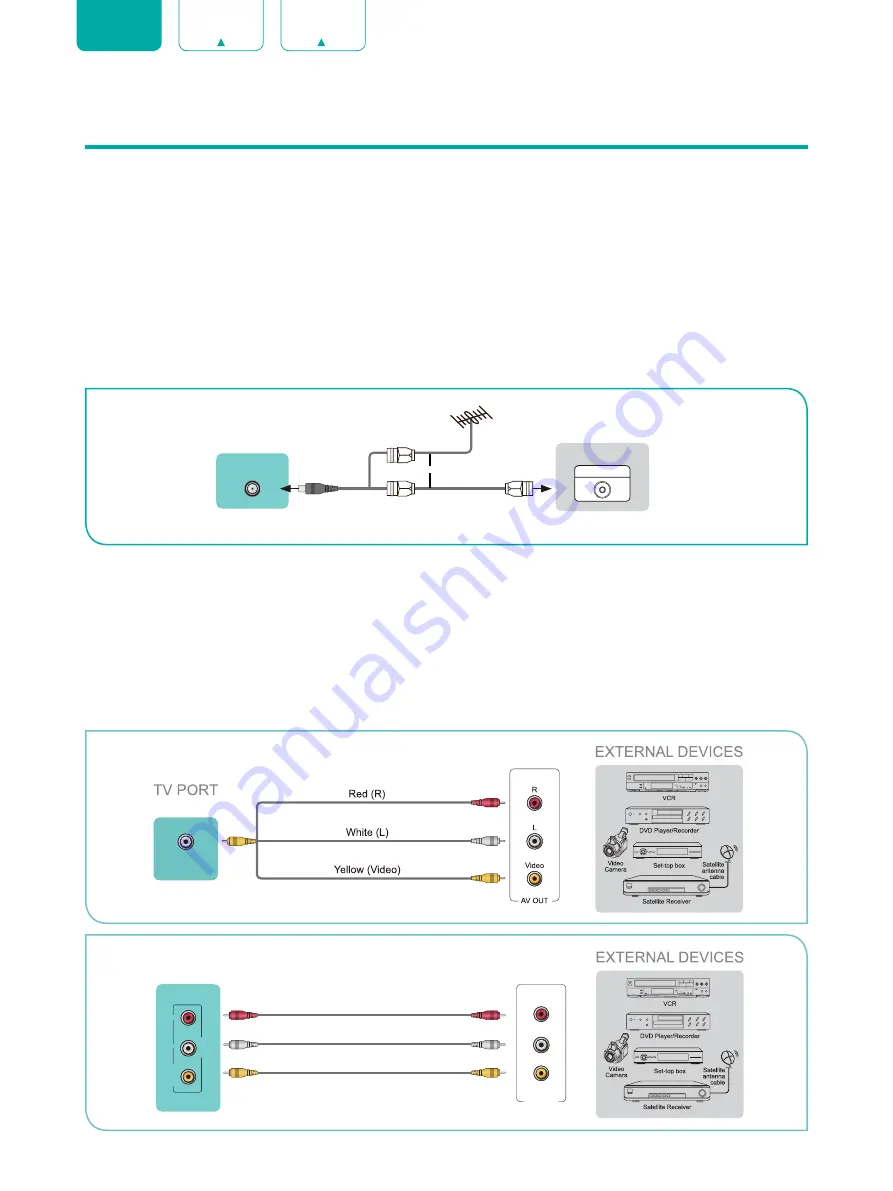
To connect an antenna,cable set-top box or satellite receiver: 
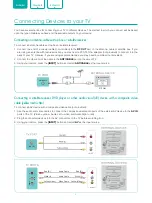
1.  Connect one end of a coaxial cable (not included) to the 

RF OUT

 port on the antenna, cable or satellite box. If you 

are using an antenna with twin-lead cable, you may need a 300-75 Ohm adapter (not provided) to connect it to the 
back of your TV. Likewise, if you are using several antennas, you may need a combiner (not provided).

2.  Connect the other end of the cable to the 

ANT/CABLE

 port on the side of TV.

3.  Using your remote, press the 

[INPUT]

 button and select 

ANT/CABLE

 as the input source. 

Connecting a satellite receiver, DVD player or other audio visual (AV) device with a composite video 
cable (yellow/red/white)

To connect an AV device with a composite video cable (not provided):
1.  Use the audio and video cables to connect the composite video/audio ports of the external AV device to the 

AV IN


ports of the TV. (Video = yellow, Audio Left = white, and Audio Right = red)

2.  Plug the connected devices into the AV connectors on the TV before switching it on.
3.  Using your remote, press the 

[INPUT]

 button and select 

AV

 as the input source.

or

ANT OUT

Cable Set top box

RF Out

EXTERNAL DEVICE

TV PORT

ANT/CABLE

AV IN

AV OUT

Video

L

R

White (L)

White (L)

Yellow (Video)

Yellow (Video)

Video Cable

Red (R)

Red (R)

Audio Cable 

Audio Cable 

TV PORTS

VIDE

O

L

R

AV

 IN

Содержание ES-M1904I0

Страница 1: ...ES M1904I0 ...

Страница 2: ...USER MANUAL Before using the TV please read this manual thoroughly and retain it for future reference ENGLISH ...

Страница 3: ...er or no consideration without the prior written permission of Hisense Company Ltd Requests for permission to store reproduce transmit or distribute materials may be made to one of the following addresses USA Hisense USA Corporation 7310 McGinnis Ferry Road Suwanee GA 30024 CANADA Hisense Canada Co Ltd 2283 Argentia Road Unit 16 Mississauga ON Canada L5N 5Z2 MEXICO Hisense Mexico S de R L de C V B...

Страница 4: ... of any kind either expressed or implied that the Application Service will be uninterrupted or error free including but not limited to vagaries of weather disruption of Service acts of God warranties of title local or regional limitations no infringement NOR IMPLIED WARRANTIES OF MERCHANTABILITY OR FITNESS FOR A PARTICULAR PURPOSE No advice or information given by Hisense providers affiliates or c...

Страница 5: ...Connecting a USB device 7 Connecting a headphone 7 Connecting Your TV to a Wireless or Wired Network 8 Connecting to a wireless network 8 Connecting to a wired Ethernet network 8 Using Your TV Remote Control 10 Buttons on your TV remote 10 Remote control range information 11 Completing the First Time Setup Menu 12 Shortcuts Instructions 13 Turning your TV on or off 13 Selecting the input source 13...

Страница 6: ...anced TV Settings 24 Getting familiar with the Home screen 24 Notifications 24 Apps 25 Media 26 Using Anyview Cast to mirror content from your device to the TV screen 27 Software updates for your TV 28 Quick Problem Solving Tips 29 ...

Страница 7: ...onnect the other end of the cable to the ANT CABLE port on the side of TV 3 Using your remote press the INPUT button and select ANT CABLE as the input source Connecting a satellite receiver DVD player or other audio visual AV device with a composite video cable yellow red white To connect an AV device with a composite video cable not provided 1 Use the audio and video cables to connect the composi...

Страница 8: ...with 2 cores as shown in the figure Connecting speakers or other audio receivers To connect speakers or other audio receivers with an audio cable not provided 1 Use an audio cable to connect the digital audio in port of the audio receiver device to the DIGITAL AUDIO OUT port of the TV 2 Plug the connected devices into the main power socket before switching on the TV TIP If you prefer to use Audio ...

Страница 9: ...NOTES Only digital sound bars that require a wired connection are compatible with the TV If the device has an Input Selector feature then make sure to change it to TV Connecting a USB device You can connect the USB devices such as hard drives USB sticks and digital cameras for browsing photos listening music and watching recorded movies 1 Connect a USB device into the USB port 2 Select the Media t...

Страница 10: ...the channel set for the wireless IP sharer is currently being used by another device nearby this will result in interference and communication failure If you apply a security system other than the systems listed below it will not work with the TV If Pure High throughput Greenfield 802 11N mode is selected and the Encryption type is set to WEP TKIP or TKIP AES WPS2 Mixed for your Access Point AP th...

Страница 11: ...omatically provide the IP address subnet mask gateway and DNS so you don t have to enter them manually Most home networks are Dynamic Networks Some networks require a Static IP address If your network requires a Static IP address you must enter the IP address subnet mask gateway and DNS values manually on your TV s Cable Setup Screen when you set up the network connection To get the IP address sub...

Страница 12: ... the previous place in the menu or app Live TV Turn Closed Caption On Off SearchNOW shortcut Dash button Select a digital sub channel Mute and restore sound Infrared transmitter Change TV input source Channel up down The button for the Quick setup menu Special function buttons Display the Home screen Confirm button Quick access buttons to apps Choose to leave the Video description feature On or Of...

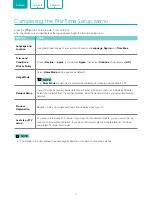
Страница 13: ...w television only for USA If you would like to program your other household remote controls to your new television please refer to the User s Manual supplied by your Cable or Satellite provider The Cable or Satellite providers User s Manuals should include instructions on how to program their remote to your television A list of codes for the most common Cable and Satellite providers are listed bel...

Страница 14: ...tore Mode should only be selected by Retailers who plan to demonstrate the TV Network Setup If your TV does not automatically detect an Ethernet connection then use a wireless network Select your network from the list that displays input the password Also you can add a hidden network Product Registration Register to stay up to date with news and updates about your TV Last step of TV setup You are ...

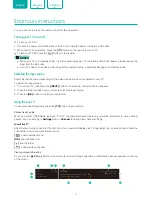
Страница 15: ...mote the list of Source appears 2 Press the D pad arrows of your remote to select the input source 3 Press the OK button to confirm your selection Using the Live TV To view broadcast programs press the TV button on your remote Channel search guide When you select ANT CABLE as input if no TV channels were saved before you will be prompted to do a channel search You can also go to Settings menu Chan...

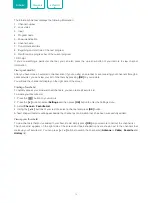
Страница 16: ...lay on the right side of the screen Creating a Favorite List To quickly access your most watched channels you can create a Favorite List To create your Favorite List 1 Press the button on your remote 2 Press the v button to select Settings and then press OK button to enter the Settings menu 3 Select Channel Favorite List 4 Using the v v buttons of your remote select a channel and press OK button A...

Страница 17: ...Theater Game Sports and Calibrated Sound Mode Select a preset sound mode to suit the type of content you are listening to Standard Theater Music Speech Late Night and Sports Picture Size Adjust the Aspect Ratio to stretch or zoom in on your picture You can choose from the following settings Auto Normal Zoom Wide Direct Dot By Dot Panoramic or Cinema Closed Caption CC You can switch between CC Off ...

Страница 18: ...sing the Settings Menu You can press the button to access the Menu press the v button on the D pad to select Settings and then press OK button to enter the Settings Menu The Settings Menu consists of the following settings Picture Sound Network Channel Accessibility System Support In each menu you can Press the v v buttons to select an item Press the OK buttons to enter the sub menu or to set on o...

Страница 19: ...ntent you re viewing Reset Picture Settings Reset all picture settings to factory default Sound Menu Sound Mode Select a preset sound mode to suit the type of content you are listening to Standard Theater Music Speech Late Night and Sports Set the sound effects to suit your preference Configure your audio settings for your sound preferences Once you choose the mode you can adjust the audio based o...

Страница 20: ...onnection When the Connection Type is Wireless means you choose a wireless network connection to access the Internet Refresh Refresh wireless network Add A Network You can add wireless network Advanced Settings Configure the advanced wireless network settings for the TV Connection Test Tests the status of your network connection Network Information View information about your network connection Ch...

Страница 21: ...enu Parental Control Turn on Parental Controls to block children from being able to view certain programs The password is required to be set when you use this function for the first time For more information about Parental Control See Parental Control on page 22 Language and Location Select the language used for this TV and your location Language Select the language used for this TV Keyboard Layou...

Страница 22: ...e feature Netflix Remove this TV from your Netflix account Please contact Netflix if you want to stop being billed for your service Vudu Sign out and remove this TV from your list of authorized Vudu devices Amazon Alexa Service Use your voice to control the TV other smart home devices and more Amazon Alexa Service Turn on and off Alexa service Amazon Alexa Service Setup Set up accounts to use Alex...

Страница 23: ...k if your TV needs software update Open Source License Click to read Open Source License details Software Update via USB Update TV software using a flash drive connected to USB Reset Advertising ID Reset your advertising ID You may still receive the same number of ads but they may not be relevant to your interests Factory Reset Reset your TV to the factory settings Support View System information ...

Страница 24: ...ocking Change PIN or Reset Parental Control Defaults features Scheduled Blocking Blocks all channels and programs during selected periods of time Channel Blocking Blocks selected channels Programme Blocking Blocks programs by ratings Input Blocking Blocks selected inputs App Blocking If an app that you want to restrict doesn t appear here then check the Parental Control settings in the app Change ...

Страница 25: ...nadvisable for young children could contain scenes disturbing to children under eight Recommended for viewing with parent 13ans Programming is appropriate for children 13 and older and may contain moderate violence language and some sexual situations 16ans Recommended for children 16 and older and may contain strong violence language and sexual content 18ans Programming intended for viewers that a...

Страница 26: ...election Indicators and Icons on the top of the Home screen You can always view the current time in the top left corner of the Home screen If your TV is connected to the Internet through a wireless connection then an icon will display in the top right corner of the screen This location makes it very convenient for you to determine if you still have Internet connectivity as you use the TV Names of ...

Страница 27: ...g message displays that asks if you re sure you want to remove the app 3 Click on Delete The icon is removed from the Apps list NOTE If an app is deleted the information related to that app is also removed Moving App Icons around Apps can not be moved around on the screen Customizing the name of your TV If you have several TV s in your home then you may want to customize the name of your TV By giv...

Страница 28: ...wse through content based on the type that you wish to access 1 You can find the file by Search Navigate to the appropriate menu tab on the screen and select All Picture Video and Music you can also find the file faster you want through the file type sort Name Date Modified Size 2 Click on the name of the folder that contains your content 3 Make your selection to play or view the content If you wa...

Страница 29: ...te press the v button on the D pad to select Settings press OK button to enter the Settings menu Go to Network Network Configuration and select Wireless 2 Press the INPUT button on your remote and select the Anyview Cast 3 Turn on the wireless display function on your Android based device NOTE Some Android based devices may not support casting 4 Find your TV in the list of devices that displays an...

Страница 30: ...herefore we recommend that you keep your TV connected to the Internet to receive updates when they are available You can choose to receive updates manually or check for software updates and install them manually Checking for the latest software To manually check for the latest firmware 1 Using your remote press the button 2 Press the v button on the D pad to select Settings press OK button to ente...

Страница 31: ...plug it after 60 seconds Check that the Color is set to 50 or higher Try different TV channels The sound and or picture is distorted or appears wavy An electric appliance may be affecting the TV Turn off any appliances that are nearby and move it farther away from the TV Insert the power plug of the TV set into another power outlet The sound and picture is blurry or cuts out If using an external a...

Отзывы: