background image

52

Select the Files to Play Back

•  To play back data on a USB memory device, insert the 

USB memory device on the TV. USB mode is selected 
automatically. (Go to step 2)

•  Use the following procedure to switch back to USB mode 

after switching from USB mode to another mode.

1

   Select "USB" or "Home Network (DLNA)" from 

INPUT list screen.

2

   Press 

D

.

 USB memory device

Press

a

/

b

/

c

/

d

 to select the drive where you 

want to fi nd your fi les, and then press 

ENTER

.

USB1

USB2-1

USB2-2

Example

•  If the TV is turned off and then on again, the number 

assigned to the USB drive may change.

 Home Network (DLNA)

Press

a

/

b

 to select the server where you want to 

find your files, and then press 

ENTER

.

Server1

Server2

Example

3

   Press 

c

/

d

 to select "Photo", "Music" or "Video", 

and then press 

ENTER

.

Music

Photo

Video

Example

4

   Press 

c

/

d

 to select the desired folder, and then 

press

ENTER

.

•  You cannot switch the input mode if a USB memory device 

is not connected.

•  You do not need to select the drive/server in step 2 when 

there is only one drive in the connected USB memory 
device or there is only one home network (DLNA) server 
connected to the TV.

•  16 is the maximum number of USB drives and 10 is the 

maximum number of home network (DLNA) servers that 
can be displayed.

•  "VIEW MODE" is fi xed during the Photo or Music mode. 

During "Video mode", you can select "Auto" or "Original".

•  The key guide display disappears automatically after a 

particular time has elapsed. To display the key guide 
display again, press 

DISPLAY

.

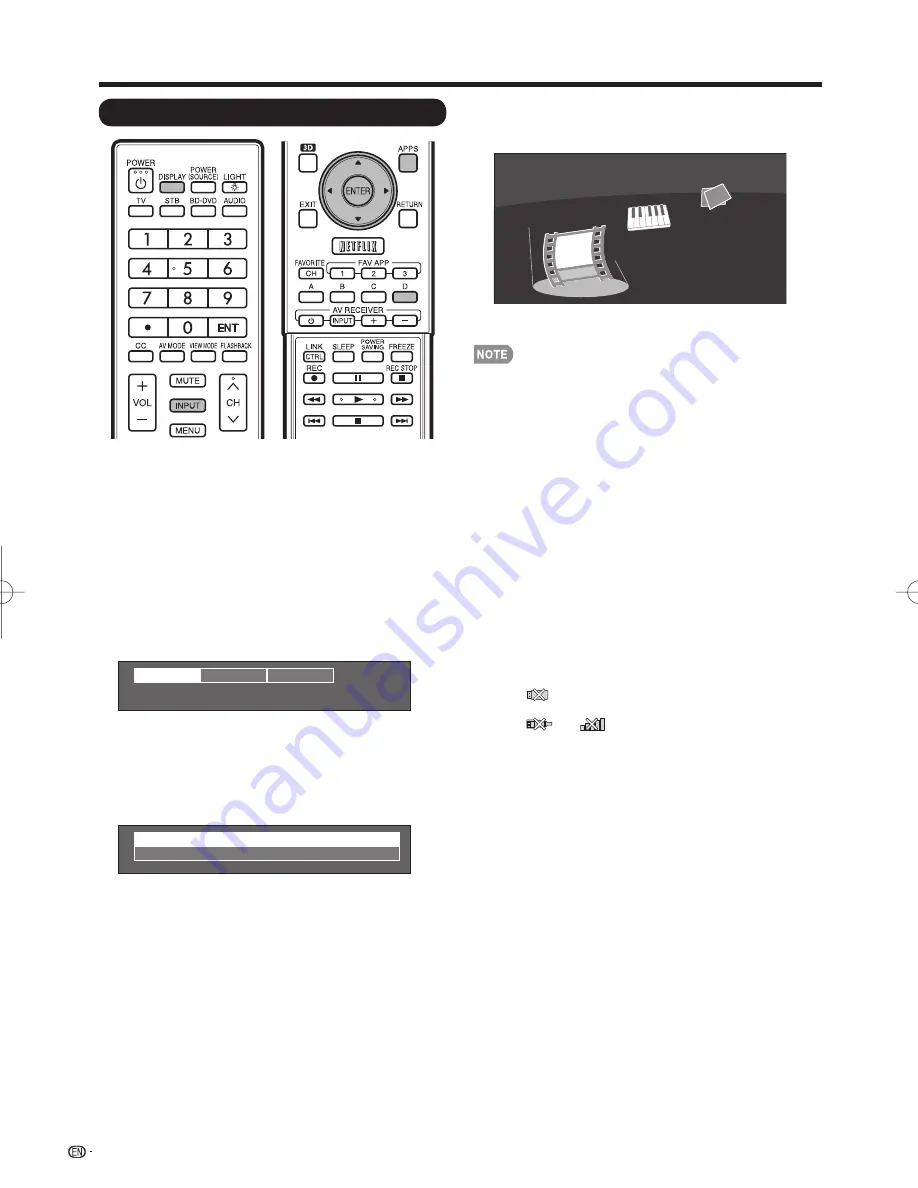
 When displaying the data with the APPS

The Media screen can be displayed even by using the 
application window.

1

   Press 

APPS

 to display the application window.

2

   Press 

a

/

b

/

c

/

d

 to select "USB Media" or "Home 

Network (DLNA)", and then press 

ENTER

.

• If "

" is displayed after you switch to USB mode, 

check the USB connection.

• If "

" or "

" is displayed after you switch to 

Home Network (DLNA) mode, check your TV's network 
settings and connection.

•  You can also display the Media screen by pressing 

FAV APP

 on the remote control unit. See page 36 for 

details on the FAV APP Key Assign function.

Enjoying Photo/Music/Video Playback

PRO-70̲60X5FD̲E̲05.indd   52

PRO-70̲60X5FD̲E̲05.indd   52

2011/07/04   14:41:08

2011/07/04   14:41:08

Содержание Elite PRO-60X5FD

Страница 1: ...PRO 70X5FD PRO 60X5FD OPERATING INSTRUCTIONS MODE D ENPLOI O PERATING I NSTRUCTIONS M ODE D ENPLOI LED LCD TV Téléviseur LCD LED ...

Страница 2: ...operation manual go to www elitelcdtv com espanol Pour la version en espagnol de ce mode d emploi veuillez consulter www elitelcdtv com espanol Para le versión en español de este manual de operación acceda a www elitelcdtv com espanol ...

Страница 3: ...uct CAUTION RISK OF ELECTRIC SHOCK DO NOT OPEN CAUTION TO REDUCE THE RISK OF ELECTRIC SHOCK DO NOT REMOVE COVER OR BACK NO USER SERVICEABLE PARTS INSIDE REFER SERVICING TO QUALIFIED SERVICE PERSONNEL TO PREVENT ELECTRIC SHOCK MATCH WIDE BLADE OF PLUG TO WIDE SLOT FULLY INSERT CAUTION WARNING FCC Regulations state that any unauthorized changes or modifications to this equipment not expressly approve...

Страница 4: ...ing status for household use FCC Compliance Statement This device complies with part 15 of the FCC Rules Operation is subject to the following two conditions 1 This device may not cause harmful interference and 2 this device must accept any interference received including interference that may cause undesired operation Wireless Radio For product available in the USA Canada market only channel 1 11...

Страница 5: ...mation 15 Power Sources This product should be operated only from the type of power source indicated on the marking label If you are not sure of the type of power supply to your home consult your product dealer or local power company For products intended to operate from battery power or other sources refer to the operating instructions 16 Overloading Do not overload wall outlets extension cords o...

Страница 6: ...ducts including amplifiers that produce heat The Liquid Crystal panel is a very high technology product with 2 073 600 pixels giving you fine picture details Occasionally a few non active pixels may appear on the screen as a fixed point of blue green red or yellow Please note that this does not affect the performance of your product Lightning For added protection for this television equipment during ...

Страница 7: ... enjoyable and safe TUNE INTO SAFETY One size does NOT fit all Follow the manufacturer s recommendations for the safe installation and use of your flat panel display Carefully read and understand all enclosed instructions for proper use of this product Don t allow children to climb on or play with furniture and television sets Don t place flat panel displays on furniture that can easily be used as st...

Страница 8: ... that may cause injury Caring for the 3D Glasses Use only the cloth provided with the 3D Glasses to clean the lenses Remove dust and soil from the cloth Any dust or other soiling on the cloth may result in scratches Do not use solvents such as benzene or thinners as doing so may damage the coating When cleaning the 3D Glasses take care not to allow water or other fluids to come into contact with th...

Страница 9: ...e Digital Living Network Alliance and LC logo mark are registered trademarks of SHARP Corporation This product is embedded with LC Font technology which was developed by SHARP Corporation for clearly displaying easy to read characters on LCD screens However other fonts are used for some screen pages too x v Color and are trademarks of Sony Corporation ABOUT DIVX VIDEO DivX is a digital video forma...

Страница 10: ...Configuring the TV Settings to Enhance 3D Image Viewing 47 49 Specifications 3D Glasses 50 Enjoying Photo Music Video Playback Connecting a USB Memory Device USB Hard Drive 51 Connecting a Home Network DLNA Server 51 Select the Files to Play Back 52 Playing Back Files on a USB Memory Device 53 57 Playing Back Files on a Home Network DLNA Server 58 59 Other Viewing Options Presetting Remote Control F...

Страница 11: ...ur fingers between the TV set and the floor Supplied Accessories Make sure the following accessories are provided with the product Remote control unit g1 Page 10 AA size battery g2 Page 11 Stand unit g1 Page 9 3D Glasses g2 See pages 43 to 47 for details of the 3D Glasses and their accessories Cable tie g1 Page 10 Operation manual g1 Always use the AC cord supplied with the TV The illustrations abov...

Страница 12: ...unlight or strong lighting In such cases change the angle of the lighting or the TV or operate the remote control unit closer to the remote control sensor IMPORTANT The Power LED on the television should light up indicating you have power to the television If the Power LED on the television still does not light up press POWER on the remote control to turn the power on IMPORTANT IF THE UNIT DOES NO...

Страница 13: ...ent types Different types of batteries have different characteristics Do not mix old and new batteries Mixing old and new batteries can shorten the life of new batteries or cause chemical leakage in old batteries Remove batteries as soon as they are worn out Chemicals that leak from batteries that come in contact with skin can cause a rash If you find any chemical leakage wipe thoroughly with a clo...

Страница 14: ...Rear RS 232C terminal Antenna Cable in COMPONENT terminals DIGITAL AUDIO OUTPUT terminal HDMI 3 terminal HDMI 4 terminal HDMI 1 terminal ARC Audio Return Channel See pages 62 and 63 VIDEO 2 terminals VIDEO 1 terminals AUDIO OUT terminal USB 1 terminal 3 USB 2 terminal ETHERNET terminal HDMI 2 terminal HDMI 5 terminal PC IN terminal 1 1 1 AUDIO IN terminal shared for PC IN and HDMI 1 2 1 See pages ...

Страница 15: ...RECEIVER Operate an AV receiver See page 61 16 SLEEP Set the sleep timer See page 22 17 LINK CTRL Display the Link Operation Menu screen This button will function only when Link Control is used See pages 62 to 65 for details 18 External equipment operational buttons Operate the external equipment 19 DISPLAY Display the channel information 20 POWER SOURCE Turns the power of the external equipment o...

Страница 16: ...e HD Quality Standard Quality AUDIO DVI OUT Pages 15 18 Page 16 Page 16 Connecting to audio equipment Cable Terminal on external equipment Optical fiber cable Ø3 5 mm stereo minijack to RCA audio cable Terminal on the TV DIGITAL AUDIO INPUT OPTICAL ANALOG AUDIO IN Page 17 Page 17 1 Press INPUT The INPUT list screen displays 2 Press a b to select the input source You can also select the input source...

Страница 17: ...video input Blu ray disc player DVD player HD cable satellite set top box HDMI OUT HDMI certified cable To enjoy 1080p display capability connect your external equipment using an HDMI certified cable or a component cable and set the equipment to 1080p output Depending on the connected equipment audio may not be output in HDMI connection In this case set the audio format of the connected equipment to...

Страница 18: ...ability connect your external equipment using an HDMI certified cable or a component cable and set the equipment to 1080p output See page 15 for connecting a Blu ray disc player DVD player or an HD cable satellite set top box to the HDMI terminal Connecting a VCR Game Console Camcorder or Cable Satellite Set top Box When using Composite cable VIDEO 1 or 2 Game console VCR Camcorder Cable Satellite ...

Страница 19: ...ct an optical fiber cable If the image is not in sync with the audio check the settings of the connected surround system When connecting an Audio amplifier It is possible to output audio through the DIGITAL AUDIO OUTPUT terminal See page 33 for details PCM audio outputs from the terminal DIGITAL AUDIO INPUT OPTICAL Optical fiber cable Depending on the connected equipment audio will not output from th...

Страница 20: ...When using DVI HDMI conversion cable HDMI 1 DVI OUT AUDIO DVI HDMI conversion cable Ø 3 5 mm stereo minijack cable When using a DVI HDMI conversion cable you should make an analog audio connection In this case in addition to connecting a DVI HDMI conversion cable to the HDMI 1 terminal connect a Ø 3 5 mm stereo minijack cable to the AUDIO IN terminal and set Audio Select to HDMI Analog See page 67...

Страница 21: ...e it will automatically memorize the broadcasting channels available in the region where you live Perform the following steps before you press POWER on the remote control unit 1 Insert the batteries into the remote control unit See page 11 2 Connect the antenna cable to the TV See page 11 3 Plug in the AC cord to the AC outlet See page 10 Language Language setting Select from among 3 languages Eng...

Страница 22: ...qualification is based on AV MODE STANDARD Antenna Cable STB Select the type of connection you will use to watch TV 6 Press c d to select Antenna Cable or Set top box and then press ENTER Set top box Antenna Cable To watch TV via an antenna or cable connection without using a set top box Select Antenna Cable and then go to step 7 To watch TV via a set top box 1 Select Set top box and then press ENT...

Страница 23: ... Time United States EST Auto TV Location Home Anntena Cable STB Antenna Cable Air Cable Air Search Result Digital 4ch Analog 7ch Press the INPUT button then the right arrow d to see the list of channels found When no channel is received after Antenna Cable was selected in step 6 and a search was carried out OK Language English Location Time United States EST Auto TV Location Home Anntena Cable STB...

Страница 24: ...able will display The still image automatically goes out after 30 minutes If you are using the freeze function and a broadcast activates the V CHIP BLOCK the freeze function will be canceled and a V CHIP BLOCK message will appear You can have the same settings by choosing Freeze on the menu items See page 32 INPUT To view external source images select the input source by pressing INPUT on the remo...

Страница 25: ...Foundation ISF After completion of the adjustments by an ISF certificated technician the ISF DAY and ISF NIGHT modes will be accessible by the user in AV MODE Contact your local dealer to ask about the ISF certificated technicians Direct Button Operation You can select a different AV MODE item for each input mode For example select STANDARD for TV input and DYNAMIC for COMPONENT When you play games ...

Страница 26: ...on such as 1 2 or 1 4 displayed 1 2 means the first of two services Example If a program has three services Digital CC ENG CC1 and Text1 the closed caption display will toggle in this sequence 1 3 ENG 2 3 CC1 3 3 Text1 Off The CC button keeps a record of the last service selected in its memory If the last closed caption mode e g 1 3 ENG you selected is not available for the next program or on anoth...

Страница 27: ...he same number of pixels on the screen Full Screen 720p only You can select Full Screen only when receiving a 720p signal Suitable for stretching 4 3 programs to fill the screen Suitable for viewing wide screen 2 35 1 aspect ratio programs in full screen When using Dot by Dot or Full Screen it is possible to see noise or bars around different outer portions of the screen Please change view mode to ...

Страница 28: ...r adjust a selected item ENTER Press to go to the next step or complete the setting RETURN Press to return to the previous step Menu options differ in the selected input modes but the operating procedures are the same The screens in the operation manual are for explanation purposes some are enlarged others cropped and may vary slightly from the actual screens The order of explanations for each men...

Страница 29: ...UDU Help Page 79 Picture Settings AV MODE Changing Pic Quality Pages 28 and 47 Intelligent Variable Contrast Page 28 OPC Page 28 Backlight Page 28 3D Brightness Boost Page 47 Contrast Page 28 Brightness Page 28 Color Page 28 Tint Page 28 Sharpness Page 28 Advanced Pages 28 29 C M S Hue Page 28 C M S Saturation Page 28 C M S Value Page 28 Color Temp Page 29 Motion Enhancement Page 29 Precision Colo...

Страница 30: ...the image brighter A lower value makes the image darker For resetting all adjustment items to the factory preset values press a b to select Reset and then press ENTER Picture Settings Adjusts the picture to your preference with the following picture settings Example STANDARD Local Dimming Off On AV MODE Changing Pic Quality Intelligent Variable Contrast OPC Backlight 3D Brightness Boost Contrast B...

Страница 31: ...ximum of 2 and a minimum of 2 by pressing c or d On Screen Display Menu Black Level Adjusts on screen black level to your preferred level High The black level gets brighter Low The black level gets darker Black Level is available for input signal from Composite Video Component 480i and analog broadcasts air and cable Film Mode 3 2 pull down Automatically detects a film based source originally encod...

Страница 32: ...ing levels High Reducing the loudness gaps among different sound sources strongly Middle Low Reducing the loudness gaps among different sound sources slightly Audio Settings menu is grayed out when Output Select is set to Variable See page 33 3D Surround The surround function produces Surround effect from the speakers 3D Hall Reproducing concert hall experience with realistic live surround sound u...

Страница 33: ...different Power Saving item for each AV MODE When Power Saving is set the OPC settings for all AV Modes will automatically change If you set OPC to On when Power Saving is set to Standard then the Power Saving setting will change to Advanced When you change the Power Saving setting from Advanced to Off or to Standard OPC will be set to Off OPTIMUM and DYNAMIC Fixed will remain set to Off When Powe...

Страница 34: ... and freeze a moving image that you are watching You can select Freeze by pressing FREEZE on the remote control unit See page 22 for details of Freeze function Change Audio Allows you to change the audio when multiple audio is available for the program you are watching MTS SAP stereo mode The TV has a feature that allows reception of sound other than the main audio for the program This feature is ...

Страница 35: ...g the INPUT list or channel display Press a b c d to select the new name for the input mode Using the software keyboard you can enter up to 10 characters for text See page 74 You cannot change labels if the input source is TV Home Network DLNA or USB HDMI Setup To watch an HDMI or PC IN equipment image select HDMI 1 HDMI 2 HDMI 3 HDMI 4 or HDMI 5 from the INPUT list using INPUT on the remote contr...

Страница 36: ...he game On The elapsed time is displayed every 30 minutes when you switch to GAME mode in external input mode Off No adjustment Operation Lock Out This function locks the operation buttons on the TV and the remote control Off No adjustment RC Control Lock All buttons on the remote control are locked Button Control Lock All buttons on the TV except POWER are locked When RC Control Lock or Button Co...

Страница 37: ...tes ENERGY STAR qualification is based on AV MODE STANDARD Antenna Cable STB Select the type of connection you will use to watch TV Air Cable Make sure what kind of connection is made with your TV when selecting Air or Cable CH Search Channel auto search makes the TV look for all channels viewable in the set area If Cable is selected for Antenna setting scrambled channels are removed after the Chan...

Страница 38: ...a button you can press that button to display the top screen of the assigned application Current Setup Checks the current setting APP1 APP2 APP3 You can assign your favorite applications displayed on the screen to these buttons For resetting adjustments to the factory preset values press a b to select Reset and then press ENTER Reset If complex adjustments are made and the settings cannot be resto...

Страница 39: ...ts strongly cautioned Some material may be inappropriate for children under 13 R Restricted Under 17 requires accompanying parent or adult guardian age varies in some jurisdictions NC 17 No one 17 and under admitted X X is an older rating that is unified with NC 17 but may be encoded in the data of older movies Voluntary movie rating system only uses an age based rating TV Parental Guidelines Examp...

Страница 40: ...esent within the context of the theme 18 Adults Intended for viewers 18 years and older and might contain depictions of violence which while related to the development of plot character or themes are intended for adult viewing Could contain graphic language and portrayals of sex and nudity Canadian French Ratings Example MPAA TV Guidelines Can French Ratings Can English Ratings 8ans 13ans 16ans 18...

Страница 41: ...ormation I N F O R M A T I O N 3 Input the 4 digit secret number by using 0 9 Software Update Enter your Secret No 4 Press a b to select Manual Update or Auto Update Setting and then press ENTER The operations thereafter vary depending on the setting Manual Update Select the method for manually updating the software USB Update Updates the software using a USB memory device containing the update fil...

Страница 42: ... process Updating to the latest software Update Version XXXXXXXX CAUTION Do not unplug the AC cord while the software is being updated 4 When the software is successfully updated a screen is displayed indicating that the update process is completed A screen indicating that the update is completed is displayed 4 seconds later the TV restarts automatically Software update is complete Update Version ...

Страница 43: ...are update file is in the USB memory device OK On Screen Display Menu 5 To update the TV software with the update file select Yes and then press ENTER Software update file is detected in the USB memory device Start update No Yes Current Version UXXXXXX1 Update Version UXXXXXX2 Example 30 Now updating Update Version UXXXXXX2 Do not unplug AC cord Remote Control operation is disabled during Update proc...

Страница 44: ...protective goggles Do not use the 3D function or 3D Glasses while walking or moving around This may result in injuries due to running into objects tripping and or falling When using the 3D Glasses take care not to accidentally strike the TV screen or other people Viewing 3D images may cause you to misjudge the distance to the TV screen and accidentally strike the screen resulting in possible injur...

Страница 45: ... USB cable The illustrations above are for explanation purposes and may vary slightly from the actual accessories Part Names 1 2 3 4 5 1 Infrared receiver Receives an infrared signal sent from the TV The 3D Glasses turn off automatically after 10 minutes if no signal is received from the TV 2 USB terminal This terminal is for recharging and supplying power 3 3D 2D OFF switch This button switches b...

Страница 46: ... is low the LED light blinks one time per second If the 3D Glasses battery is low you can recharge the 3D Glasses by connecting the supplied USB cable to the TV and the USB terminal on the 3D Glasses 1 Turn off the TV and then slide the switch on the 3D Glasses to OFF 2 Connect the cable shown at step 3 of this procedure and then turn on the TV Make sure the cable is connected before turning on th...

Страница 47: ...ially around children that can accidentally swallow them Be very careful in handling the battery to prevent it from leaking Do not attempt to dismantle or puncture the battery Do not use this battery for any other purpose Recycle properly after removing it from the 3D Glasses If you have any question regarding proper recycling please call 1 800 822 8837 see page 50 for more details 1 Pull out the ...

Страница 48: ...ess ENTER No Yes 2 Turn on the 3D Glasses and place them on your head 3 You can now view 3D images Switching from 3D to 2D Mode 4 Press 3D during the 3D mode Select Yes and press ENTER to switch to 2D mode No Yes Take off the 3D Glasses and turn off the power Ending 3D Image Viewing 5 Take off the 3D Glasses and turn off the power If the input signal switches to 2D 2D images are displayed automati...

Страница 49: ... D 3D Setup See page 48 Enjoying 3D Image Viewing Configuring the TV Settings to Enhance 3D Image Viewing Example P I C T U R E S E T T I N G S STANDARD Local Dimming Off On Middle AV MODE Changing Pic Quality Intelligent Variable Contrast OPC Backlight 3D Brightness Boost Contrast Brightness Picture Settings STANDARD 0 a30 b30 b30 0 b40 b5 a16 b16 1 Press MENU to display the MENU screen and then p...

Страница 50: ...justing the 3D still image effect depth Auto Adjusts the still image effect depth automatically Manual Manually adjust the still image effect depth If you selected Manual adjust the 3D still image effect depth with 3D Still Image Effect Adjustment This function can be adjusted when viewing 3D still images in USB mode Even if you selected Auto the 3D still image effect depth may not be correctly ad...

Страница 51: ...sses correctly 3D images will not be correctly visible if the 3D Glasses are worn upside down or back to front Other displays such as computer screens digital clocks and calculators may appear dark and difficult to view while wearing the 3D Glasses Do not wear the 3D Glasses when watching anything other than 3D images If you lie on your side while watching the TV with 3D Glasses the picture may loo...

Страница 52: ...e product color and the date of manufacture Example Black colored glasses manufactured on April 10 2011 S N B 1 4 A Bottom B Black 1 2011 2 2012 1 1 2 2 3 3 8 8 9 9 A 10 B 11 C 12 1 1 2 2 3 3 A 10 B 11 H 17 J 18 N 22 P 23 W 30 X 31 Manufacture number Color Year of manufacture Month of manufacture Day of manufacture I O Y and Z are not used This symbol attached on the product and its individual pac...

Страница 53: ...Do not remove a USB memory device or memory card from the TV while transferring files using the slide show function or switching screens or before you exit USB from the INPUT list Do not insert and remove a USB memory device USB hard drive to and from the TV repeatedly When using a card reader be sure to insert Memory first before using the card reader USB input cannot be selected when displaying th...

Страница 54: ...d to select the drive server in step 2 when there is only one drive in the connected USB memory device or there is only one home network DLNA server connected to the TV 16 is the maximum number of USB drives and 10 is the maximum number of home network DLNA servers that can be displayed VIEW MODE is fixed during the Photo or Music mode During Video mode you can select Auto or Original The key guide...

Страница 55: ... by 90 degrees to the left B green Rotate the photo by 90 degrees to the right Rotating photos only applies to the temporarily selected item and this setting is not saved The key guide display disappears automatically after a particular time has elapsed To display the key guide display again press DISPLAY Slide Show The photos displayed on the thumbnail selection screen are displayed as a slide sh...

Страница 56: ...14 4 35 Example Buttons for slide show BGM select operation Buttons Description a b c d Select a desired item ENTER Play music RETURN Return to the previous process A red Select the music to be played back Press this button to add or remove a checkmark B green Stop music C blue Play Pause music D yellow Display the USB MENU screen 4 Press RETURN to display the thumbnail selection screen and then p...

Страница 57: ...O_06 divx VIDEO_07 avi 3 42 4 55 4 08 4 20 3 55 4 26 4 35 I I I I I I I Example Buttons for file selecting operations Buttons Description a b c d Select a desired item ENTER Play back from the scene where playback was last stopped RETURN Return to the previous process A red Select deselect items checkmarks are added to the selected items B green Play back from the beginning of the selected file D ye...

Страница 58: ...osed Caption display by using System Options View Option Change CC or by pressing CC on the remote control unit Use Audio on the operation panel to change the audio You can also switch the audio by using System Options View Option Change Audio USB Menu Menu for file selecting operations Set All Auto Play Reset All Auto Play USB MENU Remove USB Device Example See page 54 for details on the Remove US...

Страница 59: ...ure Format mpo CIPA DC 007 Compliant MP Type Multi view individually image stereoscopic view Music file format MP3 mp3 Bitrate 32k 40k 48k 56k 64k 80k 96k 112k 128k 160k 192k 224k 256k 320kbps Sampling frequency 32k 44 1k 48kHz Video file format File extension Container Video Audio avi AVI DivX 3 11 4 x 5 1 6 0 XviD H 264 MPEG4 Motion Jpeg MP3 Dolby Digital LPCM ADPCM mkv MKV DivX 3 11 4 x 5 1 6 0 X...

Страница 60: ...ion screen 3D Switches between 2D and 3D modes A red Rotate the photo by 90 degrees to the left B green Rotate the photo by 90 degrees to the right Rotating photos only applies to the temporarily selected item and this setting is not saved In 3D mode you cannot rotate the photos Slide Show The photos displayed on the thumbnail selection screen are displayed as a slide show Buttons for slide show o...

Страница 61: ...turn to the previous process A red Display the Media screen Buttons for playing mode Buttons Description a Go to the beginning of a file by pressing a once and the previous file by pressing a twice b Go to the next file d Jump forward in a video 1 c Jump back in a video 1 ENTER Play Pause the video 1 RETURN Go back to the file selection screen 3D Switches between 2D and 3D modes B green Stop a video C...

Страница 62: ...istration mode 3 Press 0 9 to enter the manufacturer code Preset mode is finished once the LED no longer lights up 4 After registering the code the LED will stop blinking then turn off after one second If you perform an incorrect operation the LED will blink quickly then turn off Other Viewing Options Manufacturer codes STB mode REMOTE CONTROL CODE NUMBER CATV Pioneer 01 02 SAT Pioneer 03 BD DVD mo...

Страница 63: ...start of the chapter currently playing Each time you press it you move back to the start of the previous chapter BD DVD 9 FLASHBACK Press to switch between the current channel and the channel you were watching immediately before Some manufacturers do not preset FLASHBACK STB 10 CHU V Press CHU or CHV to tune in to a higher or lower channel STB 11 a b c d ENTER a b c d Press the button to select it...

Страница 64: ...Make sure to use an HDMI certified cable Up to 3 pieces of HDMI recording equipment and one AV amplifier can be connected using this system These operations affect the HDMI equipment selected as the current input source If the equipment does not operate turn on the equipment and select the appropriate input source using INPUT Connected Link Control compatible devices can be operated without changing...

Страница 65: ...ote control unit of the TV can be used to select the channel display program information and perform other operations of a connected Link Control compatible recorder Off This function does not work Audio Return Channel This function allows you to listen to the TV audio via audio equipment without using an optical fiber cable which conventionally is required Requirements for using an ARC compatible ...

Страница 66: ... title in the Link Control compatible equipment 1 Power on the Link Control compatible equipment and select appropriate external input 2 Press LINK CTRL to display the Link Operation Menu screen 3 Press a b to select Play from Rec List and then press ENTER The title list data from the connected Link Control compatible equipment displays 4 Select the title with a b c d and then press d to start pla...

Страница 67: ... sound Using Link Control HDMI Device Selection If multiple HDMI devices are connected in a daisy chain you can specify which device to control here 1 Press LINK CTRL to display the Link Operation Menu screen 2 Press a b to select HDMI Device Selection and then press ENTER A list of connected HDMI devices is displayed 3 Press a b to select the desired device and then press ENTER Displaying the Lin...

Страница 68: ... same settings by choosing View Mode on the menu items See page 32 You may not be able to change the View Mode while in 3D mode Example Screen size images Input signal Normal Zoom Stretch Dot by Dot 4 3 Keeps the original aspect ratio in a full screen display For viewing widescreen programs The top and bottom of the image is cropped An image fully fills the screen Detects the resolution of the sign...

Страница 69: ...ecause the screen position variable ranges may be asymmetrical The screen position variable ranges depend on the View Mode or the signal type The ranges can be seen on the position setting screen Setting Audio Input Audio Select This function sets the terminal to output the computer audio The adjustment items vary depending on the input source Select the input source corresponding to the terminal ...

Страница 70: ...ENTER 7 Set the device name 8 Set your login ID and password 9 Set the port to use with IP Control 10 Confirm the settings and then press OK Communication conditions for RS 232C Set the RS 232C communication settings on the PC to match the TV s communication conditions The TV s communication settings are as follows Baud rate 9 600 bps Data length 8 bits Parity bit None Stop bit 1 bit Flow control N...

Страница 71: ...ION VIEW MODE SURROUND SLEEP TIMER CHANNEL CC DIRECT ANALOG DIGITAL CH UP CH DOWN CHANNEL H POSITION H POSITION V POSITION CLOCK PHASE A V M D V O L M H P O S V P O S C L C K P H S E A C S U O F T M D C C H C H U P C H D W C L C P W I D E 0 x 0 x x x _ _ _ _ _ _ _ _ _ _ _ _ _ _ _ _ _ _ _ _ _ _ _ _ DIGITAL Air Two Part numbers 2 digit plus 2 digit 0100 9999 1 999 0 999 0 9999 0 6383 DIGITAL Cable T...

Страница 72: ...on including tips on using your Elite LCD TV and a frequently asked questions section Connecting to the Internet To connect your TV to the Internet you must have a broadband Internet connection If you do not have a broadband Internet connection consult the store where you purchased your TV or ask your Internet service provider or telephone company When an Internet connection is made an Ethernet an...

Страница 73: ...ode on the access point A wireless LAN connection and performance cannot be guaranteed for all residential environments In the following cases the wireless LAN signal may be poor or drop or the connection speed may become slower When used in buildings made with concrete reinforced steel or metal When placed near objects that obstruct the signal When used with other wireless devices that emit the s...

Страница 74: ...tings 6 Select Next to complete the settings The connection process starts and the WPS button on the access point can be pressed 7 Press the WPS button on the access point Pressing the WPS button displays a confirmation screen Please wait until a connection is established 8 When a connection is established the connection details are displayed Press ENTER Interactive Service If you do not want other...

Страница 75: ...o display up to date information and allow you to receive support service over the network 1 Press APPS to display the application window 2 Press a b c d to select ELITE ADVANTAGE LIVE and then press ENTER You can also display the ELITE ADVANTAGE LIVE screen by pressing FAV APP on the remote control unit See page 36 for details on the FAV APP Key Assign function Each time you select ELITE ADVANTAG...

Страница 76: ...the single byte number for that button A red Directly enters prediction candidate 1 B green Directly enters prediction candidate 2 C blue Directly enters prediction candidate 3 D yellow Enters a space Caps Off Caps On Caps Lock If alphabet is selected in Character Set this switches characters between uppercase and lowercase Each time you press ENTER the character type switches as shown below Caps ...

Страница 77: ...age 78 When a cookie confirmation window appears Choose whether or not to accept the cookie see page 78 and then press ENTER In Cookies settings you can set whether or not this window is displayed You can also opt to delete all the cookies at once See page 78 To users who access the Internet from a PC When you access the Internet from this TV the procedures may not be the same as regular browser ba...

Страница 78: ...bookmarks Displays the Browser menu Using Tabs You can use tabs to view up to 3 web pages at the same time Each page appears in a separate tab and you can switch between the tabs 1 Press B on the remote control unit to display the Tab menu You can also display the Tab menu by clicking in the toolbar Selected item Description Select This Displays the web page in the selected tab Close This Tab Clos...

Страница 79: ...ote control unit to display the toolbar 2 Press c d to select in the toolbar and then press ENTER Your bookmarks list is displayed 3 Press a b to select the title you want to edit from the bookmarks list and then press A on the remote control unit The Bookmarks menu appears 4 Select Display by Address or Display by Title in the Bookmarks menu and then press ENTER Rearranging displayed items 1 Pres...

Страница 80: ...ect this option a message is displayed when you move from a protected page to an unprotected page To change this setting remove the tick select Save Setting and then press ENTER Root Certificates CA Certificates Displays the list of certificates To disable a certificate select the certificate to be disabled and press A to display the sub menu Select Disable and then press ENTER Disabled certificates are...

Страница 81: ...lected application is displayed Follow the on screen instructions for each application Check the web site of the provider for details on setup and use of the functions These applications are provided by content providers The available applications vary depending on your country or region The delivery speed of applications varies depending on the network speed Check the web site of the provider for...

Страница 82: ...which may be unrelated to the device itself including but not limited to power failure other Internet connection or failure to configure your device properly Sharp its directors officers employees agents contractors and affiliates shall not be liable to you or any third party with respect to such failures or maintenance outages regardless of cause or whether or not it could have been avoided ALL THIR...

Страница 83: ...mount bracket to mount it Before attaching detaching the stand Before performing work make sure to turn off the TV Unfasten the four screws used to secure the stand in place Detach the stand from the TV 1 2 To attach the stand perform the above steps in reverse order In the installation procedure be careful not to catch your fingers between the TV set and the floor ...

Страница 84: ...l mounting Angular mounting PRO 70X5FD The center of the display 25 64 inch 10 0 mm above the c position PRO 60X5FD The e position is at the center of the display Refer to the operation manual of AN 52AG4 for details 0 5 10 AN 52AG4 Optional Accessories The listed optional accessories are available for the LED LCD TV Please purchase them at your nearest shop Additional optional accessories may be ...

Страница 85: ...UTE on the remote control unit Page 22 Check the audio output of the connected external equipment Is the volume too low or muted When external equipment is connected via an HDMI cable you may need to configure the audio to be output through the HDMI cable When audio is not output from external equipment connected to the PC IN or HDMI 1 terminal check the Audio Select setting Page 67 Even when exter...

Страница 86: ... TV has only limited functions compared with regular PC browsers Page 75 Troubleshooting 3D Images Problem Possible Solution 3D images are not displayed Is 3D Auto Change set to No Press 3D to switch to 3D mode Page 48 If 3D Auto Change is set to Yes but no 3D images are displayed check the display format of the content being viewed Some 3D image signals may not be recognized as 3D images automati...

Страница 87: ...d both CHU and VOLk on the TV simultaneously until the message appears on the screen The secret number is As a precautionary measure make a note of your secret number above and keep it in a safe place Cautions regarding use in high and low temperature environments When the unit is used in a low temperature space e g room office the picture may leave trails or appear slightly delayed This is not a m...

Страница 88: ... IN Audio in Ø 3 5 mm stereo jack DIGITAL AUDIO OUTPUT Optical Digital audio output g 1 PCM Dolby Digital ETHERNET Network connector USB 2 Photo Music Video mode Software update OSD language English French Spanish Power Requirement AC 120 V 60 Hz Power Consumption 282 W 0 13 W Standby with AC 120 V 204 W 0 1 W Standby with AC 120 V Weight TV stand 101 4 lbs 46 0 kg 71 7 lbs 32 5 kg TV only 94 8 lb...

Страница 89: ...harmful interference to co channel mobile satellite systems The maximum antenna gain permitted for devices in the bands 5250 5350 MHz and 5470 5725 MHz to comply with the e i r p limit and High power radars are allocated as primary users meaning they have priority of the bands 5250 5350 MHz and 5650 5850 MHz and these radars could cause interference and or damage to LE LAN devices Specification Sta...

Страница 90: ... open source software licensors require the distributor to provide the source code with the executable software components GPL and LGPL include similar requirements For information on obtaining the source code for the open source software and for obtaining the GPL LGPL and other license agreement information visit the following website http www elitelcdtv com gpl We are unable to answer any questi...

Страница 91: ...ne an upgrade you will not be able to access content that requires the upgrade libfreetype Copyright 2006 2007 2008 2009 2010 by David Turner Robert Wilhelm and Werner Lemberg cURL Copyright 1996 2010 Daniel Stenberg daniel haxx se libxml2 Copyright 1998 2003 Daniel Veillard All Rights Reserved Lua Copyright 1994 2008 Lua org PUC Rio Lua xmlreader Copyright 2008 A S Bradbury Lua slncrypto Copyrigh...

Страница 92: ...d shall constitute full satisfaction of all claims whether based on contract negligence strict liability or otherwise Sharp does not warrant nor shall Sharp be liable or in any way respon sible for Products which have been subject to abuse including but not limited to improper voltage accident misuse negligence lack of reasonable care alteration modification tampering misuse improper operation or m...

Страница 93: ...91 ...

Страница 94: ...NOTE ...

Страница 95: ... 1 8 1400 21 7 64 536 5 25 64 137 1 3 4 44 3 2 2 21 64 59 3 1 32 77 AN 52AG4 10 29 7 16 747 63 1 5 23 64 215 15 3 4 400 7 31 64 190 15 3 4 400 4 17 32 115 AN 52AG4 13 1 8 333 10 25 64 264 9 27 32 250 17 11 16 449 20 25 64 518 5 23 64 136 10 1 63 64 50 2 2 47 64 69 3 1 32 77 5 25 64 137 21 7 64 536 60 19 32 1538 88 1 63 61 64 1624 40 3 64 1017 38 43 64 982 21 25 64 543 34 3 32 865 62 1 1 Active are...

Страница 96: ...rimé au Mexique TINS F205WJZZ 11P07 MX NM Register Your Product on http www elitelcdtv com in USA only Enregistrez votre produit sur http www elitelcdtv com aux Etats Unis uniquement O PERATING I NSTRUCTIONS M ODE D ENPLOI ...

Отзывы: