background image

19

DV-SL2000W

H

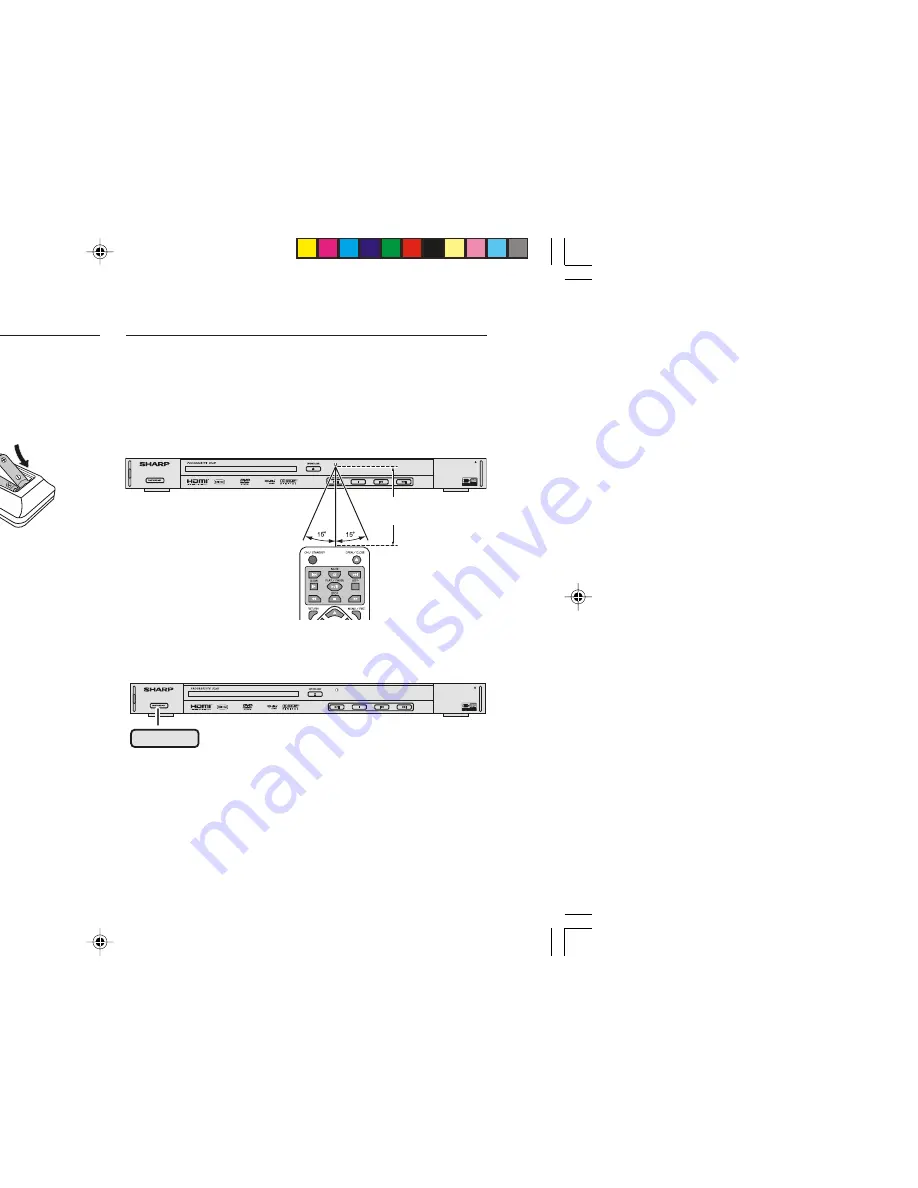
Test of the remote control

Check the remote control operation after making all the connections.
Point the remote control directly at the remote sensor on the unit.

The remote control can be used within the range shown below:

Press the ON/STAND-BY button. Does the power turn on? Now, you can
enjoy your system.

DV-SL2000

PULL OPEN

0.2 m - 6 m

(8" - 20')

H

To turn the power on

DV-SL2000

PULL OPEN

ON/STAND-BY

Press the ON/STAND-BY button:

If the power does not turn on, check the AC power lead is plugged in properly.

Preparation for Use

Battery installation

Turning the power on

1 Open the battery cover.
2 Insert the supplied batteries according to the direction indicated in

the battery compartment.

When inserting or removing the batteries, push them towards the 

·

 battery

terminals.

3 Close the cover.


Precautions for battery usage:

 Replace all old batteries with new ones at the same time.

 Do not mix old and new batteries.

 Remove the batteries if the unit is not to be used for long periods of time.

This will prevent potential damage due to battery leakage.

Caution:

 Do not use rechargeable batteries (nickel-cadmium battery, etc.).

 Incorrect installation may cause the unit to malfunction.

Notes concerning usage:

I

Replace the batteries if the operating distance is reduced or if the operation
becomes erratic. Purchase 2 “AAA” size batteries (UM-4, R03, HP-16 or
similar).

I

Periodically clean the transmitter on the remote control and the sensor on
the unit with a soft cloth.

I

Exposing the sensor on the unit to strong light may interfere with operation.
Change the lighting or the direction of the unit.

I

Keep the remote control away from moisture, heat, shock, and vibrations.

Preparation for Use

DV-SL2000W 17-25

11/22/06, 2:31 PM

19

Содержание DV-SL2000W

Страница 1: ...OP EN SHARP CORPORATION Thank you for purchasing this SHARP product To obtain the best performance from this product please read this manual carefully It will guide you in operating your SHARP product 11 17 06 4 12 PM ...

Страница 2: ... tages always remove ration and when not in s appliance to dripping vases shall be placed ks which must not be yright Accessories Note Only the above accessories are included Please confirm that the following accessories are included Remote control x 1 AAA UM 4 R03 HP 16 or similar x 2 Audio Video cable x 1 HDMI cable x 1 11 22 06 2 32 PM ...

Страница 3: ...r video CD with P B C ON 36 Random play 37 To change the audio channel 37 To play without activating the playback control function 38 To start playback from the desired point direct play 38 H CD CD R and CD RW Operation CD operation To play in the desired order programmed play 39 DivX and JPEG disc operation Playback on the DivX and JPEG menu screen 40 41 Zoom function 42 H USB and SD Memory Playb...

Страница 4: ...ecified is dangerous and may result in a fire or other type of accident causing damage SHARP will not be held responsible for any damage resulting from use of this unit with a voltage other than that which is specified H Care of DVD CD discs DVD CD discs are fairly resistant to damage however mistracking can occur due to an accumulation of dirt on the disc surface Follow the guidelines below for m...

Страница 5: ...public performance and rental regardless of whether or not such activities are for profit of disc contents are prohibited by law I This system is equipped with copy protection technology that causes substantial degradation of images when the contents of a disc are copied to a videotape I This system is protected by U S patents and other intellectual property rights the copyright for which belongs ...

Страница 6: ...the video format to the connected TVs wide screen TV or 4 3 size TV Recorded in 4 3 You can enjoy wide images on a wide screen TV and 4 3 images with the side edges cut on the 4 3 size TV Example 1 English 2 French Number of angles recorded on the DVD Angles can be selected with the ANGLE button Number of camera angles Example 1 Original English DTS 5 1 Surround 2 English Dolby Digital 5 1 Surroun...

Страница 7: ...ay Indicator 14 A B Repeat Indicator 15 Repeat Indicator 16 SVCD VCD CD Indicator 17 MP3 Indicator 18 Pause Indicator 19 DTS Signal Indicator 20 Programme Indicator 21 Random Indicator 22 Dolby Digital Signal Indicator 1 Audio Output Sockets 2 Component Video Output Sockets 3 Video Output Socket 4 AC Power Lead 5 Digital Output Socket Coaxial 6 S Video Output Socket 7 HDMI Output Socket General In...

Страница 8: ...r Button 39 15 Random Button 37 16 Audio Select Button 34 37 17 Subtitle Select Button 34 18 Disc Tray Open Close Button 26 19 Mute Button 25 20 Chapter track Skip Up Button 28 36 21 Step Button Frame by Frame Advance Playback 30 22 Fast Forward Button 28 23 Menu Playback Control On Off Button 32 33 38 24 Enter Button 20 39 40 25 On Screen Display On Off Button 35 26 A B Repeat Button 32 33 27 HDM...

Страница 9: ... 8 R AUDIO L VIDEO System Connections urn off the power onnections have OUT sockets of nnect it to the TV yback picture will nal TV TV with Audio Video input sockets To video input socket Yellow 11 22 06 2 33 PM ...

Страница 10: ...hese sockets The VIDEO OUT or S VIDEO OUT socket connection is not necessary You can enjoy high quality picture playback 2 You also need to connect the left and right audio cables to the AUDIO OUT sockets of DVD player and the Audio input sockets of the TV Component video cable not supplied COMPONENT VIDEO INPUT Y PB PR al TV continued V To S video input socket S video cable not supplied DVD playe...

Страница 11: ...mber CHANNEL 3 or CHANNEL 4 on both TV and RF Modulator whichever is not used for regular broadcast in your area Note For more details please refer to the instruction manual of the RF Modulator A V INPUT VHF UHF AERIAL IN ANT IN 2 1 3 TO TV R AUDIO L VIDEO CHANNEL 3 4 4 TV deo cable supplied RF Modulator White L Red R To video input socket Yellow To audio input sockets 11 22 06 2 33 PM ...

Страница 12: ...nd set the channel number CHANNEL 3 or CHANNEL 4 on all TV VCR and RF Modulator whichever is not used for regular broad casts in your area Note For more details please refer to the instruction manual of the RF Modulator nections VHF UHF FROM ANT A V INPUT 1 2 3 4 IN OUT TO TV ANT IN TO TV R AUDIO L VIDEO CHANNEL 3 4 CHANNEL 3 4 5 5 VHF UHF AERIAL IN TV socket Yellow Audio Video cable supplied RF M...

Страница 13: ...y sockets of the TV is not encourage to the AUDIO OUT e TV e page 21 rogressive scan capability Please consult your local audio video dealer Green Blue White L Green Blue Red Component video cable not supplied To COMPONENT VIDEO INPUT sockets To audio input sockets TV with progressive scan capability 11 22 06 2 33 PM ...

Страница 14: ...tion for still image or other picture containing long texts or horizontal lines stem ure to turn off the power and disconnect both units from the wall socket until all the connections have been The playback picture will be distorted because DVD video discs are copy protected CONNECTIONS ifier er be sure to turn off the power and disconnect both units from the wall socket until all the connections ...

Страница 15: ... TV Please consult your local audio video dealer ayer ckets White L cable ed em and sure to the wall layback ected Video cable supplied To audio input sockets White L Red R Audio System To video input Yellow TV with Audio Video input sockets To VIDEO OUT socket Yellow 11 22 06 2 33 PM ...

Страница 16: ... page 21 Dolby Digital Decoder or DTS Decoder input Amplifier with Dolby Digital Decoder DTS Decoder or MPEG 2 Decoder Centre speaker Front left speaker Front right speaker Subwoofer Surround right speaker Surround left speaker ntinued 11 22 06 2 33 PM ...

Страница 17: ...SL2000W 16 ee page 21 Please consult your local audio video dealer System Connections ital audio input Amplifier with a coaxial digital input Front left speaker Front right speaker ntinued 11 22 06 2 33 PM ...

Страница 18: ...io video dealer Dolby Pro Logic Decoder ckets NPUT sockets Amplifier with Dolby Pro Logic Decoder Centre speaker Front left speaker Front right speaker Subwoofer Surround right speaker Surround left speaker ntinued 11 22 06 2 31 PM ...

Страница 19: ... power lead from the wall socket if the unit will not be used for a prolonged period of time AC Plug Adaptor In areas or countries where a wall socket as shown in illustration 2 is used connect the unit using the AC plug adaptor supplied with the unit as illustrated The AC plug adaptor is not included in areas where the wall socket and AC power plug can be directly connected see illustration 1 t d...

Страница 20: ... Now you can enjoy your system DV SL2000 PULL OPEN 0 2 m 6 m 8 20 H To turn the power on DV SL2000 PULL OPEN ON STAND BY Press the ON STAND BY button If the power does not turn on check the AC power lead is plugged in properly Preparation for Use Turning the power on ection indicated in owards the battery time long periods of time kage battery etc on ced or if the operation UM 4 R03 HP 16 or rol a...

Страница 21: ...N PAGE button and press the ENTER button The main page returns 5 Press the SETUP button I The setting is completed I To change other settings begin from step 2 Notes I During playback VIDEO SETUP and PREFERENCES settings cannot be changed I Settings are stored even if the unit is set to the stand by mode I The backup function protects the stored settings for a few hours should there be a power fai...

Страница 22: ...ut socket This Player s digital output sockets are designed for a connection to a Dolby Digital DTS or MPEG receiver or decoder I PCM Choose this setting if your DVD player is connected to a 2 channel digital stereo amplifier When playing a disc recorded with Dolby Digital and MPEG audio formats audio signals will be modulated into 2 Channel PCM signal and it will be output from the Coaxial Output...

Страница 23: ...or DVD viewing for details see page 24 Enter a 4 digit password It is set to 1234 by default Change the password for details see page 24 This resets all settings except for PARENTAL and PASSWORD to the factory defaults The setting is completed V DISPLAY 4 3 PS 4 3 LB 16 9 ESOLUTION INTERLACE 576 P 480 P 720 P HDMI 1080I HDMI UDIO ENGLISH FRENCH SPANISH UBTITLE ENGLISH FRENCH SPANISH OFF ISC MENU E...

Страница 24: ... for audio can be set You can specify a language for conversation and narration SUBTITLE A language for subtitle can be set The subtitles are displayed in a specified language DISC MENU A language for disc menus can be set Menu screens are displayed in a specified language English Chinese DISC LOADING DISQUE CHARGEMENT English French Thank you Merci English French Merci Thank you English French AC...

Страница 25: ...s 1 Enter the old password using the direct number buttons 2 Enter the new password using the direct number buttons 3 Enter the new password again for confirmation Note When you forget your password cancel the current password by pressing 3308 using the direct number buttons 0 9 PASSWORD CHANGE PAGE NEW PASSWORD PLEASE ENTER OLD PASSWORD OLD PASSWORD CONFIRM PREFERENCES PAGE SUBTITLE CHANGE PASSWO...

Страница 26: ... volume and the VOLUME button for decreasing TV screen 0 1 2 16 H H H H H Muting The volume is muted temporarily when pressing the MUTE button on the remote control Press again to restore the volume TV screen display MUTE when press the MUTE button Preparation for use 11 22 06 2 31 PM ...

Страница 27: ...to place 8 cm 3 discs in the middle of the disc position 5 Press the 0 OPEN CLOSE button to close the disc tray Discs supporting auto start will start to play once you close the disc tray even if you do not press the 3 8 PLAY PAUSE button 6 If playback does not start in step 5 press the 3 8 PLAY PAUSE button DVD Operation H Playback VIDEO 2 etc NO DISC PULL OPEN DV SL2 000 PUL L OPE N Label side D...

Страница 28: ... is playing press the 7 STOP button The system stores the point you stopped 2 To restart play press the 3 8 PLAY PAUSE button Play resumes from the point you stopped To cancel the resume playback Press the 7 STOP button twice Notes I The resume playback feature is disabled on some discs I Depending on the disc playback may resume from slightly before the stopped position H DVD mode operation indic...

Страница 29: ... and audio CD the search can be operate between tracks I Whilst searching on a DVD the sound is not heard and the subtitles do not appear I Whilst searching on an SVCD or a VCD the sound is not heard I Audio CD disc sounds will break up during search This is not a malfunction I When search is performed during the DVD playback pictures may not be forwarded or reversed in the search speed specified ...

Страница 30: ...button twice If the _ _ _ _ _ _ is not highlighted press the 2 or 3 button repeatedly 2 Specify the time with the DIRECT NUMBER buttons and then press the ENTER button I To specify 1 hour 23 minutes and 40 seconds enter 012340 I If you enter the wrong number startover from step 1 Notes I Some discs cannot play from the specified point I Time search feature is disabled on some discs TITLE 01 11 TIM...

Страница 31: ...sabled on some discs I The sound is muted during step function H Slow motion play You can slow down the playback speed 1 Whilst a disc is playing press the SLOW button repeatedly to select the desired speed On DVD DivX Video the speed changes as follows PLAY Normal play SF 2 X SF 4 X SF 8 X SF 2 X On SVCD VCD the speed changes as follows PLAY Normal play SF 1 X SF 2 X SF 3 X 2 Press the 3 8 PLAY P...

Страница 32: ... view and display the desired part of a zoomed image press the 5 2 or 3 button repeatedly To return to normal view Press the ZOOM button repeatedly to select ZOOM OFF Notes I Images may become distorted when zoomed I Subtitles cannot be zoomed I For JPEG ZOOM function please refer page 42 for details I Only ZOOM X 2 is available for DivX file disc that contains corner of the TV ly to select the re...

Страница 33: ...me discs the repeat play function is disabled I For JPEG repeat playback please refer page 41 for details H To play repeatedly repeat play You can play a chapter track or a title repeatedly by specifying it during playback When playing SVCD or VCD cancel the P B C playback control see page 38 CHP TITLE PROG A B SLEEP PRESET TRK KHz MHz CD MP3 O V c CHAPTER REPEAT ON REP 1 Repeat the currently play...

Страница 34: ...Digital 5 1ch or DTS sound on your DVD if it has a disc menu 1 Whilst in the stop or playback mode press the MENU PBC button to display the disc menu 2 Press the 5 4 2 or 3 button to change the setting and press the ENTER button Or use the direct number buttons for some discs Note The procedure shown here provides only general steps The actual procedure for using the disc menu depends on the disc ...

Страница 35: ...he selected one I Subtitles cannot be hidden on some DVDs H To change the audio language audio output During playback you can change the audio language audio output Whilst a disc is playing press the AUDIO button repeatedly to select the desired audio number You can select recorded languages Notes I On some discs the audio language cannot be changed I For the audio language and audio system refer ...

Страница 36: ...f chapters Current chapter number Current title number Total number of titles Remaining playback time for the current title Elapsed playback time for the current title Elapsed playback time for the current track Remaining playback time for the current track Remaining playback time for the current track Elapsed playback time for the current track OFF OFF OFF Elapsed playback time for the current ch...

Страница 37: ...n twice To stop the current operation and return to the menu Press the RETURN button To scroll the menu screen menu screen with more than 1 page Press the 5 or 4 button The P B C function will not work in the following conditions Repeat programmed direct play or the skip feature is in operation Notes I During disc initialisation the volume cannot be adjusted I Subtitles and sounds on the super vid...

Страница 38: ...t by the random operation If you press the 4 button will ng of the track being played will be located acks automatically You cannot select the order of the tracks C play Cancel the P B C mode before using this function on a video CD with P B C ss the 7 STOP button CD operation continued utton repeatedly to select the desired audio channel VCD cs EREO 11 22 06 2 35 PM ...

Страница 39: ...the DIRECT button 2 Specify the time with the DIRECT NUMBER buttons I Enter minutes and seconds I To specify 1 hour 23 minutes and 40 seconds enter 8340 I If you enter the wrong number start over from step 1 Notes I Time search feature is disabled on some discs I Time search feature is not available on JPEG discs To select and play the desired driver If USB or SD card memory device is plugged in t...

Страница 40: ...he wrong number press the CLEAR button 3 Press the 3 8 PLAY PAUSE or ENTER button to start play To change the programmed contents Repeat the above procedures from step 1 Programmed contents will be cleared when you perform the following operations I Press the 7 STOP button twice I Switch the input or remove the discs I Set to stand by mode Notes I Programming is not possible whilst paused I Sequen...

Страница 41: ...cally displayed after a whilst I Using the direct number buttons you can open file or folder directly Notes I Up to 11 characters can be displayed for a folder name and a track name Underlines asterisks and spaces may not be displayed I Due to the structure of the disc information it takes longer to read a JPEG or DivX disc than a normal CD Indicates folders Indicates JPEG data Indicates DivX data...

Страница 42: ...he button is pressed the repeat play mode changes in the follow ing order TV screen Unit display REP ONE FOLDER REPEAT DISC REPEAT REP 1 REP ALL REP ALL REPEAT OFF No display Repeat the currently playing track Repeat the currently playing folder directory Repeat all the tracks Repeat play is cancelled 11 22 06 2 38 PM ...

Страница 43: ...can rotate images During playback press the 5 2 or 3 button The image rotates as shown below 3 button 90 rotation in a clockwise direction 2 button 90 rotation in an anti clockwise direction 5 button Horizontal mirror image button Vertical mirror image Note If press the 2 or 3 button repeatedly image rotates continuously 11 22 06 2 38 PM ...

Страница 44: ...re vice operation The following playback functions are the same as DVD or VCD operation Page Fast forward Fast backward 28 Still picture 30 Step function 30 Slow motion play 30 To play repeatedly repeat play 32 41 To zoom images zoom 31 To play the contents between the specified points repeatedly A B repeat 33 11 22 06 2 38 PM ...

Страница 45: ...s used for music video and image streaming with a USB memory device I The larger the capacity of the USB storage device the longer it will take for the data to be read I Some USB multi reader devices may not work correctly with the USB terminal on this unit I External storage devices cannot be played back using the USB terminal on this unit I This unit only supports MPEG 1 Audio Layer 3 format Sam...

Страница 46: ...d PULL OPEN PULL OPEN Whilst a disc is playing press the AUDIO button repeatedly to select the desired listening mode 5 1ch surround Unit display TV screen sound Example DTS H DTS or Dolby Digital Surround Enjoy DTS or Dolby Digital sound in 5 1 or 2 channel s DTS Advanced Feature p DIGITAL dts 11 22 06 2 38 PM ...

Страница 47: ...sation formed inside the unit I Is the disc very dirty I Does the disc satisfy the standards I Is the unit located near excessive vibrations I Has condensation formed inside the unit I Is the disc very dirty I Is the unit located near excessive vibrations I Has condensation formed inside the unit I Is a disc other than a DVD region number on the back of the unit SVCD VCD audio CD CD R or CD RW loa...

Страница 48: ...sc inserted in the unit 3 Press the 0 OPEN CLOSE button to close the disc tray 4 Press the ON STAND BY button to switch off and then unplug the AC power lead from the wall socket H Condensation Sudden temperature changes storage or operation in an extremely humid environment may cause condensation inside the cabinet laser pickup etc or on the transmitter on the remote control Condensation can caus...

Страница 49: ...minals Digital output terminal HDMI output terminal Power on 15 W Width 430 mm 16 15 16 Height 43 mm 1 11 16 Depth 206 mm 8 7 64 1 80 kg 3 97 lbs Analogue output OUT RCA type x 1 pair L R S video output S terminal x 1 component Y PB PR Video output RCA type x 1 COAXIAL HDMI socket Power source AC 110 240 V 50 60 Hz I DVD player Supported disc types Video signal Audio signal DVD with the same regio...

Страница 50: ... disc are copied using a VCR the copy protection code ly technology that is protected by method claims of certain U S patents and other intellectual tion and other rights owners ust be authorised by Macrovision Corporation and is intended for home and other limited by Macrovision Corporation ted f Digital Theater Systems Inc atories Dolby and the double D symbol are trademarks of Dolby Laboratorie...

Страница 51: ...MEMO 11 17 06 4 11 PM ...

Страница 52: ...SHARP CORPORATION 92LYOM20008701 06L R AS 1 11 17 06 4 12 PM ...

Отзывы: