background image

72

www.sharp.co.uk/support

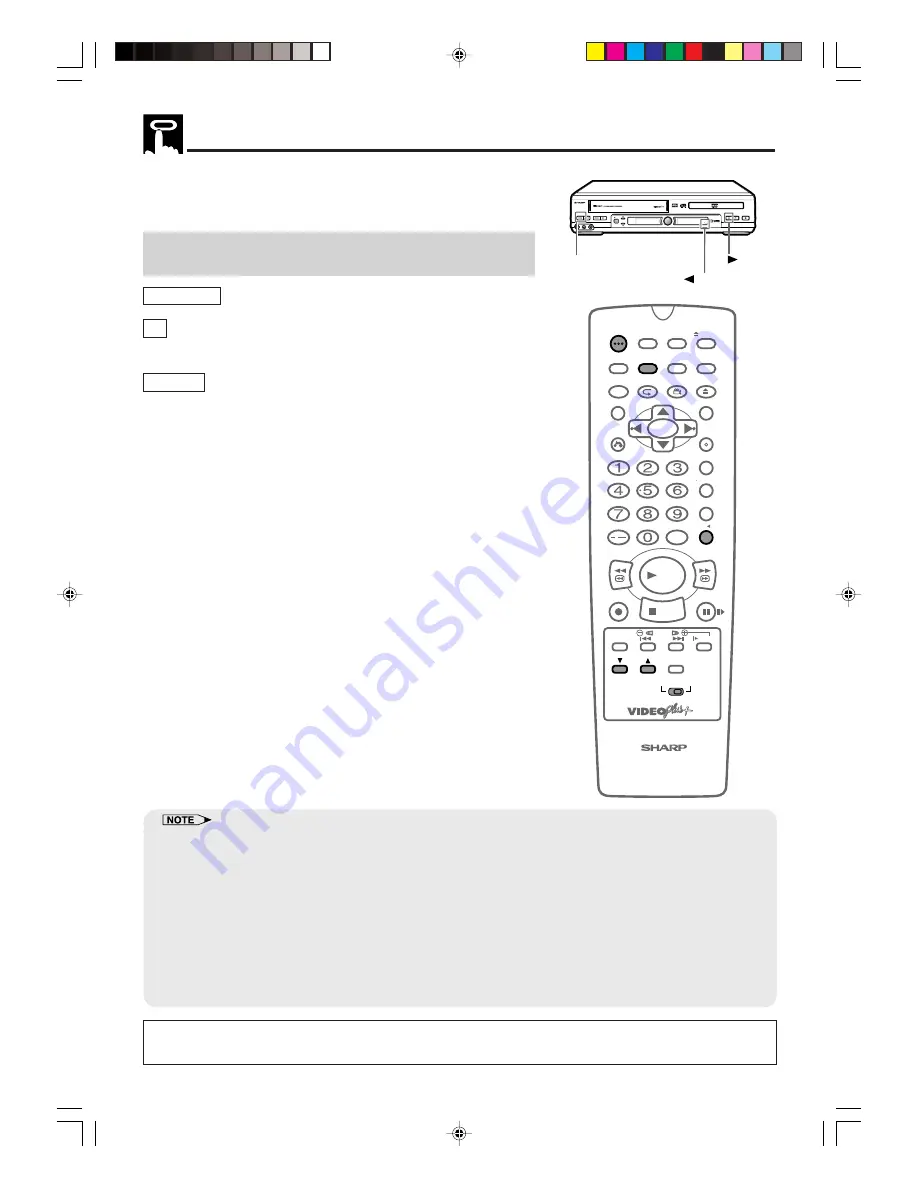
Use the following procedure to record the images and sounds on a
DVD disc onto a video cassette.

Recording a DVD disc onto a video cassette
(Tape Editing mode)

 Preparation

 TV

Turn on the TV and switch to the external “VIDEO” or “AV” channel.

 This Unit

Press 

OPERATE

.

Move 

the

 VCR/DVD CHANGE Switch

 on the Remote to 

DVD

.

1

Insert both the DVD disc and the video cassette for recording.

2

Press 

VCR 

\

\

\

\

\

 DVD

.

The VCR 

\

\

\

\

\

 DVD indicator on the product lights up.

•  

The channel has changed to DVD playback picture and the
product enters the REC PAUSE mode.

3

Press

 ON SCREEN

 to turn off the DVD on screen display (see

page 51).

If the DVD on screen display is “ON” while recording, the
display will also be recorded.

4

Press 

û

PLAY

.

The disc starts playback

5

Press 

æ

REC

.

The images on the DVD disc are recorded onto the VCR
cassette.

6

To stop the Tape Editing mode, first move the 

VCR/DVD

CHANGE Switch

 to VCR and press the 

Ë

STOP button to stop

the VCR. Then move the selector switch to DVD and press

Ë

STOP to stop the DVD.

Recording a DVD Disc onto a Video Cassette

/

OPEN/

 CLOSE

OPERATE

VCR/DVD

SELECTOR

VCR MENU

DVD SETUP

TAPE

SPEED

ON

SCREEN

TIMER

ON/OFF

TITLE

DVD MENU

DISPLAY

VIDEO Plus+

EJECT

FUNCTION

CONTROL

PROG/

REPEAT

ANGLE

CLEAR  

RETURN

REV

FWD

SET

ENTER

ZERO BACK

SKIP SEARCH

TV/VCR

VCR    DVD

AM/PM

INPUT SELECT

PAUSE/STILL

REC

VCR/DVD COMBINATION

PLAY

STOP

SLOW

CH

VCR

DVD

SKIP

DPSS

AUDIO

OUTPUT

RRMCGA069WJSA

AV 2 IN  VDEO

OPEN/CLOSE

OPERATE EJECT/STOP

REW

PLAY/X2

REC

CH

VCR/DVD

SELECTOR

TIMER

VCR   DVD

PLAY

STOP

LINE IN 3   VIDEO     L - AUDIO - R

/

DV-NC65

DVD / CD PLAYER

PAL

PLAY

OPERATE

VCR     DVD indicator

The following are not signs of trouble:

1

The brightness of images from regular DVD disc playback and from discs played in Tape Editing mode might vary.

2

The discs playing time and the Real time counter vary slightly when recording.

While in Tape Editing mode it is not possible to adjust timer settings to use Exact Rec function.

The DVD/VCR output jacks become VCR fixed.

The following operations cancel the Tape Editing mode:

1

When stopped or performing other tape operations except for recording or pause.

2

When changing channels.

3

When pressing 

VCR


\


DVD

 once more or turning the power on or off, after setting the Tape Editing mode.

Copy protected DVD discs cannot be recorded (the image will be distorted when 

æ

REC

 is pressed).

Discs that can be recorded onto tape are DVD discs that are not copy protected, and Audio CD-R and CD-RW (CD-R
or CD-RW are limited to those recorded in Audio CD format).

The recordings which you make from TV/radio broadcasts or audio sources (such as records) are for your
own private use and cannot be used without prior permission or consent of the author.

DVNC65H071_072.pm6

30/8/02, 11:52 am

72

Содержание DV-NC65H

Страница 1: ...e www sharp co uk support Customers without Internet access may telephone the 08705 274277 during office hours or 01 676 0648 if telephoning from Ireland NTSC PAL 2 TINS A222WJZZ Printed in the UK SHARP CORPORATION Osaka Japan SHARP ELECTRONICS U K LTD Sharp House Thorp Road Newton Heath Manchester M40 5BE 100 of the pulp used in making this paper comes from sustainable forests DVNC65HHyo1_4 pm6 3...

Страница 2: ... yourself For service please contact your dealer If this is not possible please call our Customer Information centre for details of your nearest Sharp Service Centre In the unlikely event of this equipment requiring repair during the guarantee period you will need to provide proof of the date of purchase to the repairing company Please keep your invoice or receipt which is supplied at the time of ...

Страница 3: ...s coloured brown must be connected to the plug terminal which is marked L or coloured red Ensure that neither the brown nor the blue wire is connected to the earth terminal in your three pin plug Before replacing the plug cover make sure that If the new fitted plug contains a fuse its value is the same as that removed from the cut off plug The cord grip is clamped over the sheath of the mains lead...

Страница 4: ...g Tips and Hints for easier operation Functions for DVD Functions for Audio CD Quick Start Guide the separate sheet GENERAL INFORMATION CONNECTION AND INITIAL SETTING VCR DVD SETUP WATCHING THE VCR DVD OTHER INFORMATION DVD DVD C D C D Important Be sure to read this Operation Manual carefully before using the Unit for the first time and keep it on hand for future reference when you experience oper...

Страница 5: ...EN DO NOT STARE INTO BEAM OR VIEW DIRECTLY WITH OPTICAL INSTRUMENTS SA005WJ VORSICHT LASERSTRAHLUNG WENNGEFFNET BLICKENSIENICHTINDENSTRAHL UNDBETRACHTENSIEDIESENNICHTDIREKTMITOPTISCHENINSTRUMENTEN ATTENTION RADIATION LASER EN CAS D OUVERTURE NE PAS FIXER LE FAISCEAU NI REGARDER DIRECTEMENT DES INSTRUMENTS OPTIQUES VARNING LASERSTRÅLNING NÄR DENNADEL ÄR ÖPPNAD STIRRAEJ IN I STRÅLEN OCH BETRAKTAEJ S...

Страница 6: ... is not a malfunction of the unit or the TV To watch a TV broadcast turn off the unit Service Do not attempt to service this Unit yourself Please refer any service to the nearest service centre approved by SHARP Copyright Recording and playback of any material may require consent Please refer particularly to the provisions of the Copyright Act 1956 the Dramatic and Musical Performers Protection Ac...

Страница 7: ...rch 62 DPSS 62 Skip Search 62 GENERAL INFORMATION SAFETY INFORMATION 5 Contents 7 Types of Discs that Can Be Played on This Unit 9 Disc Handling and Maintenance 11 Features 12 Accessories 13 Major Components 14 CONNECTION AND INITIAL SETTINGS Basic Connection 18 Connecting to ANTENNA IN ANTENNA OUT 18 Connecting a TV with LINE 1 TV Output and LINE 2 Input SCARTS 19 Connecting a TV Equipped with VI...

Страница 8: ...ording 64 How to Use the VIDEO Plus system to Make a Recording 64 How to Set a Delayed Recording 66 Setting a Recording 66 How to Check Change and Cancel a Delayed Recording 68 Checking a Recording 68 Changing a Recording 69 Cancelling a Recording 69 Recording from Other Equipment 70 Tape Remaining 71 Recording a DVD Disc onto a Video Cassette 72 Recording a DVD disc onto a video cassette Tape Edi...

Страница 9: ... NTSC signals when playing NTSC discs NTSC signals cannot be converted to modifed PAL signals An NTSC TV or NTSC compatable Multi system TV must be used when playing NTSC discs 1 DVD video players and discs are designed with region numbers which dictate the regions in which a disc can be played If the region number on the disc you want to play does not match the region number in this Unit you will...

Страница 10: ...the instructions given on the screen Icons Used on DVDs Sample Icons 2 This Unit supports 2 channel L R audio and 5 1ch Multi channel MPEG Audio 1 2 only when the DIGITAL OUT coaxial jack is used for connection It does not support 7 1 channel MPEG Audio Version 2 0 3 When playing back a CD G Graphics or CD EXTRA disc the audio portion will be played but the graphic images will not be shown Title C...

Страница 11: ...hich will cause noise If the playing surface of a disc is soiled or scratched the Unit may decide that the disc is incompatible and eject the disc tray or it may fail to play the disc correctly Wipe any soiling off the playing surface with a soft cloth If the Disc is Brought from a Cold to a Warm Environment Dew May Form on the Disc Wipe the dew off with a soft dry lint free cloth before using the...

Страница 12: ...sound 1 Manufactured under license from Dolby Laboratories Dolby Pro Logic and the double D symbol are trademarks of Dolby Laboratories 2 DTS and DTS Digital Surround are trademarks of Digital Theater Systems Inc Disc Features and this Operation Manual The types of functions and operations that can be used for a particular disc vary depending on the features of that disc In some cases these functi...

Страница 13: ...dvice or assistance regarding your Sharp product please visit our web site www sharp co uk support Customers without Internet access may telephone the 08705 274277 during office hours or 01 676 0648 if telephoning from Ireland NTSC PAL 2 CHECK THAT ALL THESE ACCESSORIES ARE SUPPLIED WITH THE UNIT CONTACT YOUR DEALER IF ANY ARE MISSING Remote Control The Remote Control must be pointed towards the U...

Страница 14: ...input jack 70 54 EJECT STOP OPERATE 24 54 PLAY X2 63 REC 55 REW 54 CH K L 54 Cassette compartment 24 VCR DVD SELECTOR 63 TIMER indicator SEPVP D VCR L R VCR Mode Indicator 37 54 Cassette in Indicator Timer Recording Indicator 63 Tape Speeds Indicator 63 Audio Output Indicator 59 Video Programming System Programme Delivery Control Indicator 65 Decoder Indicator 37 63 Recording Indicator 38 Clock In...

Страница 15: ...NC65 DVD CD PLAYER PAL Numbers in refer to the main pages in this Operation Manual where the topic is explained OPERATE 24 VCR DVD Selector Indicator 24 75 Disc tray 75 Disc operation buttons PLAY STOP 72 VCR DVD indicator A B TITLE TRACK CHAPTER TOTAL PROGRAM VIRTUAL ANGLE 51 Operation status Time indicator 2 TITLE indicator TRACK indicator CHAPTER indicator 1 91 PROGRAM indicator 86 VIRTUAL surr...

Страница 16: ...onents REV FWD STOP OPEN CLOSE VCR DVD SELECTOR VCR MENU DVD SETUP TAPE SPEED ON SCREEN TITLE DVD MENU DISPLAY FUNCTION CONTROL PROG REPEAT ANGLE CLEAR RETURN OPERATE TIMER ON OFF VIDEOPlus EJECT SET ENTER ZERO BACK SKIP SEARCH TV VCR VCR DVD AM PM INPUT SELECT PAUSE STILL REC SLOW CH VCR DVD SKIP DPSS AUDIO OUTPUT VCR DVD COMBINATION RRMCGA069WJSA 38 ON SCREEN 63 TIMER ON OFF 24 OPERATE 51 DISPLA...

Страница 17: ...OPEN CLOSE 41 DVD SETUP 41 ENTER 77 PAUSE STILL 77 76 FWD 76 SLOW 24 VCR DVD CHANGE Switch SKIP PLAY Do not subject the Remote to shock water or excessive humidity The Remote may not function if the Unit sensor is in direct sunlight or any other strong light Incorrect use of batteries may cause them to leak or burst Read the battery warnings and use the batteries properly Do not mix old and new ba...

Страница 18: ...et 21 DVD AUDIO output jacks VCR DVD shared VIDEO output jack 20 18 ANTENNA OUT 21 DVD S VIDEO output jack 19 SCART LINE 1 TV socket 22 DVD DIGITAL AUDIO output jack LINE 2 LINE 1 TV S VIDEO OUTPUT SELECTOR RGB VIDEO S VIDEO DIGITAL AUDIO VCR DVD OUT R L AUDIO VIDEO ANTENNA IN OUT DVD OUT R L AUDIO To an AC outlet DVNC65H018 pm6 30 8 02 10 07 am 18 ...

Страница 19: ...se electrical interference when you are watching television programmes Connecting to ANTENNA IN ANTENNA OUT The connection method differs depending on the type of TV The signal from ANTENNA OUT will only be the Television Signal A scart lead MUST be used to view the units playback signal LINE 2 LINE 1 TV S VIDEO OUTPUT SELECTOR RGB VIDEO S VIDEO AUDIO VCR DVD OUT R L AUDIO VIDEO ANTENNA IN OUT DVD...

Страница 20: ... VCR DVD OUT jacks can be used instead of LINE 1 TV depending on your TV Change the position according to the signal type VIDEO S VIDEO RGB that is output to TV during DVD playback To SCART output VCR or DECORDER SCART OUTPUT The factory default setting for the OUTPUT SELECTOR is VIDEO If your TV supports the higher quality modes S VIDEO or RGB via the SCART then please set the selector for your p...

Страница 21: ... listen to the audio through audio equipment connect only VIDEO lead to the TV Connecting a TV Equipped with VIDEO AUDIO Input Jacks LINE 2 LINE 1 TV S VIDEO OUTPUT SELECTOR RGB VIDEO S VIDEO AUDIO VCR DVD OUT R L AUDIO VIDEO ANTENNA IN OUT DVD OUT R L AUDIO DIGITAL White Red Yellow Yellow White L Red R Yellow White L Red R Required leads VIDEO AUDIO lead commercially available VIDEO AUDIO lead co...

Страница 22: ...nalogue Connection LINE 2 LINE 1 TV S VIDEO OUTPUT SELECTOR RGB VIDEO S VIDEO AUDIO VCR DVD OUT R L AUDIO VIDEO ANTENNA IN OUT DVD OUT R L AUDIO DIGITAL This Unit Required lead VIDEO AUDIO lead commercially available White L Red R White L Red R S VIDEO lead commercially available To AUDIO OUT jacks VIDEO AUDIO lead commercially available TV with external input jacks S VIDEO lead commercially avail...

Страница 23: ...oaxial digital input jack Connection to a processor or amplifier with a coaxial digital input jack DVD Audio Connections Digital Connection to an MD to Record a CD Some Audio CDs have a short silent section between musical tracks When sound from discs such as these is digitally recorded by connecting the Unit directly to a digital recorder such as an MD player the music may be recorded continuousl...

Страница 24: ...e priority VCR DVD SELECTOR VCR DVD OPEN CLOSE OPERATE VCR DVD SELECTOR VCR MENU DVD SETUP TAPE SPEED ON SCREEN TIMER ON OFF TITLE DVD MENU DISPLAY VIDEOPlus EJECT FUNCTION CONTROL PROG REPEAT ANGLE CLEAR RETURN REV FWD SET ENTER ZERO BACK SKIP SEARCH TV VCR VCR DVD AM PM INPUT SELECT PAUSE STILL REC VCR DVD COMBINATION PLAY STOP SLOW CH VCR DVD SKIP DPSS AUDIO OUTPUT RRMCGA069WJSA OPEN CLOSE OPER...

Страница 25: ...reen 28 Mode Selection 29 Manually Tuning Channel Setting 30 Channel Sort 32 Deleting Channels 33 Re naming Channels 34 Clock Setting 35 Manual Clock Setting 35 Post Code Security 36 Changing Post Code Pin Number 36 Decoder Switching Operation 37 Selecting the Output from the VCR 37 VCR Display Information 38 VCR Reset 38 DVNC65H025 Tobira pm6 30 8 02 11 25 am 25 ...

Страница 26: ...ial Scart cables are connected to your Unit and then press SET to confirm PLEASE BE SURE THE AERIAL SCART CABLE IS CONNECTED TO YOUR VCR PRESS SET TO CONTINUE SET ENTER MENU EXIT 5 All available terrestrial channels will be automatically installed Auto install may take a few minutes 1 CH22 AUTOMATIC TUNING PLEASE WAIT SET ENTER MENU EXIT 6 Once Auto Installation is complete the MOVE menu screen wi...

Страница 27: ... 7 10 Press VCR MENU to exit if you are satisfied with the channel order The correct time and date should now be displayed on your TV screen for approximately 2 seconds If the clock is not automatically set the CLOCK screen will appear Refer to Manual Clock Setting on page 35 VCR Auto Installation OPEN CLOSE OPERATE VCR DVD SELECTOR VCR MENU DVD SETUP TAPE SPEED ON SCREEN TIMER ON OFF TITLE DVD ME...

Страница 28: ...lect an item for the menu See the following pages for details on each menu procedure MENU item list Main Menu 64 29 30 VIDEO PLUS MODE SETUP 66 NICAM AUTO OFF COLOUR AUTO PAL REPEAT ON OFF CHANNEL PRESET POST CODE PRESET FINE TUNING CHANNEL SKIP DECODER BLUE MUTE AUTO OFF CHANNEL SORT CLOCK SUPER P ON OFF 16 9 AUTO OFF TIMER MOVE NAME CANCEL MENU VIDEOPLUS TIMER MODE SET UP SELECT SET ENTER MENU E...

Страница 29: ...ET to enter The screen returns to MENU screen and press MENU to return to normal If you press VCR MENU to exit the mode selection screen in Step 5 the data will not be stored Be sure to press SET to store the data OPEN CLOSE OPERATE VCR DVD SELECTOR VCR MENU DVD SETUP TAPE SPEED ON SCREEN TIMER ON OFF TITLE DVD MENU DISPLAY VIDEOPlus EJECT FUNCTION CONTROL PROG REPEAT ANGLE CLEAR RETURN REV FWD SE...

Страница 30: ...SET ENTER MENU EXIT 4 Press to select CHANNEL 5 Press to start tuning in either direction Tuning will stop when a channel is received If it is not the desired channel press to continue tuning 6 Press to select FINE TUNING Press and hold until the sharpest colour picture is obtained IMPORTANT NOTE 7 Press to select DECODER This is preset to OFF If you connect a decoder as shown previously you must ...

Страница 31: ...DVD COMBINATION PLAY STOP SLOW CH VCR DVD SKIP DPSS AUDIO OUTPUT RRMCGA069WJSA 8 Press to select SKIP then to select ON or OFF The SKIP function determines whether the channel can be selected when using the CH instead of the number buttons 9 Press SET to store this channel The Unit will increment to the next channel up If any more channels are to be tuned in repeat this proce dure Once all the cha...

Страница 32: ...s are to be moved repeat the procedure from step 5 8 When all the channels are in your preferred order either press CLEAR to return to the CHANNEL SORT menu or press VCR MENU to return to the normal screen OPEN CLOSE OPERATE VCR DVD SELECTOR VCR MENU DVD SETUP TAPE SPEED ON SCREEN TIMER ON OFF TITLE DVD MENU DISPLAY VIDEOPlus EJECT FUNCTION CONTROL PROG REPEAT ANGLE CLEAR RETURN REV FWD SET ENTER ...

Страница 33: ...AR CHANNEL SORT SELECT SET ENTER MENU EXIT 7 When all the channels you wish have been cancelled either press CLEAR to return to the CHANNEL SORT menu or press VCR MENU to return to the normal screen If when deleting channels the picture becomes unclear and the on screen display is unreadable ON SCREEN can be used to toggle between a blue background and the normal picture The blue background will b...

Страница 34: ... SET ENTER MENU EXIT 7 If any more channels are to be re named repeat the procedure from step 5 8 When all the channels are named correctly either press CLEAR to return to the CHANNEL SORT menu or press VCR MENU to return to the normal screen If when re naming channels the picture becomes unclear and the on screen display is unreadable ON SCREEN can be used to toggle between a blue background and ...

Страница 35: ...k enter AM or PM by pressing AM PM on the Remote 6 Press to select DATE Enter the date using the number buttons or For example for 1st April enter 01 04 7 Press to select YEAR Enter the last two digits of the year using the number buttons or For example for 2002 enter 02 For the year 2003 enter 03 8 Auto Clock Setting Press to select Press to change between AUTO CLOCK on off is ON is OFF Then pres...

Страница 36: ...eturn to a normal screen 6 Write your PIN number in the box provided for future reference IMPORTANT Please keep your Operation Manual separate from your VCR Changing POST CODE PIN NUMBER If you wish to change your PIN number at any time 1 Follow steps 1 to 3 above 2 Enter your current PIN number Press SET to confirm 3 Press re select PIN number 4 Enter your new PIN number Press SET to confirm then...

Страница 37: ...al to your TV through the LINE 1 terminal and you can watch the unscrambled picture When making recording using a separate decoder connected as shown remember to leave the decoder function ON If you connect a decoder unit to this Unit the decoder unit provides a switching signal which will automatically allow your TV to display the unscrambled signal routed through the Unit To use this feature mak...

Страница 38: ...ing sequence Clock mode The current time will be displayed Channel position mode The channel position will be displayed 1 Tape counter mode The current tape position will be displayed Tape remain mode The amount of video tape remaining will be displayed The default time and date will not be displayed if the clock has not been set The VCR will return to Tape counter mode each time it is switched on...

Страница 39: ...ng 45 Setting the COMPRESSION Dolby Digital output level 45 Setting the DOLBY DIGITAL 46 Setting the MPEG 47 Setting the CINEMA VOICE 48 DISC LANGUAGE Setting 49 Setting SUB TITLE AUDIO and MENU languages from 8 languages 49 Selecting languages from OTHER 50 DVD Display Information 51 Operation Mode Indicators 51 Language Code List for Disc Language 52 DVD SETUP DVNC65H039 Tobira pm6 30 8 02 11 37...

Страница 40: ...ng for increasing the average volume of Dolby Digital audio when playing a DVD Use this setting for specifying either BITSTREAM or D PCM PCM as the digital type output Use this setting for selecting languages of subtitle audio track and disc menu recorded on a disc TV MODE PARENTAL 1 to 8 ON OFF Country Code AUDIO DISC LANGUAGE COMPRESSION ON OFF AUDIO DIGITAL SUB TITLE TV MODE MENU Languages you ...

Страница 41: ...ss ENTER to display the items you can select 5 Use or to select LB 4 3 PS 4 3 or 16 9 Example Selecting PS 4 3 TV MODE Continue on next page OPEN CLOSE OPERATE VCR DVD SELECTOR VCR MENU DVD SETUP TAPE SPEED ON SCREEN TIMER ON OFF TITLE DVD MENU DISPLAY VIDEOPlus EJECT FUNCTION CONTROL PROG REPEAT ANGLE CLEAR RETURN REV FWD SET ENTER ZERO BACK SKIP SEARCH TV VCR VCR DVD AM PM INPUT SELECT PAUSE STI...

Страница 42: ...eo material is played in this mode on a conventional TV screen black bands appear at the top and bottom of the screen 16 9 Wide screen TV This is the correct mode for playing wide screen videos on a wide screen TV You must also set the screen mode on your wide screen TV to FULL 6 Press ENTER to confirm the TV MODE setting When you have completed the setting above press RETURN to exit the SETUP scr...

Страница 43: ...t your password password verification display appears 3 Use the number buttons 0 to 9 to enter a 4 digit password PASSWORD 1 2 3 4 Enter the numbers slowly as each number is stored separately If you enter the wrong number three times in succession the normal screen reappears If you forget your password you can erase your current password by press rSTOP four times 4 The cursor is moved to LEVEL and...

Страница 44: ...working correctly try changing the country code PARENTAL PASSWORD LEVEL 8 CODE UK PARENTAL CODE USA FRANCE CANADA UK JAPAN ITALY GERMANY SPAIN OPEN CLOSE OPERATE VCR DVD SELECTOR VCR MENU DVD SETUP TAPE SPEED ON SCREEN TIMER ON OFF TITLE DVD MENU DISPLAY VIDEOPlus EJECT FUNCTION CONTROL PROG REPEAT ANGLE CLEAR RETURN REV FWD SET ENTER ZERO BACK SKIP SEARCH TV VCR VCR DVD AM PM INPUT SELECT PAUSE S...

Страница 45: ...at is similar to that of an Audio CD OFF Audio level recorded on disc is played back without modification ON Dolby Digital average audio level is increased so it sounds similar to that of Audio CD Use of the OFF setting is recommended when the Unit is connected to audio equipment or depending on the disc the sound is abnormal Advanced Surround is disabled when COMPRESSION is set to ON Preparation ...

Страница 46: ...GITAL When playing a disc recorded using Dolby Digital 5 1ch you can specify either BITSTREAM or D PCM as the digital type output Before setting the DIGITAL perform the step 1 to 2 on pages 45 and 46 1 Press ENTER and then use or to select DIGITAL 2 Press ENTER to display the settings you can select OPEN CLOSE OPERATE VCR DVD SELECTOR VCR MENU DVD SETUP TAPE SPEED ON SCREEN TIMER ON OFF TITLE DVD ...

Страница 47: ...ction to the PCM digital input jack of a DAT or MD or for a digital connection to a receiver amplifier that does not have an MPEG Audio decoder 4 Press ENTER to confirm the setting 5 Press RETURN to exit the SETUP screen and return to normal screen If you want to go on and specify other settings use or to display the other SETUP screen without pressing RETURN When playing a disc recorded using DTS...

Страница 48: ... press RETURN to return to the SETUP screen However if you want to go on and specify other settings use or to display other setting screens The CINEMA VOICE setting raises the sound of the centre channel It does not affect the voices in other channels Even if this function is set to ON the results may or may not be effective depending on the disc OPEN CLOSE OPERATE VCR DVD SELECTOR VCR MENU DVD SE...

Страница 49: ...E TV MODE PARENTAL LEVEL 8 AUDIO DISC LANGUAGE 3 Press ENTER and then use or to select AUDIO SUB TITLE or MENU You can set AUDIO SUB TITLE or MENU individually Example Selecting AUDIO DISC LANGUAGE AUDIO ENGLISH SUB TITLE ENGLISH MENU ENGLISH 4 After selecting the item press ENTER 5 Select the language you want to use with and Example Selecting FRENCH AUDIO ENGLISH CHINESE SPANISH SWEDISH FRENCH D...

Страница 50: ... OTHER AUDIO 1 E AUDIO 2 N The SUB TITLE and MENU screens are displayed respectively when being set 2 Press or to select the alphabet as the first letter on AUDIO 1 upper side 3 Press to move the cursor to AUDIO 2 lower side 4 Press or to select the alphabet as the second letter 5 Press ENTER to confirm the setting Press RETURN to return to the previous screen OPEN CLOSE OPERATE VCR DVD SELECTOR V...

Страница 51: ...d on the DVD Front Panel Display depending on the operation status Display Examples Region Local Number Error Indicator If the region local number of the disc that you attempt to play differs from the region number of this Unit see page 99 REGION CODE ERROR appears on the TV screen and the disc tray slides out The disc cannot be played TV Screen DVD Front Panel Display Remarks If no disc is loaded...

Страница 52: ... Korean KS Kashmiri KU Kurdish KY Kirghiz LA Latin LN Lingala LO Laothian LT Lithuanian LV Latvian Lettish Code Language Name MG Malagasy MI Maori MK Macedonian ML Malayalam MN Mongolian MO Moldavian MR Marathi MS Malay MT Maltese MY Burmese NA Nauru NE Nepali NL Dutch NO Norwegian OC Occitan OM Afan Oromo OR Oriya PA Panjabi PL Polish PS Pashto Pushto PT Portuguese QU Quechua RM Rhaeto Romance RN...

Страница 53: ... Repeat Auto Zero Back 61 Auto Repeat 61 Auto Zero Back 61 DPSS Digital Program Search System Skip Search 62 DPSS 62 Skip Search 62 TV Program Recording 63 Selection of a Channel 63 Tape Speed Selection 63 Immediate Recording 63 Simple Timed Recording 63 Timer Recording 64 How to Use the VIDEO Plus System to Make a Recording 64 How to Set a Delayed Recording 66 Setting a Recording 66 How to Check ...

Страница 54: ...ty during playback It is normally set to ON See page 60 Picture Disturbance During Playback This Unit has an automatic tracking system which reduces picture disturbance when you start to playback a video tape When auto tracking is in operation flashes on the on screen display If the picture still has disturbance you may need to manually track the video tape During PLAYBACK of a video tape Press CH...

Страница 55: ...ayback to select search mode 2 Press ûPLAY to resume playback OR 3 Press FFè or È REW to decrease the speed during visual search mode There are 2 search speeds in each direction The unit switches between them each time the button is pressed 4 Press ûPLAY There will be picture interference and possibly a change to black and white picture using Visual Fast Forward Rewind functions Automatic Head Cle...

Страница 56: ...ard to PAL and is used in some Non European Countries Your Unit can playback pre recorded NTSC cassette onto a PAL system TV but cannot record an NTSC signal onto a video cassette You cannot record NTSC signals or dub NTSC cassettes onto other VCR s from this Unit You cannot use Slow speed Still frame Double Speed Frame Advance or Tape Remaining with a pre recorded NTSC cassette Some picture noise...

Страница 57: ...es may appear on black and white recordings 1 Follow steps 1 to 3 from BLUE MUTE above 2 Press to select COLOUR 3 Press to select AUTO or PAL 4 Press SET to confirm and then VCR MENU to return to the normal screen OPEN CLOSE OPERATE VCR DVD SELECTOR VCR MENU DVD SETUP TAPE SPEED ON SCREEN TIMER ON OFF TITLE DVD MENU DISPLAY VIDEOPlus EJECT FUNCTION CONTROL PROG REPEAT ANGLE CLEAR RETURN REV FWD SE...

Страница 58: ...o 3 from BLUE MUTE on page 57 2 Press to select 16 9 3 Press to select AUTO or OFF 4 Press SET to confirm and then VCR MENU to return to the normal screen OPEN CLOSE OPERATE VCR DVD SELECTOR VCR MENU DVD SETUP TAPE SPEED ON SCREEN TIMER ON OFF TITLE DVD MENU DISPLAY VIDEOPlus EJECT FUNCTION CONTROL PROG REPEAT ANGLE CLEAR RETURN REV FWD SET ENTER ZERO BACK SKIP SEARCH TV VCR VCR DVD AM PM INPUT SE...

Страница 59: ...not appear on the VCR Front Panel display Pressing AUDIO OUTPUT a fourth time normal Hi Fi stereo sound will be heard and will appear on the VCR Front Panel display NICAM Hi Fi STEREO SOUND Your Unit can receive and record NICAM sound The Unit is normally set so that NICAM sound is possible if it is present on the receiving signal otherwise the Unit will automatically switch to receive the mono si...

Страница 60: ...tape 1 Sharp Super Picture is set to off automatically When finished play back the setting will return to the previous setting 2 You cannot change ON OFF setting manually The ON OFF status of the Sharp Super Picture can be checked when ON SCREEN is pressed to display OSD When the Unit power is turned off the Sharp Super Picture setting is retained in memory If power is interrupted for more than 60...

Страница 61: ...MENU EXIT 3 Select REPEAT mode with Then set the mode to ON or OFF with 4 Press SET to confirm and return to the menu screen 5 Press VCR MENU to return to normal screen Auto Zero Back ZERO BACK uses the tape counter to determine a specific point on a cassette you may wish to return to 1 Press DISPLAY until tape counter appears 2 Press CLEAR to identify the current position on a video cassette and ...

Страница 62: ...cordings must be longer than 3 minutes The starting point of playback may vary This feature will only work with video tapes recorded on a VCR with the DPSS feature Skip Search With this feature you can set a forward video search time to approx 30 60 90 or 120 seconds of recorded material After searching normal playback will resume automatically 1 Press ûPLAY to start playback 2 Press SKIP SEARCH T...

Страница 63: ... Æ Æ ÆREC to continue recording 6 Press ËSTOP once to stop recording Simple Timed Recording 1 Press Æ Æ Æ Æ ÆREC 2 To specify a stop time each additional press of Æ Æ Æ Æ ÆREC will delay the stop time by 10 minutes 3 Press ËSTOP once to stop recording at any time TV Program Recording OPEN CLOSE OPERATE VCR DVD SELECTOR VCR MENU DVD SETUP TAPE SPEED ON SCREEN TIMER ON OFF TITLE DVD MENU DISPLAY VID...

Страница 64: ...ou want to make additional recordings at the same time each day or week then use to select the WEEKLY or DAILY option as appropriate 4 Press SET to confirm Check that the menu list agrees with the times shown in the TV listing If it does not press CLEAR to return to the VIDEO Plus system menu and re enter the correct PlusCode number The first time that you use the VIDEO Plus system to make a recor...

Страница 65: ...TOR VCR MENU DVD SETUP TAPE SPEED ON SCREEN TIMER ON OFF TITLE DVD MENU DISPLAY VIDEOPlus EJECT FUNCTION CONTROL PROG REPEAT ANGLE CLEAR RETURN REV FWD SET ENTER ZERO BACK SKIP SEARCH TV VCR VCR DVD AM PM INPUT SELECT PAUSE STILL REC VCR DVD COMBINATION SLOW CH VCR DVD SKIP DPSS AUDIO OUTPUT RRMCGA069WJSA PLAY STOP You may also access the VIDEO Plus system menu by the following procedure 1 Press V...

Страница 66: ...ess SET to confirm MENU VIDEOPLUS TIMER MODE SET UP SELECT SET ENTER MENU EXIT 4 Press SET again the on screen display will now show today s date If you wish to change the date use or number buttons If you use the number buttons enter two digits for the day then two for the month For example for July 9th press 0 9 9th then 0 7 July When the correct date for your recording is shown press to move to...

Страница 67: ... to the next setting 7 Enter the start time using or the number buttons hours first then minutes when entering less than 10 hours or minutes add a 0 before the number for example for 21 05 start press 2 1 0 5 Then press to move to the next setting 1 2 DATE PR START STOP 21 06 02 12 00AM13 00PMSP 9 07D03 21 05PM SELECT SET ENTER MENU EXIT CHANGE 8 Enter the stop time for example for 22 30 stop pres...

Страница 68: ...red indicator light flashes a video tape has not been inserted into the Unit If the video tape is ejected when the Unit tries to record the record protection tab has been removed During recording press ËSTOP to cancel the recording If there are further recordings to be made the Unit will return to Timer Standby How to Check Change and Cancel a Delayed Recording Checking a Recording You can see on ...

Страница 69: ...ecording on page 68 2 To cancel a delayed recording press to highlight the recording to be cancelled then press CLEAR 1 2 DATE PR START STOP 21 06 02 12 00AM13 00PMSP 2 2 CLEAR CANCEL SELECT SET ENTER MENU EXIT 3 Press VCR MENU to exit If there are some programmes to be recorded do not forget to press TIMER ON OFF to return the Unit to Timer Standby mode OPEN CLOSE OPERATE VCR DVD SELECTOR VCR MEN...

Страница 70: ...r equipment operation manuals for further information LINE 1 TV LINE 2 LINE 1 TV S VIDEO OUTPUT SELECTOR RGB VIDEO S VIDEO DVD VCR Unit back panel L R LINE IN 3 VIDEO L AUDIO R 1 Connect your signal source e g Camcorder Digital Camera etc to the desired scart socket on the back of the Unit using the manufacturers recommended cable not supplied 2 Ensure that the tape on which you wish to record is ...

Страница 71: ...When the computation is completed the tape remaining will be shown on the OSD and VCR display for 5 seconds If the REM mode is selected with MODE OSD or DISPLAY and the VCR is in Stop mode the tape will automatically fast forward or rewind for a few seconds and then the VCR will begin computing the amount of tape remaining During computation REC will not function and pressing STOP PLAY X2 or other...

Страница 72: ... BACK SKIP SEARCH TV VCR VCR DVD AM PM INPUT SELECT PAUSE STILL REC VCR DVD COMBINATION PLAY STOP SLOW CH VCR DVD SKIP DPSS AUDIO OUTPUT RRMCGA069WJSA AV 2 IN VDEO OPEN CLOSE OPERATE EJECT STOP REW PLAY X2 REC CH VCR DVD SELECTOR TIMER VCR DVD PLAY STOP LINE IN 3 VIDEO L AUDIO R DV NC65 DVD CD PLAYER PAL PLAY OPERATE VCR DVD indicator The following are not signs of trouble 1 The brightness of imag...

Страница 73: ...s 79 Regarding MP3 discs 79 Playing MP3 discs 79 To play MP3 discs 80 To play another file music title while playing 80 To skip the file while playing 80 About the Function Control Screen 81 Direct skip title chapter time 82 Subtitle language setting 83 Angle setting 84 Audio setting 85 Advanced Surround setting 86 Digital Gamma setting 87 Direct Selection of Scenes 88 Selecting Scenes by Title Nu...

Страница 74: ... the DVD VCR shared output jack 2 Press OPERATE 3 Move VCR DVD CHANGE Switch on the remote control to DVD VCR DVD 4 Press VCR DVD SELECTOR to enter the DVD mode The VCR DVD SELECTOR on the product lights up in green Each time VCR DVD SELECTOR is pressed the mode changes between VCR mode and DVD mode Preparing to Use The DVD OPEN CLOSE OPERATE VCR DVD SELECTOR VCR MENU DVD SETUP TAPE SPEED ON SCREE...

Страница 75: ...scs in the tray This can damage the player and the discs 4 Press î OPEN CLOSE to close the disc tray 5 Press ûPLAY Playback image appears on the screen The Start Up screen will be shown for audio CDs Some discs are played back automatically without pressing û PLAY Some discs prompt you to select a title In this case select a title you want to view 6 Press ËSTOP to stop playback If the disc is load...

Страница 76: ...eed of slow motion playback changes in the following sequence DVD 1 approx x1 2 2 approx x1 8 3 approx x1 16 Number of Presses 2 Press ûPLAY to return to the normal playback or press âPAUSE STILL to return to the still picture mode On some discs the slow motion playback functions are disabled Slow motion playback is disabled on Audio CDs and MP3 discs Playback DVD 1 Fast scan image appears here No...

Страница 77: ...s ÀSKIP and playback begins and you then press ÀSKIP again within 3 seconds playback returns to the beginning of the previous chapter track The frame advance playback functions are disabled for Audio CDs and CD R RW On some discs the skip functions are disabled The playback image is not displayed during the skip It resumes during playback following the skip OPEN CLOSE OPERATE VCR DVD SELECTOR VCR ...

Страница 78: ...without changing the current angle This function can only be used for discs on which scenes shot from multiple angles have been recorded If no angles are recorded is displayed Playback OPEN CLOSE OPERATE VCR DVD SELECTOR VCR MENU DVD SETUP TAPE SPEED ON SCREEN TIMER ON OFF TITLE DVD MENU DISPLAY VIDEOPlus EJECT FUNCTION CONTROL PROG REPEAT ANGLE CLEAR RETURN REV FWD SET ENTER ZERO BACK SKIP SEARCH...

Страница 79: ...sion of a multi session disc can be played When both audio tracks and MP3 files are recorded on a disc audio tracks will be played Depending on the folder tree reading MP3 files can take time The more files there are the longer the reading time Therefore it is recommended to lower the number of folders before recording Folder or track file names are limited to 8 characters The folder file names ar...

Страница 80: ...ress RETURN to return to the folder selection screen When pressing ûPLAY after selecting the folder the playback screen is displayed and the files in that folder can be played from the beginning 3 Select the file music title you want to play by using or and then press ENTER The chosen file music title will be played in sequence 4 Press ËSTOP to stop playback To play another file music title while ...

Страница 81: ...ber of the title currently played back is displayed You can skip directly to the desired title 2 2 2 2 2 Direct chapter skip The number of the chapter currently played back is displayed You can skip directly to the desired chapter 3 3 3 3 3 Direct time skip Elapsed time from the beginning of the disc is displayed You can skip directly to the point from which you want to start playback 4 4 4 4 4 Su...

Страница 82: ...mple Entering title 5 4 Press ENTER The played back image changes to the beginning of the specified title You can exit the Function control screen by pressing RETURN or FUNCTION CONTROL The number of titles chapters or times you can input depends on that of the titles chapters or times recorded on a disc you play 2 5 8 3 1 3 8 2 ENGLISH 1 1 51ch ON ON DVD 5 DVD 5 5 DVD OPEN CLOSE OPERATE VCR DVD S...

Страница 83: ...n by pressing RETURN or FUNCTION CONTROL This function can only be used for discs on which subtitles have been recorded in multiple languages Some DVD discs are marked Forced Display indicating that the subtitling cannot be suppressed With such discs the subtitles will be displayed even when you select OFF display This does not indicate a fault with this Unit If no subtitles are recorded on the di...

Страница 84: ...epending on the disc used 2 DVD 4 Press ENTER to confirm the setting You can exit the Function control screen by pressing RETURN or FUNCTION CONTROL This function can only be used for discs on which scenes shot from multiple angles have been recorded If no angles are recorded on the disc xx is displayed OPEN CLOSE OPERATE VCR DVD SELECTOR VCR MENU DVD SETUP TAPE SPEED ON SCREEN TIMER ON OFF TITLE ...

Страница 85: ...nt to use See page 45 for details about the types of audio format 4 Press ENTER to confirm the setting You can exit the Function control screen by pressing RETURN or FUNCTION CONTROL This function can only be used for discs on which the sound has been recorded in multiple formats With certain types of discs you can change the audio using the disc menu A DTS digital surround decoder is required to ...

Страница 86: ...onnection Advanced Surround does not operate when you play back a disc recorded using Linear PCM or DTS format Advanced Surround setting This function allows you to enjoy a surround sound effect when you are using an analog connection using LINE 1 OUT on this Unit to 2 channel audio equipment TV etc Preparation To use the Advanced Surround function Set the COMPRESSION setting in AUDIO to OFF see p...

Страница 87: ...While ON is displayed press or The level selection indicator that shows the current level appears If no button is pressed within 10 seconds the level selection indicator goes off 5 Use or to change the level ON DVD 6 Press ENTER to confirm the setting If no change is made for 10 seconds after the level is set the level indicator goes off You can exit the Function control screen by pressing RETURN ...

Страница 88: ...STOP SLOW CH VCR DVD SKIP DPSS AUDIO OUTPUT RRMCGA069WJSA Selecting Scenes by Title Number 1 Press TITLE to show the title screen Example 2 Use the number buttons 0 to 9 to enter the desired title or or to highlight the desired title 3 When you press ENTER or û PLAY the title specified in step 2 starts playing Selecting Scenes from the Menu Screen 1 Press DVD MENU to show the menu screen Example 2...

Страница 89: ... the steps below 1 Press to move the cursor to the playlist 2 Press or to select the program chapter you want to delete and then press RETURN To delete all programmed chapters move the cursor to the playlist and then press RETURN for more than two seconds 4 Press ûPLAY to begin playing the programmed chapters The chapters will be played in the order they were entered The PROGRAM indicator lights u...

Страница 90: ... playback Up to 24 tracks can be programmed The programe cannot be set during the normal playback On some discs in which programmed playback is prohibited this function is disabled Programmed Playback C D C D OPEN CLOSE OPERATE VCR DVD SELECTOR VCR MENU DVD SETUP TAPE SPEED ON SCREEN TIMER ON OFF TITLE DVD MENU DISPLAY VIDEOPlus EJECT FUNCTION CONTROL PROG REPEAT ANGLE CLEAR RETURN REV FWD SET ENT...

Страница 91: ...aying the MP3 files The file will be played in the order they were entered 5 Press Ë Ë Ë Ë ËSTOP to stop the programmed playback To start programmed playback again follow the steps below 1 Press Ë Ë Ë Ë ËSTOP to stop programmed playback 2 Press PROG 3 Select the file you programmed and press ENTER 4 Press û û û û ûPLAY OPEN CLOSE OPERATE VCR DVD SELECTOR VCR MENU DVD SETUP TAPE SPEED ON SCREEN TIM...

Страница 92: ...Plus EJECT FUNCTION CONTROL PROG REPEAT ANGLE CLEAR RETURN REV FWD SET ENTER ZERO BACK SKIP SEARCH TV VCR VCR DVD AM PM INPUT SELECT PAUSE STILL REC VCR DVD COMBINATION PLAY STOP SLOW CH VCR DVD SKIP DPSS AUDIO OUTPUT RRMCGA069WJSA DVD A B B C DVD A B B T DVD A B B T A B DVD A B B T DVD A B B CD R RW CD R RW C D C D DVD DVD Chapter Repeat Title Repeat A B Repeat See the next page for details OFF T...

Страница 93: ...e chapter If the title track finishes before specifying the ending location B the location where the title track finishes will be set as the ending location B The A B repeat function cannot be used during programmed playback If the DVD Front Panel display does not show the elapsed playback time while a disc is playing A B repeat playback cannot be used for that disc The A B repeat function does no...

Страница 94: ...d off The continued playback described here may not be possible on some discs such as discs that automatically start playing when the disc tray closes This resume operation does not work in the following cases If you press ËSTOP twice If you press ËSTOP during auto playback When you open the disc tray After enabling the Resume function OPEN CLOSE OPERATE VCR DVD SELECTOR VCR MENU DVD SETUP TAPE SP...

Страница 95: ... uk support Help line 08705 274277 office hours 95 www sharp co uk support Other Information Troubleshooting 96 Definition of Terms 98 Specifications 101 Guarantee 102 WATCHING THE DVD DVNC65H095 Tobira pm6 30 8 02 12 10 pm 95 ...

Страница 96: ...y be operating In this event unplug the Unit from the power outlet briefly and then plug it in again Are the batteries loaded correctly Are the batteries flat Is the signal emitter on the Remote pointing at the Unit Is the Remote too far from the Unit or is there any obstacle between the Remote and the Unit Did the VCR DVD CHANGE Switch change correctly Did the VCR DVD SELECTOR change correctly Se...

Страница 97: ...al noise or interference If this should happen unplug the Unit and plug it in again after a few minutes Troubleshooting Possible Cause Solutions The record protection tab has been removed from the cassette Broadcast does not carry VPS PDC signal which alters recording time Check VPS PDC mode is switched ON Ensure date and time are correctly set on the Unit Make sure there is no other tape in the V...

Страница 98: ...creen to view the scene from different angles These numbers are recorded on DVD discs A title is subdivided into many sections each of which is numbered and specific parts of video presentations can be searched quickly using these numbers Setting that increases the average volume of Dolby Digital audio when playing a DVD Corrects for gradations in dark areas of images to make images clearer A soun...

Страница 99: ...ingdom of Belgium Bosnia and Bosnia and Herzegovina Herzegovina Bulgaria Republic of Bulgaria Croatia Republic of Croatia Cyprus Republic of Cyprus Czech The Czech Republic Denmark Kingdom of Denmark Egypt Arab Republic of Egypt Finland Republic of Finland France French Republic Germany Federal Republic of Germany Greece Hellenic Republic Hungary Republic of Hungary Iceland Republic of Iceland Ira...

Страница 100: ... scene quickly It may not work with some discs This is a menu displayed by some DVDs for selection of chapters and subtitle set The title menu is also called a top menu These numbers are recorded on DVD discs When a disc contains two or more movies these movies are numbered as title 1 title 2 etc These numbers are assigned to the tracks which are recorded on audio CDs They enable specific tracks t...

Страница 101: ...75Ω Audio Input Input level 3 8 dBs 47kΩ 0 dBs 0 775 Vrms Audio Output Output level 3 8 dBs 1kΩ 0 dBs 0 775 Vrms Hi Fi Audio Dynamic Range 90 dB Frequency Response 20 Hz 20 kHz Memory Backup 10 minutes DVD VCR shared Video output Output level 1 Vp p 75Ω S video output Y output level 1 Vp p 75Ω C output level 0 300 Vp p 75Ω Audio output Output level 2 Vrms 1 kHz 0 dB Video signal horizontal resolut...

Страница 102: ...s not cover carriage costs batteries or video tapes 5 In the unlikely event of this product requiring repair please contact the supplier from whom it was purchased Where this is not possible please contact the SHARP Helpline on the telephone number given below 6 This guarantee is offered as an additional benefit to your statutory rights and does not affect these rights in any way 7 No person has a...

Отзывы: