Sharp DV-NC200 Скачать руководство пользователя страница 18

V

CR F

UNC

TIONS

– 18 –

EN

When an OTR or a Timer Recording is completed...

• 

   If the other Timer Recordings remain as programmed, the VCR/DVD 

switches to the DVD mode automatically, and the TIMER indicator on 
the front panel lights up to indicate the VCR/DVD is in the timer standby 
mode. In some occasions, however, the VCR/DVD may be automatically 
turned off, instead of changing to the DVD mode after pressing 

TIMER ON/OFF

.

• 

    The TIMER indicator on the front panel flashes if there are no more Timer 

Recordings on standby. If you want to use the VCR function, press 

TIMER ON/OFF

 on the remote control or 

STOP 

C

/EJECT 

A

 on the VCR/

DVD. Then press 

VCR

 to activate the VCR function.

• 

    Once the VCR/DVD switches to the DVD mode, all the VCR function will 

be unavailable. “   ” will not appear as long as the DVD is in use. All the 

DVD functions are available during OTR, timer standby mode and Timer 
Recording.

• 

   When you use the VCR/DVD in DVD mode during an OTR or a Timer 

Recording, the VCR/DVD will not turn off automatically even if the end 
time of the OTR or Timer Recording has been past.

Note (for Timer Recording) :

• 

    If there is a power failure or the VCR/DVD is unplugged for more than 1 

hour, clock and all timer settings will be lost.

To avoid overlap of Timer Programming ...

• 

   A timer programme will not work while another programme is under 

execution.

9:00

10:00

11:00

Programme 1

Programme 2

Programme 3

1.

  Insert a pre-recorded tape into the playing VCR.

2.

  Insert a tape with its erase-protection tab into the recording 

VCR/DVD.

3.

  Press TAPE SPEED/SYSTEM on the remote control of the recording 

VCR/DVD to select the desired recording speed (SP/LP).

4.

  Select the “AV2” or “AV3” position on the recording VCR/DVD.

•  To use the input jack on the back of this VCR/DVD, select “AV2” 

position by pressing 

0

0

2

 on the remote control or 

CH 

K

 /


L

.

•  To use the input jacks on the front of this VCR/DVD, select “AV3” 

position by pressing 

0

0

3

 on the remote control or 

CH 

K

 /


L

.

5.

  Press REC on the recording VCR/DVD.

6.

  Begin playback of the tape in another source.

7.

  To stop recording, press 

STOP 

C

/EJECT


A

 on the VCR/DVD for 

the recording VCR/DVD, then stop playback of the tape in another 
source.

Hint

•   For best results during dubbing, use the front panel controls when-

ever possible. The remote control might affect another source’s 
operation.

•  If video or colour fades in and out, you may be copying a copy 

guarded video tape.

•  Unauthorised recording of copyrighted materials may infringe on 

the rights of copyright owners, violate copyright laws and may not 
record clearly.

•  “AV2” and “AV3” are found before the lowest memorised channel.  

(Example: P02)

•   “AV3” input jacks are on the front of this VCR/DVD.

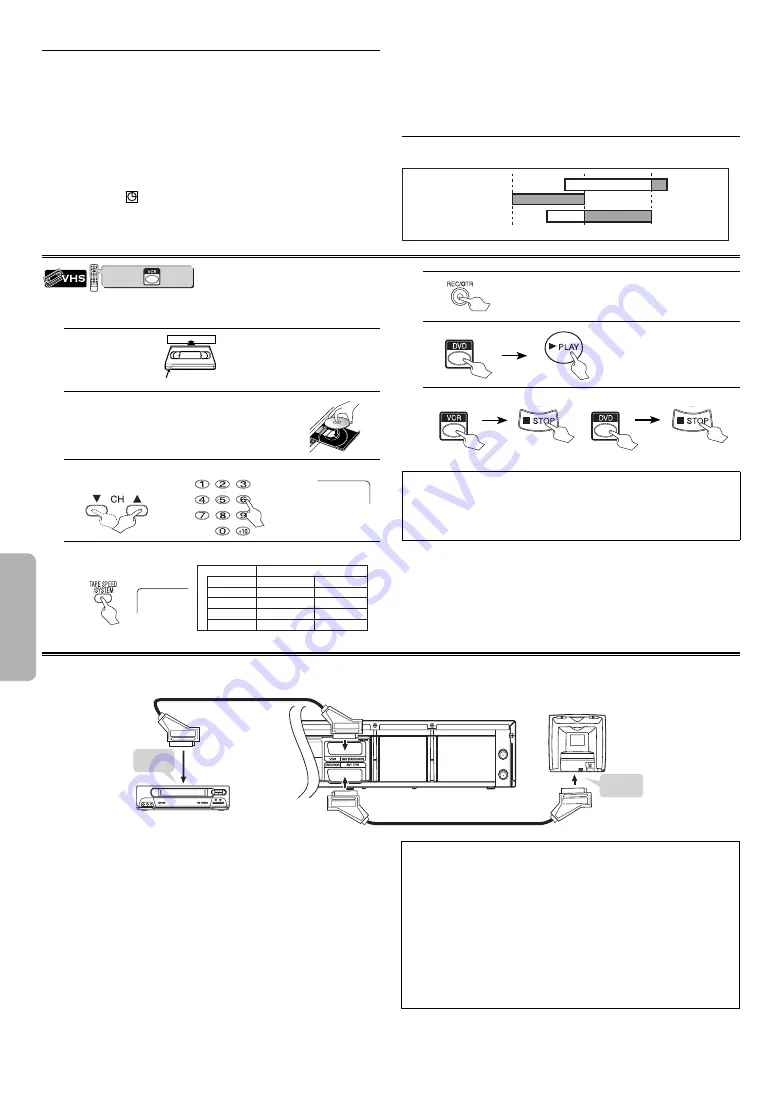
Copying a Video Tape

Warning:

 Unauthorised recordings of copyrighted video tapes may be an infringement of copyright laws.

Connect the recording VCR/DVD(this unit), playing VCR(another VCR) and your TV as outline in the following diagram.

Direct Dubbing

AERIAL

RF OUT

(Back of TV)

(Back of Recording VCR/DVD)

Scart cable 

(commercially available)

Scart cable 

(commercially available)

(Back of another source)

To SCART

terminal

To SCART

terminal


VCR/DVD COMBINATION

NA527AD

1

2

3

6

5

4

7

0

+10

8

9

STOP

PLAY

VCR

DVD

press      first.

Refer to page 7 to switch between the VCR mode and the DVD mode.
This will be possible only if the DVD is not copy protected.

1.

XJUIFSBTFQSPUFDUJPOUBC

  If necessary, rewind or fast 

forward the tape to the point 
at which you want to begin 
recording.

Insert a tape.

2.

Insert a disc with label facing up.

3.

or

Press 

0

0

4

 to select DISC.

DISC

TV Screen

4.

SP

Tape Speed

SP Mode

Recording / Playback Time

Tape Type

LP Mode

E-60

1 hour

2 hours

E-120

2 hours

4 hours

E-180

3 hours

6 hours

E-240

4 hours

8 hours

Select the desired tape speed.

5.

Recording starts.

6.

Playback starts.

7.

To Stop Recording.

To Stop Playback.

Hint

•   Press 

STILL/PAUSE


F

 at the point where you want to start 

recording when you do dubbing middle of the DVD.

•   To stop recording temporarily, press 

STILL/PAUSE


F

 after press 

VCR

. Press 

STILL/PAUSE


F

 again to resume recording.

Downloaded from: 

http://www.usersmanualguide.com/

Содержание DV-NC200

Страница 1: ...CR DVD COMBINATION 5 PULL OPEN DV NC200 OPERATE OPEN CLOSE PLAY STOP DVD VCR CH TIMER REC PLAY REW FF STOP EJECT TRACKING OUTPUT The region number for this VCR DVD is 5 MODEL DV NC200 RU PAL P REFACE DVD F UNCTIONS S ETUP VCR F UNCTIONS I NFORMATION P RECAUTIONS Downloaded from http www usersmanualguide com ...

Страница 2: ...l the VCR DVD in a hori zontal and stable position Do not place anything directly on top of the VCR DVD Do not place the VCR DVD directly on top of the TV Depending on the TV noise or disturbance of the picture and or sound may be generated if the VCR DVD is placed too close to your TV In this case please ensure enough space between your TV and the VCR DVD Do not cover or place the VCR DVD in encl...

Страница 3: ...st Forward Reverse Search 20 Slow Forward Slow Reverse Zoom Rapid Play Playing the Disc Recorded in VR Mode Video Recording Format 21 MP3 JPEG PLAYBACK 22 Kodak Picture CD 22 Dual Playback Transition Mode Adjustment of Picture Size Folder Playback 23 ON SCREEN DISPLAY 24 SEARCH FUNCTION 25 Track Search Title Chapter Search Time Search 25 MARKER SETUP 26 REPEAT RANDOM PROGRAMMED PLAYBACK 26 Repeat ...

Страница 4: ...00 RU Serial No ______________________________________ Maintenance Servicing 1 Please refer to relevant topics in the TROUBLESHOOTING GUIDE on page 34 before returning the product 2 Do not attempt to service this VCR DVD yourself Instead unplug it and contact a SHARP Approved Service Centre for inspection 3 Be sure the service technician uses authorised replacement parts or their equivalents Unaut...

Страница 5: ... normally the picture or sound may not be smooth etc In this case you need to finalise the disc with the DVD recorder Refer to the manual accompanying the DVD recorder 7 Only the discs recorded in the video mode and finalised can be played back Unfinalised discs cannot be played back Depending on the recording status of a disc the disc may not be played back at all or the picture or sound may not ...

Страница 6: ...STOP DVD To stop playback 4 DVD OUTPUT Indicator The indicator is on when this VCR DVD is in the DVD mode Make sure that this indicator is on before using the DVD player 5 OUTPUT To select the DVD mode or VCR mode 6 VCR OUTPUT Indicator The indicator is on when this VCR DVD is in the VCR mode Make sure that this indicator is on before VCR operation 7 OPEN CLOSE DVD To open or close the disc tray 8...

Страница 7: ...0 8 9 TAPESPEED SYSTEM DIRECTSKIP QUICK FIND TIMER ON OFF CH SLOW SEARCHMODE GAMMA MENU TITLE STILL PAUSE REC OTR STOP PLAY FWD REV RETURN SKIP REPEAT A B REPEAT CLEAR C RESET ENTER ZOOM AUDIO VCR MARKER DVD MODE SETUP SUBTITLE OPEN CLOSE EJECT ANGLE DISPLAY OPERATE VCR DVD COMBINATION NA545FD VCR OUTPUT DVD OUTPUT button DVD OUTPUT indicator VCR OUTPUT indicator DVD button VCR button VCR DVD SWIT...

Страница 8: ...nt angle DVD Video Press to select DVD output mode and to use the remote control in DVD mode Press to select DVD output mode and to use the remote control in DVD mode Press to accept a setting Press to accept a setting Press to adjust the black parts of the picture brighter Press to adjust the black parts of the picture brighter VCD Press to call back the Marker display Press to call back the Mark...

Страница 9: ... VCD Fast forwards playback to a desired point Press to forward in slow motion faster Press to display the DVD menus Press to display the MP3 or JPEG file lists Press to display the VCR menu Press to insert discs into or remove them from the tray Press to insert discs into or remove them from the tray Press to remove the tape from the VCR Press to turn the power on and off Press to turn the power ...

Страница 10: ...e VIDEO OUT SCART make sure your TV s input mode is set correctly according to the connection you made You will not be able to hear all of the sound being output by the VCR DVD if you use the audio cables supplied to a monaural TV that has only one audio input jack Be sure that the colours of the jacks and plugs match up when connecting the cable If you want to listen to the audio through audio eq...

Страница 11: ...VCR DVD up to the DTS decoder you can enjoy 5 1 channel surround system which reproduces the original sound as truthfully as possible 5 1 channel surround system is developed by the Digital Theater System Inc Connection to an Audio System Playing Dolby Digital 5 1 channel audio DTS or MPEG audio Playing 2 channel audio COAXIAL L R AUDIO VCR DVD Analogue audio input jacks Audio cable supplied Stere...

Страница 12: ...UTE _ _ or To decide 6 Select the current hour CLOCK YEAR 2005 MONTH 07 DAY 16 SA B HOUR _ _ MINUTE _ _ or To decide 7 Select the current minute CLOCK YEAR 2005 MONTH 07 DAY 16 SA HOUR 01 B MINUTE _ _ or To decide 8 To exit the CLOCK screen Hint To go back one step press Cursor s during the steps 3 to 7 Although seconds are not displayed they begin counting from 00 when you exit by pressing MENU U...

Страница 13: ...05 B CHANNEL 005 DECODER OFF SKIP OFF VIDEO MODE SECAM Channel Plan CH Indication TV Channel 02 12 E2 E12 21 69 E21 E69 74 78 X Y Z Z 1 Z 2 80 99 100 S1 S20 GAP 121 141 S21 S41 142 153 R1 R12 8 To exit the Manual Channel Preset To confirm that a channel has been added press CH K L Hint Usually this VCR DVD distinguishes the colour system which should be set according to the broadcasting However if...

Страница 14: ...urn to the static screen 5 MOVE P01 02 P06 07 P02 03 P07 08 P03 11 P08 09 P04 05 P09 10 P05 06 B P10 04 or To decide Press Cursor K L repeatedly until the channel move to another position number 6 To exit the Channel Reprogramming Change the On Screen Language VCR DVD COMBINATION NA527AD 1 2 3 6 5 4 7 0 10 8 9 STOP PLAY VCR DVD press first 1 Select INITIAL or To decide MENU TIMER SET UP B INITIAL ...

Страница 15: ...ecording Insert a tape into this VCR DVD 1 x1 Once INDEX 01 2 Pro 1 Pro 2 Pro 3 Pro 4 Pro 5 02 01 01 02 03 Beginning of tape End of tape CURRENT PROGRAMME INDEX MARK 01 20 INDEX 03 or Within 30 seconds 3 To rewind After searching To fast forward Within 30 seconds 4 B When the preset programme is reached the VCR DVD will start playback automatically Hint Index Search can be set up to 20 This functi...

Страница 16: ...AD 1 2 3 6 5 4 7 0 10 8 9 STOP PLAY VCR DVD press first VCR DVD COMBINATION NA527AD 1 2 3 6 5 4 7 0 10 8 9 STOP PLAY VCR DVD press first Refer to page 7 to switch between the VCR mode and the DVD mode 1 XJUI FSBTF QSPUFDUJPO UBC If necessary rewind or fast forward the tape to the point at which you want to begin recording Insert a tape 2 Select the desired channel or P12 TV Screen 3 SP Tape Speed ...

Страница 17: ...ress Cursor K L to select the programme number which you want to check The details of the programme will appear on the TV screen Press Cursor s B to go to the digit you want to change Then enter correct numbers by pressing Cursor K L You may cancel the entire programme by pressing Cursor s while the programme number flashes 4 Press MENU to exit 5 Press TIMER ON OFF to return to the timer standby m...

Страница 18: ...l or CH K L 5 Press REC on the recording VCR DVD 6 Begin playback of the tape in another source 7 To stop recording press STOP C EJECT A on the VCR DVD for the recording VCR DVD then stop playback of the tape in another source Hint For best results during dubbing use the front panel controls when ever possible The remote control might affect another source s operation If video or colour fades in a...

Страница 19: ...unter This shows the elapsed recording or playback time in hours minutes and seconds on screen Nothing is shown in the case of blank portion The indication will appear when the tape is rewound further than the tape counter position 0 00 00 To reset tape counter press CLEAR C RESET OTHER INFORMATION Status Display You can check the Counter or Clock Channel number 1 Hi Fi Stereo Sound System This VC...

Страница 20: ... vary depending on the disc Refer to the manual accompanying the disc for more details Resume VCR DVD COMBINATION NA527AD 1 2 3 6 5 4 7 0 10 8 9 STOP PLAY VCR DVD press first Press STOP C during playback Resume message will appear on the TV screen Press PLAY B playback will resume from the point at which playback was stopped Hint To cancel resume press STOP C one more time during the stop mode On ...

Страница 21: ... or Press ENTER to switch among x1 3 x0 8 and OFF or Plays back approximately at 0 8 times of normal playback Plays back approximately at 1 3 times of normal playback OFF No effects 3 To continue normal playback press PLAY B Hint Audio language setting cannot be changed while using this mode Virtual Surround and Digital Gamma settings cannot be changed while using this mode Virtual Surround does n...

Страница 22: ...ion JEIDA Files whose extension is other than mp3 MP3 jpg JPG and jpeg JPEG will not be listed in the MP3 or JPEG menu If the file is not recorded in MP3 or JPEG format noise may be pro duced even if the file extension is either mp3 MP3 jpg JPG or jpeg JPEG The name of group and track can be displayed in up to 25 charac ters Unrecognisable characters will be replaced with asterisks Unplayable grou...

Страница 23: ...creen The default setting is CUT IN OUT Adjustment of Picture Size VCR DVD COMBINATION NA527AD 1 2 3 6 5 4 7 0 10 8 9 STOP PLAY VCR DVD press first Depending on the TV connected to this VCR DVD the overall picture cannot be displayed and the edge of the picture can be cut off In this case you can adjust the size of the JPEG playback image on screen 1 Press MODE repeatedly until appears NORMAL 2 To...

Страница 24: ...00 00 1 23 45 T Title Current title number Total titles Elapsed time of the current title Remaining time of the current title 2 Hint When the Dual Playback is ON MP3 and JPEG file name will be displayed 4 12 0 03 21 0 02 15 T T Track Current track number Total tracks Elapsed time of the current track Remaining time of the current track Current playback status 1 3 4 12 0 13 45 0 45 40 T Current rep...

Страница 25: ...AD 1 2 3 6 5 4 7 0 10 8 9 STOP PLAY VCR DVD press first Using DIRECT SKIP 1 12 Press DIRECT SKIP once for the Chapter Search Press DIRECT SKIP twice for the Title Search 2 Within 30 seconds 12 Using SKIP H G 1 If the disc has no chapters C 1 C 2 C 3 C 4 Current Chapter C or SKIP SKIP T 1 T 2 T 3 T 4 Current Title T SKIP SKIP Hint Depending on the disc being played this function can also be perform...

Страница 26: ...ific point which you set To exit the Marker display 1 Hint The Marker display will disappear in about 30 seconds when there is no input To clear a marker select the marker to be cleared at step 2 in the section To set a marker or To return to the marker later and then press CLEAR C RESET Opening the disc tray or turning off the power will erase all mark ers Selecting AC at step 2 in the section To...

Страница 27: ...16 4 24 ALL CLEAR T 4 3 58 T 16 4 24 T 16 4 24 or Up to 99 tracks can be ordered If 8 or more tracks were in a programme use SKIP H G to see all the tracks While a MP3 or JPEG folder is open Press Cursor B when you want to go to the next hierar chy Press Cursor s when you want to go back to the previ ous hierarchy except for the 1st hierarchy Press TITLE when you want to go back to the 1st hierar ...

Страница 28: ... change the audio language setting If you choose any other languages will be displayed instead Refer to page 33 For VR mode only Pressing AUDIO cycles the sound mode through MAIN SUB MAIN SUB DVD RW discs recorded in double sound 2 languages can be played back in either sound mode of MAIN SUB or MAIN SUB With discs recorded in VR mode changing the audio MAIN SUB or MAIN SUB is effective only when ...

Страница 29: ...d mode changes as example below Hint Virtual Surround cannot be changed when the sound mode is set to either L ch or R ch Stereo Sound Mode is not available on DTS CD Virtual Surround VCR DVD COMBINATION NA527AD 1 2 3 6 5 4 7 0 10 8 9 STOP PLAY VCR DVD press first You can enjoy stereophonic virtual world on your existing 2 channel stereo system 1 OFF Press MODE repeatedly until appears 2 or or 1 N...

Страница 30: ...ault PAL See hint below VIDEO OUT Default SCART See hint below Select the desired setting or Select the desired setting or TV ASPECT 4 3 LETTERBOX STILL MODE AUTO TV TYPE PAL VIDEO OUT SCART SCART COMPONENT INTERLACE COMPONENT PROGRESSIVE VIDEO OUT TV ASPECT 4 3 LETTERBOX STILL MODE AUTO TV TYPE PAL VIDEO OUT SCART 4 3 LETTERBOX AUTO AUTO SCART STILL MODE Default AUTO See hint below TV ASPECT 4 3 ...

Страница 31: ...on is available only to the discs which are recorded in the Dolby Digital format DOWN SAMPLING When playing disc with copyright protection the sound will be down sampled at 48 kHz even if you set to OFF This function is available only on digital outputting of a disc recorded in 96 kHz PARENTAL Setting Parental Control limits the disc viewing that exceed your settings An incorrect password will not...

Страница 32: ...les simultaneously OTHERS ANGLE ICON DUAL PLAYBACK SLIDE SHOW ON OFF 5sec ENTER OFF OFF 5sec ANGLE ICON DUAL PLAYBACK SLIDE SHOW ON OFF 5sec ON ON 5sec ANGLE ICON DUAL PLAYBACK SLIDE SHOW ON OFF 5sec SLIDE SHOW Default 5sec Set to the length of displayed JPEG picture 5sec The picture changes every 5 seconds 10sec The picture changes every 10 seconds MUSIC The picture changes according to the chang...

Страница 33: ...abic 4764 Armenian 5471 Assamese 4765 Aymara 4771 Azerbaijani 4772 Bashkir 4847 Basque 5167 Bengali Bangla 4860 Bhutani 5072 Bihari 4854 Bislama 4855 Breton 4864 Bulgarian 4853 Burmese 5971 Byelorussian 4851 C E Cambodian 5759 Catalan 4947 Chinese CHI 7254 Corsican 4961 Croatian 5464 Czech 4965 Danish DAN 5047 Dutch DUT 6058 English ENG 5160 Esperanto 5161 Estonian 5166 F H Faroese 5261 Fiji 5256 ...

Страница 34: ...opy a copyrighted video tape You are experiencing copy guard protection The VCR DVD turns off automatical ly after the Timer Recording standby mode is set Depending on the circumstance of the Timer Recording standby mode the VCR DVD may be automatically turned off instead of changing to the DVD mode This is not a malfunction Turn on the VCR DVD if you want to use the DVD after this happens D V D N...

Страница 35: ... 35 EN Downloaded from http www usersmanualguide com ...

Страница 36: ...SHARP CORPORATION 9HS1VMN20949 H9943RD 1VMN20949 Printed in China Downloaded from http www usersmanualguide com ...

Страница 37: ... tv dvd and othes Manual users user manuals user guide manual owners manual instruction manual manual owner manual owner s manual guide manual operation operating manual user s manual operating instructions manual operators manual operator manual product documentation manual user maintenance brochure user reference pdf manual Downloaded from http www usersmanualguide com ...

Отзывы: