03/12/19
CD-MPS660E(A)3.fm
21
CD-MPS660E
TINSZA040AWZZ
CD or M
P
3 disc
Playbac
k
!
File search (by folder or title 1/2/3)
You can search and play files by folder or title 1/2/3 within one MP3
disc.
File search by title 1/2/3:
"
In step 5, select "T-1", "T-2" or "T-3" and follow the same steps
as file search by folder.
"
The unit searches all files on the disc, regardless of the folder.
To stop playback:
Press the button.
To exit the MP3 navigation mode:
In the stop mode, press the button.
Notes:
"
In the MP3 navigation mode, direct play and direct search func-
tions are disabled.
"
If a folder, title or file name does not appear, or appears incor-
rectly, remove and reinsert the disc and try again.
"
If you press the RANDOM button in the stop mode, the MP3 nav-
igation mode will be cancelled.
1
Press one of the 1 - 5 buttons to select a disc tray con-
taining an MP3 disc.
2
Press the / button, and the unit starts to read the MP3
disc.
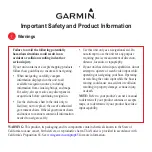
3
Press the button to stop playback.
"NAVI READ" appears and the display shows the total number
of folders and files on the selected disc.
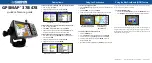
4
Press the MP3 NAVIGATION button.
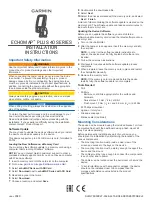
5
Press the , , or button to se-
lect "FOL", "T-1", "T-2" or "T-3".
To search files by folder name, se-
lect "FOL" (will flash).
The following steps describe file search by folder:
6
Press the ENTER button.
The total number of folders (or titles) appears for 2 seconds,
and names of the first 2 folders (or titles) are displayed.
"
The MP3 NAVIGATION button allows you to go one step back.
"
Press the MP3 DISPLAY button to
check the number of files.
Total number
of folders
Total number
of files
MP3 disc
indicator
Folder
Title 1
Title 2
Title 3
Folder name
7
Use the or button to scroll and select a folder (or title),
and then press the ENTER button.
If you press the / button instead of the ENTER button, all
files in the selected folder (or title) are played.
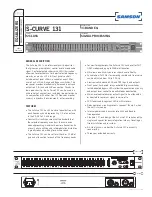
8
Use the or button to scroll and select a file.
9
Press the / button to start playback.
The unit plays from the selected file to the last file in the select-
ed folder (or title), and the previous display returns.
Folder name
File name
4