background image

16

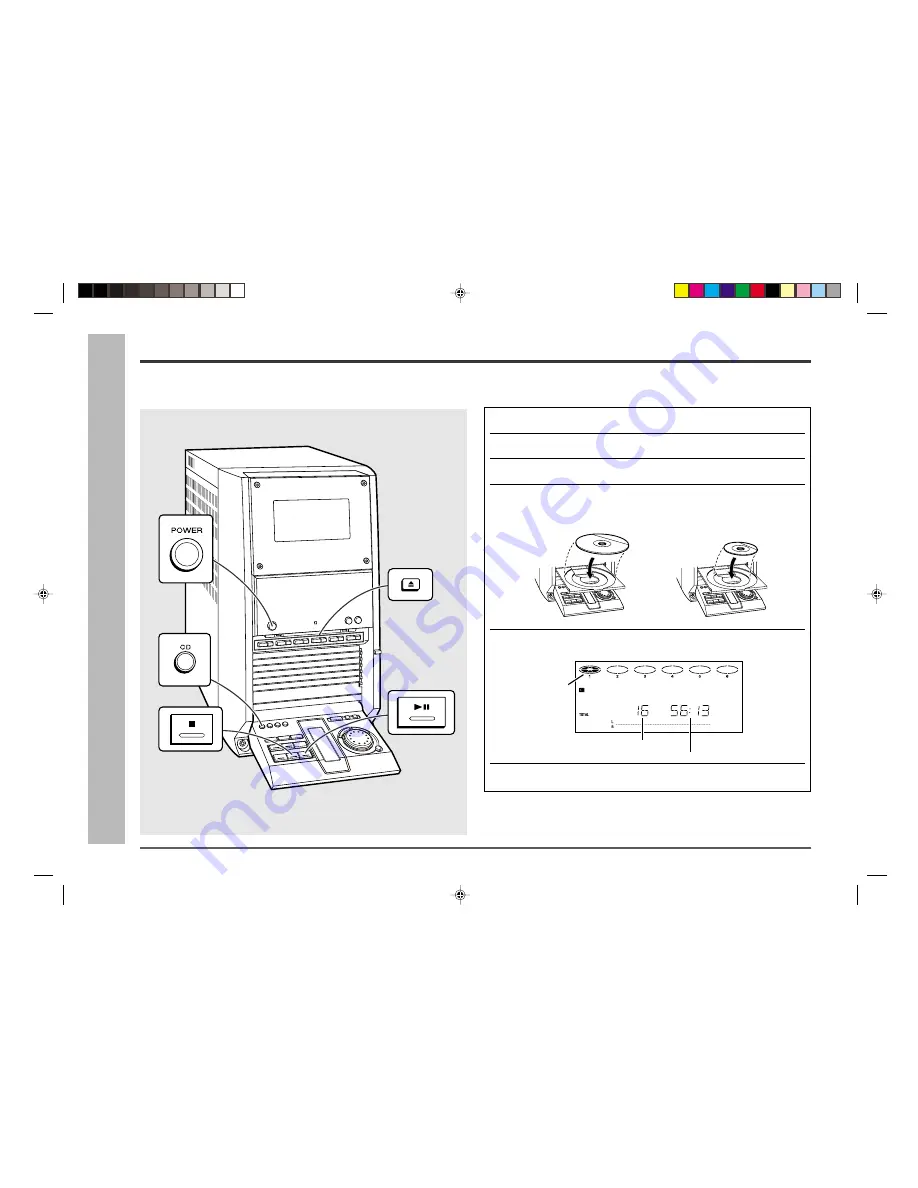
Listening to a CD (CDs)

To play discs in turn (from Disc 1 to Disc 6)

1

Press the POWER button to turn the power on.

2

Press the CD button.

3

Press the DISC 1 

button to open the disc tray 1.

4

Place a CD on the disc tray 1, label side up.

Be sure to place 3" (8 cm) CD in the middle of the disc trays.

5

Press the DISC 1 

button to close the disc tray 1.

6

You can place discs on the trays 2 - 6 by following steps 3 - 5.

Note:
The system will search CD trays until it finds a CD and will not search the rest of the
trays.

5” (12 cm)

3” (8 cm)

Total number of tracks

Total playing time

Means "disc
inside".

CD Playback

– Listening to a CD (CDs) –

This system can play audio CD-R and CD-RW discs just as CD discs, but cannot
perform recording.

 Sound Control (See page 14.)

Содержание CD-CH1500

Страница 1: ...est performance from this product please read this manual carefully It will guide you in operating your SHARP product CD CH1500 Audio Tower System consisting of CD CH1500 main unit and CP RW5500 speaker system AUDIO TOWER SYSTEM MODEL CD CH1500 OPERATION MANUAL ...

Страница 2: ... connected Consult the dealer or an experienced radio TV technician for help WARNING FCC Regulations state that any unauthorized changes or modifications to this equip ment not expressly approved by the manufacturer could void the user s authority to operate this equipment NOTE It is the intent of Sharp that this product be used in full compliance with the copyright laws of the United States and t...

Страница 3: ...re not likely to be walked on or pinched by items placed upon or against them paying particular attention to cords at plugs convenience receptacles and the point where they exit from the appliance 10 Do not use liquid cleaners or aerosol cleaners Use a damp cloth for cleaning 11 Power Lines An outdoor antenna should be located away from power lines 12 Outdoor Antenna Grounding If an outside antenn...

Страница 4: ...d station 21 Tape Playback Listening to a Cassette Tape 22 Recording Recording from a CD 23 Recording from the Radio 24 Advanced Features Timer and Sleep Operation 25 27 Enhancing Your Stereo System 28 References Troubleshooting Chart 29 30 Maintenance 30 Specifications 31 CONSUMER LIMITED WARRANTY Back cover Accessories Note Only the above accessories are included Please confirm that the followin...

Страница 5: ... of this unit with a voltage other than that which is specified Volume control The sound level at a given volume setting depends on speaker efficiency location and various other factors It is advisable to avoid exposure to high volume levels which occur while turning the unit on with the volume control setting up high or while continually listening at high volumes Care of compact discs Compact dis...

Страница 6: ...27 16 Enter Button 15 21 25 27 17 CD Button 16 23 26 18 Tape Button 22 24 26 19 Tuner Band Button 20 26 20 Auxiliary Button 28 21 Tape Reverse Mode Select Button 22 24 22 Clear Button 19 21 23 Memory Button 19 24 CD Fast Reverse Tape Fast Wind or Tuning Down Button with Indicator 17 20 22 28 25 Tape Reverse Play Button with Indicator 22 23 26 CD Fast Forward Tape Fast Wind or Tuning Up Button with...

Страница 7: ...rding Indicator 12 All Disc Play Indicator 13 Level Meter 14 FM Stereo Mode Indicator 15 CD Repeat Indicator 16 CD Pause Indicator 17 CD Play Indicator 18 FM Stereo Indicator 19 Tape Reverse Mode Indicator Rear panel Reference page 01 FM AM Antenna Jack 10 02 Auxiliary Input Jacks 28 03 Speaker Terminals 10 04 AC Power Cord 10 05 Transport screw 10 30 3 4 5 1 2 1 2 3 4 5 6 7 8 9 10 11 12 13 14 15 ...

Страница 8: ... 16 FM Stereo Mode Button 20 17 Display Button 18 Dimmer Button 13 19 CD Play Mode Select Button 20 CD Track Up or Fast Forward Tape Fast Wind Tuner Preset Up Button 21 CD Play or Pause Tape Play Button 22 Tape Record Pause Button 23 Tape Reverse Mode Select Button 24 Equalizer Mode Select Button 25 Extra Bass Button 26 Volume Up or Down Buttons 1 2 3 4 5 6 7 8 9 10 11 12 13 14 15 16 17 18 19 20 2...

Страница 9: ...ain Speaker Terminals 03 Subwoofer 6 Bass Reflex Duct 1 2 3 4 5 6 Placing the speaker system There is no distinction between the right and the left speakers Right speaker Left speaker Bi amp system Each speaker unit has a built in subwoofer low frequency range which is driven sepa rately from the woofer and tweeter mid to high frequency range Two independent amplifiers which have individual freque...

Страница 10: ...em Connections System Connections FM antenna Right speaker Left speaker AM loop antenna AC outlet AC 120 V 60 Hz Not supplied VCR DVD etc Not supplied Transport screw Listening to the playback sounds from VCR DVD etc See page 28 ...

Страница 11: ... for a prolonged period of time Incorrect Incorrect Remove the transport screw Before turning the power on be sure to remove the transport screw on the back of the unit using a flat blade screwdriver or a coin Note This screw is required when transporting the unit again Please keep it see page 30 Speaker connection Main terminals Connect the blue wire to the and the black one to the Subwoofer term...

Страница 12: ...argeable batteries nickel cadmium battery etc Installing the batteries incorrectly may cause the unit to malfunction Notes concerning use Replace the batteries if the operating distance is reduced or if the operation be comes erratic Periodically clean the transmitter on the remote control and the sensor on the ste reo system with a soft cloth Exposing the sensor on the stereo system to strong lig...

Страница 13: ...nsumption mode To return to the demonstration mode When the unit is in the power stand by mode press the DEMO button again Opening and closing the control panel The control panel is motorized The control panel automatically opens when the power is turned on and closes when the unit is set to the power stand by mode When the power is turned on you can open or close the control panel by pressing the...

Страница 14: ...s and X BASS will appear To cancel the extra bass mode press the X BASS button Bass is emphasized Canceled Equalizer When the EQUALIZER button is pressed the current mode setting will be displayed To change to a different mode press the EQUALIZER button repeatedly until the de sired sound mode appears Basic Operation Sound Control The sound is not modified Bass and treble are emphasized Vocals mid...

Страница 15: ...beginning Setting the Clock In this example the clock is set for the 12 hour AM12 00 display 1 Press the POWER button to turn the power on 2 Press the MENU button 3 Turn the jog dial to select CLOCK and within 10 seconds press the ENTER button 4 Turn the jog dial to select the 12 hour or 24 hour display and within 2 minutes press the ENTER button 5 Turn the jog dial to adjust the hour and within 2...

Страница 16: ...e middle of the disc trays 5 Press the DISC 1 7 7 7 7 7 button to close the disc tray 1 6 You can place discs on the trays 2 6 by following steps 3 5 Note The system will search CD trays until it finds a CD and will not search the rest of the trays 5 12 cm 3 8 cm Total number of tracks Total playing time Means disc inside CD Playback Listening to a CD CDs This system can play audio CD R and CD RW ...

Страница 17: ...n again If TV or radio interference occurs during CD operation move the unit away from the TV or radio If a disc is damaged dirty or loaded upside down the disc will be skipped To locate the desired portion For audible fast forward Press and hold down the 2 button during playback For audible fast reverse Press and hold down the 3 button during playback Notes Normal playback will resume when the 3 ...

Страница 18: ...Y MODE button repeatedly to select the normal playback mode Switching the time display Each time the TIME button on the remote control is pressed during playback or in the pause mode the display will change Repeat or Random Play Normal playback mode Random playback mode Repeat playback mode The elapsed playing time for the current track will be displayed The remaining playing time for the current ...

Страница 19: ...dicator is flashing Each time the button is pressed one track will be cleared beginning with the last track programmed To cancel the programmed play mode While in the stop mode press the CLEAR button The MEMORY indicator will disap pear and all the programmed content will be cleared Adding tracks to the program If a program has been previously stored the MEMORY indicator will be displayed Then fol...

Страница 20: ...r will stop at the first receivable broadcast station Notes When radio interference occurs auto scan tuning may stop automatically at that point Auto scan tuning will skip weak signal stations To stop the auto tuning press the TUNING X or W button again To receive an FM stereo transmission Press the ST MODE button on the remote control to display the ST indicator j will appear when an FM broadcast...

Страница 21: ...sly memorized will be erased To scan the preset stations The stations saved in memory can be scanned automatically Preset memory scan 1 Press the PRESET X X X X X or W W W W W button on the remote control for more than 0 5 seconds The preset number will flash and the programmed stations will be tuned in sequentially for 5 seconds each 2 Press the PRESET X X X X X or W W W W W button again when the...

Страница 22: ...the remote control press the button to switch the playback side Then press the 06 1 0 button To stop playback Press the button Fast forward rewind on side A To advance the tape press the 2 button To rewind it press the 3 button Fast forward rewind on side B To advance the tape press the 3 button To rewind it press the 2 button Caution To remove the cassette press the button and then open the compa...

Страница 23: ...t from the disc of the lowest number To perform programmed recording 1 Program discs and tracks page 19 2 Press the REC PAUSE I6 button 3 Regardless of the setting in step 5 press the 06 button to record on side A or the 1 button for side B To stop recording Press the button The CD and tape will stop Auto restart function If the recording side is switched from side A to B during recording the syst...

Страница 24: ...itch over to side A 5 Press the 06 06 06 06 06 button to record on side A or the 1 1 1 1 1 button for side B When you press the 06 1 0 button on the remote control the system will record on the side specified in step 4 To interrupt recording Press the REC PAUSE I6 button To resume recording press the same button 06 or 1 you pressed in step 5 To stop recording Press the button Note If you hear a wh...

Страница 25: ...he ENTER button For timer playback For timer recording 4 PLAY or REC will flash for 5 seconds Press the ENTER button during the flash or 5 Turn the jog dial to specify the hour to start and within 10 sec onds press the ENTER button The illustrations show the timer playback setting Timer and Sleep Operation Timer playback The unit turns on and plays the desired source CD tuner tape at the preset ti...

Страница 26: ...ss the POWER button to turn the power on 2 Press the MENU button 3 Turn the jog dial to select TIMER PLAY or TIMER REC and then press the ENTER button 4 Press the POWER button to enter the timer stand by mode 12When the preset time is reached playback or recording will start The volume will increase gradually until it reaches the volume you were listen ing to before your system enters the timer st...

Страница 27: ... stop An interval of 3 minutes or more is required End time Note Once the sleep time is set it will remain unchanged until the setting is changed To cancel the sleep operation Press the POWER button while the sleep timer is set To confirm the remaining sleep time Perform the above steps 2 3 This time you can also change the sleep time 1 Play back the desired sound source 2 Press the MENU button 3 ...

Страница 28: ...on The OVER indicator should not light at the maximum level 2 4 0 Note To prevent hum interference place this unit away from a television To record on a tape 1 Insert a cassette in the cassette compartment 2 Press the AUX button to select AUX 3 Press the REC PAUSE I6 button 4 Operate the VCR DVD etc 5 Adjust the input level from VCR DVD etc using the 3 or 2 button The OVER indicator should not lig...

Страница 29: ...ymptom Cannot record Cannot record tracks with proper sound quality Cannot erase completely Sound skipping Cannot hear treble Sound fluctuation Cannot remove the tape Possible cause Is the erase protection tab removed Is it a normal tape You cannot record on a metal or CrO2 tape Is there any slack Is the tape stretched Are the capstan pinch rollers or heads dirty If a power failure occurs during p...

Страница 30: ...the unit to the stand by mode and turn the power on again 2 If the unit is not restored in the previous operation unplug and plug in the unit and then turn the power on Clearing all the memory reset If neither operation above restores the unit clear all the memory by following the instructions be low 1 Press the POWER button to enter the power stand by mode 2 While pressing down the VOLUME X butto...

Страница 31: ... Hz 200 Hz 6 ohms 10 T H D Main 40 W ch 200 Hz 20 kHz 6 ohms 10 T H D Output terminals Speakers 6 ohms Headphones 16 50 ohms recommended 32 ohms Input terminals Auxiliary 500 mV 47 kohms CD player Type 6 disc multi play compact disc player Signal readout Non contact 3 beam semiconductor laser pickup D A converter 1 bit D A converter Frequency response 20 20 000 Hz Dynamic range 90 dB 1 kHz Tuner F...

Страница 32: ... described herein shall be the sole and exclusive warranties granted by Sharp and shall be the sole and exclusive remedy available to the purchaser Correction of defects in the manner and for the period of time described herein shall constitute complete fulfillment of all liabilities and responsibilities of Sharp to the purchaser with respect to the Product and shall constitute full satisfaction o...

Отзывы: