background image

– 9 –

CD-C622/C2900

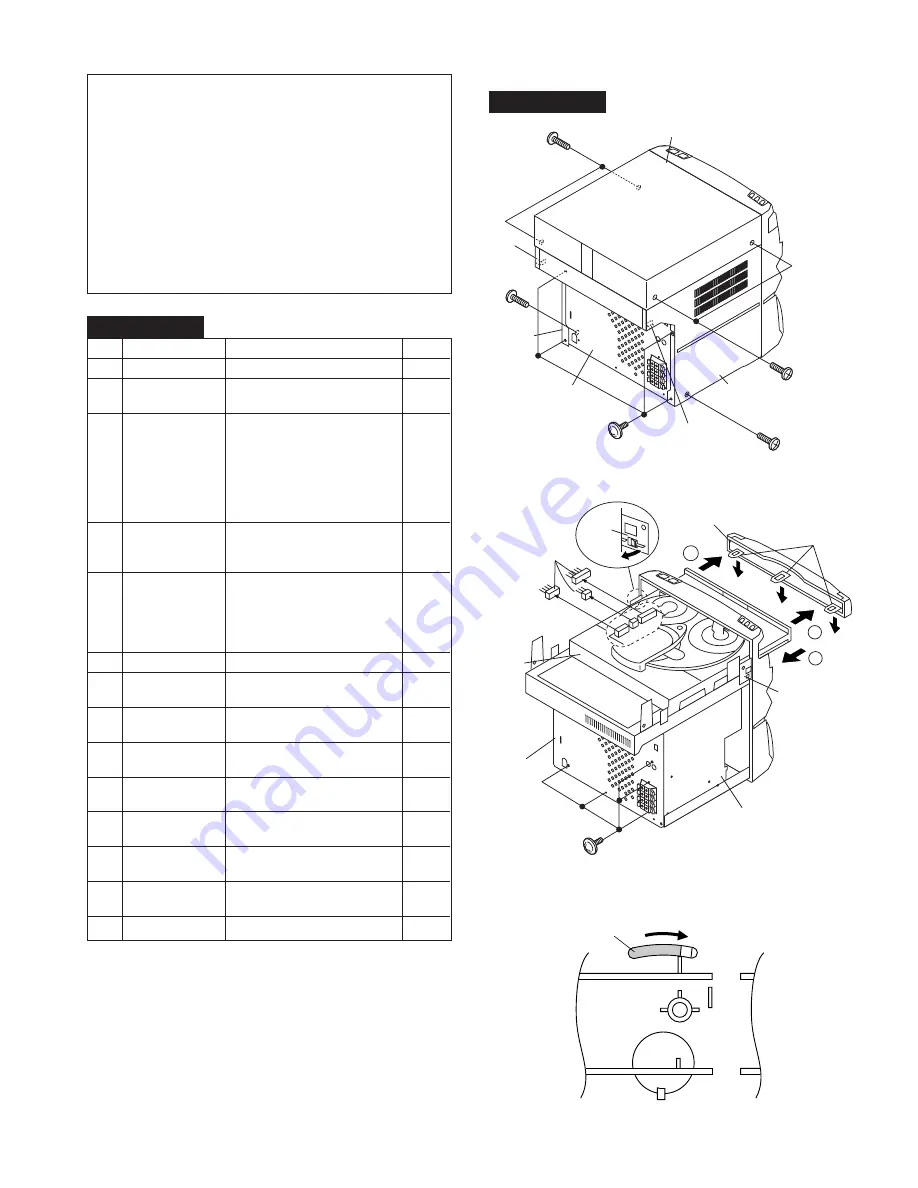
DISASSEMBLY

Caution on Disassembly
Follow the below-mentioned notes when disassembling
the unit and reassembling it, to keep it safe and ensure
excellent performance:
1. Take cassette tape and compact disc out of the unit.
2. Be sure to remove the power supply plug from the wall

outlet before starting to disassemble the unit.

3. Take off nylon bands or wire holders where they need be

removed when disassembling the unit. After servicing
the unit, be sure to rearrange the leads where they were
before disassembling.

4. Take suffcient care on static electricity of integrated

circuits and other circuits when servicing.

Figure 9-2

Figure 9-3

CD-C622/C2900

1

Top Cabinet

1. Screw ..................... (A1) x4

9-1

2

Side Panel

1. Screw ..................... (B1) x6

9-1

(Left/right)

2. Hook ....................... (B2) x2

3

CD Player Unit/

1. Turn on the power supply,

9-2

CD Tray Cover

    open the disc tray, take out
    the CD cover, and close.
    (Note 1)
2. Hook ....................... (C1) x3
3. Hook ....................... (C2) x2
4. Socket .................... (C3) x3

4

Back Board

1. Screw ..................... (D1) x5

9-2

(with Digital
Output PWB)

5

Main PWB

1. Screw ..................... (E1) x3

10-1

2. Socket .................... (E2) x4
3. Flat Wire ................. (E3) x1
4. Tip Wire .................. (E4) x1
5. Flat Cable .............. (E5) x1

6

Front Panel

1. Screw ..................... (F1) x1

10-1

7

Display PWB/

1. Socket .................... (G1) x1

10-2

Switch PWB

2. Screw ..................... (G2) x12

8

Tape Mechanism 1. Open the cassette holder.

10-2

2. Screw...................... (H1) x5

9

Headphones PWB 1. Screw ..................... (J1) x1

10-2

2. Support Bracket ..... (J2) x1

10

Turntable

1. Screw ..................... (K1) x1

10-3

2. Cover ..................... (K2) x1

11

Disc Tray

1. Screw ..................... (L1) x2

10-3

2. Guide ..................... (L2) x2

12

CD Servo PWB

1. Screw ..................... (M1) x1

10-4

(Note 2)

2. Socket .................... (M2) x4

13

CD Changer

1. Screw ..................... (N1) x4

10-5

Mechanism

14

CD Mechanism

1. Screw ..................... (P1) x1

10-5

STEP

REMOVAL

PROCEDURE

FIGURE

Note 1:
How to open the changer manually. (Fig. 9-3)
1. Change, turn fully the lock lever in the arrow direction

through the hole on the loading chassis bottom in this state.
After that, push forward the CD player base.

Note 2:
1. After removing the connector for the optical pickup fromthe

connector wrap the conductive aluminium foil around the
front end of connector so as to protect the optical pickup
from electrostatic damage.

Figure 9-1

CD-C622/C2900

LOCK 
     LEVER

(Illustration: CD-C622)

Top Cabinet

(A1)x2
ø3x12mm

(A1)x2
ø3x12mm

Side Panel
(Left)

Side Panel
(Right)

(B1)x1
ø3x8mm

(B1)x1
ø3x8mm

(B1)x4
ø3x8mm

(B2)x1

(B2)x1

Back Board

(D1)x5
ø3x8mm

Back Board

Main PWB

CD Tray Cover

CD Player
Unit

Hook
( C1) x3

( C2 ) x1

(C3) x3

1

1

2

Pull

(C2) x1

Содержание CD-C2900

Страница 1: ...T PARTS LIST EXPLODED VIEW PACKING OF THE SET For U S A Only CD C622 In the interests of user safety the set should be restored to its original condition and only parts identical to those specified be used SERVICE MANUAL This document has been published to be used for after sales service only The contents are subject to change without notice SHARP CORPORATION CD C622 mini component system consisti...

Страница 2: ...C outlet Using two clip leads connect a 1 5k ohm 10 watt resistor paralleled by a 0 15µF capacitor in series with all exposed metal cabinet parts and a known earth ground such as conduit or electrical ground connected to earth ground Use a VTVM or VOM with 1000 ohm per volt or higher sensitivity to measure the AC voltage drop across the resistor See diagram Connect the resistor connection to all e...

Страница 3: ...n Stand by 0 3 W CD C2900 Power on 100 W Dimensions Width 10 5 8 270 mm Height 11 13 16 300 mm Depth 13 13 16 351 mm Weight 13 7 lbs 6 2 kg Amplifier section Output power 40 watts minimum RMS per CD C622 Except for channel into 4 ohms from 60 Hz Canada to 20 kHz 10 total harmonic distortion Output power Front speakers CD C622 For Canada MPO 108 W 54 W 54 W 10 T H D RMS 60 W 30 W 30 W 10 T H D Rear...

Страница 4: ...cators 15 CD TUNER Memory Indicator 16 Timer Indicator 17 Sleep Indicator 18 TAPE 2 Record Pause Button 19 CD Track Down Review Button TUNER Preset Down Button TAPE 2 Rewind Button 20 CD Track Up Cue Button TUNER Preset Up Button TAPE 2 Fast Forward Button 21 Timer Sleep Button 22 Clock Button 23 Timer Set Indicator 24 Power Button 25 Equalizer Mode Selector Button 26 Dimmer Button 27 Extra Bass D...

Страница 5: ...ar Button 6 Track Down Review Button 7 Track Up Cue Button 8 Disc Skip Button 9 Play Repeat Button 10 Stop Button 11 Random Button Tuner control section 12 Preset Up Down Buttons Tape control section 13 TAPE 1 Play Button 14 TAPE 2 Record Pause Button 15 TAPE 1 2 Stop Button 16 TAPE 2 Play Button 17 TAPE 2 Rewind Button 18 TAPE 2 Fast Forward Button Common section 19 Equalizer Mode Selector Button...

Страница 6: ...layed Note In the event of a power failure or when the AC power lead is disconnected the clock display will go out When the AC power supply is restored the clock display will flash on and off to indicate the time when the power failure occurred or when the AC power lead was disconnected If this happens follow the procedure below to change the clock time To change the clock time Press the CLOCK but...

Страница 7: ... de FM AC 120 V 60 Hz 120 V de CA 60 Hz Wire with the white line Cable con la línea blanca Red Rojo Red Rojo Black Negro Turning the power on and off Conexión y desconexión de la alimentación Remote control Controlador remoto POWER POWER 1 5 15 Black Negro Wire with the white line Cable con la línea blanca 3 Listening to a CD Audición de discos CD 4 Listening to a tape Audición de una cinta 5 List...

Страница 8: ... Antena de FM AC 120 V 60 Hz 120 V de CA 60 Hz Red Rojo Red Rojo Black Negro Black Negro Turning the power on and off Conexión y desconexión de la alimentación Remote control Controlador remoto POWER POWER 1 5 15 3 Listening to a CD Audición de discos CD 4 Listening to a tape Audición de una cinta 5 Listening to the radio Audición de la radio 6 Recording from CDs Grabaciones de discos CD 7 Sound c...

Страница 9: ... x1 4 Tip Wire E4 x1 5 Flat Cable E5 x1 6 Front Panel 1 Screw F1 x1 10 1 7 Display PWB 1 Socket G1 x1 10 2 Switch PWB 2 Screw G2 x12 8 Tape Mechanism 1 Open the cassette holder 10 2 2 Screw H1 x5 9 Headphones PWB 1 Screw J1 x1 10 2 2 Support Bracket J2 x1 10 Turntable 1 Screw K1 x1 10 3 2 Cover K2 x1 11 Disc Tray 1 Screw L1 x2 10 3 2 Guide L2 x2 12 CD Servo PWB 1 Screw M1 x1 10 4 Note 2 2 Socket M...

Страница 10: ...x1 ø3 x10mm Turntable Disc Tray K2 x1 L2 x1 L2 x1 CD Player Unit Washer M1 x1 ø3 x10mm M2 x2 M2 x2 CD Player Unit CD Servo PWB N1 x4 ø3 x12mm P1 x1 ø2 6 x10mm CD Changer Mechanism CD Mechanism Shift Lever CD Player Base F1 x1 ø3x8mm E2 x2 E1 x2 ø3x8mm E1 x1 ø3x10mm E3 x1 E5 x1 E2 x2 E4 x1 G1 x1 Front Panel Main PWB Front Panel Display PWB Switch PWB Open Cassette Holder Tape Mechanism G2 x2 ø3x10m...

Страница 11: ...p A2 x2 3 Screw A3 x2 4 Screw A4 x2 5 Screw A5 x4 STEP REMOVAL PROCEDURE FIGURE Note The rear speakers can be easily disassembled Therefore the disassembling method is not discribed For details refer to the disassembling drawing in the Parts Guide Screw Driver Woofer Piezo A3 x4 ø4x12mm A2 x2 Front Panel A1 x1 A4 x2 ø3x10mm A3 x2 ø3x10mm Front Panel A1 x1 Screw Driver Woofer Tweeter Super Tweeter ...

Страница 12: ...he disassembly method to remove the CD mechanism How to remove the loading motor See Fig 12 1 1 Remove the screws A1 x 2 pcs to remove the loading motor Figure 12 1 A1 x2 ø2 6 x5mm Loading Up Down Motor Motor PWB B1 x2 ø2 6 x6mm Shaft B2 x1 Stop Washer B3 x1 Gear B4 x1 CD Mechanism Pickup Note After removing the connector for the optical pickup fromthe connector wrap the conductive aluminium foil ...

Страница 13: ...F 98 00 MHz 98 00 MHz L302 2 10 30 dB Test Stage Instrument Connection Frequency Frequency Display Serring Adjusting Point Detection Signal generator 10 7 MHz FM sweep generator Detection 10 7 MHz 98 00 MHz T352 Input Pin 1 of IC303 Output TP302 IF 10 7 MHz 98 00 MHz T301 Turn Input Pin 1 of the core of IC301 transformer Output TP302 T352 fully counter clookwise Instrument Connection Test Stage Ad...

Страница 14: ...g method POWER OFF Setting the test mode Any one of test mode can be set by pressing several keys as follows REC PAUSE DISC SKIP POWER TEST CD operation test TEST mode Function CD test mode Setting of TEST mode Indication of CD TST mode Fig 14 1 OPEN CLOSE operation is manual operation The pickup can be moved by using the or key MEMORY LASER ON PLAY key input Press STOP key Stop TOC IL is performe...

Страница 15: ...apacitor theexpression capacitance withstand voltage is used CH TH RH UJ Temperature compensation ML Mylar type P P Polypropylene type Schematic diagram and Wiring Side of P W Board for this model are subject to change for improvement without prior notice REF NO DESCRIPTION POSITION POSITION SW714 TUNER BAND ON OFF SW715 VIDEO ON OFF SW716 TAPE ON OFF SW717 CD ON OFF SW722 FF ON OFF SW723 TUNING U...

Страница 16: ... 0 5ms 5 0 V HFL 0 5ms 5 0 V TES REVIEW 50ms 10 0 V JP CUE 50ms 10 0 V JP 50ms 0 50 V JP 50ms 1 00 V TE 0 5ms 10 0 V JP 0 5ms 10 0 V JP 0 5ms 0 50 V JP 0 5ms 1 00 V TE REVIEW 50ms 10 0 V JP 50ms 10 0 V JP 50ms 0 50 V JP 50ms 1 00 V TE 0 5ms 10 0 V JP 0 5ms 10 0 V JP 0 5ms 0 50 V JP 0 5ms 1 00 V TE PLAY 20ms 1 00 V SPO NORMAL DISC TN0 01 20ms 2 00 V CLV PLAY TCD 712 140mm TN0 01 50ms 1 00 V SPO 50m...

Страница 17: ...C1 LA9241M SERVO AMP RES CQCK COIN SQOUT RWC WRQ CL DAT SELIAL CONTROL CE Q51 SL SL DRF 9 8 7 6 5 4 3 2 1 GND D MECHA UP GND D DISK NO OPEN CLOSE GND D M M GND M 9 8 7 6 5 4 3 2 1 CNP10 M 5V B1 62 64 45 36 23 43 37 31 38 39 40 24 25 10 1 2 2 1 3 3 2 1 4 5 6 10 26 58 53 10 12 20 32 40 43 44 53 52 51 54 31 30 29 23 27 16 15 41 44 Q1 Q52 4 3V Q81 7 3V B1 REGULATOR TO MAIN SECTION TO IC601 XOUT EFMO E...

Страница 18: ... REF L NF R NF PB HEAD REC PB HEAD SWITCHING Q103 Q106 AC BIAS IC101 AN7345K PLAYBACK AND RECORD PLAYBACK AMP PB ERASE HEAD SWITCHING BAIS Q126 Q124 L103 Q128 L104 Q111 Q110 Q109 Q107 Q108 SWITCHING SWITCHING SWITCHING B4 1 2 3 CNS11 FROM CD SECTION CNP11 17 B4 VOLTAGE REGURATER SWM3 FOOL PROOF SWM4 F A S SOLM1 SOLENOID SWM5 CAM 5 16 4 17 3 18 2 19 1 20 9 IC601 M62439SP AUDIO PROCESSOR L L R R L R...

Страница 19: ...IS T1 T2 REC UTING Q121 Q122 B4 AM TCHING D801 D803 D806 Q801 D807 D809 2 3 1 B7 RX701 Q705 Q706 Q707 2 1 3 6 7 L OUT IC901 STK40704 POWER AMP B B R OUT 13 8 Q601 Q602 ZD801 Q603 Q604 B1 B4 B5 B2 7 3V 12V ANALOG 12V MOTOR 5 6V 5V Q821 Q822 Q824 Q823 VOLTAGE REGULATOR VOLTAGE REGULATOR VOLTAGE REGULATOR VOLTAGE REGULATOR Q702 Q703 AVDD MO ST CO FM AM 14 10 15 10 11 12 13 14 15 16 17 18 19 20 21 22 ...

Страница 20: ...1 36 35 34 33 32 31 30 29 28 27 26 25 24 23 22 19 20 21 42 41 40 39 38 37 C76 0 022 CNP12 CNP2 CNS12 P29 12 B TO DISPLAY PW CNP3 6 5 4 3 2 1 2 3 4 5 1 CNS1A CNS1B 2 3 4 5 1 CNS2B CNS2A 6 5 4 3 2 6 5 4 3 2 1 CNS3B 1 CNS3A 6 5 4 3 2 1 CNP3A 2 3 4 5 1 PICKUP UNIT CD MOTOR PWB C M M2 SLED MOTOR M M1 SPINDLE MOTOR SW4 PICKUP IN SL_ SL_ CD_PUIN SP SP SPN VCC2 VCC4 LD_M LD_M VCC3 M M SOL SOL SP SP SPO SO...

Страница 21: ...WB CD SERVO PWB B 1 1 2 3 4 5 6 7 8 9 10 2 3 4 5 6 1 1 2 2 SOLM2 SOLENOID M M3 T T UP DOWN LOADING SW1 OPEN CLOSE SENSOR PWB D SW2 MECHA UP SW3 DISC NUMBER CNS12 P29 12 B TO DISPLAY PWB CD SIGNAL M M CD_D_NO R88 1 2K R89 1 2K R90 220 R91 1K 5V NC NC TEST5 CS TA1 2KX8 RAM 1BIT DAC SERVO COMMAND TES HLF V P CLV_ CLV TEST2 EFMIN EFMO VSS FR VVDD ISET VVSS PDO DEF1 TOFF TGL JP JP_ PCK FSEQ VDD CONT1 C...

Страница 22: ...C316 100P C393 1 50 R380 1 5K R381 10K C369 47 25 C313 0 022 C338 100P C303 0 01 C319 0 022 C314 10 16 CF301 R314 10K C318 22P CH D301 1SS133 C309 4 7P UJ 22 21 20 19 18 17 16 15 14 13 12 11 10 9 8 7 6 5 4 3 2 1 9 8 7 6 5 4 3 2 1 VD303 SCV211C VD331 SVC348S VD302 SCV211C C383 0 022 L303 T301 MAIN PWB A1 1 3 FM SIGNAL AM SIGNAL C312 0 001 C384 0 001 C311 0 022 C308 0 0047 C307 0 0047 R316 4 7K R302...

Страница 23: ...9 0 022 0 R381 10K CF351 C369 47 25 338 00P C357 3 3 50 R361 10K Q343 KRA109 M R356 10K R375 1 2K VR351 6 8K B 7 16 15 14 13 12 11 10 9 8 7 6 24 23 22 21 20 19 18 17 16 15 14 13 12 11 10 9 8 7 6 5 4 3 2 1 VD331 SVC348S C366 1 50 C365 1 50 C383 0 022 C395 0 022 P25 12 C TO MAIN DECK SECTION T352 T351 10 18 2 19 20 21 22 23 24 R317 820 NC NC NC NC 5 1V 4 4V 11V 10 9V 0 2V TP302 VDD FM IN AM IN IO2 I...

Страница 24: ... 22 25 R628 22K R617 2 2K R618 2 2K R614 10K C623 0 001 C624 0 001 Q602 2SC3331 Q601 2SC3331 C634 0 0047 C635 0 0047 R646 100K R645 100K C626 0 001 C625 0 001 Q604 2SC3331 Q603 2SC3331 C115 47 25 C116 47 25 R135 622 5 6K 2900 8 2K C129 470P R139 560 C127 0 022 C128 3 3 50 C131 0 001 R137 6 8K C121 1 50 R123 3 9K C119 560P C117 0 033 C130 470P R140 560 C132 0 001 R138 6 8K R132 33K R120 56 C120 560...

Страница 25: ...3 3 9K C119 560P C145 22 25 C140 0 0033 C130 470P C142 1 50 R140 560 C132 0 001 R138 6 8K C134 22 25 R132 33K C120 560P R126 5 6K C136 0 068 R142 56 R124 3 9K C122 1 50 R125 5 6K R131 33K C133 22 25 9 8 7 6 5 4 Q122 2SC3331 C156 3 3 50 C154 47 16 3 3 50 R156 220K R174 5 6K R170 680 R175 1K Q114 2SC3331 C630 0 022 D601 1SS133 D602 1SS133 2 CNS701 P28 1 D TO DISPLAY PWB P26 1 E TO POWER SECTION 7 6 ...

Страница 26: ...923 56K C924 15P R924 1K C923 47P D803 1N4004S D806 1N4004S D805 1N4004S D804 1N4004S Z M Q80 KTA127 1 2 3 4 5 6 7 8 9 10 11 12 13 14 15 Q905 2SC3331 R931 10K R929 1K C921 0 022 R938 56K R939 56K C920 0 022 R926 0 1 1W R803 47K C802 100 35 ZD801 MTZJ6 2A C803 47 50 R802 47 2 C830 47 25 C821 0 047 ML R837 10K C832 0 1 ML C831 47 25 2 C911 100 50 C912 100 50 R913 100 1 4W Fusible R966 22K C905 220P ...

Страница 27: ...41 4 7K R942 4 7K Q960 2SC3331 1 2 3 4 5 6 7 8 R803 47K C802 100 35 ZD801 MTZJ6 2A C803 47 50 R802 47 1 2 CNP801 T802 C801 0 0047 M M901 FAN MOTOR FW801 1 2 T801 POWER TRANSFORMER C810 470 25 Q803 AN78L05 1 D816 1SS133 2 3 C814 10 16 R808 220 C815 1000 6 3 D815 1SS133 D818 1SS133 Q802 KRC107 M CNP806 R962 68K R801 12K SO801 AC INPUT F802 4 0A 125V F803 4 0A 125V 1 2 3 B2 16 OHMS CH 6 OHMS CH B B B...

Страница 28: ... TO MAIN PWB C702 1 50 BI701 4 1 8 7 2 3 5 6 4 1 8 2 3 5 6 7 NC DISTOUT SPN_P SP_DET SPRLY DIST0 DIST0 L DEMOSTART DIST0 H ECOSTART REC PLAY AC RLY CON 5V 15V SPA SIG A_GND 12V M D_GND REC PLAY T_BIAS T_T1 T2 S MUTE HI_CUT SP_RLY SP_DET SPN_P VLOAD VP VF2 VF1 DO CLK CE DI 12V 12V 12V 12V 0V 0V U D SW VDD G4 G5 G6 G7 G8 G9 P1 P10 P11 P2 P3 P4 P5 P6 P7 P8 VLOAD P16 HI CUT S MUTE T_T1T2 T BIAS FPA TI...

Страница 29: ...4 5 6 7 8 9 RS706 470 RS707 470 SW708 SW709 SW707 SW706 SW705 FW702 SW704 SW703 SW701 0 L DEMOSTART 0 H ECOSTART LAY Y CON 5V BACK UP CD TAPE VIDEO MEMORY SET REC PAUSE U D SW VDD G1 G2 G3 G4 G5 G6 G7 G8 G9 P1 P10 P11 DNO SW VSS REMOCON SYS STOP O C SW PUIN SW T2 RUN SPEANA1 SPEANA2 SPEANA3 AVSS SLD SLD FRF DRF SQOUT PCCL VPP LCK1 CLK DO CD DSP RES CD DSP WRQ CD DSP RWC CD DSP COIN CD DSP CQCK RES...

Страница 30: ...31 R633 C349 C351 R359 C354 R360 R349 C353 R348 R347 R352 C630 C304 C360 R372 R371 R373 R374 C384 IC303 RL901 SO901 SPEAKER TERMINAL C831 C830 C821 C826 Q821 D82 R922 C918 C917 R924 R921 R916 R923 C923 R830 D801 Q6 C62 ZD602 Q604 C905 R646 C620 C612 R606 R602 C IC6 R611 R645 C611 L343 R629 R365 ZD351 C369 Q344 R356 R317 R381 R362 Q343 R350 D342 C366 C393 C316 IC302 Q601 Q603 R903 R901 C901 C902 R9...

Страница 31: ...626 C634 C624 R625 R614 C626 R620 R907 5 623 C625 R601 R604 R624 C619 R605 R603 R641 R639 R612 C616 R610 R369 CNP102 Q801 R158 R175 Q113 C133 C128 C135 C155 C141 C121 Q121 JK970 HEADPHONES FW801 CNP101 C153 R155 C117 C115 Q124 Q110 Q126 Q111 L103 Q128 Q109 C109 R160 C152 Q106 Q104 Q103 Q105 R112 C150 C105 L104 C151 Q108 Q107 R120 C118 R111 C116 R102 R119 IC101 C122 C134 C136 R138 D804 D805 D803 R8...

Страница 32: ... R632 C631 C632 R631 R633 C349 C351 R359 C354 R360 R349 C353 R348 R347 R352 C630 C304 C360 R372 R371 R373 R374 IC303 RL901 SO901 SPEAKER TERMINAL C831 C C830 C821 C826 Q821 D820 R922 C918 C917 R924 R921 R916 R923 C923 R830 D801 Q60 C627 ZD602 Q604 C905 R646 C620 C612 R606 R602 C C6 IC60 R611 R645 C611 R609 L343 R629 R365 ZD351 C369 Q344 R356 R317 R381 R362 Q343 R350 D342 C366 C393 C316 IC302 Q601 ...

Страница 33: ...C624 R625 R614 C626 R620 R907 5 23 C625 R601 R604 R624 C619 R605 R603 R641 R639 R612 C616 R610 R369 CNP102 Q801 R158 R175 Q113 C133 C128 C135 C155 C141 C121 Q121 JK970 HEADPHONES FW801 CNP101 C153 R155 C117 C115 Q124 Q110 Q126 Q111 L103 Q128 Q109 C109 R160 C152 Q106 Q104 Q103 Q105 R112 C150 C105 L104 C151 Q108 Q107 R120 C118 R111 C116 R102 R119 IC101 C122 C134 C136 R138 D804 D805 D803 R801 C802 R1...

Страница 34: ...8 7 6 5 R572 R568 C555 C556 C551 R562 R578 RD25 RD27 R749 R750 RD28 R711 C713 RD09 C557 1 5 10 15 20 25 30 31 35 40 6 65 70 75 85 90 95 100 80 81 1 18 10 9 R786 Q702 Q703 RD24 SW725 PLAY LED716 LED717 C705 D716 XL701 R762 R763 R764 FL701 R708 R707 R706 C709 RS704 LED705 RS711 LED706 R771 R774 R772 R775 R778 R776 R777 R770 R768 R769 R766 R767 R765 RD23 BI701 SW724 TUNING DOWN BI702 SW723 TUNING UP ...

Страница 35: ...1 CNS701 SW715 VIDEO SW716 TAPE FW702 SW701 POWER RD01 SW717 CD RD14 R714 C702 SW705 DISC 1 SW706 DISC 2 SW704 TIMER SLEEP SW703 CLOCK LED722 RX701 C714 SW707 DISC 3 R798 FW702 LED701 LED702 R703 R735 C715 SW710 REV R753 R752 RD12 R747 R748 R754 R751 SW712 MEMORY SET SW711 REC PAUSE SW714 TUNER BAND R705 R713 R712 R786 Q702 SW725 PLAY LED716 LED717 SW713 STOP R787 R780 R715 R733 R734 RD13 R745 R73...

Страница 36: ...8 7 6 5 R572 R568 C555 C556 C551 R562 R578 RD25 RD27 R749 R750 RD28 R711 C713 RD09 C557 1 5 10 15 20 25 30 31 35 40 6 65 70 75 85 90 95 100 80 81 1 18 10 9 R786 Q702 Q703 RD24 SW725 PLAY LED716 LED717 C705 D716 XL701 R762 R763 R764 FL701 R708 R707 R706 C709 RS704 LED705 RS711 LED706 R771 R774 R772 R775 R778 R776 R777 R770 R768 R769 R766 R767 R765 RD23 BI701 SW724 TUNING DOWN BI702 SW723 TUNING UP ...

Страница 37: ...1 CNS701 SW715 VIDEO SW716 TAPE FW702 SW701 POWER RD01 SW717 CD RD14 R714 C702 SW705 DISC 1 SW706 DISC 2 SW704 TIMER SLEEP SW703 CLOCK LED722 RX701 C714 SW707 DISC 3 R798 FW702 LED701 LED702 R703 R735 C715 SW710 REV R753 R752 RD12 R747 R748 R754 R751 SW712 MEMORY SET SW711 REC PAUSE SW714 TUNER BAND R705 R713 R712 R786 Q702 SW725 PLAY LED716 LED717 SW713 STOP R787 R780 R715 R733 R734 RD13 R745 R73...

Страница 38: ...PE MECHANISM PWB E CNS3B CNS3A RD WH GY WH GY WH 1 2 3 4 5 6 1 2 3 4 5 6 CD MOTOR PWB C CNS5 2 1 2 1 CNS10 WH RD GY WH BR WH GY OR WH GY 10 1 BIM5 6 9 8 7 6 5 4 3 2 1 SW2 MECHA UP SW1 OPEN CLOSE M3 T T UP DOWN LOADING SW3 DISC NUMBER SENSOR PWB D SOLM2 SOLENOID 1 2 3 4 T802 POWER TRANSFORMER RL801 SO801 C809 D813 D812 D811 D810 C810 D816 C814 CNP806 CNS806 Q802 R808 D818 D802 C815 D815 Q803 3 2 1 ...

Страница 39: ...59 C49 C45 C38 C47 R60 C46 C27 R41 R42 C23 R40 C25 R38 C24 R43 R53 R52 R50 C56 R44 R45 C32 R46 R1 C2 C15 C54 R8 R9 R10 R15 C10 R16 R14 R13 R20 R21 R22 R17 R23 R18 CNP10 D91 R84 C77 D93 D92 R80 Q51 R81 C52 CNP11 C51 ZD61 CNP99 BI1A R71 C71 L61 R91 R89 R88 R90 C19 C18 C20 BI1B R54 R55 C72 R65 R72 CNP12 D81 C83 D82 C43 C41 C42 R61 R63 R62 R57 C22 C57 C28 C29 R47 C37 XL1 R19 C11 C33 C55 C36 C82 CNP3 R...

Страница 40: ... CNP806 CNS806 Q802 R808 D818 D802 C815 D815 Q803 3 2 1 3 2 1 1 2 CNP801 1 2 AC POWER INPUT AC120 60Hz AC POWER SUPPLAY CORD CNP802 P33 10 E TO MAIN PWB RD BL RD YL YL BR BK BR CNS802 T801 POWER TRANSFORMER RD BL CNS801 1 2 3 4 5 6 7 8 P36 2 H TO DISPLAY PWB POWER PWB A2 BR COLOR TABLE RD R OR YL GR BL VL GY WH W BK PK BROWN RED ORANGE YELLOW GREEN BLUE VIOLET GRAY WHITE BLACK PINK ...

Страница 41: ... 5V 7 1V 8 1V 17 16 15 14 13 20 19 18 7 1V 8 1V 1 7V 1 7V 1 7V 1 7V 1 7V 1 7V 21 24 23 22 PIN NO VOLTAGE IC303 0 2V 11 9V 4 5V 4 5V 2 5V 2 5V 0V 0V 0V 0V 0V 0V 4 5V 4 5V 0V 0V 0V 0V 0V 0V 5 1V 5 1V 0V 0V 9 8 7 6 5 4 3 2 1 12 11 10 0V 2 5V 0V 0V 0V 0V 2 5V 0V 5 1V 5 1V 0 9V 0 9V 0 9V 0 9V 1 3V 1 1V 17 16 15 14 13 20 19 18 0V 0V 2 5V 2 5V 21 22 PIN NO VOLTAGE IC302 5 2V 0 2V 0V 0V 0 9V 0V 1 6V 0V 6 ...

Страница 42: ... use a cleaning disc designed for CD optical pickup lenses HOW TO USE 1 Using the brush in the cleaner cap apply 1 or 2 drops of the cleaning fluid to the brush on the CD cleaner disc which has the mark next to it 2 Place the CD cleaner disc onto the CD disc tray with the brush side down then press the play button 3 You will hear musicfor about 20 seconds and the CD player will automatically stop ...

Страница 43: ...specific state When the CD mechanism is moved up 0V In other states 4 3V Yes Is there following voltage input on the IC701 pin 21 in the specific state In other states 4 3V When the CD mechanism is moved up 0V When turntable fails to move Check the MECHA UP SW and the wiring from the IC701 pin 21 to the MECHA UP SW Is 4V output from the Q91 emitter during operation stated above Yes Yes Check the w...

Страница 44: ... 24 and 25 IC91 pins 1 and 3 The CD function will not work The CD operating keys don t work Check the CD DSP power supply and 16 93 MHz clock and reset terminal Check the waveform of SCK SO DATA and SI COMM Yes Yes See if the pick up is in the pick up in PICKUP IN SW position If the items mentioned above are OK check the main microcomputer IC701 Yes Yes No Yes No The CD operating keys work Check t...

Страница 45: ...Figure 45 2 Figure 45 1 Waveform in case of normal play back HF 1 0V DIV 0 5µsec DIV DC When playing back the disc 3 2 1 4 0 5s 1 00 V IC1 16 FD 0 5s 10 0 V IC2 13 CLV 0 5s 10 0 V IC1 54 DRF 0 5s 2 00 V IC1 7 TE Check the tracking system Check waveform of IC1 pin 7 TE Play is possible in TEST mode Although IL is possible play is impossible Check the periphery of IC 1 pin 14 Normal jump is impeded ...

Страница 46: ...is performed when disc exits Yes Although HF waveform is normal TOC data cannot be read Yes Check PDO waveform Fig 46 Abnormal Check the IC1 pins 43 and 44 IC2 pins 3 5 7 10 and 11 Stop Play As VCO freque ncy is locked at 4 32 M Hz voltage of PDO rises and stabili zes 2 3 0 5s 1 00 V IC2 3 PDO 0 5s 1 00 V IC2 16 FD Although HF waveform is normal and the time indication is normal no sound is emitte...

Страница 47: ...amplifier input 25 SPG Pin to connect gain setting resistor in the 12cm mode of spindle 26 SP Pin to connect spindle phase compensation constant together with SPD pin 27 SPD Spindle control signal output pin 28 SLEQ Pin to connect thread phase compensation constant 29 SLD Thread control signal output pin 30 SL Input pin of thread feed signal from micro computer 31 SL Input pin of thread feed signa...

Страница 48: ...Pin to connect capacitor for peak hold of RF signal 61 BH1 Pin to connect capacitor for bottom hold of RF signal 62 LDD APC circuit output pin 63 LDS APC circuit output pin 64 VCC1 RF system VCC pin Figure 48 BLOCK DIAGRAM OF IC 1 FIN2 FIN1 E F TB TE TE TESI SCI TH TA TD TD JP TO FD FD FA FA FE FE AGND SP SPI SPG SP SPD SLEQ SLD SL SL JP JP TGL TOFF TES HFL SLOF CV CV RFSM RFS SLC SLI DGND FSC TBC...

Страница 49: ...NT2 Input Output General use input output terminal 2 26 CONT3 Input Output General use input output terminal 3 27 CONT4 Input Output General use input output terminal 4 28 CONT5 Input Output General use input output terminal 5 29 EMPH CONT6 Output Deemphasis monitor terminal H Deemphasis disc play back General use output terminal 6 30 C2F Output C2 flag output terminal 31 DOUT Output Digital OUT o...

Страница 50: ...al 62 TEST5 Input Input terminal for test Pull down resistor built in Be sure to connect this terminal to 0V 63 CS Input Chip selection input terminal Pull down resistor built in In noncontrol state connect this terminal to 0V 64 TEST1 Input Input terminal for test Pull down resistor is not provided Be sure to connect this terminal to 0V Note The same potential must be supplied to the power termin...

Страница 51: ...verted output 37 OUT5 CH5 inverted output 38 OUT6 CH6 non inverted output 39 OUT6 CH6 inverted output 40 VCC4 Power supply 4 CH6 41 IN6 CH6 inverted input 42 IN6 CH6 non inverted input IC3 VHiM63001FP 1 Focus Tracking Spin Slide Driver M63001FP Pin No Terminal Name Function IC562 563 VHiKiA4558P 1 KIA4558P IC601 VHiM62439SP 1 Audio Processor M62439SP Figure 51 BLOCK DIAGRAM OF IC 1 2 3 4 5 6 7 8 9...

Страница 52: ...TA INPUT 63 Hz 29 ANI4 TUN SM Input TUNER SIGNAL METER INPUT 30 ANI3 T2 RUN Input TAPE2 RUN PULSE INPUT 31 33 ANI2 ANI0 KEYIN3 KEYIN1 Input KEY INPUT 34 AVDD AVDD ANALOG VDD 35 AVREF AVREF ANALOG REF VOLTAGE 36 P03 PUIN SW Input CD PUIN SWITCH 37 P02 O C SW Input CD OPEN CLOSE SWITCH 38 INTP1 SYS STOP Input SYSTEM STOP INPUT 39 INTP0 REMOCON Input REMOCON INPUT 40 Vss VSS GROUND VOLTAGE 41 P74 DNO...

Страница 53: ...utput DISTINATION OUTPUT 67 P103 FIP32 DIAT4 P22 Input Output FL DISPLAY SEGMENT DRIVER DISTINATION INPUT 68 P102 FIP31 DIAT3 P21 Input Output FL DISPLAY SEGMENT DRIVER DISTINATION INPUT 69 P101 FIP30 DIAT2 P20 P15 Input Output FL DISPLAY SEGMENT DRIVER DISTINATION INPUT 70 P100 FIP29 DIAT1 P19 P16 Input Output FL DISPLAY SEGMENT DRIVER DISTINATION INPUT 71 78 FIP28 FIP21 P18 P13 P11 P7 Output FL ...

Страница 54: ... d f g m e r p n h j k 1G 8G ANODE CONNECTION 1G 7G 8G 9G 10G 11G 2G 6G P1 P2 P3 P4 P5 P6 P7 P8 P9 P10 P11 P12 P13 P14 P15 P16 P17 P18 P19 P20 P21 P22 Dp d c n p r e m g b k j h f a S2 S3 S4 S5 Dp d c n p r e m g b k j h f a S2 S3 S4 S5 Dp d c n p r e m g b k j h f a S2 S3 S4 S5 Dp d c n p r e m g b k j h f a S2 S3 S4 S5 c o LOWER S1 B1 B2 B3 B4 B5 B6 B7 S1 B1 B2 B3 B4 B5 B6 B7 S1 B1 B2 B3 B4 B5 B...

Страница 55: ...uare type without lead wire VC TQ Square type without lead wire VC CY Square type without lead wire VC CZ Square type without lead wire VC J The 13th character represents capacity difference J 5 K 10 M 20 N 30 C 0 25 pF D 0 5 pF Z 80 20 If there are no indications for the electrolytic capacitors error is 20 Resistors VRD Carbon film type VRS Carbon film type VRN Metal film type VR MF Cylindrical t...

Страница 56: ...3 1 J AA Silicon 1SS133 D818 VHD1SS133 1 J AA Silicon 1SS133 D820 821 VHD1SS133 1 J AA Silicon 1SS133 D832 833 VHD1SS133 1 J AA Silicon 1SS133 D903 904 VHD1SS133 1 J AA Silicon 1SS133 D906 907 VHD1SS133 1 J AA Silicon 1SS133 D960 962 VHD1SS133 1 J AA Silicon 1SS133 LED701 VHPL1154GT4 1 J AB LED Green L1154GT4 LED702 VHPSLI342YCB1 J AC LED Orange SLI342YCB LED703 VHPSLI342DCB1 J AC LED Yellow SLI34...

Страница 57: ...0J J AA 22 pF UJ 50V C335 VCCSPA1HL561J J AA 560 pF 50V C337 VCEAZA1CW106M J AC 10 µF 16V Electrolytic C338 VCKYMN1HB101K J AA 100 pF 50V C349 VCTYMN1EF223Z J AA 0 022 µF 25V C350 VCEAZA1AW227M J AC 220 µF 10V Electrolytic C351 VCTYMN1CX222K J AA 0 0022 µF 16V C353 VCTYMN0JY183M J AA 0 018 µF 6 3V C354 VCKYMN1HB221K J AA 220 pF 50V C355 357 VCEAZA1HW335M J AB 3 3 µF 50V Electrolytic C358 CPU100V15...

Страница 58: ...T2CD821J J AA 820 ohms 1 6W R82 83 VRS TV2AB391J J AA 390 ohms 1 10W R84 VRD ST2CD222J J AA 2 2 kohms 1 6W R88 89 VRD ST2CD122J J AA 1 2 kohms 1 6W R90 VRD ST2CD221J J AA 220 ohms 1 6W R91 VRD ST2CD102J J AA 1 kohm 1 6W R93 VRS TV2AB221J J AA 220 ohms 1 10W R101 VRD MN2BD102J J AA 1 kohm 1 8W R102 VRD ST2CD102J J AA 1 kohm 1 6W R103 104 VRD MN2BD222J J AA 2 2 kohms 1 8W R105 106 VRD MN2BD332J J AA...

Страница 59: ...D RT2HD3R3J J AA 3 3 ohms 1 2W R832 VRD ST2CD223J J AA 22 kohms 1 6W R837 VRD ST2CD103J J AA 10 kohm 1 6W R901 VRD ST2CD104J J AA 100 kohm 1 6W R902 VRD ST2CD683J J AA 68 kohms 1 6W R903 VRD ST2CD104J J AA 100 kohm 1 6W R904 VRD ST2CD683J J AA 68 kohms 1 6W R905 VRD MN2BD102J J AA 1 kohm 1 8W R907 VRD MN2BD102J J AA 1 kohm 1 8W R912 913 VRG ST2EC101J J AB 100 ohm 1 4W Fusible R916 VRD ST2CD102J J ...

Страница 60: ...ch Leaf Type F A S SWM5 204 11 92LM SW1658A J AB Switch Leaf Type CAM WTM801 QCNCW012EAWZZ J AC Plug 5Pin CD MECHANISM PARTS 301 NGERH0011AWZZ J AC Gear Middle 302 NGERH0012AWZZ J AC Gear Drive 303 MLEVP0010AWZZ J AC Rail Guide 304 NSFTM0002AWFW J AE Shaft Guide 305 92LM CUSN1524A J AC Cushion 306 92LHPC1MASY J BG Pickup Unit Ass y 306 1 Pickup Unit Not Replacement Item 306 2 NGERR0043AFZZ J AC Ge...

Страница 61: ...0P10000 J AA Screw ø3 10mm 605 XJBSD30P14000 J AA Screw ø3 14mm 606 XJBSD30P10000 J AA Screw ø3 10mm 607 LX TZ0019AFZZ J AB Screw Special 608 LX JZ0039AFFD J AA Screw ø3 12mm 609 XBPSD26P05JSO J AB Screw ø2 6 5mm 610 XEBSD26P12000 J AA Screw ø2 6 12mm 611 XEBSD30P10000 J AA Screw ø3 10mm 612 XEBSD30P12000 J AA Screw ø3 12mm 613 LX JZ0010AFFD J AA Screw ø3 10mm 614 LX HZ0082AFZZ J AA Screw ø4 8mm 6...

Страница 62: ...013WB396A J BA Woofer SP3 4 VSP0050TBM26A J AR Tweeter SP5 6 92L303R0300110 J AN Super Tweeter 7 SPEAKER BOX PARTS REAR SPEAKER CD C622 ONLY 901 92L02 02 0001 J AR Net Frame Ass y 902 92L03 02 0001 J AP Bottom Cabinet 903 92L06 01 0001 J Speaker Cord 904 92L09 01 0001 J AC Screw ø3 14mm 905 92L15 01 0001 J Label Parts Code SP1 2 92L08 01 0001 J AS Speaker Full range GBOXS0021AWM1 CP C2900 SPEAKER ...

Страница 63: ...CD C622 C2900 63 A B C D E F G H 1 2 3 4 5 6 Figure 8 CD MECHANISM EXPLODED VIEW 8 CD C622 C2900 306 1 701 304 701 302 301 702 702 303 M1 703x2 703x2 305x2 SW4 M2 305 PWB C 306 2 306 3 306 704 ...

Страница 64: ...33 243 246 250 2 250 244 1 245 2 246 2 245 1 246 1 245 3 246 3 244 2 244 3 244 4 244 5 244 6 244 7 244 8 244 9 244 10 244 11 244 12 244 13 244 14 244 15 244 16 244 17 244 18 244 19 244 20 244 21 244 22 247 252 252 247 248 249 1 249 2 249 602 215 FL701 227 253 604 239 245 PWB E PWB A4 204 204 1 204 2 204 3 204 4 204 5 204 6 204 7 204 8 204 9 204 10 204 11 604x5 244 Silicon grease 604x10 602x2 605x2...

Страница 65: ...WB D CD MECHANISM PWB B 254 611 236 213 223 217 210 238 236 611 213 612x4 236 222 211 SOLM2 M3 609x2 SW2 218 232 216 228 230 231 231 214 610 607 229 226 607 235 234 236x2 236 616 207 236 236 SW3 201 603 620 621 256 255 1 255 2 255 3 255 237 202 617x2 617x2 251 251 3 251 2 251 1 251 4 611 601 221 219 ...

Страница 66: ...6 A B C D E F G H 1 2 3 4 5 6 Figure 11 SPEAKER EXPLODED VIEW 1 3 11 CP C622 903 SP3 4 SP1 2 907x4 909 904 902 908 908 905 906 901 BK BK RD RD PIEZO SP3 4 WOOFER SP1 2 PIEZO SP3 L CH SP4 R CH WOOFER SP1 L CH SP2 R CH ...

Страница 67: ...909x2 907 SP1 2 911x4 910 with Capacitor C1 2 C1 2 Capacitor 912 909x2 906 SP5 6 902 903 901 SUPER TWEETER SP5 L CH SP6 R CH TWEETER SP3 L CH SP4 R CH WOOFER SP1 L CH SP2 R CH SUPER TWEETER SP5 L CH SP6 R CH TWEETER SP3 L CH SP4 R CH WOOFER SP3 L CH SP4 R CH C1 2 Capacitor 2 2µF 50V Electrolytic N P BK YE BK BK RED RED ...

Страница 68: ...CD C622 C2900 68 Figure 13 SPEAKER EXPLODED VIEW 3 3 13 GBOXS0021AWM1 CD C622 ONLY A B C D E F G H 1 2 3 4 5 6 901 SP1 2 SP1 2 902 904x6 905 903 ...

Страница 69: ...er L R Front Speaker L R CP C622 92L17 01 0001 Packing Add Top Bottom 92L412 0125 Packing Add Top Bottom 92L16 01 0002 Polyethylene Bag 92L411 0108 Polyethylene Bag 92L416 0060 Center Pad Bottom FM AM Loop Antenna Quick Guide Operation Manual AC Power Cord Remote Control 92LBAG1460C1 Polyethylene Bag Accessories FRONT OF SIDE SPEAKERS BOTTOM SIDE A A B B C C TOP FRONT BACK SPAKC0729AWZZ Packing Ca...

Страница 70: ...d Left Right Front Speaker L R CP C2900 92L720TPC46200 Packing Add Top 92L70032001600 Polyethylene Bag Bottom FM AM Loop Antenna Quick Guide Operation Manual AC Power Cord Remote Control 92LBAG1460C1 Polyethylene Bag Accessories FRONT OF SIDE SPEAKERS 92L71525003200 Sheet 92L720BPC46200 Packing Add Bottom A A B B TOP FRONT BACK SPAKC0745AWZZ Packing Case Bar Code Label ...

Страница 71: ...CD C622 C2900 71 16 M E M O ...

Страница 72: ...ns electronic mechanical photocopying recording or otherwise without prior written permission of the publisher SHARP CORPORATION Communication Systems Group Quality Reliability Control Center Higashihiroshima Hiroshima 739 0192 Japan Printed in Japan COPYRIGHT 1999 BY SHARP CORPORATION ALL RIGHTS RESERVED SC SL LAG A9903 2627NS HA M ...

Отзывы: