background image

30

TROUBLESHOOTING

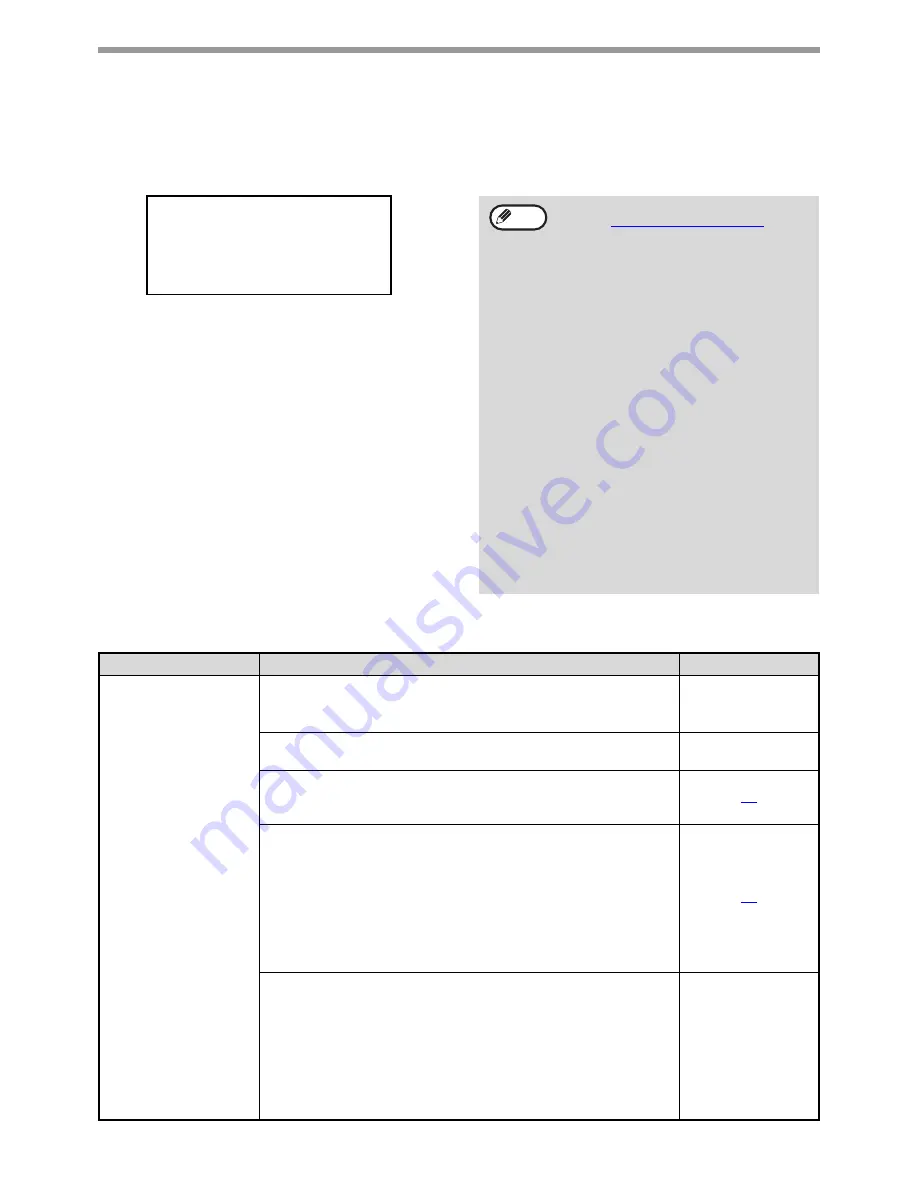
A notice page is printed

If you find that a notice page has been printed at the end of a print job, the print data received from the computer has 
not been printed as specified. Fix the problem as explained below and then try printing again.

What to do when a notice page is printed

The above notice page is printed when a print job 
containing more data than can be held in the memory 
of the dual function board is sent. Deactivate the 
ROPM function by removing the checkmark from 
[ROPM] in the [Configuration] tab of the printer driver 
setup screen. If you need to use the ROPM function, 
set the "Print quality" in the printer driver to [Draft], or 
increase the amount of memory in the machine.

SCANNING PROBLEMS

****************************************************

Notice Page

****************************************************

The IMC memory full error had occurred,

a normal output was not able to be executed.

Please refer to the operation manual for

the solution method.

• The Notice Page can be set to not print 

out in 

"NOTICE PAGE" (page 26)

 of the 

key operator programs.

When the dual function board is installed

• The memory of the dual function board is used 

to temporarily hold print data when the ROPM 
function is used. This memory is also used to 
temporarily store the image of the original during 
copying. The proportion of memory allocated to 
the printer function can be changed in the key 
operator programs. See the "Key operator's 
guide". The memory can also be increased by 
adding the optional memory modules. For 
details, contact your SHARP dealer.

When the dual function board is not 
installed

• A notice page such as "The incorrect driver 

is chosen, a normal output was not able to 
be executed....." will be printed if you 
attempt to print using the print driver for the 
dual function board. Install the standard print 
driver as explained in "1. INSTALLING THE 
SOFTWARE (THAT ACCOMPANIES THE 
MACHINE)" in the "Software setup guide" 
and select the standard driver when printing.

Note

Problem

Cause and solution

Page

Poor scanning 
quality.

The document glass or the underside of the document 
cover/SPF is dirty. 

Clean regularly.

Operation manual (for 

general information 

and copier)

The original is smudged or blotchy. 

Use a clean original.

You have not specified a suitable resolution.

Make sure that the resolution setting in the scanner driver is 
appropriate for the original.

18

You are scanning a large area (for example an entire 11" x 
17" or A3 document) at high resolution. 

If you attempt to scan a large area at high resolution and there is insufficient 
memory in the machine to hold the scanned data, scanning will take place at 
a lower resolution and the scanner driver will enhance the data to make up 
for the lower resolution. However, the quality of the enhanced image will not 
be as high as if scanning took place at the higher resolution. To scan a 
ledger or A3 original in full color at 600 dpi without using enhancement, the 
dual function board and 256 MB memory option are required. 

17

You have not specified a suitable value for the "B/W 
Threshold" setting.

If you are using a TWAIN-compliant application and are using 
[White], [Red], [Green], or [Blue] for "Light Source" in the TWAIN 
driver, make sure that the "B/W Threshold" setting is appropriate. A 
larger threshold value makes your output darker, while a small 
threshold value makes it lighter. To adjust the threshold 
automatically, click the [Auto Threshold] button on the [Image] tab of 
the "Custom Settings (or Professional)" screen. 

Содержание AR M207 - B/W Laser - All-in-One

Страница 1: ...OPERATION MANUAL for printer and scanner DIGITAL MULTIFUNCTIONAL SYSTEM Page INTRODUCTION 1 CONTENTS 2 PRINT 3 PRINTER SHARING 11 SCAN 15 KEY OPERATOR PROGRAMS 26 TROUBLESHOOTING 28 SPECIFICATIONS 32 ...

Страница 2: ...ed to simply as SPF Where AR XXXX appears in this manual please substitute the name of your model for XXXX Trademark Acknowledgments Sharpdesk is a trademark of Sharp Corporation Microsoft Windows Windows 95 Windows 98 Windows Me Windows NT 4 0 Windows 2000 Windows XP and Internet Explorer are registered trademarks or trademarks of Microsoft Corporation in the U S A and other countries IBM PC AT a...

Страница 3: ...IMAGE 180 DEGREES 9 PRINTING A WATERMARK 9 OUTLINE OF THE PRINT STATUS WINDOW 10 2 PRINTER SHARING SHARING THE PRINTER USING WINDOWS NETWORKING 11 SHARED PRINTER SETTINGS 12 CLIENT SETTINGS 13 3 SCAN SCANNING OVERVIEW 15 SCANNING FROM A TWAIN COMPLIANT APPLICATION 16 SCANNER DRIVER SETTINGS 18 SCANNING FROM A WIA COMPLIANT APPLICATION WINDOWS XP 20 SCANNING FROM THE SCANNER AND CAMERA WIZARD WINDO...

Страница 4: ...ar Windows 2000 does not have the Preferences button in this dialog box Select settings as needed on each of the tabs in the setup screen PRINTER DRIVER SETTINGS page 6 TWO SIDED PRINTING ONLY FOR MODELS THAT SUPPORT TWO SIDED PRINTING page 7 PRINTING MULTIPLE PAGES ON ONE PAGE page 7 FITTING THE PRINT IMAGE TO THE PAPER page 8 ROTATING THE PRINT IMAGE 180 DEGREES page 9 PRINTING A WATERMARK page ...

Страница 5: ...UT OF PRINT is disabled Add paper to the bypass tray press the PRINT key on the machine to switch to printer mode and select BYPASS TRAY Printing will resume When FORCED OUTPUT OF PRINT is enabled The closest size of paper in a tray other than the bypass tray will be used for printing HOW BYPASS TRAY AND BYPASS MANUAL DIFFER IN THE PAPER SOURCE SETTINGS There are two bypass tray settings in Paper ...

Страница 6: ...gs 2 Click Printers and Other Hardware and click Printers and Faxes In Windows 2000 click Printers 3 Click the SHARP AR XXXX printer driver icon and select Properties from the File menu 4 Click the Printing Preferences button in the General tab The printer driver setup screen will appear PRINTER DRIVER SETTINGS page 6 Windows 95 98 Me NT 4 0 1 Click the Start button select Settings and then click ...

Страница 7: ...item from a list of options 6 Image of paper trays The tray selected in Paper Source in the Paper tab appears in blue You can also click on a tray to select it 7 OK button Click this button to save your settings and exit the dialog box 8 Cancel button Click this button to exit the dialog box without making any changes to the settings 9 Apply button Click to save your settings without closing the d...

Страница 8: ...s on a single sheet of paper To use this function open the printer driver setup screen and select 2 Up or 4 Up for N Up Printing on the Main tab To open the printer driver see BASIC PRINTING page 3 If you select the Border checkbox borderlines will be printed around each page Paper sizes that can be used for two sided printing are Ledger Letter Legal Foolscap A3 A4 A5 B4 and B5 The bypass tray can...

Страница 9: ...printer driver setup screen 2 Select the original size Ledger or A3 of the print image in Paper Size 3 Click on the Fit to Page checkbox 4 Select the size of the paper Letter or A4 that is loaded in the machine from Fit to Paper Size The size of the print image will be automatically adjusted to match the paper loaded in the machine The Fit To Paper Size setting is not available when N Up Printing ...

Страница 10: ... on your document To print a watermark open the printer driver setup screen click the Watermarks tab and follow the steps below To open the printer driver see BASIC PRINTING page 3 How to Print a Watermark From the Watermark drop down list select the watermark that you wish to print for example CONFIDENTIAL and start printing You can enter text to create your own custom watermark For details on wa...

Страница 11: ...lained below Follow the instructions in the status window to solve the problem 3 Tab Click a tab to bring it to the front The Options tab allows you to select display options for the Print Status Window 4 Document Name Shows the name of the document currently being printed 5 Cancel Job button Printing can be canceled by clicking this button before the machine receives the job 6 Help button Click t...

Страница 12: ...E PRINTER USING WINDOWS NETWORKING The machine can be used as a shared printer in a Windows 95 98 Me NT 4 0 2000 XP network environment Note that the Windows network environment must already be established Print server as explained here is a computer that is directly connected to the machine and a Client is any other computer that is connected to the same network Shared printer Client Client Clien...

Страница 13: ...log box 6 Click Printers and Other Hardware in the Control Panel and click Printers and Faxes In operating systems other than Windows XP double click the Printers icon 7 Click the SHARP AR XXXX printer driver icon and select Sharing from the File menu 8 Configure the settings for sharing and then click the OK button CLIENT SETTINGS page 13 For information on the settings refer to your operating ma...

Страница 14: ... button In Windows 95 98 Me 2000 select Network printer and then click the Next button 6 Select Browse for a printer and click the Next button In Windows 95 98 Me click the Browse button If you are using Windows 2000 select Type the printer name or click Next to browse for a printer and then click the Next button 7 Select the printer to be shared in the network and then click the Next button If yo...

Страница 15: ...he SHARP AR XXXX printer driver icon and select Properties from the File menu The printer properties will appear 3 Click the Ports tab and then click the Add Port button The Printer Ports dialog box will appear 4 Select Local Port in the Available Printer Ports list and click the New Port button The Port Name dialog box will appear 5 Enter name of server connected to machine name of shared printer...

Страница 16: ...e in USB 2 0 High speed mode be sure to read USB2 0 MODE and System requirements for USB 2 0 Hi Speed mode in the Key operator s guide The environment in which the machine s scanning function can be used is subject to certain limitations For more information see 1 INSTALLING THE SOFTWARE THAT ACCOMPANIES THE MACHINE in the Software setup guide Note Caution Scanning from a TWAIN 1 compliant or WIA ...

Страница 17: ...Click the Preview button The preview image will appear If you are using Windows XP you can also select WIA SHARP AR XXXX to scan using the WIA driver SCANNING FROM A WIA COMPLIANT APPLICATION WINDOWS XP page 20 Depending on your system SHARP MFP TWAIN G 1 0 32 32 or WIA SHARP AR XXXX 1 0 32 32 may appear in the above select source screen Note If you selected SPF Duplex Book or SPF Duplex Tablet fr...

Страница 18: ... the scan preferences lower the resolution or specify a suitable scanning area The scan resolution will vary depending on the scanning area and how much memory in the machine is free For example if a letter or A4 original is scanned in full color at 300 dpi with only the standard memory installed the machine will scan the original in full color at 150 dpi and the scanner driver will enhance the re...

Страница 19: ...e settings click the Help button in the preview screen to display Help 3 Image Area menu Set the scanning area To scan the original size detected by the machine select Auto The scanning area can also be specified as desired in the preview window 4 Zoom Preview checkbox When this is selected the selected part of the preview image will be enlarged when the Preview button is clicked To return to the ...

Страница 20: ...tion shown in the preview window 3 Image Size button Click this button to open a dialog box that allows you to specify the scanning area by entering numbers Pixels mm or inches can be selected for the units of the numbers By initially specifying a scanning area numbers can be entered to change that area relative to the top left corner as a fixed origin 4 Auto Scan Area Adjustment button Auto Scan ...

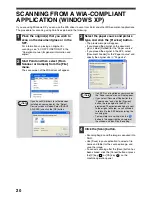
Страница 21: ...ment Feeder for the Paper source and specify the original size in Page size 4 Click the Scan button Scanning begins and the image is acquired into Paint Use Save in your application to select a file name and folder for the scanned image and save the image To cancel scanning after the Scan button has been clicked click the Cancel button or press the C key or CA key on the machine operation panel If...

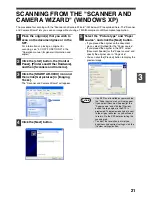
Страница 22: ...Tasks The Scanner and Camera Wizard will appear 4 Click the Next button 5 Select the Picture type and Paper source and click the Next button If you placed the original on the document glass select Flatbed for the Paper source If you placed the original in the SPF select Document Feeder for the Paper source and specify the original size in Page size You can click the Preview button to display the p...

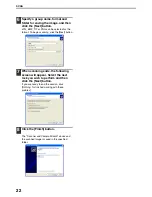
Страница 23: ...anning click the Next button 7 When scanning ends the following screen will appear Select the next task you wish to perform and then click the Next button If you are ready to end the session click Nothing I m finished working with these pictures 8 Click the Finish button The Scanner and Camera Wizard closes and the scanned image is saved in the specified folder ...

Страница 24: ...per misfeed or an open cover The key operator programs are being used The tray paper size is being set During copying or printing During scanning of an original for a fax transmission when the fax option is installed If the machine is in copy mode press the SCAN key to switch to scanner mode and clear the previously set copy settings Note When the dual function board is installed If computers are ...

Страница 25: ...estinations SC1 through SC6 on the machine 2 Application Selection area Select the application that starts up here 3 Show TWAIN setting screen when scanning checkbox Select whether or not the TWAIN screen is shown when scanning When the checkbox is selected the TWAIN screen appears when scanning is executed to let you adjust the scanning conditions 4 Scan Setup area Set the scan conditions 5 OK bu...

Страница 26: ...s If the Button Manager icon does not appear on the task bar click the start button select All Programs Programs in other than Windows XP select Sharp Button Manager G and then click Button Manager to start Button Manager The Button Manager icon appears on the task bar If the Show TWAIN setting screen when scanning checkbox is selected the setting screen will appear when scanning is executed to le...

Страница 27: ...kmark appears in the checkbox A checkmark in the checkbox indicates that ENABLE is selected No checkmark indicates that DISABLE is selected For the initial key operator code set at the factory see PROGRAMMING A KEY OPERATOR CODE in the Key operator s guide Mode Program Settings Explanation Printer NOTICE PAGE ENABLE DISABLE Select whether or not a Notice Page page 30 is printed when printing is no...

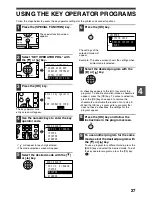
Страница 28: ...ear press the OK key To cancel a selection press the OK key once again to remove the checkmark and disable the function Go to step 9 When the OK key is pressed for a program that does not have a checkbox the settings for the program appear 8 Press the OK key and follow the instructions in the program screen 9 To use another program for the same mode select the desired program with the or key To us...

Страница 29: ...ion is installed Wait until copying scanning or fax printing is finished Has the printer driver been installed correctly Follow these steps to check and see if the printer driver is installed 1 Click the start button the Control Panel Printers and Other Hardware and then Printers and Faxes If you are using Windows 95 98 Me 2000 click the Start button point to Settings and select Printers 5 2 Make ...

Страница 30: ...me remove the paper from the tray and store it in a dark place in a bag to prevent moisture absorption Operation manual for general information and copier You did not set sufficient margins in the paper settings of your application The top and bottom of the paper may be dirty if the margins are set outside of the specified print quality area Set the margins within the specified print quality area ...

Страница 31: ...able to be executed will be printed if you attempt to print using the print driver for the dual function board Install the standard print driver as explained in 1 INSTALLING THE SOFTWARE THAT ACCOMPANIES THE MACHINE in the Software setup guide and select the standard driver when printing Note Problem Cause and solution Page Poor scanning quality The document glass or the underside of the document ...

Страница 32: ...The original was not placed in the correct position Place the original correctly Operation manual for general information and copier Unable to scan the image If scanning is not possible shut down your computer turn off the machine s power switch and unplug the machine s power cord Next start your computer restore power to the machine and try scanning again If scanning is still not possible check t...

Страница 33: ...lution 600 dpi Memory Page memory AR M165 AR M206 AR M207 32 MB AR M161 AR M162 16 MB IMC Memory 2 16 MB Emulation SHARP GDI SPLC Sharp Printer Language with Compression 2 Memory expansion 256 MB expansion memory board AR SM5 can be installed in one DIMM expansion slot 2 Interface port IEEE1284 parallel port USB 1 1 port USB 1 USB 2 0 port USB 2 2 Interface cables Parallel cable Shielded bi direct...

Страница 34: ...I Interface port USB 1 1 port USB 1 USB 2 0 port USB 2 When the dual function board is installed Drop out color Yes Supported operating systems Windows 98 Windows Me Windows 2000 Professional Windows XP Home Edition Windows XP Professional For more information see 1 INSTALLING THE SOFTWARE THAT ACCOMPANIES THE MACHINE in the Software setup guide Void area Top and bottom edges 7 64 2 5 mm right and...

Страница 35: ...OPERATION MANUAL for printer and scanner SHARP CORPORATION ARM207 EN PRINTER ...

Отзывы: