background image

6-15

6

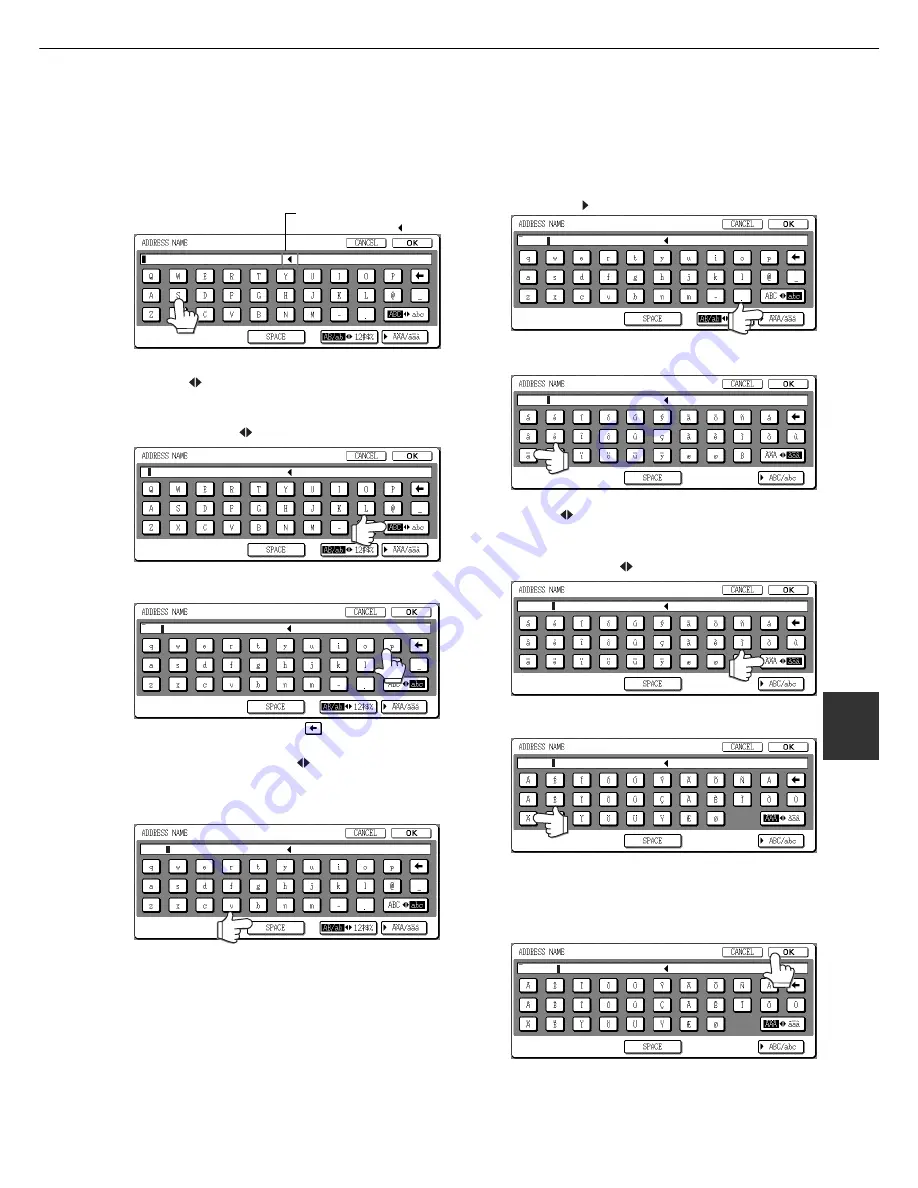
Entering alphabetical characters

(Example: Sharp äÄ)

1

Touch the S key.

Characters cannot be 
entered beyond the "  " mark.

To switch between upper case and lower case, touch
the ABC 

 abc key. When ABC is highlighted, upper

case letters are entered.

2

Touch the ABC 

 abc key.

S

3

Touch the "h" key, "a" key, "r" key, and "p" key.

Shar

If you make a mistake, touch the 

 key to move the cursor

(

) back one space and then enter the correct character.

You can also press the AB/ab 

 12#$% key during entry

to enter a number or symbol.

4

Touch the SPACE key.

Sharp

The cursor (

) moves forward and a space is entered.

ENTERING CHARACTERS

To enter or edit characters in setting screens such as auto dial key programming screens, follow the steps below.
Characters that can be entered are alphabetical characters, special characters, numbers, and symbols.

5

Touch the   ÃÄÂ/ãäâ key.

Sharp

6

Touch the "ä" key.

Sharp

To switch between upper case and lower case, touch
the ÃÄ 

 ãäâ key. When ãäâ is highlighted, lower case

letters are entered.

7

Touch the  ÃÄ 

 ãäâ key.

Sharp ä

8

Touch the "Ä" key.

Sharp ä

You can press the ABC/abc key during entry to return to
alphabetical character entry. You can also enter numbers
and symbols.

9

When finished, touch the OK key.

Sharp äÄ

You will exit the character entry screen and return to the
programming screen. If you touch the CANCEL key, you
will return to the programming screen without storing
the entered characters.

Содержание AR-FX5

Страница 1: ...s product be sure to read the installation requirements and cautions sections of the Operation manual for printer operation and general information Be sure to keep all operation manuals handy for reference including this manual the Operation manual for printer operation and general information and operation manuals for any optional equipment which has been installed ...

Страница 2: ...t Notice for New Zealand Users General The grant of a Telepermit for any item of terminal equipment indicates only that Telecom has accepted that the item complies with minimum conditions for connection to its network It indicates no endorsement of the product by Telecom nor dose it provide any sort of warranty Above all it provides no assurance that any item will work correctly in all respects wi...

Страница 3: ...ife of the lithium battery is approximately 5 years if the main switch and fax power switch are kept continually off Other information If a thunderstorm occurs we recommend that you unplug the power cord from the power outlet Information will be retained in memory even if the power cord is unplugged INTRODUCTION Thank you for purchasing this product This manual only explains the facsimile function...

Страница 4: ...ION 2 6 RECEIVING FAXES 2 7 RECEIVING A FAX 2 7 CHAPTER 3 USINGCONVENIENTFUNCTIONS1 ADVANCEDTRANSMISSION METHODS Page SENDING THE SAME DOCUMENT TO MULTIPLE DESTINATIONS IN A SINGLE OPERATION BROADCAST TRANSMISSION 3 2 USING BROADCAST TRANSMISSION 3 3 AUTOMATIC TRANSMISSION AT A SPECIFIED TIME TIMER TRANSMISSION 3 4 SETTING UP A TIMER TRANSMISSION 3 4 TRANSMISSION AND RECEPTION USING THE POLLING FU...

Страница 5: ...DITING AND DELETING ONE TOUCH KEYS 6 5 PROGRAMMING A GROUP KEY 6 6 EDITING AND DELETING GROUP KEYS 6 7 STORING A PROGRAM 6 8 EDITING AND DELETING PROGRAMS 6 8 STORING A GROUP INDEX 6 9 Page PROGRAMMING EDITING AND DELETING F CODE MEMORY BOXES 6 10 PROGRAMMING AN F CODE MEMORY BOX 6 10 SETTING FOR F CODE POLLING MEMORY BOXES NUMBER OF TRANSMISSIONS 6 11 SETTINGFORF CODECONFIDENTIALTRANSMISSION MEMO...

Страница 6: ...to take adequate measures WARNING Australian Communications Authority ACA regulations state that no unauthorized changes or modifications to this equipment are permitted Note Complies with the following standards ACA TS001 1997 AS NZS 3260 ACA TS002 1997 NZ TELECOM and AS NZS 3548 These limits are designed to provide reasonable protection against interference in an installation This equipment gene...

Страница 7: ...TER INSTALLATION 1 2 A LOOK AT THE OPERATION PANEL 1 3 FAX MODE CONDITION SETTING SCREEN 1 4 ORIGINALS 1 6 ORIGINALS THAT CAN BE FAXED 1 6 LOADING A DOCUMENT 1 7 USING THE AUTO DOCUMENT FEEDER 1 7 USING THE DOCUMENT GLASS 1 7 CHECKING THE SIZE OF A LOADED ORIGINAL 1 8 MANUALLY SETTING THE SCANNING SIZE 1 8 SELECTING RESOLUTION AND EXPOSURE SETTINGS 1 9 SELECTING THE RESOLUTION 1 9 SELECTING THE EX...

Страница 8: ...nit as a fax machine Please keep the fax power switch turned on at all times Make sure the correct date and time have been set Make sure the correct date and time have been programmed in the unit refer to page 3 8 of Operation manual for printer operation and general information If the date and time are wrong please correct them It is important to set the correct date and time because they are use...

Страница 9: ...ub addresses passcodes and numerical settings One digit is cleared each time you press the key When an original is being scanned this key can also be used to cancel scanning CA key Use to cancel a transmission or programming operation When the key is pressed the operation is canceled and you return to the initial screen next page When sending a fax this key is also used to cancel an image setting ...

Страница 10: ...r one touch dialing or group dialing SUB ADDRESS key page 4 3 Touch this key to enter a sub address or passcode ADDRESS REVIEW key When performing a broadcast transmission touch this key to check your selected destinations Your selected destinations will appear as a list and the list can be edited SPECIAL MODES key Touch this key to select one of the following special functions Timer transmission ...

Страница 11: ...stom settings refer to pages 6 3 and 6 9 Frequently used one touch key destinations can be stored on the FREQUENT USE card for convenient access One touch key display This shows the one touch keys that have been stored on the selected index card The key type is indicated by the icon at the right One touch keys in which a fax number is stored are indicated by a icon The display is initially set to ...

Страница 12: ...8 1 2 x14 B4 1 0 64 1 0 78 11 x17 A3 8 1 2 x11 A4 8 1 2 x11 R A4R 1 0 5 1 0 5 8 1 2 x14 B4 8 1 2 x11 A4 8 1 2 x11 R A4R 1 0 78 1 0 64 A document can also be faxed without reducing its size In this case the left and right edges will not be transmitted Refer to page 8 6 Automatic reduction of faxed document If the size width of the faxed document is greater than the receiving machine s paper size th...

Страница 13: ...ny objects under the original size detector plate Closing the document glass cover with an object underneath may damage the original size detector plate and prevent correct detection of the document size 3 Align the edges of the document pages and then insert the stack in the document feeder so that the first page is face down Insert the stack into the auto document feeder until it stops The stack...

Страница 14: ...outer OK key REDIAL OK OK KER L 8 X11 1 2 You will return to the initial screen Pressing the inner OK key in the step above returns you to step 2 5 The selected size appears in the top half of the ORIGINALkey ORIGINAL STANDARD RESOLUTION 8 X11 1 2 If you loaded a long original If you loaded a long up to 31 5 800mm original in the auto document feeder touch the LONG SIZE key in step 3 above NOTE Wh...

Страница 15: ...g is Standard If desired you can change the initial setting to a different setting using the key operator program Refer to page 8 3 When using the automatic document feeder the resolution setting cannot be changed once scanning has begun Even if you send a document using Fine Super fine or Ultra fine resolution some receiving fax machines may not be able to print the document at the same resolutio...

Страница 16: ... OK OK LIGHT You will return to the initial screen Dark Select this setting if your original consists Original mostly of dark characters Auto This setting automatically adjusts the ex posure for light and dark parts of the origi nal Light Select this setting if your original consists Original mostly of faint characters Exposure settings NOTE When using the document glass to scan pages an original ...

Страница 17: ...ber On hook dialing This feature allows you to dial without lifting an extension phone connected to the machine Press the SPEAKER key listen for the dial tone through the speaker and then dial To speak with another person you must lift the extension phone connected to the machine when they answer Faxes must be sent manually when using on hook dialing Refer to page 5 2 On hook dialing is not possib...

Страница 18: ......

Страница 19: ...s such as sending faxes Page SENDING A FAX 2 2 BASIC PROCEDURE FOR SENDING FAXES 2 2 TRANSMISSION BY AUTO DIALING 2 5 TRANSMITTING A TWO SIDED DOCUMENT 2 5 PRIORITY TRANSMISSION OF A STORED JOB 2 6 CANCELING A FAX TRANSMISSION 2 6 RECEIVING FAXES 2 7 RECEIVING A FAX 2 7 ...

Страница 20: ...key and set the document size Refer to page 1 8 4 If needed adjust the resolution setting Refer to page 1 9 AUTO A4 ORIGINAL STANDARD RESOLUTION 5 If needed adjust the exposure setting Refer to page 1 10 AUTO ORIGINAL AUTO EXPOSURE STANDARD RESOLUTION 6 Dial the fax number The number that you entered appears in the message display If it is not correct press the C key and re enter the number You ca...

Страница 21: ... the job as explained on page 2 6 If the machine makes two beeps during or at the end of transmission and an error message appears in the message display refer to page 7 3 to fix the problem If the power is turned off or a power failure occurs while a document is being scanned in the auto document feeder the machine will stop and a document jam will occur After power is restored remove the documen...

Страница 22: ...y scanned by touching the SEND key The page that was being scanned when the memory became full will be cleared from memory If the memory becomes full while scanning the first page of a document the transmission job is automatically canceled The number of jobs that can be stored will depend on the number of pages in each job and the transmission conditions The number of storable jobs will increase ...

Страница 23: ...ing one touch dialing or group dialing instead of entering a full fax number with the numeric keys follow the steps below To use an auto dial destination you must first program the full fax number and name of the destination Refer to page 1 11 for information on auto dialing and pages 6 3 6 6 for information on programming auto dial destinations 1 Perform steps 1 through 5 of Basic Procedure for S...

Страница 24: ...ve an urgent transmission job and multiple transmission jobs have already been stored you can give priority to the urgent job so that it will be transmitted immediately after the job currently being executed This is done from the job status screen For details on using the job status screen refer to page 1 14 of Operation manual for printer operation and general information 1 Press the JOB STATUS k...

Страница 25: ...to talk with the other person If received data cannot be printed If the machine runs out of paper or toner or a paper jam occurs print and copy jobs that are in progress will be held in memory until printing becomes possible The jobs are automatically printed when printing capability is restored When received data is held in memory the DATA light next to the IMAGE SEND key blinks You can also use ...

Страница 26: ......

Страница 27: ...3 2 USING BROADCAST TRANSMISSION 3 3 AUTOMATIC TRANSMISSION AT A SPECIFIED TIME TIMER TRANSMISSION 3 4 SETTING UP A TIMER TRANSMISSION 3 4 TRANSMISSION AND RECEPTION USING THE POLLING FUNCTION 3 5 USING THE POLLING FUNCTION 3 6 USING POLLING MEMORY 3 7 OWN NUMBER SENDING 3 9 FAXING A DIVIDED ORIGINAL DUAL PAGE SCAN 3 10 PROGRAMMING FREQUENTLY USED OPERATIONS 3 11 USING A PROGRAM 3 11 TRANSFERRING ...

Страница 28: ...ents to the same group of destinations it is convenient to program those destinations into a group key A group key is a one touch key in which multiple destinations are programmed The procedure for programming group keys is explained on page 6 6 When using a group key to send a fax the destinations programmed in the group key are counted as broadcasting destinations For example if five destination...

Страница 29: ... when successively dialing fax numbers with the numeric keys Example XXXX NEXT ADDRESS XXXX Dial Dial Cannot be omitted XXXX NEXT ADDRESS One touch NEXT ADDRESS One touch Dial Can be omitted Can be omitted If desired you can use the key operator program to set the machine so that the NEXT ADDRESS key must always be pressed refer to page 8 3 4 Touch the ADDRESS REVIEW key to display the list of des...

Страница 30: ... day of the week Touch the key or the key until the desired day is selected DAY OF THE WEEK IMER The initial setting is no selection If you select this setting the transmission will be performed as soon as the specified time arrives SETTING UP A TIMER TRANSMISSION 4 Select the time Touch the key or the key until the desired time appears 30 CANCEL TIME HH mm Select the time in 24 hour format Exampl...

Страница 31: ...ion allows your machine to call a sending machine and initiate reception of a document loaded in that machine A timer setting can also be established to have the operation take place at night or another specified time refer to the previous page The other machine Document data previously scanned into memory Your machine Polling ask other machine to send document Document data is automatically sent ...

Страница 32: ...en performing serial polling an auto dial key that includes a sub address or passcode page 4 2 cannot be selected 4 When you have finished entering the destination s press the START key JOB STORED appears in the screen Your machine prints the document after receiving it from the sending machine Manual polling A document should not be loaded in the machine when the following operation is performed ...

Страница 33: ... and then the MEMORY BOX key MEMORY BOX OK SUB ADDRESS ADDRESS REVI SPECIAL MODES To cancel the operation touch the CA key 3 Touch the DATA STORE key POLLIN DATA STORE PRINT 4 Touch the PUBLIC BOX key PUBLIC BOX This specifies that the document will be scanned into the Public Box 5 Set the original size resolution exposure and other scanning conditions as needed 6 Press the START key The document ...

Страница 34: ...blic Box an icon will appear to the right of the PUBLIC BOX key To check the stored data you can print it out 1 Touch the SPECIAL MODES key in fax mode and then touch the MEMORY BOX key MEMORY BOX OK SUB ADDRESS ADDRESS REVI SPECIAL MODES 2 Touch the PRINT DATA key POLLING MEMORY ORE PRINT DATA 3 Touch the PUBLIC BOX key PUBLIC BOX Touching the CANCEL key will return you to the screen of step 2 4 ...

Страница 35: ...transmission If desired you can use the key operator program to omit the page number refer to page 8 6 Position of sender s information The key operator program can be used to select whether the sender s information is added outside the original data or inside the data page 8 7 The initial factory setting is outside the data Outside scanned data Inside scanned data None of the transmitted image is...

Страница 36: ...RESS REVI SPECIAL MODES 2 Touch the OK key OK REDIAL AKER You will return to the initial screen 3 Place the original on the document glass page 1 7 and perform the transmission operation If you have more originals to scan after pressing the Start key and scanning the first original change originals and repeat scanning until all originals have been scanned When finished press the READ END key that ...

Страница 37: ...ax number Polling Dual Page Scan Resolution and exposure Auto dial keys one touch or group keys are used to store the destination fax number A full number cannot be entered using the numeric keys When storing a broadcast transmission or serial polling operation in a program up to 300 destination fax numbers can be stored USING A PROGRAM 1 In fax mode load the document page 1 7 Do not load a docume...

Страница 38: ...emory box page 4 6 cannot be transferred The result of transfer is indicated on an activity report page 7 3 USING THE TRANSFER FUNCTION Program the fax number of the transfer destination Use the key operator program to program the number of the transfer destination page 8 8 Only one fax number can be programmed The transfer function cannot be used unless a number is programmed Transferring receive...

Страница 39: ...t to you Page TRANSMISSION BETWEEN MACHINES SUPPORTING F CODES 4 2 MEMORY BOXES AND SUB ADDRESSES PASSCODES REQUIRED FOR F CODE TRANSMISSION 4 2 ENTERING A SUB ADDRESS AND PASSCODE FOR A MEMORY BOX IN THE OTHER MACHINE 4 3 CREATING A MEMORY BOX FOR F CODE TRANSMISSION 4 3 F CODE POLLING MEMORY 4 4 USING F CODE POLLING MEMORY 4 4 PROCEDURE FOR F CODE POLLING 4 5 F CODE CONFIDENTIAL TRANSMISSION 4 6...

Страница 40: ... MEMORY Sub address location in memory Select any number up to 20 digits Box name used to manage boxes in your machine Select a name of up to 18 characters Passcode key Select any number up to 20 digits Not required 1115 Product Planning Dept The Public Box is used for normal serial polling page 3 5 When communication occurs involving a memory box the communication will only take place if the sub ...

Страница 41: ...sub address and passcode have been programmed into the one touch key the following steps are not needed 2 Touch the SUB ADDRESS key CONDITION SETTINGS SUB ADDRESS ADDRESS REVIEW A slash appears at the end of the fax number If you make a mistake press the C key to clear the mistake 3 Use the numeric keys to enter the sub address of the other machine s memory box max 20 digits If you make a mistake ...

Страница 42: ...as a passcode for F code polling memory The sub address and passcode of the polling memory box are always used for polling security The receiving machine bears the expense phone charges of the transmission USING F CODE POLLING MEMORY In order for another machine to retrieve a document from your machine you must first scan the document into the F code polling memory box You can check scanned docume...

Страница 43: ... passcode PWD of the other machine s F code polling memory box Serial polling selecting multiple fax machines to be polled using a group key or by touching the NEXT ADDRESS key is not possible with F code polling 1 In fax mode touch the SPECIAL MODES key and then the POLLING key POLLING PROGRAM DUAL PAGE SCAN SUB ADDRESS ADDRESS REVI SPECIAL MODES The POLLING key is highlighted and the polling ico...

Страница 44: ...al transmission NOTES This machine does not support Sharp s previous confidential transmission function which uses the programmed sender s fax number and ID code Refer to pages 6 10 through 6 13 for the procedures for creating editing and deleting F code confidential memory boxes Take care not to forget the print PIN programmed in the F code confidential memory box If you forget the passcode consu...

Страница 45: ... SPECIAL MODES The memory box menu appears To cancel the operation press the CANCEL key 2 Touch the PRINT DATA key CONFIDENTIAL RECEPTION DATA PRINT DATA 3 Touch the memory box key that has the document data you wish to print MEMORY BOX CONFIDENTIAL RECEPTION SLA SCANNER TEAM MARKETING GROUP SELECT MEMORY BOX A mark appears to the right of memory boxes that have received document data A memory box...

Страница 46: ... the document is called the relay request machine and the machine that has a memory box containing the end receiving machines and which relays the received document to those machines is called the relay machine The relay machine also prints the document sent by the relay request machine For example corporate headquarters in Seattle wants to send the same document to branch offices in San Francisco...

Страница 47: ...ving machines are programmed using auto dial keys one touch keys or group keys If you need to program an end receiving machine that has not been programmed in a one touch key program the number in a one touch key first and then create the memory box USING THE F CODE RELAY REQUEST FUNCTION your machine requests a relay broadcast First ask the operator of the other F code machine to create an F code...

Страница 48: ......

Страница 49: ...cument as well as features that expand the range of use of the fax machine such as connecting an extension phone Page CONNECTING AN EXTENSION PHONE 5 2 CONNECTING AN EXTENSION PHONE 5 2 SENDING A FAX AFTER TALKING ON THE PHONE MANUAL TRANSMISSION 5 2 USING AN EXTENSION PHONE TO RECEIVE A FAX 5 3 RECEIVING A FAX AFTER TALKING MANUAL RECEPTION 5 4 ...

Страница 50: ...y send one page by manual transmission 2 Lift the extension phone Or you can press the SPEAKER key page 1 11 3 Dial the number of the other party or touch a one touch key CORPO TPS SHARP CORPORATION You can also dial using the keypad on the extension phone You cannot use a group key or a one touch key that includes a sub address and passcode 4 Speak to the other party when they answer If you used ...

Страница 51: ...ax transmission NOTES The reception mode is initially set to AUTO If you have not connected an extension phone keep the reception mode set to AUTO If you hear beeps during reception or at the end of reception and an error message appears in the display refer to page 7 3 Changing the reception mode to MANUAL 1 Press the CUSTOM SETTINGS key 2 Touch the RECEIVE MODE key LIST PRINT RECEIVE MODE 3 Touc...

Страница 52: ... activate fax reception from the extension phone This is called remote reception After speaking or when you hear a fax tone through the extension phone perform the following procedure with the extension phone still lifted NOTE The following procedure is not possible if you are on a pulse dial line and your extension phone cannot produce tone signals To find out whether your extension phone can pro...

Страница 53: ...MMING A GROUP KEY 6 6 EDITING AND DELETING GROUP KEYS 6 7 STORING A PROGRAM 6 8 EDITING AND DELETING PROGRAMS 6 8 STORING A GROUP INDEX 6 9 PROGRAMMING EDITING AND DELETING F CODE MEMORY BOXES 6 10 PROGRAMMING AN F CODE MEMORY BOX 6 10 SETTING FOR F CODE POLLING MEMORY BOXES NUMBER OF TRANSMISSIONS 6 11 SETTING FOR F CODE CONFIDENTIAL TRANSMISSION MEMORY BOXES PRINT PIN 6 12 SETTING FOR F CODE REL...

Страница 54: ...ROL key KEY OPERATOR PRO ADDRESS CONTROL REC 3 Touch the DIRECT ADDRESS PROGRAM key DIRECT ADDRESS PROGRAM CUSTOM INDEX The DIRECT ADDRESS PROGRAM menu appears 4 Touch the desired key and perform the programming operation Refer to the pages indicated below for the operation you wish to perform CUSTOM SETTINGS DIRECT ADDRESS PROGRAM INDIVIDUAL GROUP STORE OK PROGRAM AMEND DELETE INDIVIDUAL key Stor...

Страница 55: ...ne touch key in the FREQUENT USE index If you touch the wrong key simply touch the correct key 7 Touch the OK key 8 Touch the FAX No key P CORPORATION FAX No MODE The fax number entry screen appears 9 Use the numeric keys to enter the fax number To insert a pause between digits of the number touch the PAUSE key The pause appears as a hyphen Refer to page 8 4 to set the duration of the pause If you...

Страница 56: ...e 6 15 for the procedure for entering characters 14Check the transmission settings The initial transmission settings are TRANSMISSION SPEED 33 6 kbps and INTERNATIONAL CORRESPONDENCE MODE NONE To change either of the settings touch the MODE key S INITIAL 0666211221 3456 987654 AX No 33 6 kbps NONE MODE If you do not wish to change the settings this step is not necessary After touching the MODE key...

Страница 57: ...d then change or delete the key STORING EDITING AND DELETING AUTO DIAL KEYS AND PROGRAMS 1 Touch the AMEND DELETE key AMEND DELETE 2 Touch the one touch key you wish to edit or delete DIRECT ADDRESS AMEND DELETE SELECT ADDRESS TO AMEND DELETE EXIT SHARP CORPORATION FREQUENT USE ABCD EFGHI JKLMN OPQRST UVWXYZ ABC GROUP CORPO TPS SHARP GROUP SHARP DIGITAL DOCU SLA SCANNER TEAM CLIFF QUIROGA DANIEL E...

Страница 58: ...not programmed in a one touch key first program the destination in a one touch key and then store it in the group key STORING EDITING AND DELETING AUTO DIAL KEYS AND PROGRAMS 4 To check the destinations that you have stored in the group touch the ADDRESS REVIEW key OPQRST UVWXYZ ABC GROUP ADDRESS REVIEW A list of your selected destinations is displayed You can delete a displayed destination by tou...

Страница 59: ...END DELETE SELECT ADDRESS TO AMEND DELETE EXIT SHARP CORPORATION FREQUENT USE ABCD EFGHI JKLMN OPQRST UVWXYZ ABC GROUP CORPO TPS SHARP GROUP SHARP DIGITAL DOCU SLA SCANNER TEAM CLIFF QUIROGA DANIEL ERNY CHARLER WATTS PROGRAM To edit a group key follow steps 3 and 4 To delete a group key follow steps 5 and 6 When you have finished editing or deleting touch the EXIT key 3 Touch the key of the item y...

Страница 60: ...E You can store up to 300 destinations in a program however you cannot directly enter fax numbers with the numeric keys A destination must be programmed in an auto dial key one touch key or group key before it can be stored in a program 4 Touch the OK key 5 Your settings are displayed Make sure they are correct PROGRAM PROGRAM NAME SETTINGS ADDRESS 2 ADDRESSES HALF TONE SUPER FINE DARK ORIGINAL RE...

Страница 61: ...OM SETTINGS key and then touch the ADDRESS CONTROL key refer to steps 1 and 2 on page 6 2 2 Touch the CUSTOM INDEX key DIRECT ADDRESS PROGRAM CUSTOM INDEX 3 Touch an index key USER 1 to USER 6 You can enter a name for the selected index CUSTOM SETTINGS CUSTOM INDEX SELECT THE KEY TO BE CUSTOM NAMED OK USER 1 USER 2 USER 3 USER 4 USER 5 USER 6 When touched the letter entry screen appears 4 Enter a ...

Страница 62: ...S PASS CODE VIA THE 10 KEY PAD THEN PARESS OK 214341434 PASS CODE SUB ADDRESS PASS CODE The characters and cannot be used in a sub address If you enter an incorrect digit press the C key and re enter the correct digit If you do not wish to enter a passcode proceed to step 9 7 To set a passcode touch the PASS CODE key OK CANCEL THE 10 KEY PAD THEN PRESS OK PASS CODE A slash appears after the sub ad...

Страница 63: ...pages F code polling memory this page F code confidential transmission next page F code relay broadcast transmission page 6 13 SETTING FOR F CODE POLLING MEMORY BOXES NUMBER OFTRANSMISSIONS You can select whether to have document data that was scanned into an F code polling memory box automatically cleared after one transmission or to leave the document data in the box and allow an unlimited numbe...

Страница 64: ...orget the passcode consult your Sharp dealer 1 Touch the PRINT PIN key SUB ADDRESS BOX NAME FAX INFORMATION 55112233 481221 PRINT PIN 2 Use the numeric keys to enter a 4 digit number F CODE MEMORY BOX CONFIDENTIAL PRINT PIN ENTER THE PRINT PIN VIA THE 10 KEY PAD THEN PRESS OK No 003 EXIT OK CANCEL NEXT If you make a mistake press the C key All digits will be cleared so you will need to re enter th...

Страница 65: ...XES EDITING AND DELETING A MEMORY BOX 1 Press the CUSTOM SETTINGS key and then touch the ADDRESS CONTROL key refer to steps 1 and 2 on page 6 2 2 Touch the F CODE MEMORY BOX key 3 Touch a memory box key POLLING MEMORY CONFIDENTIAL or RELAY BROADCAST on the bottom line AMEND DELETE 4 Touch the memory box key that you wish to edit or delete MEMORY BOX AMEND DELETE SELECT MEMORY BOX TO AMEND DELETE P...

Страница 66: ...VIDUAL LIST GROUP LIST PROGRAM LIST MEMORY BOX LIST PROCESSING PRINT DATA appears in the message display and printing begins To cancel printing touch the CANCEL key NOTES The list is printed before other print jobs are printed If you attempt to print a list when no data exists a warning message will appear PRINTING PROGRAMMED INFORMATION You can print out lists of the one touch keys group keys pro...

Страница 67: ...o enter or edit characters in setting screens such as auto dial key programming screens follow the steps below Characters that can be entered are alphabetical characters special characters numbers and symbols 5 Touch the ÃÄÂ ãäâ key Sharp 6 Touch the ä key Sharp To switch between upper case and lower case touch the ÃÄÂ ãäâ key When ãäâ is highlighted lower case letters are entered 7 Touch the ÃÄÂ ...

Страница 68: ...can continue touching keys to enter characters You can also touch another character type selection key ÃÄÂ ãäâ key or AB ab 12 key to enter characters other than numbers and symbols 3 When you have finished entering characters touch the OK key 1 1 You will exit the character entry screen and return to the programming screen If you touch the CANCEL key you will return to the programming screen with...

Страница 69: ...ou make efficient use of the fax features of the machine including solutions to common problems Page WHEN A TRANSACTION REPORT IS PRINTED 7 2 VIEWING THE COMMUNICATION ACTIVITY REPORT 7 3 WHEN AN ALARM SOUNDS AND A WARNING MESSAGE IS DISPLAYED 7 3 PROBLEMS AND SOLUTIONS 7 4 ...

Страница 70: ...A power failure occurred during the transaction MEMORY OVER The memory became full during quick on line transmission MEM FULL The memory became full during reception LENGTH OVER The transmitted document was over 59 long and therefore could not be received ORIGINAL ERROR Manual transmission was not successful because a jam occurred PASS NG The connection was broken because the polling passcode was ...

Страница 71: ...bs have been completed Close the indicated cover Turn off the power and then turn it back on If the same message still appears contact your dealer Page Printer manual 1 16 Printer manual 1 25 1 7 2 4 2 4 1 5 7 2 7 2 7 3 and 7 4 Message screen Alarm OPEN TRAY x AND ADD xxxxxxxx PAPER THE LINE WAS BUSY FAX TRANSMISSION WAS SUSPENDED PLEASE RETURN xx ORIGINALS TO THE DOCUMENT FEEDER THEN PRESS START ...

Страница 72: ...s Turn the main switch on Press the IMAGE SEND key to set the machine to fax mode Check with the operator of the receiving machine Check the transmittable sizes Make sure the original is placed so that the correct side is scanned Check with the operator of the other machine Try the transmission again Check the resolution and exposure settings Set the clock to the correct time Restore printing capa...

Страница 73: ... operator programs used by key operators Key operators should read this chapter well to ensure correct use of the programs Page KEY OPERATOR PROGRAMS 8 2 KEY OPERATOR PROGRAM LIST 8 2 USING THE KEY OPERATOR PROGRAMS 8 2 SETTING PROGRAMS 8 3 PRINTING OUT SETTINGS 8 10 ...

Страница 74: ...f direct address keys displayed setting 8 3 Must input next address key at broadcast setting 8 3 Initial resolution setting 8 3 Scan complete sound setting 8 3 Fax default settings Own number and name set 8 4 Auto wake up print 8 4 Pause time setting 8 4 Speaker volume setting 8 4 Original print on send error report 8 5 Remote reception number setting 8 5 Transaction report print select setting 8 ...

Страница 75: ...ear when the number of one touch keys displayed is set to 12 Must input next address key at broadcast setting YoucanselectwhethertheNEXTADDRESSkeymust be pressed before entering the next destination when performing a broadcast transmission page 3 2 NormallythemachineissetsothattouchingtheNEXT ADDRESS key can be omitted except when the numeric keys are used to enter one full fax number after anothe...

Страница 76: ...Up to 20 characters can be entered for the name Refer to page 6 15 for the procedure for entering characters 2 Touch the FAX No key and enter the fax number Enter up to 20 digits for the number using the numeric keys To enter a press the key To enter a space press the SPACE key If you make a mistake press the C key and re enter the correct digit 3 Touch the OK key YouwillreturntotheOWNNUMBERANDNAM...

Страница 77: ...RINTOUTNOTICEPAGE PRINT OUT ERROR REPORT ONLY NOT PRINT OUT NOTICE PAGE NOPRINTEDREPORT The normal settings are indicated by shading above Activity report print select setting You can select whether to have the activity report automatically printed out after 50 transactions both transmissions and receptions have been recorded or specify a time that the report is to be automatically printed out onc...

Страница 78: ...1 R A4R or rotate a 5 1 2 x8 1 2 R B5R or A5R document to 5 1 2 x8 1 2 B5 or A5 The setting is normally turned on and documents are rotated counterclockwise 8 1 2 x11 R A4R documents are not rotated KEY OPERATOR PROGRAMS ROTATION SENDING SETTING ORIGINAL SET SENDING DIRECTION OK A4R A4 A5R A5 B5R B5 Rotation settings can be separately established for different document sizes To turn off a rotation...

Страница 79: ... the call To set the machine to automatically re attempt the call touch the box so a checkmark appears and then adjust the times of recall setting and the interval of recall setting below Note that in Canada Australia and New Zealand only one re attempt is made the number of re attempts cannot be selected NOTE Even if this setting is turned on your machine will not re attempt the call when a docum...

Страница 80: ... is used to select the output tray for received faxes The trays that can be selected will vary depending on what peripheral devices have been installed KEY OPERATOR PROGRAMS Fax receive settings The fax reception settings allow you to adjust certain parameters for receiving faxes to better suit your needs Settings that can be adjusted depend on the peripheral devices installed The fax receive sett...

Страница 81: ...ling memory this setting is used to select whether any machine will be allowed to poll your machine or only machines that have been programmed in your machine Polling security is normally turned on a checkmark appears in the box To allow any machine to poll your machine touch the box to remove the checkmark Passcode number setting When the polling security setting is turned on use this setting to ...

Страница 82: ...CTIVITY REPORT SENDER LIST ALL KEY OPERATOR PROGRAMS LIST PROCESSING PRINT DATA appears in the message screen and printing begins To cancel printing touch the CANCEL key NOTES The list is printed before other jobs waiting to be printed In the screen of Step 4 you can touch the SENDER LIST key to print the Sender List This allows you to check the name and fax number you programmed in Own number and...

Страница 83: ...9 1 CHAPTER 9 APPENDIX This chapter contains reference information regarding the fax features of the machine Page SPECIFICATIONS 9 2 ...

Страница 84: ... A3 to A5 5 1 2 x8 1 2 or A5 Vertically oriented feeding Maximum length 31 1 2 or 800mm using DSPF Refer to pages 2 4 for transmission of 5 1 2 x8 1 2 A5 size documents Effective scanning width 11 7 297mm maximum Halftone transmission Yes 256 levels Contrast adjustment Automatic dark and light by manual adjustment Extension telephone connection Possible 1 telephone Auto dialing Combined total of 5...

Страница 85: ...9 3 9 NOTE ...

Страница 86: ...9 4 NOTE ...

Страница 87: ......

Страница 88: ...Operation manual for facsimile PRINTED IN CHINA 2002G KS1 TINSE2305FCZZ SHARP CORPORATION ...

Отзывы: