background image

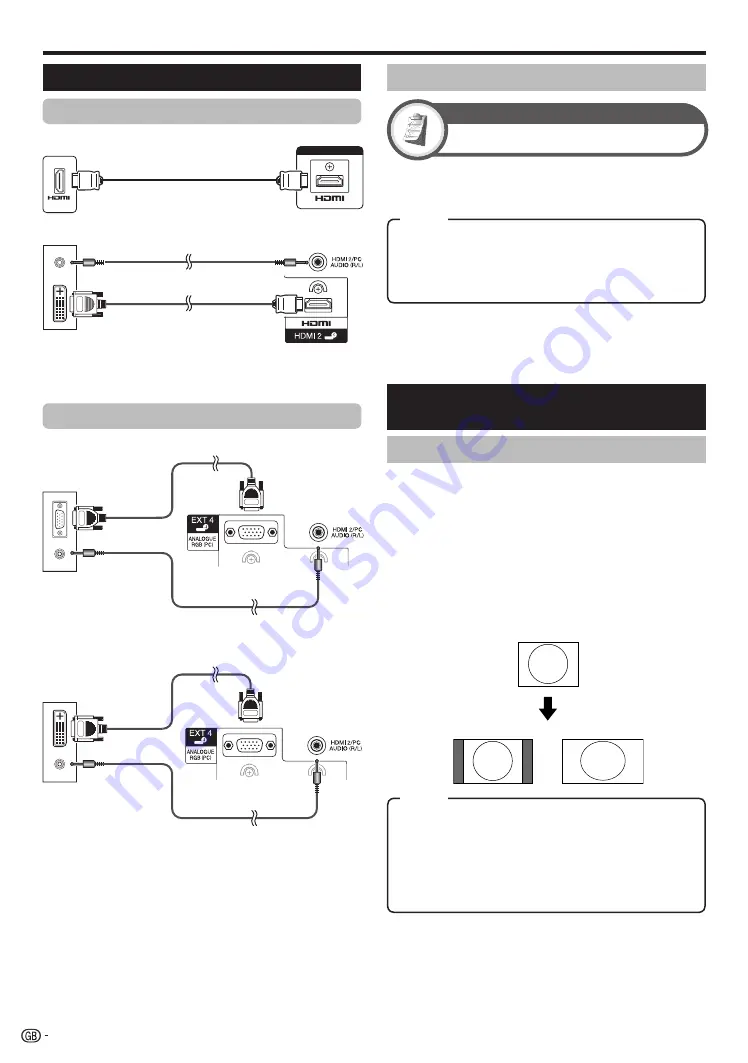
Connecting a PC

When using the EXT4 terminal, you must select “EXT4 (RGB)” in the 
“PC Audio Select” menu (Refer to the right column for details).

NOTE

The PC input terminals are DDC1/2B-compatible.
Refer to page 39 for a list of PC signals compatible with the TV.
A Macintosh adaptor may be required for use with some Macintosh 
computers.
When connecting to a PC, the input signal type is automatically 
detected except 1,024 

768 and 1,360 

768 signals.

*


Analogue Connection

NOTE

Refer to page 30 for AV signals (See below).
HDMI: 480i/480p/576i/576p/720p/1080i/1080p
ANALOGUE RGB: 576p/720p (50Hz)/1080i
The ANALOGUE RGB terminal (PC) (EXT4) is not 
compatible with 480i/576i/1080p signals.

Connecting a PC

HDMI Connection

Displaying a PC image on the 
screen

Selecting the picture size

You can select the picture size.

Press 

f

.

The “WIDE MODE” menu displays.

Press 

f

 or 

a

/

b

 to select a desired item on the 

menu.

NOTE

Connect the PC before making adjustments.
Selectable picture size may vary with input signal type.

EXAMPLE

1

2


Full:

 An image fully fills the screen.

Cinema:

 For letterbox pictures. Bars may appear on the 

top and bottom with some programmes.

Normal:

 Keeps the original aspect ratio in a full screen 

display.

Dot by Dot:

 Displays an image with the same number of 

pixels on the screen.

When using the HDMI2 terminal, you must select the proper item in 
the “PC Audio Select” menu depending on the type of HDMI cable 
connected (Refer to the right column for details).

*

Setting audio input

PC Audio Select

Option

When using the EXT4 terminal or HDMI2 terminal, you must 
select which terminal uses the AUDIO (R/L) jack for analogue 
audio input.

HDMI2:

 When connecting devices (including a PC) with DVI/HDMI 

cable to the HDMI2 terminal and inputting analogue audio 
signals from the AUDIO (R/L) jack.

EXT4 (RGB):

 When connecting a PC to the EXT4 terminal, and 

inputting analogue audio signals from the AUDIO (R/L) jack.

Item

NOTE

You must set this to “EXT4 (RGB)” when connecting 
devices (including a PC) with an HDMI-certified cable to the 
HDMI2 terminal. If “HDMI2” is set, there will be no sound 
output.

 36

ø 3.5 mm stereo minijack cable

HDMI1, 2* or 3

HDMI-certified cable

PC

HDMI2*

DVI/HDMI cable

RGB cable

ø 3.5 mm stereo minijack cable

ø 3.5 mm stereo minijack cable

DVI/RGB conversion cable

Normal

Full

Item

PC

EXT4*

PC

EXT4*

PC

Содержание Aquos LC-46DH65E

Страница 1: ...LC 52DH65S OPERATION MANUAL BEDIENUNGSANLEITUNG MODE D EMPLOI MANUALE DI ISTRUZIONI GEBRUIKSAANWIJZING MANUAL DE MANEJO MANUAL DE OPERAÇÃO D808WJZZ 1 OPERATION MANUAL BEDIENUNGSANLEITUNG MODE D EMPLOI MANUALE DI ISTRUZIONI GEBRUIKSAANWIJZING MANUAL DE MANEJO MANUAL DE OPERAÇÃO ENGLISH DEUTSCH FRANÇAIS ITALIANO NEDERLANDS ESPAÑOL TINS D808WJZZ 08P09 SP NG PIN SHARP ELECTRÓNICA ESPAÑA S A Polígono I...

Страница 2: ...r no circumstances should the cut off plug be inserted elsewhere into a 13A socket outlet as a serious electric shock may occur To fit an appropriate plug to the mains lead follow the instructions below IMPORTANT The wires in the mains lead are coloured in accordance with the following code Blue Neutral Brown Live As the colours of the wires in the mains lead of this product may not correspond wit...

Страница 3: ...sword Parental lock settings 29 Language Settings language subtitle multi audio 29 Useful Viewing functions 30 Selecting the picture size 30 Selecting the WSS Wide Screen Signalling picture size automatically 30 Selecting the WSS Wide Screen Signalling picture size manually 30 Selecting the picture size manually 30 Selecting the recording picture size manually 31 Selecting the HDMI picture size au...

Страница 4: ... product away from heat sources such as radiators heaters stoves and other heat generating products including amplifiers To prevent fire never place any type of candle or naked flames on the top or near the TV set To prevent fire or shock hazard do not place the AC cord under the TV set or other heavy items Do not display a still picture for a long time as this could cause an afterimage to remain ...

Страница 5: ...MODE Select a video setting Page 25 1 2 3 4 5 6 7 8 9 0 Q END Exit the MENU screen R G Y B Colour buttons The coloured buttons are correspondingly used to select the coloured items on the screen e g EPG MHEG 5 Teletext b INPUT SOURCE Select an input source Page 10 EPG DTV Display the EPG screen Pages 11 13 RADIO DTV Switch between Radio and Data mode When only data broadcasting no radio broadcasti...

Страница 6: ...ACE slot EXT8 terminals HDMI3 HDMI terminal USB terminal Headphones AC INPUT terminal 7 8 9 10 11 12 13 14 15 16 WARNING Excessive sound pressure from earphones and headphones can cause hearing loss 4 OPC sensor Remote control sensor OPC indicator B Standby On indicator MENU button a Power button ik l Volume buttons Pr s Programme channel buttons b INPUT SOURCE button The HDMI2 and EXT4 terminals ...

Страница 7: ...s in reverse order Supplied accessories Attaching the stand unit Before attaching or detaching the stand unplug the AC cord from the AC INPUT terminal Before performing work spread cushioning over the surface on which you will be laying the TV This will prevent it from being damaged CAUTION Attach the stand in the correct direction Be sure to follow the instructions Incorrect installation of the s...

Страница 8: ...the remote control unit for an extended period of time remove the batteries from it When replacing the batteries use alkaline batteries instead of zinc carbon ones Note on disposing batteries The batteries provided contain no harmful materials such as cadmium lead or mercury Regulations concerning used batteries stipulate that batteries may no longer be thrown out with the household rubbish Deposi...

Страница 9: ...ng a on the TV Page 10 Run the initial auto installation Page 9 Language setting English Italiano Svenska Home Store setting STORE HOME Country setting Austria A B G Finland FIN B G Greece GR B G Channel search setting Analogue Search Digital Search n o Congratulations Now you can watch TV If necessary adjust the antenna to attain maximum signal reception Page 9 n o 7 Preparation Power on and run ...

Страница 10: ...ask qualified service personnel about using an optional bracket to mount the TV to a wall To use this TV mounted on a wall first remove the adhesive tape at the two locations on the rear of the TV and then use the screws supplied with the wall mount bracket to secure the bracket to the rear of the TV When you mount the TV on a wall you should attach the supporting post When using wall mount bracke...

Страница 11: ...and 28 1 2 3 4 5 The TV searches for sorts and stores all the receivable TV stations according to their settings and the connected antenna To abort the initial auto installation in progress press 6 NOTE If you turn off the power on the TV after performing step 5 the initial auto installation wizard does not appear The auto installation function allows you to execute the installation again from the...

Страница 12: ...al broadcasts E Daily operation Switching on off Turning on off the power Press a on the TV Switch it off by pressing a on the TV Standby mode To standby mode If the TV is switched on you can switch it to standby by pressing B on the remote control unit Switching on from standby From standby press B on the remote control unit TV indicator status B indicator Status Off Power off Green Power on Red ...

Страница 13: ...e EPG data must be automatically captured while the TV is in standby mode After setting to Yes it may take some time to turn off the power using the remote control unit due to the process of the data capture NOTE If the TV main power is switched off the EPG data will not be captured Display Range Setup The Display Range Setup allows you to select three types of time spans for display on the screen...

Страница 14: ... 6 PM 6 PM 0 AM Today Press a b to select the desired programme and then press OK NOTE When you select a programme outside of the current time span the timer setting screen is displayed Page 13 5 1 2 3 Select a programme Select the time span Press c d to select the time span you want to search Continue to press d to display programmes in the next time span Select the desired programme Press a b to...

Страница 15: ...rogramme is marked with an icon NOTE Refer to pages 15 17 and 20 21 for connecting external devices 3 Cancelling the timer recording Press EPG Press a b c d to select the programme on timer setup and then press OK Press c d to select Cancel and then press OK Press c d to select Yes and then press OK Cancelling using the B button on the remote control unit Press EPG Press B to display the timer rec...

Страница 16: ...n encoded letting you experience DTV interactively When provided the MHEG 5 application will start when you press m Sample MHEG 5 screen Watching TV Teletext What is Teletext Teletext broadcasts pages of information and entertainment to specially equipped TV Your TV receives teletext signals broadcast by a TV network and decodes them into graphical format for viewing News weather and sports inform...

Страница 17: ...he connected device Refer to page 36 for connecting a PC to the TV Introduction to connections The TV is equipped with the terminals as shown below Find the cable corresponding the TV s terminal and connect the device NOTE The cables illustrated in pages 15 18 are commercially available items E 15 Audio device Page 18 Video recording device Pages 16 and 17 Game console or camcorder Page 16 HDMI ce...

Страница 18: ...t possible format for the picture will be detected and set automatically Supported video signal 576i 576p 480i 480p 1080i 720p 1080p See page 39 for PC signal compatibility Component connection You will enjoy accurate colour reproduction and high quality images through the EXT3 terminal when connecting a DVD player recorder or other device Y PB CB L R PR CR COMPONENT AUDIO VIDEO connection You can...

Страница 19: ... VCR has the WYSIWYR button you can automatically start recording by pressing the WYSIWYR button Preset Download Automatically transfers the channel preset information from the tuner on the TV to the one on the connected audiovisual equipment e g VCR via the EXT2 terminal NOTE Refer to the operation manuals of external equipment for details The AV Link function works only when audiovisual equipmen...

Страница 20: ... Option Digital Audio Output select PCM or Dolby Digital NOTE LC 46D65E LC 52D65E When you set this to Dolby Digital and you receive the Dolby Digital audio format Dolby Digital audio is output Otherwise PCM audio is output When you set this to PCM PCM audio is output no matter what audio formats you receive LC 46DH65E LC 46DH65S LC 52DH65E LC 52DH65S When you set this to Dolby Digital and you rec...

Страница 21: ...t Carefully insert the CI Module in the CI slot with the contact side forward The logo on the CI Module must be facing outward from the rear of the TV Do not use excessive force Make sure the module is not bent in the process 1 2 Checking CI Module information NOTE Make sure that the CI Module is properly inserted This menu is only available for digital stations Press MENU and the MENU screen disp...

Страница 22: ...Multiple control of HDMI devices You can select which HDMI device to operate using the OPTION button NOTE When you use AQUOS LINK make sure to use a certified HDMI cable Point the remote control unit toward the TV not to the connected HDMI device Video noise may occur depending on the type of HDMI cable used Make sure to use a certified HDMI cable Up to three HDMI recording devices one AV amplifie...

Страница 23: ...up Selecting Recorder Here you can select a recorder for the recording from several connected recorders Repeat steps 1 to 3 in AQUOS LINK Control Press a b to select Selecting Recorder and then press OK Select the recorder and then press OK NOTE If you have connected the AQUOS AUDIO speaker system between the TV and an AQUOS Recorder the external source s indication changes e g from HDMI1 to HDMI1...

Страница 24: ...source switches and the recorder s EPG is displayed Select the programme to record Refer to the operation manual of the recorder for details 1 2 1 2 3 1 2 3 1 2 1 2 3 Operating an AQUOS LINK device AQUOS LINK allows you to operate the HDMI connected device with a single remote control unit Open the remote control unit s flip cover Press PLAY I to start playback of a title See the right column sect...

Страница 25: ...operations Operation without a remote control unit This function is useful when there is no remote control unit within your reach Press MENU and the MENU screen displays Press Pr s instead of a b or ik l instead of c d to select the item Press b to complete the setting NOTE The MENU screen will disappear if left unattended for several seconds 1 2 3 About the Guide Display The Guide Display at the ...

Страница 26: ...eates each still film frame for high definition picture quality Active Contrast Automatically adjusts the contrast of an image according to the scene DNR DNR Digital Noise Reduction produces a clearer image Off High Middle Low 3D Y C Provides high quality images with minimal dot crawl and cross colour noise by detecting changes in the image Off The brightness is fixed at the value set in Backlight...

Страница 27: ...s to choose from to best match the system environment which can vary due to factors like room brightness type of programme watched or the type of image input from external equipment Press AV MODE Each time you press AV MODE the mode changes You can also switch the mode on the Picture and Audio menu screen by pressing AV MODE 1 2 Audio Settings Audio Balance Treble Surround Reset 0 0 15 L 15 R Off ...

Страница 28: ... enters standby mode NOTE Select Off to cancel the sleep timer When the time has been set countdown automatically starts Five minutes before the preset of time expires the remaining time displays each minute Sleep Timer ECO 26 Standard Reduces the backlight brightness by 20 Advanced Reduces the backlight brightness by 30 Off The backlight brightness is the same value of your settings in the select...

Страница 29: ...ol unit corresponding with the item you want to reconfigure The mark indicates the operation is set to on Each time the colour button is pressed you can switch the corresponding operation on off E 1 2 Programme Setup Setup Digital channel settings Digital Setting You can reconfigure the DTV service settings automatically or manually Additional Search Use this menu to add new services automatically...

Страница 30: ... E 1 2 3 4 Programme Setup Setup Analogue Setting You can reconfigure the analogue TV channels settings automatically or manually Additional Search Use this menu to add new channels automatically after auto installation has been made Start searching channels after selecting the colour system Manual Adjust Use this menu to set up analogue TV channels manually After selecting Yes on the screen press...

Страница 31: ...red subtitle languages including subtitles for the hearing impaired to display if subtitles are available NOTE Subtitles will not be displayed when the service does not contain subtitle information Digital Audio Language Option Set up to three preferred multi audio languages to display if the audio languages are available Switching the multi audio languages Each time you press 2 on the remote cont...

Страница 32: ...ast signals Full For 16 9 squeeze pictures Cinema 16 9 For 16 9 letterbox pictures Bars may appear on the top and bottom with some programmes Cinema 14 9 For 14 9 letterbox pictures Bars may appear on the top and bottom with some programmes Full Displays with an Overscan image Crops all sides of screen Underscan Displays with an Underscan image only when receiving a 720p signal Displays with the H...

Страница 33: ...ing may not be available This function is not available for DTV broadcasts with MHEG signals Automatic volume adjustment Auto Volume Option Different sound sources sometimes do not have the same volume level such as a programme and its commercial breaks The Automatic Volume Control Auto Volume reduces this problem by equalizing levels Emphasising dialogue Clear Voice Option This function emphasise...

Страница 34: ...ess p The channel display will appear on the TV Press p again within the several seconds that the channel display is on the screen Time information will be shown in the lower right corner of the screen for several seconds Even when you change the TV channel you can display the time information with steps 2 and 3 above NOTE If acquired successfully the time information will appear in the upper righ...

Страница 35: ...DMI1 EXT6 NOTE You cannot change labels if the input source is TV or USB 1 2 3 4 Input Skip Setup This setting allows you to skip the SCART HDMI or RGB input on the Input Source Selection operation EXT1 SCART EXT2 SCART EXT4 RGB HDMI1 HDMI2 HDMI3 Yes No Colour system settings You can change the colour system to one that is compatible with the image on the screen NOTE The factory preset value is Au...

Страница 36: ...Press a b c d to select the drive where you want to find your files and then press OK NOTE You do not need to select the drive in step 2 when there is only one drive in the connected USB device 16 is the maximum number of drives that can be displayed 1 2 Photo Mode Viewing thumbnails 2007 10 18 13 30 00 600KB Demo Demo 01 Demo jpg 1600X1200 Sample Buttons for thumbnail operations Buttons Descripti...

Страница 37: ...E The selected BGM is played repeatedly The slide show continues until you press 6 The slide show speed is approximately 10 seconds per photo E E Music Mode File name ROOT Demo Demo1 CLASSIC SONG_01 MP3 SONG_02 MP3 SONG_03 MP3 SONG_04 MP3 SONG_05 MP3 SONG_06 MP3 SONG_07 MP3 SONG_08 MP3 SONG_09 MP3 Time 3 05 3 15 3 02 6 05 4 52 0 00 3 13 3 23 3 33 Playing SONG_02 MP3 1 00 3 15 Buttons for Music Mod...

Страница 38: ... Cinema For letterbox pictures Bars may appear on the top and bottom with some programmes Normal Keeps the original aspect ratio in a full screen display Dot by Dot Displays an image with the same number of pixels on the screen When using the HDMI2 terminal you must select the proper item in the PC Audio Select menu depending on the type of HDMI cable connected Refer to the right column for detail...

Страница 39: ...c is successful Auto Sync completed successfully displays If not Auto Sync failed Auto Sync may fail even if Auto Sync completed successfully displays Auto Sync may fail if the PC image has low resolution has unclear black edges or is moved while executing Auto Sync Be sure to connect the PC to the TV and switch it on before starting Auto Sync Auto Sync can be executed only when inputting analogue...

Страница 40: ...the RS 232C terminal The input signal PC video can be selected the volume can be adjusted and various other adjustments and settings can be made enabling automatic programmed playing Use an RS 232C serial control cable cross type commercially available for the connections NOTE This operation system should be used by a person who is accustomed to using PCs Parameter Input the parameter values align...

Страница 41: ...MMAND PARAMETER CONTROL CONTENTS POSITION H P O S _ H POSITION AV PC V P O S _ V POSITION AV PC C L C K _ CLOCK 0 180 P H S E _ _ PHASE 0 40 WIDE MODE W I D E 0 _ _ _ TOGGLE AV W I D E 1 _ _ _ NORMAL AV W I D E 2 _ _ _ ZOOM 14 9 AV W I D E 3 _ _ _ PANORAMA AV W I D E 4 _ _ _ FULL AV W I D E 5 _ _ _ CINEMA 16 9 AV W I D E 6 _ _ _ CINEMA 14 9 AV W I D E 7 _ _ _ NORMAL PC W I D E 8 _ _ _ CINEMA PC W ...

Страница 42: ...nction This happens when the cabinet slightly expands and contracts according to changes in temperature This does not affect the TV s performance Cautions regarding use in high and low temperature environments When the TV is used in a low temperature space e g room office the picture may leave trails or appear slightly delayed This is not a malfunction and the TV will recover when the temperature ...

Страница 43: ...are You can select the method of update If the software is updated the confirmation message New download information has been detected appears If the TV receives the update service while in standby mode a confirmation message displays after turning on the power Follow the screen prompts 1 2 Yes Starts downloading immediately It takes approximately one hour to update You cannot carry out other oper...

Страница 44: ...e EN50221 R206001 OUTPUT RCA pin AUDIO R L Headphones Ø 3 5 mm jack Audio output OSD language Czech Danish Dutch English Estonian Finnish French German Greek Hungarian Italian Latvian Lithuanian Norwegian Polish Portuguese Russian Slovak Slovene Spanish Swedish Turkish Ukrainian Power Requirement AC 220 240 V 50 Hz Power Consumption Method IEC62087 LC 46D65E 217 W 0 5 W Standby LC 52D65E 266 W 0 5...

Страница 45: ... free of charge to the dealer even if you don t purchase a new product Further collection facilities are listed on the homepage of www swico ch or www sens ch B Information on Disposal for Business Users 1 In the European Union If the product is used for business purposes and you want to discard it Please contact your SHARP dealer who will inform you about the take back of the product You might be...

Страница 46: ... 12 13 14 15 16 17 18 Universal viewing Parental approval pref X rated Universal viewing Parental approval pref X rated Universal viewing Parental approval pref X rated User adjusted rating Broadcasted rating User adjusted rating Broadcasted rating 44 ...

Страница 47: ...r no circumstances should the cut off plug be inserted elsewhere into a 13A socket outlet as a serious electric shock may occur To fit an appropriate plug to the mains lead follow the instructions below IMPORTANT The wires in the mains lead are coloured in accordance with the following code Blue Neutral Brown Live As the colours of the wires in the mains lead of this product may not correspond wit...

Страница 48: ...LC 52DH65S OPERATION MANUAL BEDIENUNGSANLEITUNG MODE D EMPLOI MANUALE DI ISTRUZIONI GEBRUIKSAANWIJZING MANUAL DE MANEJO MANUAL DE OPERAÇÃO D808WJZZ 1 OPERATION MANUAL BEDIENUNGSANLEITUNG MODE D EMPLOI MANUALE DI ISTRUZIONI GEBRUIKSAANWIJZING MANUAL DE MANEJO MANUAL DE OPERAÇÃO ENGLISH DEUTSCH FRANÇAIS ITALIANO NEDERLANDS ESPAÑOL TINS D808WJZZ 08P09 SP NG PIN SHARP ELECTRÓNICA ESPAÑA S A Polígono I...

Отзывы: