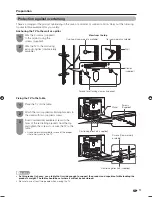
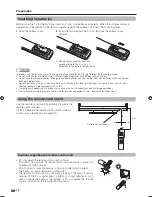
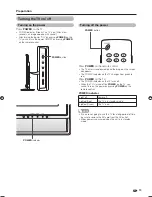
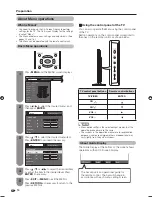
background image


20

Watching TV

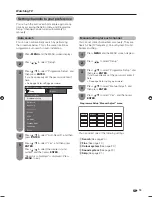
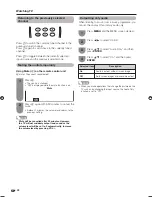
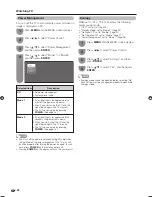
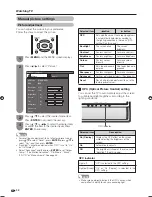
Search tuning

Press 

a

/

b

/

c

/

d

 to select the channel you 

want to edit, and then press 

ENTER

.

•  The selected channel information displays.

Press 

a

/

b

 to select “Search”, and then press 

ENTER

.

1

2

MENU    

[Setup ... Programme Setup]

Fine

Colour System

Sound System

Skip

Search

179.25

MHz

NEXT

As 

ENTER

 is pressed, the next channels will 

be searched in order.

3

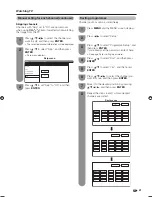
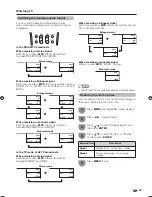
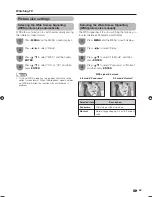
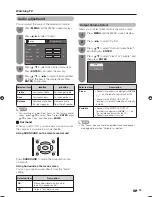
Fine tuning

Press 

a

/

b

/

c

/

d

 to select the channel you 

want to edit, and then press 

ENTER

.

•  The selected channel information displays.

1

Press 

a

/

b

 to select “Fine”, and then press 

ENTER

.

2

Press 

c

/

d

 to adjust the frequency, and then 

press 

RETURN 

or

 MENU

.

•  Adjust while checking the background picture as 

a reference.

3

Fine

Colour System

Sound System

Skip

Search

179.25

MHz

•  Instead of the method above, you can also set 

by directly entering the frequency number of the 
channel with 

 9

.

•  When setting a frequency on the “Fine” screen, 

the last fi gure of the frequency needs to be “0” or 
“5”.

a

• 179.25 MHz: Press 

s

 7 

s

 9 

s

 2 

s

 5

.

•  49.25 MHz: Press 

s

 9 

s

 2 

s

 5 

s

 ENTER

.

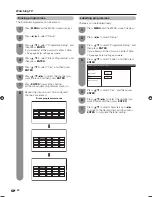
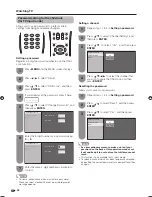
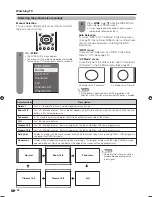
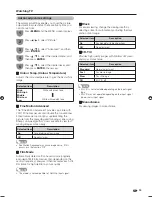
Sound system (Broadcasting system)

Press 

a

/

b

/

c

/

d

 to select the channel you 

want to edit, and then press 

ENTER

.

•  The selected channel information displays.

Press 

a

/

b

 to select “Sound System”, and 

then press 

ENTER

.

•  Receivable sound systems (Broadcasting systems) 

are listed.

1

2

Fine

Search

Colour System

Sound System

Skip

B/G

D/K

I

M

Press 

a

/

b

 to select the optimum sound 

system, and then press 

ENTER

.

3

Sound system menu

Press 

a

/

b

 to select the optimum colour 

system, and then press 

ENTER

.

3

Fine

Colour System

Sound System

Skip

Search

AUTO

PAL

SECAM

NTSC 3.58

PAL-60

NTSC 4.43

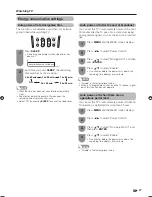
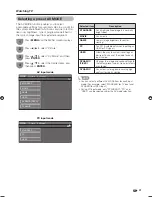
Colour system

Press 

a

/

b

/

c

/

d

 to select the channel you 

want to edit, and then press 

ENTER

.

•  The selected channel information displays.

1

Press 

a

/

b

 to select “Colour System” and 

then press 

ENTER

.

•  Receivable colour systems are listed.

2

Colour system menu

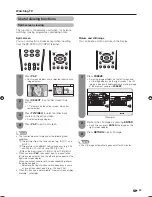
Manual setting for each channel (continued)

NOTE

•  Check the sound system if the sound output were not 

correct.

52GX3H_en_c.indd   20

52GX3H_en_c.indd   20

2007/10/25   10:24:16

2007/10/25   10:24:16

Содержание Aquos LC-42PA63H

Страница 1: ...LC 42GX3H LC 46GX3H LC 52GX3H ENGLISH LCD COLOUR TELEVISION 液晶彩色電視機 液晶彩色電視機 OPERATION MANUAL 使用說明書 使用說明書 LC 42GX3H LC 46GX3H LC 52GX3H OPERATION MANUAL 使用說明書 使用說明書 中文 繁體 中文 簡體 ...

Страница 2: ......

Страница 3: ...10 Using Digital Audio Output 10 Protection against overturning 11 Inserting the batteries 12 Using the remote control unit 12 Cautions regarding the remote control unit 12 Turning the TV on off 13 Turning on the power 13 Turning off the power 13 About Menu operations 14 What is Menu 14 Basic Menu operations 14 About Guide Display 14 TV AV input mode menu items 15 PC input mode menu items 16 Watch...

Страница 4: ...osition 34 Game Play Time 34 Audio adjustment 35 Output Volume Select 35 Settings when using external devices Settings when using HDMI output devices 36 Selecting the input source and signal type 37 Selecting input source 37 Selecting input signal type 37 Labelling input sources 38 Skipping HDMI PC input 38 Colour system settings 38 Connecting a PC Displaying a PC image on the screen 39 Selecting ...

Страница 5: ...gs This product is not designed for built in installation do not place the product in an enclosed place such as a bookcase or rack unless proper ventilation is provided or the manufacturer s instructions are followed The LCD panel used in this product is made of glass Therefore it can break when the product is struck forcefully or with a sharp object If the LCD panel is broken be careful not to be...

Страница 6: ...Remote control unit AAA size battery g2 AC cord Cable clamp Operation manual Safety restraints Page 7 Page 12 Page 8 Page 8 Page 11 Restraining brackets Screws for brackets Clamps Screws for clamps Protective cover g2 Page 50 Used with batteries inserted Always use the AC cord supplied with the TV For bundling cables HDMI the HDMI logo and High Definition Multimedia Interface are trademarks or regi...

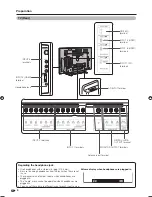
Страница 7: ...tton OPC sensor Remote control sensor POWER indicator The illustrations and on screen displays in this operation manual are for explanation purposes and may vary slightly from the actual operations The illustrations used throughout this manual are based on LC 52GX3H TV Front Top Side SLEEP timer indicator POWER On Off button MENU button TV VIDEO button Channel up r down s buttons Volume up e down ...

Страница 8: ...sure to unplug headphones from the jack when they are not in use The speakers do not output volume when headphones are plugged in The Audio menu cannot be operated when headphones are plugged in You can set the volume to different levels for each input source Volume display when headphones are plugged in 20 Headphone jack INPUT 5 HDMI terminal INPUT 6 HDMI terminals INPUT 3 terminals MONITOR OUTPU...

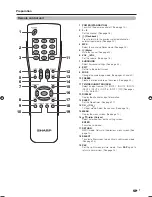
Страница 9: ...n the screen See page 23 11 TV VIDEO INPUT SOURCE Select an input source TV INPUT 1 INPUT 2 INPUT 3 INPUT 4 INPUT 5 INPUT 6 INPUT 7 PC See pages 10 23 36 to 39 12 DISPLAY Display the channel or input information 13 SLEEP Set the Sleep timer See page 27 14 CHr CHs TV input mode Select the channel See page 18 15 MENU Display the menu screen See page 14 16 a b c d Cursor Select a desired item on the ...

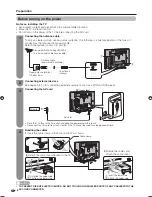
Страница 10: ...e AC cord from the AC outlet if the TV will not be used for a long period of time TV rear view Connecting the antenna cable To enjoy a clearer picture use an outdoor antenna The following is a brief explanation of the types of connections that are used for coaxial cable Detach the terminal cover of 1 and 2 Standard DIN45325 plug IEC169 2 75 ohm coaxial cable round cable Room antenna terminal 75 oh...

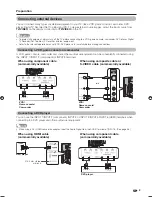
Страница 11: ...ayer and other audiovisual equipment When using HDMI cable commercially available When using component cable commercially available NOTE When using a DVI HDMI conversion adaptor input the Audio Signal from the AUDIO terminal of INPUT 6 See page 36 R AUDIO L Y PB CB PR CR When using component cable commercially available R AUDIO L Y PB CB PR CR Connecting external devices You can connect many types...

Страница 12: ... Top Box Using Digital Audio Output It is possible to output audio through the DIGITAL AUDIO OUTPUT terminal PCM audio outputs from the terminal To optical digital input of external audio devices Optical fibre cable commercially available Connecting a PC You can use the INPUT 7 PC terminals when connecting to a PC See page 39 ANALOGUE RGB AUDIO R L PC NOTE The DIGITAL AUDIO OUTPUT terminal usually ...

Страница 13: ...th two supplied screws Place the TV on the table 1 2 CAUTION As this product is heavy use a table that is wide enough to support the product and capable of withstanding the product s weight The table should be set where it will not be overturned Be sure to use at least two people when moving the TV Tie commercially available Screws for attaching clamps supplied View from the top Stand Restraining ...

Страница 14: ...tions in the battery compartment 2 Insert the two supplied AAA size batteries 3 Close the battery cover 5 m Use the remote control unit by pointing it towards the remote sensor window Objects between the remote control unit and sensor window may prevent proper operation Cautions regarding the remote control unit Do not subject the remote control unit to shock In addition do not soak the remote con...

Страница 15: ... this TV for a long period of time be sure to remove the AC cord from the AC outlet Minor power is consumed when the unit is in standby mode Turning the TV on off Press POWER on the remote control The TV enters standby mode and the image on the screen disappears The POWER indicator on the TV changes from green to red Press POWER on the TV The POWER indicator on the TV turns off When the TV is turn...

Страница 16: ...tional guide for the remote control The bar will change in accordance with each menu setting screen What is Menu You need to bring up the On Screen Display to perform settings for the TV The On Screen Display for the settings is called Menu The Menu enables various settings and adjustments See pages 15 and 16 The Menu can be operated with the remote control unit Press MENU and the MENU screen disp...

Страница 17: ...age 35 Surround Page 35 Reset Page 35 Setup Auto Installation Page 17 Programme Setup Pages 19 22 Child Lock Page 26 Input Skip Page 38 Input Label Page 38 Position Page 34 WSS Page 29 4 3 Mode Page 29 Standby Mode Page 25 Language Page 18 Reset Page 46 Option DNR Page 34 Input Select INPUT1 Page 37 INPUT2 Page 37 INPUT3 Page 37 Output Volume Select Page 35 Audio Only Page 24 Game Play Time Page 3...

Страница 18: ... Input Skip Page 38 Input Label Page 38 Standby Mode Page 25 Language Page 18 Reset Page 46 Option NOTE Some menu items may not be displayed depending on the selected input source Input Select INPUT1 Page 37 INPUT2 Page 37 INPUT3 Page 37 Output Volume Select Page 35 Audio Only Page 24 Game Play Time Page 34 Fine Sync Input Signal Page 42 Auto Sync Page 41 H Position Page 41 V Position Page 41 Cloc...

Страница 19: ...ave already set the password enter it here See page 26 for setting a password 4 6 Press a b to select the desired language listed on the screen and then press ENTER Press a b to select the desired sound system and then press ENTER You do not need to do anything during the auto search Search is completed is displayed Press MENU to exit Press a b to select Yes and then press ENTER 5 Watching TV Sett...

Страница 20: ...ou can change the volume on the TV or on the remote control unit To increase the volume press VOLk To decrease the volume press VOLl NOTE TV INPUT1 INPUT2 INPUT3 INPUT4 INPUT5 INPUT6 and INPUT7 PC modes can store volume adjustment values separately Menu language settings You can also select a language from setup menu Select from among 4 languages English Simplified Chinese Traditional Chinese and A...

Страница 21: ...ss a b to select Yes and then press ENTER Press a b to select the desired sound system and then press ENTER Search is completed is displayed Press MENU to exit Press a b to select Auto Search and then press ENTER Watching TV You can select one of the following settings 1 Search See page 20 2 Fine See page 20 3 Colour system See page 20 4 Sound system See page 20 5 Skip See page 21 Manual setting f...

Страница 22: ...e Fine screen the last figure of the frequency needs to be 0 or 5 a 179 25 MHz Press 1 s 7 s 9 s 2 s 5 49 25 MHz Press 4 s 9 s 2 s 5 s ENTER Sound system Broadcasting system Press a b c d to select the channel you want to edit and then press ENTER The selected channel information displays Press a b to select Sound System and then press ENTER Receivable sound systems Broadcasting systems are listed ...

Страница 23: ...01 06 SAT 1 KABEL 01 SAT 1 07 08 09 10 03 02 04 05 11 12 13 14 15 16 17 18 19 20 Sort menus 01 06 SAT 1 KABEL 01 02 SAT 1 KABEL 07 08 09 10 03 02 04 05 11 12 13 14 15 16 17 18 19 20 01 06 KABEL SAT 1 01 KABEL 07 08 09 10 03 02 04 05 11 12 13 14 15 16 17 18 19 20 Watching TV Skipping channels Channels with Skip set to On are passed over when using CHr s even if selected while watching the image fro...

Страница 24: ... 15 16 17 18 19 20 SAT 1 PRO7 02 KABEL 03 04 05 01 SAT 1 03 KABEL PRO7 02 06 07 08 09 10 11 12 13 14 15 16 17 18 19 20 04 05 01 SAT 1 02 KABEL 06 07 08 09 10 11 12 13 14 15 16 17 18 19 20 03 04 05 Press MENU and the MENU screen displays 1 Press c d to select Setup Press a b to select Programme Setup and then press ENTER If you already set the password enter it here See page 26 for setting a passwo...

Страница 25: ...conditions 1Two pictures from the same source e g INPUT 1 and INPUT 1 2Two pictures with different vertical frequency e g PAL and PAL 60 PAL 50 Hz and NTSC 60 Hz 3When the input signal is 1080P 50Hz or 1080P 60Hz When you press P P the current input is moved to the left side screen display and the other input appears on the right side screen display When you cannot acquire split screen capability ...

Страница 26: ... music programme you can set the display off and enjoy audio only Press MENU and the MENU screen displays 1 Press c d to select Option 2 Press a b to select Audio Only and then press ENTER 3 Press a b to select On and then press ENTER 4 NOTE When you make operations that change the picture on the TV such as by changing the input source the Audio Only function is set to Off Selected item Descriptio...

Страница 27: ...isplays When receiving a bilingual signal Each time you press MPX the mode switches among CH A CH B and CH AB Stereo mode STEREO B G PAL B G PAL NICAM 99 BBC2 MONO 99 BBC2 Bilingual mode B G CH A PAL NICAM 99 BBC2 B G CH B PAL NICAM 99 BBC2 MONO 99 BBC2 CH AB B G PAL B G PAL NICAM 99 BBC2 Monaural mode MONO B G PAL B G PAL NICAM 99 BBC2 MONO 99 BBC2 Stereo mode B G STEREO PAL 99 BBC2 B G MONO PAL ...

Страница 28: ...assword Reconfirm Enter the 4 digit number as a password using 0 9 6 NOTE As a precautionary measure make a note of your password on the back of this operation manual cut it out and keep it in a safe place that children cannot reach This function is only available for TV input mode To relock a channel which has been temporarily unlocked by inputting the correct password turn power off and then on ...

Страница 29: ... to select Enable Five minutes before the power shuts down the remaining time displays every minute 4 Press MENU and the MENU screen displays 1 Press c d to select Power Control Press a b to select No Operation Off and then press ENTER 3 Press a b to select Enable Five minutes before the power shuts down the remaining time displays every minute 4 NOTE Disable is the factory preset value Auto power...

Страница 30: ...ximately 8 minutes the power shuts down Even if you start using the PC and the signal inputs again the TV stays off The TV turns on again by pressing POWER See page 13 If no signal inputs for approximately 8 seconds the power shuts down When you start using the PC and the signal inputs again the TV turns on The TV turns on again by pressing POWER See page 13 Press MENU and the MENU screen displays...

Страница 31: ...the broadcast signal contains no WSS information the function will not work even if enabled Selecting the Wide Screen Signalling WSS picture size manually The WSS signal has 4 3 auto switching that allows you to select between Panorama and Normal Press MENU and the MENU screen displays 1 Press c d to select Setup 2 Press a b to select 4 3 Mode and then press ENTER 3 Press a b to select Panorama or...

Страница 32: ...ng the picture size manually Press WIDE The WIDE MODE menu displays The menu lists the wide mode options selectable for the type of TV video signal currently received 1 Press WIDE or a b while the WIDE MODE menu displays on the screen As you toggle down the options each mode is immediately reflected on the TV 2 WIDE MODE Normal Zoom 14 9 Panorama Full Cinema 16 9 Cinema 14 9 4 3 Mode set to Panoram...

Страница 33: ... defined image in a normally bright room MOVIE For a movie GAME Lowers image brightness for easier viewing PC For PC Available only when inputting an HDMI or PC signal USER Allows the user to customise settings as desired You can set the mode for each input source DYNAMIC FIXED Changes the image and sound settings to the factory preset values No adjustments are allowed DYNAMIC For a clear cut image...

Страница 34: ...teps to adjust the picture Watching TV MENU Picture Picture Audio Contrast OPC Off AV Mode STANDARD Brightness Colour Tint Sharpness Advanced Reset 30 0 0 0 0 Backlight 16 Manual picture settings Selected item cbutton dbutton OPC Sets whether or not the screen brightness is automatically adjusted according to the lighting condition in the room OPC setting See this page Backlight The screen dims Th...

Страница 35: ...nalyses it then recreates each still film frame for high definition picture quality w Monochrome For viewing images in monochrome Selected item Description High Mid High Middle Mid Low Low White with bluish tone White with reddish tone Selected item Description Standard Normal adjustment Fast For movie image Slow For still image Off 3D Y C off w Black For easier viewing change the viewing depth by s...

Страница 36: ...e factory preset values press a b to select Reset and then press ENTER Adjustments are stored separately according to input source Images may not be displayed properly depending on the settings and or signals Selected item Description H Position Centres the image by moving it to the left or right V Position Centres the image by moving it up or down Game Play Time This function displays the elapsed...

Страница 37: ... b to select Fixed or Variable and then press ENTER Press a b to select Output Volume Select and then press ENTER 3 4 w Surround When you set to On you can enjoy surround sound the same as if you were in a movie theatre Using SURROUND on the remote control unit Press SURROUND to switch the Surround function on and off Using Surround on the menu screen You can produce Surround effects from the Audi...

Страница 38: ...n connecting a DVI HDMI conversion adaptor cable to the HDMI terminal the image may not come in clearly Audio Select is only available for INPUT6 Connecting an HDMI output device Settings when using external devices HDMI terminals can carry audio and visual signals to the TV with an HDMI certified cable When you want to output the audio and picture from an HDMI output device on the TV select INPUT4...

Страница 39: ...ct Option 2 Press a b to select Input Select and then press ENTER 3 Selecting input signal type For setting the signal type of external equipment Press a b to select a signal type you want to set and then press ENTER 4 NOTE If no colour image displays try changing the other signal type Check the operation manual of the external equipment for the signal type When the signal type is set to Auto the ...

Страница 40: ... an HDMI input terminal INPUT 4 to INPUT 6 is selected a Menu screen for selecting Auto or Manual is displayed When you select Auto using a b the Menu screen returns to the Input Label Menu screen 4 Labelling input sources TV INPUT1 INPUT2 DVD INPUT3 INPUT4 INPUT5 Repeat the above until the name is fully spelt out and then press MENU The name can be 6 characters or less When you want to set an inp...

Страница 41: ...gnals compatible with the TV TV INPUT1 INPUT2 INPUT6 INPUT3 INPUT4 INPUT5 INPUT6 INPUT7 Signal names for 15 pin mini D sub connector NOTE Macintosh adaptor may be required for use for some Macintosh computers Pin No 5 is not used for inputting the signal 15 14 13 12 9 11 10 8 7 6 5 4 3 2 1 Pin No Signal name Pin No Signal name Pin No Signal name R GND Ground Not connected G GND Ground SDA B GND Gr...

Страница 42: ... adjustments Selectable picture size may vary with input signal type Connecting a PC PC Connecting a PC Input Signal Full Normal An image fully fills the screen Keeps the original aspect ratio in a full screen display a Picture size images Dot by Dot Detects the resolution of the signal and displays an image with the same number of pixels on the screen WIDE MODE Full Dot by Dot or RGB cable commerc...

Страница 43: ... available RGB cable etc Selected item Description H Position Centres the image by moving it to the left or right V Position Centres the image by moving it up or down Clock Adjusts when the image flickers with vertical stripes Phase Adjusts when characters have low contrast or when the image flickers Adjusting the PC image automatically Adjusting the PC image manually Connecting a PC Press a b to se...

Страница 44: ...play when the same signal resolution is input again 1024 x 768 1360 x 768 NOTE You can only select the Input Signal on the Setup menu when receiving one of the 2 input signals listed above Press MENU and the MENU screen displays 1 Press c d to select Option 2 Input resolution settings Press a b to select Fine Sync and then press ENTER 3 Press a b to select the desired input signal on the display a...

Страница 45: ... the control commands from the PC via the RS 232C connector The TV operates according to the received command and sends a response message to the PC Do not send multiple commands at the same time Wait until the PC receives the OK response before sending the next command Command format Parameter Input the parameter values aligning left and fill with space s for the remainder Be sure that four values...

Страница 46: ... T T T T T M S S S S K E E E E E E E E E E E E E U U U A M M M M M M 0 1 2 3 4 5 6 7 8 0 1 2 0 1 2 _ 0 1 2 3 4 5 _ _ _ _ _ _ _ _ _ _ _ _ _ _ _ _ _ _ _ _ _ _ _ _ _ _ _ _ _ _ _ _ _ _ _ _ _ _ _ _ _ _ _ _ _ _ _ _ _ _ _ _ _ _ _ _ _ _ _ _ _ _ _ _ _ _ _ _ _ _ _ _ _ _ _ CONTROL ITEM COMMAND PARAMETER CONTROL CONTENTS _ _ _ _ _ _ _ _ _ _ _ _ _ _ _ _ _ _ _ _ _ _ _ _ _ _ _ _ _ _ _ _ _ _ _ _ _ _ _ _ _ _ _ _ _...

Страница 47: ...may look dark in a room that is too bright Check the colour system setting See pages 20 and 38 Check the input signal setting See page 42 Check the HDMI Setup setting See page 36 The unit s internal temperature has increased Remove any objects blocking the vent or clean Check the power control setting See pages 27 and 28 Is the sleep timer set See page 27 Is the connection to external equipment co...

Страница 48: ...p 2 Press a b to select Yes and then press ENTER When Reset is completed the backlight will turn off and then on in a short period of time The screen will be returned to its original state Execute auto installation displays on the screen 4 Reset 3 Press a b to select Yes and then press ENTER Auto installation will be executed 5 NOTE If you execute Reset all the settings such as Picture Audio Progr...

Страница 49: ...mm jack 15 pin mini D sub AUDIO in Ø 3 5 mm jack STEREO BILINGUAL NICAM B G I D K A2 stereo B G Resolution 2 073 600 pixels 1920 g 1080 As a part of policy of continuous improvement SHARP reserves the right to make design and specification changes for product improvement without prior notice The performance specification figures indicated are nominal values of production units There may be some devia...

Страница 50: ...933 2 1010 730 400 657 73 400 624 271 91 85 200 431 526 2 Dimensional drawings 48 Unit mm Appendix LC 42GX3H ...

Страница 51: ...650 287 92 95 1023 4 1107 457 781 400 709 72 175 400 575 6 Dimensional drawings Unit mm Appendix LC 46GX3H LC 52GX3H 1157 0 400 699 316 92 116 1243 651 6 859 400 786 495 73 137 49 ...

Страница 52: ...or wall mounting with the optional bracket AN 52AG4 remove the stand Before setting TV on the wall Remove the connected cables DVD VCR etc from the terminals Detach the four caps at the 4 locations on the rear of the TV Firmly affix the protective cover to the cabinet hole on the bottom of the TV 50 1 2 1 Detach the stand from the TV Hold the stand so it will not drop from the edge of the base area...

Страница 53: ...rsonnel Customers should not attempt to do the work themselves SHARP bears no responsibility for improper mounting or mounting that results in accident or injury Using a SHARP recommended bracket to mount the TV You can ask a qualified service professional about using a SHARP recommended AN 52AG4 bracket to mount the TV to the wall Carefully read the instructions that come with the bracket before b...

Страница 54: ...iagonally stretch string and mark the intersecting point in a way that no permanent marks will be left on the wall 2 1 Remove the screws from the stand 2 Attach the bracket to the LCD TV 3 When adjusting the bracket s angle adjust it before installing the TV on the wall The adjusting angles of AN 52AG4 are 0 5 10 15 and 20 4 Lift the TV remove it from the stand and attach it to the bracket Attach ...

Страница 55: ...7 3 1 3 6 1 When using wall mount bracket AN 52AG4 Every time the attaching point is moved this figure changes by 50 mm On the wall bracket of AN 52AG4 there is a letter b indicating the centre point of the TV monitor 20 2 9 1 9 1 2 0 3 1 6 7 7 3 1 5 1 5 9 7 2 9 1 6 3 1 0 0 4 400 155 375 7 3 1 3 6 1 When using wall mount bracket AN 52AG4 Every time the attaching point is moved this figure changes by...

Страница 56: ...is manual and keep it in a familiar place CLEARING THE PASSWORD 4 The password input screen displays 5 If you enter 3001 using 0 9 the Child Lock setting menu will be displayed Press MENU and the MENU screen displays 1 Press c d to select Setup 2 Press a b to select Child Lock and then press ENTER 3 The new password is now set 6 Enter the 4 digit number as a password using 0 9 See page 26 ...

Страница 57: ......
Страница 58: ...LC 42GX3H LC 46GX3H LC 52GX3H OPERATION MANUAL 使用說明書 使用說明書 Printed in Japan 日本印刷 日本印刷 TINS D304WJZZ 07P10 JA KG Printed on 100 post consumer recycled paper 本說明用紙使用的是100 的再生紙 本說明用紙使用的是100 的再生紙 ...

Отзывы: