background image

9

Preparation

 Connecting the TV

Notes on installing the TV

•  Avoid direct sunlight and place the TV in a well-ventilated 

location.

•  Place the TV in a level location.
•  Do not turn on the power of the TV before connecting the AC 

cord.


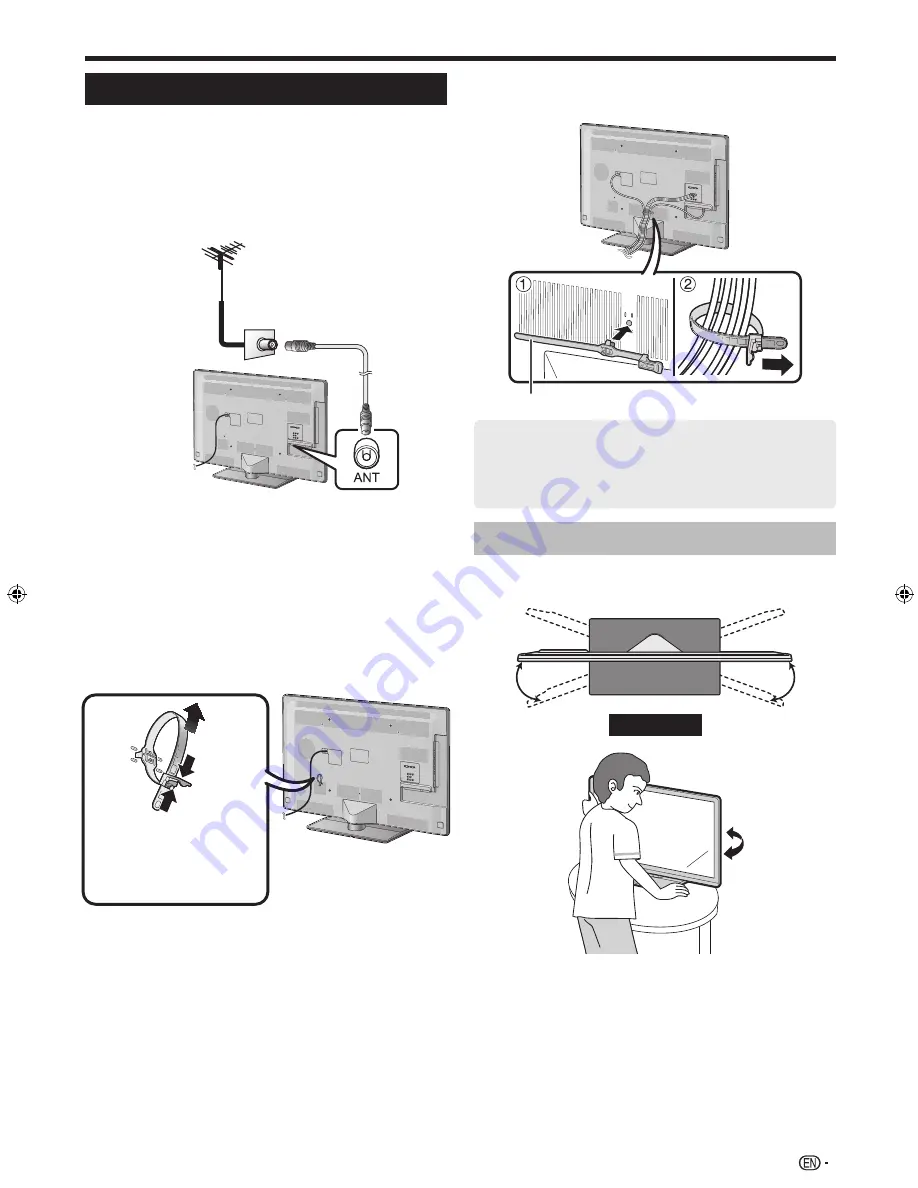
1

Connect the antenna cable.

n

o

p


Standard DIN45325 connector (IEC169-2)


Antenna cable (75-ohm coaxial type: commercially 
available)


Room antenna terminal (75-ohm type)


2

Connect external devices.

See pages 25 to 28 for connecting external equipment, such 
as a VCR and DVD player.


3

Plug the AC cord in to the AC outlet (product 
shape varies in some countries).

TV (rear view)

Detach the cable tie on the 
rear of the TV. Press cable tie 
clip (

1

) and pull out cable tie 

(

2

) completely to release.

2

1

1

•  Place the TV close to the AC outlet, and keep the power 

plug within reach.

•  Disconnect the AC cord from the AC outlet if the TV will 

not be used for a long period of time.


4

Bundle the cables.


1

Insert the clip into the hole on the TV.


2

Bundle the cables.

Cable tie

CAUTION
TO PREVENT RISK OF ELECTRIC SHOCK, DO 
NOT TOUCH UN-INSULATED PARTS OF ANY 
CABLES WITH THE AC CORD CONNECTED.

Angle adjustment

The TV can be rotated up to 20 degrees to the right or 
left.

20°

20°

Front

CAUTION

•  Adjust the screen with both hands. Place one hand on the TV 

and rotate the screen while holding the bottom of the stand 
with your other hand.

LC40LE835_book.indb   9

LC40LE835_book.indb   9

10/7/2011   12:04:27 PM

10/7/2011   12:04:27 PM

Содержание Aquos LC-40LE835M

Страница 1: ...MODEL LC 60LE835X LC 52LE835X LC 46LE835X LC 40LE835X LCD COLOUR TELEVISION OPERATION MANUAL ...

Страница 2: ......

Страница 3: ...G 24 Cancelling the timer setup 24 Connecting external devices 25 Video connections 26 HDMI connection 26 Component connection 27 VIDEO connection 27 Audio connections 28 Speaker amplifier connection 28 AQUOS LINK 29 Controlling HDMI devices using AQUOS LINK 29 AQUOS LINK connection 30 Operating an AQUOS LINK device 30 Basic adjustment 32 Picture settings 32 Audio settings 34 Power save settings 3...

Страница 4: ...ing 3D Images 68 Appendix 69 Troubleshooting 69 Troubleshooting Digital broadcasting 69 Reset 70 Updating your TV via DVB T 70 Getting information 71 Updating your TV via USB Network 71 Information on the software licence for this product 72 Software licence 72 Specifications 73 Removing the stand 74 Mounting the TV on a wall 75 Dimensional drawings 76 CLEARING THE PASSWORD 78 NOTE The illustratio...

Страница 5: ...dust sticks on the surface of the LCD panel clean the panel with a commercially available cleaning brush anti static brush Important safety precautions Caring for the cabinet Use a soft cloth cotton flannel etc and gently wipe the surface of the cabinet Using a chemical cloth wet dry sheet type cloth etc may deform the components of the main unit cabinet or cause cracking Wiping with a hard cloth ...

Страница 6: ...er place any type of candle or naked flames on the top or near the TV set To prevent fire or shock hazard do not place the AC power cord under the TV set or other heavy items Do not place heavy objects on this product or stand on it Doing so could cause injury if the product overturns Take special care near children and pets Unplug the power cord before you move the TV set If not unplugged beforeh...

Страница 7: ...rest shop Additional optional accessories may be available in the near future When purchasing please read the newest catalogue for compatibility and check the availability No Part name Part number 1 Wall mount bracket 60 inch models AN 52AG4 Wall mount bracket 52 46 inch models 2 Wall mount bracket 40 inch models AN 37AG2 Attachment 40 inch models AN 37P30 3 3D glasses AN 3DG10 S AN 3DG20 B No Par...

Страница 8: ...ble 1 Place the TV on the table 2 Pull the attached restraining bracket out so that it is at a 90 degrees angle 3 Insert commercially available screws in the holes of the restraining bracket and tighten the screws to secure the TV to the table Use commercially available screws to firmly secure the TV CAUTION As this product is heavy use a table that is wide enough to support the product and capabl...

Страница 9: ... screw 2 Attach the supporting post for the stand unit onto the base using the long screws with a screwdriver as shown Supporting post Long screws Long screws 40 inch models 52 46 inch models 3 Insert the stand into the openings on the bottom of the TV hold the stand so it will not drop from the edge of the base area Soft cushion 40 inch models 52 46 inch models 4 Insert and tighten middle screws ...

Страница 10: ...s and two short screws 2 Attach the supporting post for the stand unit onto the base using the long screws with a screwdriver as shown Supporting post 2 1 Long screws 3 Insert the stand into the openings on the bottom of the TV hold the stand so it will not drop from the edge of the base area Soft cushion 4 Insert and tighten middle screws into the holes on the rear of the TV Middle screws 5 Attac...

Страница 11: ...n some countries TV rear view Detach the cable tie on the rear of the TV Press cable tie clip 1 and pull out cable tie 2 completely to release 2 1 1 Place the TV close to the AC outlet and keep the power plug within reach Disconnect the AC cord from the AC outlet if the TV will not be used for a long period of time 4 Bundle the cables 1 Insert the clip into the hole on the TV 2 Bundle the cables C...

Страница 12: ...wipe thoroughly with a cloth The batteries supplied with this product may have a shorter life expectancy due to storage conditions If you will not be using the remote control unit for an extended period of time remove the batteries from it Batteries shall not be exposed to excessive heat such as sunshine fire or the like Angle of the remote control unit Use the remote control unit by pointing it t...

Страница 13: ...I terminal INPUT 6 HDMI 2 HDMI terminal INPUT 5 HDMI 4 HDMI terminal INPUT 7 INPUT 1 AV IN terminal USB 2 HDD port ETHERNET 10 100 terminal Antenna terminal DIGITAL AUDIO OUTPUT terminal AUDIO IN HDMI 2 PC jack 3 USB 3 WIRELESS LAN port 1 Refer to page 42 for details 2 Skype will be available only for the USB1 port Visit the following website for details skype http www skype com or Sharp http www ...

Страница 14: ...R Execute a command 15 EXIT Turn off the On Screen Display Page 13 16 MENU Displays the menu screen Page 13 17 FREEZE Freeze a motion picture on the screen INFO DTV only Display the programme information Page 17 18 RADIO DTV only Switch between radio and data mode When only data broadcasting no radio broadcasting is transmitted by DVB the radio broadcasting will be skipped DISPLAY Display the chan...

Страница 15: ...n Display to perform settings for the TV The OSD On screen Display for the settings is called TV Menu The TV Menu enables various settings and adjustments NOTE You can call up TV Menu screen by press MENU MENU MENU MENU 7 Input change 8 IP Control Page 62 9 Network setup Pages 45 46 10 CH list Page 17 HOME End Enter Select USB LAN Tube You TM CH list IP Control Home network Input change Network se...

Страница 16: ...ress c d to move the cursor when highlighted 7 Input field The text you enter is displayed as you type it in 8 Character Input characters by using these buttons 9 Put a line break 10 Clear Erases the character string When the cursor is somewhere in a line the character string to the right of the cursor will be erased When the cursor is at the right end of a line the entire line will be erased 11 D...

Страница 17: ...vable TV stations according to their settings and the connected antenna To abort the initial auto installation in progress press C NOTE If you turn off the power on the TV while performing a channel search in Step 5 the initial auto installation wizard may not appear The auto installation function allows you to execute the installation again from Setup View setting Page 36 The initial auto install...

Страница 18: ...remote control unit 2 Switch on from standby From standby press POWER on the remote control unit NOTE If you are not going to use this TV for a long period of time be sure to remove the AC cord from the AC outlet A small amount of electric power is still consumed even when the TV is in standby mode Changing channels 1 Turn on the power 2 Select a programme using 0 9 numeric buttons or CHr s on the...

Страница 19: ...the remote control MENU MENU HProgramme info HInput Info Video 576i 001 DTV TV1 SD Moving 20 00 21 00 Audio STEREO Age No limit Optic REC OK If there is more information pressing c d allows you to go to the next page or return to the previous page You can cancel this info by pressing INFO again E Using Info on the menu screen Go to HOME TV Menu Setup Option Option for view Programme info Selecting...

Страница 20: ...iving a stereo signal Each time you press MPX the mode switches between NICAM STEREO and MONO Stereo mode ATV STEREO ATV MONO When receiving a bilingual signal Each time you press MPX the mode switches among NICAM CH A NICAM CH B NICAM CH AB and MONO Bilingual mode ATV MONO ATV CH AB ATV CH A ATV CH B When receiving a monaural signal Each time you press MPX the mode switches between NICAM MONO and...

Страница 21: ...dden teletext Reveal or hide hidden information such as an answer to a quiz 3 Freeze Hold Stop updating teletext pages automatically or release the hold mode Subtitle for teletext Display the subtitle or exit the subtitle screen Subtitles will not be displayed when the service does not contain subtitle information 1 Subpage Reveal or hide subpages Selects directly the desired subpage 0 9 Move to t...

Страница 22: ...is function is set to enable MHEG 5 in DTV mode Go to HOME TV Menu Setup View setting Individual setting MHEG 5 EPG Item Enable MHEG 5 is displayed during DTV mode Disable MHEG 5 is not displayed during DTV mode NOTE This function is only displayed for models for the New Zealand market This function is not displayed for models for the other market than New Zealand When the country setting is set t...

Страница 23: ...tup allows you to select three types of time spans for display on the screen Go to HOME TV Menu Setup Option EPG setup Display range setup Item Mode 1 Wide angle Displays six hours of programme information Mode 2 Zoom Displays three hours of programme information Mode 3 Vertical angle Changes to the EPG display format with a vertical time span NOTE Display range setup cannot be selected when the c...

Страница 24: ...mation sent by the TV station When the country setting is set to New Zealand the EPG screen and operation differ due to the use of MHEG 5 EPG The EPG screen and operation vary depending on the broadcasts When the country setting is set to New Zealand the EPG function is not available when MHEG 5 EPG is not broadcasted MHEG 5 EPG may not be displayed properly in the 3D mode If so cancel the 3D mode...

Страница 25: ...MHEG 5 EPG 5 Search for a programme by date time 1 Press Y 2 Press c d to select the desired time span and then press A EPG DTV TV 6 7 8 9 10 11 Select Enter Back Exit Search by time Back to EPG Next Next Prev 0 6 6 12 12 18 18 0 Select time Enter Prev Enter Today Fri 1 4 20 00 Today Sat 2 Sun 3 Mon 4 Tue 5 Wed 6 Thu 7 Fri 8 TV1 TV2 TV3 TV4 4 PMPS 1BUUFSO PWJOH 4 PMPS BS PMPS BS 4 PMPS 1 POPTDP PM...

Страница 26: ...elected TV programme is marked with an icon 5 Press A to select Back Cancelling the timer setup 1 Press EPG 2 Press a b c d to select the programme with timer setup and then press A 3 Press c d to select Cancel and then press A 4 Press c d to select Yes and then press A E Cancelling using B button on the remote control unit 1 Press EPG 2 Press B to display the timer setup list 3 Press a b to selec...

Страница 27: ...Image quality Audio quality Connectable devices Reference page HDMI cable Excellent in both image quality and audio quality Reproduction devices such as a DVD player Game console 26 DVI HDMI cable 3 5 mm stereo minijack cable Good image quality Component cable Audio cable Average in both image quality and audio quality Reproduction devices such as a DVD player 27 AV cable Supplied AV cable Average...

Страница 28: ...use the same HDCP copy protection method E When using the HDMI 2 terminal You must set the audio signal input source depending on the type of HDMI cable connected refer to page 41 for details HDMI certified cable 1 Press INPUT to select HDMI2 from the INPUT menu and then press A 2 Go to HOME TV Menu Setup Option Terminal setting Audio select select HDMI Digital DVI HDMI cable 1 Press INPUT to sele...

Страница 29: ...hen connecting a DVD player recorder or other device n o Component cable commercially available Audio cable commercially available VIDEO connection Example of connectable devices E VCR E DVD player recorder E Game console E Camcorder You can use the INPUT1 or INPUT2 terminal when connecting to a game console camcorder a DVD player recorder or other device n o or AV cable supplied accessory AV cabl...

Страница 30: ...o not twist when inserting Drawing from a side view Do not insert sideways NOTE Optical digital audio will be output in 2 ch stereo when it is from the external equipment connected to the TV using an HDMI cable If the image is not in sync with the audio check the settings of the connected surround system E After connecting Digital audio output setting After connecting an amplifier with digital aud...

Страница 31: ... compatible audio system You can adjust the volume and select the sound mode of the AQUOS LINK compatible audio system Multiple control of HDMI devices You can select which HDMI device to operate using the Link operation menu Single remote control operation AQUOS LINK automatically recognises connected HDMI devices and you can control the TV and the devices as if using a universal remote control u...

Страница 32: ...se an audio system compatible with the ARC function of the TV you do not need to connect an optical audio cable to the TV Connecting an AQUOS BD player AQUOS recorder only n AQUOS BD player AQUOS recorder Operating an AQUOS LINK device AQUOS LINK allows you to operate the HDMI connected device with a single remote control unit Use the following procedure to start playback 1 Press I to start playba...

Страница 33: ...AQUOS TV speaker system Sound mode change You can manually change the AQUOS AUDIO speaker system s sound mode The sound mode changes every time you press A Refer to the operation manual of the AQUOS AUDIO speaker system for details Model select If multiple HDMI devices are connected in a daisy chain you can specify which device to control here The HDMI device changes every time you press A AQUOS L...

Страница 34: ...igh contrast for sports viewing the Picture and Audio settings cannot be adjusted STANDARD 3D Refer to page 66 for details MOVIE 3D GAME 3D NOTE 1 PC is available only when selecting HDMI1 HDMI2 HDMI3 HDMI4 or PC from the INPUT menu 2 x v Colour is available only when accepting an x v Colour signal through an HDMI terminal You can select a different AV mode item for each input mode for example sel...

Страница 35: ...ing images This function will have no effect in the following cases 1 The type of signal received is a PC signal 2 An OSD is being displayed 3 Teletext is activated If images appear blurred set to Off Quad pixel plus Reproduces high definition images with higher resolution Gamma adjustment Selects the tone difference of the brightness and darkness of the image according to the type of programme wa...

Страница 36: ... movie theater 3D Standard Creates three dimensional surround sound with detailed control of the signal phase SRS TS HD SRS TruSurround HD creates a high quality surround sound experience when watching DVD movies and TV programmes broadcast in surround sound Off Outputs normal sound Audio Bass enhancer This function allows you to enjoy bass enhanced sound Audio Clear voice This function emphasises...

Страница 37: ...rmation windows NOTE This function does not work when AV mode is set to DYNAMIC Fixed This function does not work when 3D brightness boost is set to High or Low ECO No signal off When set to Enable the TV will automatically enter standby mode if there is no signal input for 15 minutes NOTE Even if a TV programme finishes this function may not operate because of interference from other TV stations ...

Страница 38: ...you have already set the password enter it here See page 38 for setting a password 3 The Digital setting screen displays and then press A 4 Press a b to select the desired menu item and then press A 5 Press c d to select Yes and then press A Additional search Use this menu to add new services automatically after Auto installation has been completed Start searching channels after selecting the colo...

Страница 39: ...he optimum sound systems broadcasting systems to receive B G D K I M NOTE Check the sound system if the sound output were not correct Label When a TV channel sends its network name the Auto installation detects the information and assigns a name to it However you can change channel names individually Select each character of the new name for the channel with using the software keyboard see page 14...

Страница 40: ...ess c d to select Yes and then press A Password Yes No Delete password NOTE As a precautionary measure make a note of your password on page 78 cut it out and keep it in a safe place that children cannot reach This function is only available for TV input mode To relock a channel which has been temporarily unlocked by inputting the correct password turn power off and then on again View setting Paren...

Страница 41: ...guages to display if the audio languages are available Go to HOME TV Menu Setup View setting Individual setting Digital audio language E Switching the multi audio languages Each time you press MPX on the remote control unit the audio language switches NOTE This function depends on audio language information from broadcasters If audio for the selected language is not included in a received broadcas...

Страница 42: ...tom with some programmes Panorama In this mode the picture is stretched toward each side of the screen The picture may appear similar to Full depending on broadcast signals Full For 16 9 squeeze pictures Cinema 16 9 For 16 9 letterbox pictures Bars may appear on the top and bottom with some programmes Cinema 14 9 For 14 9 letterbox pictures Bars may appear on the top and bottom with some programme...

Страница 43: ...ting HDMI2 from the INPUT menu Item HDMI Digital When connecting devices including a PC with a HDMI cable to the HDMI2 terminal HDMI Analog When connecting devices including a PC with a DVI HDMI cable to the HDMI2 terminal and inputting analogue audio signals from the AUDIO IN jack When selecting PC from the INPUT menu Item Video When connecting devices with AV cable to the PC terminal display ima...

Страница 44: ...on adaptor cable to the HDMI terminal the image may not come in clearly Option Headphone Audio out select You can select which device is used for outputting audio Go to HOME TV Menu Setup Option Terminal setting Headphone Audio out select Item Headphone Output audio through headphones Audio out Output audio through an A V receiver or surround audio controller Regarding the headphone jack Use headp...

Страница 45: ...sting a picture s horizontal and vertical position Go to HOME TV Menu Setup Option Screen effect Position Item H Pos Centres the image by moving it to the left or right V Pos Centres the image by moving it up or down NOTE For resetting all adjustment items to the factory preset values press a b to select Reset and then press A Adjustments are stored separately for each input source Depending on th...

Страница 46: ...psed time is displayed in 30 minute increments after you start playing a game Off Hides the time NOTE This function is displayed in the external input mode This function is reset after performing the following operations 1 When toggling the input 2 When changing AV mode Option Key lock This function allows you to lock the buttons on the TV or remote control unit in order to prohibit children from ...

Страница 47: ...eds such as streaming media E Wired connection overview PC home network server Router commercially available ETHERNET cable commercially available Network E How to connect Router ETHERNET terminal LAN n ETHERNET cable commercially available 1 Switch on the router commercially available Refer to the router s operation manual for switching on 2 Connect the ETHERNET terminal on the TV to the router c...

Страница 48: ...o HOME Network setup Connection type 4 Press c d to select Wireless and then press A 5 Select OK to confirm 6 Press a b to select Wireless setup in the Network setup menu 7 Press c d to select Change and then press A 8 Press a b to select WPS and then press A WPS Search Manual setup If your router access point does not support WPS Wi Fi Protected Setup select Search and follow the on screen instru...

Страница 49: ...lliance f Wi Fi Protected Setup certification program from the Wi Fi Alliance When there is significant interference in the 2 4 GHz frequency such as from other wireless LAN devices Bluetooth devices 2 4 GHz cordless telephones and microwave ovens it is recommended that you use a wireless LAN access point that supports IEEE802 11a n 5 GHz and set the access point to transmit at 5 GHz For setup det...

Страница 50: ...t the following website http www skype com Skype the skype logo and other marks indicated are trademarks of skype Limited or other related companies Calling phones and mobiles sending sms short message service mail and saving instant messages are not available Using AQUOS NET By connecting the TV to the Internet you can enjoy a variety of broadband content 1 Press HOME to display the HOME screen 2...

Страница 51: ... can clear browser setting which includes cookies bookmarks and caches Go to HOME TV Menu Setup View setting Clear browser setting NOTE Password input is required when executing Clear browser setting if Password is set CAUTION If you exercise this operation browser setting will be completely initialized If there is important information take notes before executing About links Web pages on the Inte...

Страница 52: ...L THIRD PARTY CONTENT OR SERVICES ACCESSIBLE VIA THIS DEVICE IS PROVIDED TO YOU ON AN AS IS AND AS AVAILABLE BASIS AND SHARP AND ITS AFFILIATES MAKE NO WARRANTY OR REPRESENTATION OF ANY KIND TO YOU EITHER EXPRESS OR IMPLIED INCLUDING WITHOUT LIMITATION ANY WARRANTIES OF MERCHANTABILITY NON INFRINGEMENT FITNESS FOR A PARTICULAR PURPOSE OR ANY WARRANTIES OF SUITABILITY AVAILABILITY ACCURACY COMPLETE...

Страница 53: ...orage device to be used for time shift in the Device registration menu Page 54 At least 1 GB is required for a USB storage device for time shift A USB HDD cannot be used as a USB storage device for time shift 2 Press c d to select Yes and then press A The TV starts initializing the USB storage device Delete the data in the USB storage device NOTE Do not disconnect the USB storage device when the T...

Страница 54: ...y available on the control panel NOTE Instead of pressing buttons on the remote control unit most of the operations shown to the left are also available on the screen with the control panel You can call up this control panel by pressing CONTROL on the remote control unit or select Control Time shift from Option Option for view The control panel for time shift displays only during time shift operat...

Страница 55: ...ressing DISPLAY on the remote control unit Audio ENG STEREO Video Subtitle Off New information The time shift ready icon shows up when READY is pressed and the TV is recording the programme The status icon shows up depending on what is shown on the screen Counter The counter displays when you set On in Display the Time shift memory Go to HOME TV Menu Setup Option Time shift setting Time shift Memo...

Страница 56: ...an use the time interval you set using the c or d buttons on the control panel Option Device registration You need to perform this function to register the USB storage device for the time shift Go to HOME TV Menu Setup Option Time shift setting Device registration Refer to For time shift Page 51 for registering a USB storage device NOTE Only one USB storage device can be registered for time shift ...

Страница 57: ...cted to the TV Selecting modes and drives servers 1 Press B USB media mode Example USB1 1 USB3 2 USB1 2 USB2 USB3 1 USB3 3 1 Press a b to select Select USB drive and then press A The available selections are Select USB drive and Folder display setting 2 Press a b c d to select the USB drive where you want to find your files and then press A You can select from All or Folder for the type of folder ...

Страница 58: ...3D images they will be displayed in 2D You can see the file name shooting date file size and pixel size of the selected photo on the left of the screen shooting date is only available in the EXIF file format 3D mode You can view photos in 3D mode 1 Press B to display the USB media menu screen 2 Press a b to select 3D display and then press A See pages 64 to 68 for details on the 3D function NOTE I...

Страница 59: ...n When using USB media mode Buttons Description C Return to the previous operation 3D Switch between 2D and 3D modes DISPLAY Reveal hide the guide display B button Display the USB media menu Select slide show interval USB device removal NOTE The selected BGMs are played repeatedly The slide show continues until you press C Depending on the photo the slide show interval per photo may be longer than...

Страница 60: ...a menu Title edition Chapter Show video information USB device removal 0 9 Jump to scenes at 10 increments 0 90 Limited to files without chapters DISPLAY Reveal hide the guide display This function is available only for the USB media mode E Control panel Press CONTROL and the control panel displays and operations for video playback will be available This screen image is for the USB media mode It m...

Страница 61: ...ader Mass Storage class USB HDD File system FAT FAT32 NTFS Photo file format JPEG jpg DCF2 0 compliant MP mpo CIPA DC 007 Music file format MP3 mp3 Bitrate 32 k 40 k 48 k 56 k 64 k 80 k 96 k 112 k 128 k 160 k 192 k 224 k 256 k 320 kbps Sampling frequency 32 k 44 1 k 48 kHz Video file format File extension Container Video Audio avi AVI DivX 3 11 4 x 5 1 6 0 XviD H 264 MPEG4 Motion Jpeg MP3 Dolby Di...

Страница 62: ...ecting the picture size You can select the picture size 1 Press WIDE The Wide mode menu displays 2 Press WIDE or a b to select the desired item EXAMPLE Input signal 1024g768 1360g768 Normal Keeps the original aspect ratio in a full screen display Cinema For viewing wide screen programmes The top and bottom of the image is slightly cropped only 1024g768 signals Full An image fully fills the screen ...

Страница 63: ...C from the INPUT menu and then press A 2 Go to HOME TV Menu Setup Option Terminal setting PC signal setting Fine sync 3 Press a b to select the specific adjustment item 4 Press c d to adjust the item to the desired position Item H Pos Centres the image by moving it to the left or right V Pos Centres the image by moving it up or down Clock Adjusts when the image flickers with vertical stripes Phase...

Страница 64: ...t OK and then press A Communication conditions for RS 232C RS 232C serial control cable cross type commercially available Set the RS 232C communications settings on the PC to match the TV s communications conditions The TV s communications settings are as follows Baud rate 9 600 bps Data length 8 bits Parity bit None Stop bit 1 bit Flow control None Communication procedure Send the control command...

Страница 65: ... D E 1 1 _ _ UNDERSCAN AV PC W I D E 1 2 _ _ AUTO USB Video Home network Video W I D E 1 3 _ _ ORIGINAL USB Video Home network Video CONTROL ITEM COMMAND PARAMETER CONTROL CONTENTS MUTE M U T E 0 _ _ _ TOGGLE M U T E 1 _ _ _ MUTE M U T E 2 _ _ _ MUTE OFF SURROUND A C S U 0 _ _ _ SURROUND TOGGLE A C S U 1 _ _ _ SURROUND TS HD ON A C S U 2 _ _ _ SURROUND OFF A C S U 4 _ _ _ SURROUND 3D HALL A C S U ...

Страница 66: ...e recommended distance Be careful of your surroundings when viewing 3D images When you view 3D images objects may appear at a distance closer or farther than the actual TV screen This may cause you to misjudge the distance to the TV screen and possibly result in injury if you accidentally hit the screen or surrounding objects The 3D glasses are not recommended for people aged less than 6 When chil...

Страница 67: ... to 2D mode 3 Take off the 3D glasses and turn off the power of the 3D glasses Press the power button for at least two seconds The LED light lights for two seconds NOTE If the input signal switches to 2D 2D images are displayed automatically 3D mode is canceled automatically when the setting is changed input source is changed the input signal resolution is changed or the power is turned off Receiv...

Страница 68: ...D s 3D convert effect is available only when selecting 2D s 3D refer to Watching 2D images in 3D shown above B button 3D setup Page 67 Configuring the TV settings to enhance 3D image viewing You can make various settings to enhance 3D image viewing 3D picture adjustments E Basic operation Go to HOME TV Menu Setup Picture select adjust the item you want to set NOTE Which items can be selected adjus...

Страница 69: ...till image effect adjustment This function can be adjusted when viewing 3D still images in USB media mode Even if you selected Auto the 3D still image effect depth may not be correctly adjusted depending on the 3D still image 3D still images taken in macro mode will be displayed with excessive depth If you experience discomfort while viewing 3D images immediately discontinue viewing 3D still image...

Страница 70: ...s may not be displayed correctly Caution during viewing Do not use devices that emit strong electromagnetic waves such as cellular phones or wireless transceivers near the 3D glasses Doing so may cause the 3D glasses to malfunction The 3D glasses cannot operate fully at extreme high or low temperatures Use them within the specified usage temperature range If the 3D glasses are used in a room with ...

Страница 71: ... correct Pages 25f28 Is the correct input source selected Page 17 Is a non compatible signal being input Page 61 Is the picture adjustment correct Pages 32f33 Is the antenna connected properly Page 9 Is On selected in Audio only Page 35 No sound Is the volume too low Make sure that headphones are not connected Check if you pressed e on the remote control unit Is the proper item selected in the Aud...

Страница 72: ...Ensure that your TV software version is always up to date From time to time SHARP will make updated TV base software and DVB software available View setting Download setup Go to HOME TV Menu Setup View setting Individual setting Standby search Download setup Searching for updates The TV automatically determines whether a new software version is available when the TV is in standby mode Item Yes Aut...

Страница 73: ...ough the network Go to HOME TV Menu Setup Information Software update Network update and follow the on screen instruction A broadband connection and Network setup are required to update the software using the internet Pages 45 46 2 Press A and then insert the USB device containing the software update file CAUTION Be sure to insert the USB device correctly into the terminal 3 The TV displays a conf...

Страница 74: ...sidiaries and are used under license ABOUT DIVX VIDEO DivX is a digital video format created by DivX LLC a subsidiary of Rovi Corporation This is an official DivX Certified device that plays DivX video Visit divx com for more information and software tools to convert your files into DivX videos ABOUT DIVX VIDEO ON DEMAND This DivX Certified device must be registered in order to play purchased DivX...

Страница 75: ...50Hz 720P 60Hz 1080I 50Hz 1080I 60Hz 1080P 50Hz 1080P 60Hz 1080P 24Hz HDMI 4 HDMI HDMI input 480I 576I 480P 576P 720P 50Hz 720P 60Hz 1080I 50Hz 1080I 60Hz 1080P 50Hz 1080P 60Hz 1080P 24Hz USB 1 USB 1 USB 2 HDD USB USB 3 WIRELESS LAN USB ETHERNET 10 100 Network connector AUDIO IN HDMI 2 PC φ 3 5 mm jack 2 DIGITAL AUDIO OUTPUT Optical S PDIF digital audio output OUTPUT Headphones φ 3 5 mm jack audio...

Страница 76: ...E To attach the stand perform the above steps in reverse order As the TV is very heavy be careful when moving it LC 52LE835X LC 46LE835X LC 40LE835X 1 Loosen the screw used to secure the stand cover and remove the cover 2 Remove the stand 1 Unfasten the screws used to secure the stand in place 2 Detach the stand from the TV hold the stand so it will not drop from the edge of the base area LC 40LE8...

Страница 77: ...ears no responsibility for improper mounting or mounting that results in accident or injury You can ask qualified service personnel about using an optional bracket and attachment to mount the TV to a wall When you mount the TV on a wall you should attach the supporting post Detach the AC cord holder on the rear of the TV before mounting the TV on a wall Only for 40 inch models Hanging on the wall ...

Страница 78: ... 4 3 41 4 26 4 2 160 AN 52AG4 LC 52LE835X 400 400 180 19 215 293 131 1206 787 738 648 0 1 436 507 1152 0 1 298 109 400 101 312 20 33 4 3 41 4 26 4 2 AN 52AG4 1 Active area 2 Thinnest part 3 Excluding projecting part 4 Including projecting part NOTE Dimensions do not include protrusions such as screws and some parts Appendix ...

Страница 79: ...4 3 41 4 26 4 2 AN 52AG4 LC 40LE835X 300 300 124 231 50 328 938 116 636 588 65 885 6 1 360 460 174 264 120 271 498 15 1 19 20 33 4 3 41 4 26 4 2 AN 37AG2 AN 37P30 1 Active area 2 Thinnest part 3 Excluding projecting part 4 Including projecting part NOTE Dimensions do not include protrusions such as screws and some parts Appendix ...

Страница 80: ...ress and hold both CHr and VOL on the TV simultaneously until the message appears on the screen NOTE To set the password again refer to Password on page 38 and follow the instructions The Password is NOTE As a precautionary measure make a note of your password above remove it from this manual and keep it in a familiar place Appendix ...

Страница 81: ...79 Memo ...

Страница 82: ...80 Memo ...

Страница 83: ...MILE 09 573 0113 FOR LOCATION ENQUIRIES WITHIN AUSTRALIA REGARDING YOUR LOCAL SHARP APPROVED SERVICE CENTRE VISIT OUR WEBSITE AT www sharp net au OR CALL SHARP CUSTOMER CARE 1300 135 022 SHARP CORPORATION OF AUSTRALIA PTY LTD SPform019 JUNE 2004 LOCAL CALL COSTS APPLY WITHIN AUSTRALIA SHARP APPROVED SERVICE CENTRE www sharp net nz CONTACT YOUR SELLING DEALER RETAILER OR CALL ...

Страница 84: ...Printed in Malaysia TINS F342WJZZ 11P10 MA NP ...

Отзывы: