background image

w

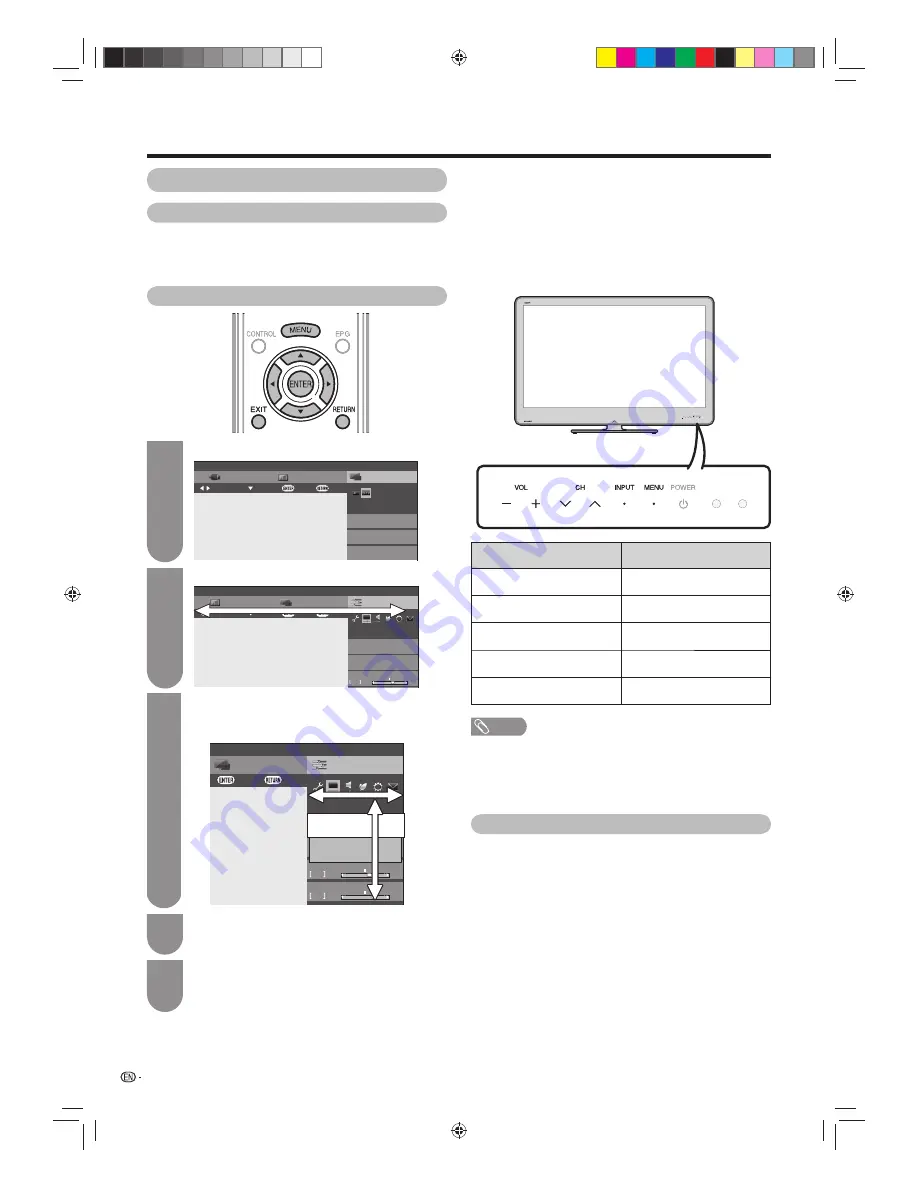
 Using the control panel of the TV

You can also operate the Menu using the control panel 
of the TV.
Button operations on the control panel correspond to 
the ones on the remote control as shown below.

NOTE

•  Menu options differ in the selected input modes, but the 

operating procedures are the same.

•  The screens in the operation manual are for explanation 

purposes (some are enlarged, others cropped) and may 
vary slightly from the actual screens.

About Menu operations

TV control panel buttons

Remote control buttons

INPUT

ENTER

CH

 r

a

CH

 s

b

VOL 

k

d

VOL 

l

c


18

CH list

EPG

Menu

DTV

:Exit

:Enter

:Select

:Select menu

TV2

HD ColorBar

TV1

SD Moving

TV3

H264 SD-Color Pat…

001

002

003

Link

operation

Preparation

Basic Menu operations

What is Menu?

•  You need to bring up the On-Screen Display to perform 

settings for the TV. The On-Screen Display for the settings 
is called “Menu”.

•  The Menu can be operated with the remote control unit.

Press 

MENU

 and the MENU screen displays.

Press 

c

/

d

 to select the desired menu.

Press 

a

/

b/c/d

 to select the desired menu 

item. 
Press 

ENTER

 to proceed if necessary.

1

2

3

Press 

EXIT

 or 

MENU

 to exit the MENU.

Press 

RETURN

 as necessary to return to the 

previous MENUs.

5

Press 

a

/

b

 or 

c

/

d

 to select the desired item 

or adjust the item to the desired level. Press 

ENTER

 if necessary.

4

About Guide Display

The operations differ depending on the functions and 
menu items. Refer to the guide display for the key 
buttons.

Setup

CH list

Menu

Picture

:Exit

:Enter

:Select

:Select Menu

Backlight

AV mode

OPC

[Off]

[STANDARD]

STANDARD

-16

+16

+3

EPG

Setup

CH list

Menu

Picture

:Back

:Enter

Backlight

STANDARD

-16

+16

+3

+30

Contrast

0

+40

AV mode

Select picture and audio quality 

[STANDARD]

40LE820X_en_au.indd   18

40LE820X_en_au.indd   18

2010/06/18   16:11:23

2010/06/18   16:11:23

Содержание Aquos LC-40LE820X

Страница 1: ...MODEL LC 40LE820X LC 46LE820X LC 52LE820X LCD COLOUR TELEVISION OPERATION MANUAL cover_40LE820X_au indd 1 cover_40LE820X_au indd 1 2010 06 18 16 14 17 2010 06 18 16 14 17 ...

Страница 2: ...Printed in Malaysia TINS E735WJZZ 10P06 MA NG cover_40LE820X_au indd 2 cover_40LE820X_au indd 2 2010 06 18 16 14 19 2010 06 18 16 14 19 ...

Страница 3: ...tput 14 Inserting the batteries 15 Using the remote control unit 15 Cautions regarding the remote control unit 15 Turning the TV on off 16 Turning on off the power 16 Standby mode 16 Supplying electric power to the antenna 16 Initial auto installation 17 Checking signal strength and channel strength 17 About Menu operations 18 What is Menu 18 Basic Menu operations 18 About Guide Display 18 Watchin...

Страница 4: ...nalogue DTV Digital buttons 40 EPG 41 Basic settings 41 EPG display settings 41 Selecting a programme using EPG 42 Basic operation 42 Selecting a programme 42 Timer setting using EPG 44 Cancelling the timer setting 44 Time zone 44 MHEG 5 EPG setting 44 AQUOS LINK Controlling HDMI devices using AQUOS LINK 45 AQUOS LINK connection 46 Connecting an AQUOS BD Player via the AQUOS LINK compatible audio ...

Страница 5: ...ng Subtitles 61 Switching subtitle languages 61 Using the MHEG 5 application 61 Other useful features Connecting a USB device 62 Connecting a Home network server 62 USB media Home network 62 Video mode 63 Music mode 64 Photo mode 64 DivX setup 65 List of files compatible with USB mode 65 Tool menu items 66 Appendix Troubleshooting 67 Troubleshooting Digital broadcasting 67 Reset 68 Download setup 6...

Страница 6: ...r Do not clean with excessive force so as to avoid the scratch of the panel surface If dust sticks on the surface of the LCD panel clean the panel with a commercially available cleaning brush anti static brush Trademarks SRS TruSurround HD creates an immersive feature rich surround sound experience from two speakers complete with rich bass high frequency detail and clear dialogue HDMI the HDMI log...

Страница 7: ...hand on each side of the TV In case the product is dropped and the cabinet is damaged be sure to turn off the power of the product and unplug the power cord If you continue to use the product it may cause fire or electric shock Contact your dealer Do not open the rear cover of the cabinet to reconstruct the circuits There exists high voltage within the cabinet and it may cause electric shock and in...

Страница 8: ...ovided with the product See the following CAUTION notes CAUTION The stand is made of tempered glass Read the following precautionary instructions carefully and use it properly Do not drop or place unnecessary stress on it when assembling and attaching the stand Be sure to not accidentally hit the glass part of the stand with a sharp or hard object as it may cause the glass to break Using tempered ...

Страница 9: ... edge of the base area NOTE When attaching the stand with the TV laying flat spread a soft cushion on the table and lay the TV on it To detach the stand perform the steps in reverse order Angle adjustment You can rotate up to 20 degrees to the right or left CAUTION Adjust the screen with both hands Place one hand on the TV and rotate the screen while holding the bottom of the stand the black part i...

Страница 10: ...rom the top and tighten the screws to secure the TV to the table Use commercially available screws of the proper size to firmly secure the TV 3 Fixing the TV to the table Attach the supplied restraining brackets to the stand with two supplied screws Place the TV on the soft cushion 1 2 CAUTION As this product is heavy use a table that is wide enough to support the product and capable of withstandin...

Страница 11: ... from the actual operations The Illustrations used throughout this manual are based on LC 40LE820X TV Front 1 VOL k l Volume up down buttons 2 CH r s Channel up down buttons 3 INPUT button 4 MENU button 5 POWER a On Off button 6 OPC sensor 7 Remote control sensor 8 Illumination LED 1 2 3 4 5 6 7 8 40LE820X_en_au indd 9 40LE820X_en_au indd 9 2010 06 18 16 11 12 2010 06 18 16 11 12 ...

Страница 12: ...d in You can set the volume to different levels for each input source Volume display when headphones are plugged in 20 OUTPUT Headphones AUDIO L R terminal INPUT6 HDMI terminal DIGITAL AUDIO OUTPUT terminal INPUT4 HDMI ARC terminal INPUT7 HDMI terminal INPUT3 PC input terminal USB terminal ETHERNET 10 100 terminal AUDIO IN terminal The AUDIO IN terminal can use the same audio input terminal INPUT3...

Страница 13: ...TV only Switch between radio and data mode When only data broadcasting no radio broadcasting is transmitted by DVB the radio broadcasting will be skipped DISPLAY Displays the channel or input information 18 INPUT INPUT SOURCE Select an input source ATV DTV INPUT1 INPUT2 INPUT3 PC INPUT4 INPUT5 INPUT6 INPUT7 and USB See pages 13 14 50 to 52 and 54 19 ECO Select Energy save setting See page 30 20 AV...

Страница 14: ...n to the AC outlet Place the TV close to the AC outlet and keep the power plug within reach Disconnect the AC cord from the AC outlet if the TV will not be used for a long period of time TV rear view Connecting the antenna cable To enjoy a clearer picture use an outdoor antenna The following is a brief explanation of the types of connections that are used for coaxial cable Standard DIN45325 plug I...

Страница 15: ...nd other audiovisual equipment When using HDMI cable commercially available When using component cable commercially available NOTE When using a DVI HDMI conversion adaptor input the Audio Signal from the AUDIO terminal of AUDIO IN See page 50 When using component cable commercially available Connecting external devices You can connect many types of external equipment to your TV like a VCR game con...

Страница 16: ...software Connecting a Digital TV STB Set Top Box You can use the INPUT4 ARC INPUT5 INPUT6 INPUT7 HDMI or the INPUT1 component INPUT2 composite terminals when connecting to a Digital TV STB Set Top Box and other audiovisual equipment NOTE When using a DVI HDMI adaptor or conversion cable input the Audio Signal from the AUDIO terminal of AUDIO IN See page 50 When using HDMI cable commercially availa...

Страница 17: ...mpartment 2 Insert the two supplied AAA size alkaline batteries 3 Close the battery cover 5 m Use the remote control unit by pointing it towards the remote sensor window Objects between the remote control unit and sensor window may prevent proper operation Cautions regarding the remote control unit Do not subject the remote control unit to shock In addition do not soak the remote control unit with...

Страница 18: ...ess ENTER 7 Press c d to select On and then press ENTER 8 Press DTV to access DTV mode 1 Press b c d to select View setting 4 Press a b to select Channel settings and then press ENTER 5 POWER button POWER a button NOTE If you are not going to use this TV for a long period of time be sure to remove the AC cord from the AC outlet Minor power is consumed when the unit is in standby mode Turning on of...

Страница 19: ...rd does not appear The auto installation function allows you to execute the auto installation again from the Setup menu See page 19 The initial auto installation wizard will go off if you leave the TV unattended for 30 minutes before searching for channels in step 5 Press MENU and the MENU screen displays 1 Checking signal strength and channel strength If you install a DTV antenna for the first tim...

Страница 20: ... to perform settings for the TV The On Screen Display for the settings is called Menu The Menu can be operated with the remote control unit Press MENU and the MENU screen displays Press c d to select the desired menu Press a b c d to select the desired menu item Press ENTER to proceed if necessary 1 2 3 Press EXIT or MENU to exit the MENU Press RETURN as necessary to return to the previous MENUs 5...

Страница 21: ...ired language listed on the screen and then press ENTER Press c d to select Digital search or Analogue search and then press ENTER You do not need to do anything during the auto search Press c d to select Yes and then press ENTER 6 Watching TV Setting channels automatically You can run auto installation again even after setting up the preset channels Press b c d to select View setting 3 Setup CH l...

Страница 22: ...owed by 2 To select a 3 digit channel e g channel 123 Press 1 followed by 2 and 3 Watching TV 20 Changing the volume You can change the volume on the TV or on the remote control unit To increase the volume press VOL e To decrease the volume press VOL f NOTE TV INPUT1 INPUT2 INPUT3 PC INPUT4 ARC INPUT5 INPUT6 INPUT7 and USB modes can store volume adjustment values separately Selecting programmes Ad...

Страница 23: ... 7 Press a b to select the desired menu item and then press ENTER 6 Buttons for Manual Adjust operation Menu items Remote control buttons Description Lock R When the service is locked you must enter your password whenever you tune to the service CH Skip G Services with a mark are passed over when pressing r s in the TV remote control unit Delete Y The service is deleted from the list Execute one o...

Страница 24: ...Lock Search 48 25 PAL I Off Off Press a b to select item and press ENTER Next Search the next channel Store Memorise the current display channel Cancel Return to the previous screen The search result will not be stored 3 Fine tuning Press a b c d to select the channel you want to edit and then press ENTER The selected channel information displays 1 Press a b to select Fine and then press ENTER 2 P...

Страница 25: ...iewing of any channel Press a b c d to select the channel you want to edit and then press ENTER The selected channel information will be displayed 1 Press a b to set Lock to On and then press ENTER 3 Fine Colour sys Off On Sound sys Label Skip Lock Search 48 25 PAL I Off Off Press a b to select Lock and then press ENTER Child lock menu will be displayed 2 Lock menu NOTE See page 28 for setting a p...

Страница 26: ...ect View setting 3 Press a b to select Channel settings and then press ENTER 4 The Programme setup screen displays and then press ENTER If you have already set the password enter it here See page 28 for setting a password The Analogue setting screen displays and then press ENTER The Programme setup screen displays and then press ENTER If you have already set the password enter it here See page 28 ...

Страница 27: ...n to switch back to the currently tuned channel Press A to toggle between the currently selected input source and the previously selected one Press A to return to the previous page in teletext mode Outputting only audio When listening to music from a music programme you can set the display off and enjoy audio only Press MENU and the MENU screen displays 1 Press c d to select Setup 2 Press a b to s...

Страница 28: ...electing the Language Switching subtitle languages Each time you press on the remote control the subtitle switches when the broadcast contains subtitle information 2 Press MENU and the MENU screen displays Press c d to select Setup 6 Press a b to select Subtitle and then press ENTER Press a b to select For hearing impaired 1 5 7 Press c d to select Yes H Displaying subtitles for the hearing impair...

Страница 29: ...tches between STEREO and MONO When receiving a monaural signal When you press MPX MONO displays When receiving a bilingual signal Each time you press MPX the mode switches among CH A CH B and CH AB Stereo mode Bilingual mode Monaural mode Stereo mode Bilingual mode Monaural mode Switching the digital audio format If multi sound modes are received each time you press MPX the mode switches as follow...

Страница 30: ...ss ENTER 7 Password Yes No Setting Password You can change or clear Password Enter your new password Use 4 digits Enter the password again to confirm Enter the 4 digit number as a password using 0 9 8 NOTE As a precautionary measure make a note of your password on the back of this operation manual cut it out and keep it in a safe place that children cannot reach See page 75 This function is only a...

Страница 31: ...control panel buttons on the TV Selected item Description No block Cancel the blocking Age 4 18 years Select desired age to block Example If age 14 is selected programmes rated for ages of 15 or more are blocked General and above G Content is not offensive to most viewers Parental guidance and above PG Content is such that parents may not want their children to view the programme Mature and above ...

Страница 32: ...Press c d to select Setup 2 Press a b to select ECO picture control 4 Press c d to select On or Off 5 Press a b to select Energy save and then press ENTER 4 Press a b to select Standard or Advanced and then press ENTER 5 Selected item Description Standard Reduces the backlight brightness Advanced Reduces the backlight brightness more than Standard Off The backlight brightness is the same value of ...

Страница 33: ...o select ECO 3 Press b c d to select ECO 3 Selecting the Wide Screen Signalling WSS picture size automatically WSS allows a television to switch automatically among the different screen formats Press MENU and the MENU screen displays 1 Press c d to select Setup 2 Press a b to select WSS 4 Press c d to select On or Off 5 NOTE Try to set WIDE mode if an image does not switch to the correct screen fo...

Страница 34: ...he wide mode options selectable for the type of TV video signal currently received 1 Press WIDE or a b while the WIDE MODE menu displays on the screen As you toggle down the options each mode is immediately reflected on the TV 2 WIDE MODE Normal Zoom 14 9 Panorama Full Cinema 16 9 Cinema 14 9 4 3 Mode set to Panorama 4 3 Mode set to Normal Auto Selection If you set WSS and 4 3 Mode in the Setup men...

Страница 35: ...select a different AV mode item for each input mode For example select STANDARD for TV input and DYNAMIC for VIDEO input The item marked with is available only when selecting INPUT4 INPUT5 INPUT6 INPUT7 or INPUT3 PC from the INPUT in the CH list menu The item marked with is available only when accepting an x v Colour signal through an HDMI terminal Press AV MODE Present AV MODE displays Press AV M...

Страница 36: ...tup CH list Menu Picture Exit Enter Select Backlight AV mode OPC Off STANDARD STANDARD 16 16 3 Manual picture settings Selected item cbutton dbutton OPC Sets whether or not the screen brightness is automatically adjusted according to the lighting condition in the room OPC setting See this page Backlight The screen dims The screen brightens Contrast For less contrast For more contrast Brightness Fo...

Страница 37: ...ustment range of the gamma can be set to a maximum of 2 and a minimum of 2 by pressing c or d H Film mode Automatically detects a film based source originally encoded at 24 25 frames second depending on the vertical frequency analyses it then recreates each still film frame for high definition picture quality H Active contrast Automatically adjusts the contrast of an image according to the scene H DN...

Страница 38: ... Setup 2 Press a b to select Position and then press ENTER 5 Press a b to select H Pos or V Pos 6 Press c d to adjust the item to your desired position 7 Position Display position adjustment 0 H Pos 0 8 8 V Pos 8 8 NOTE For resetting all adjustment items to the factory preset values press a b to select Reset and then press ENTER Adjustments are stored separately according to input source Images ma...

Страница 39: ...ime On half hourly Display the clock time in 30 minutes increments Off Hide the clock time On On half hourly Off Displaying the clock On Off Time format Time display 24HR AM PM Selecting time format Time format Time display Press c d to select Setup 2 Press c d to select Setup 2 Press a b to select Time display and then press ENTER 5 Press b c d to select View setting 3 Press a b to select Individ...

Страница 40: ...ing DVD movies and TV programmes broadcast in surround sound Off Outputs the normal sound Press b c d to select Audio Press MENU and the MENU screen displays 1 3 Press c d to select On or Off Press a b to select SRS TS HD 4 5 Press c d to select Setup 2 Press c d to select Setup 2 Automatic volume adjustment Different sound sources sometimes do not have the same volume level such as a programme an...

Страница 41: ...lay your desired programme and then press ENTER When you press ENTER the TV jumps to the channel 2 CH list EPG Menu DTV Exit Enter Select Select menu TV2 HD ColorBar TV1 SD Moving TV3 H264 SD Color Pat TV4 H264 HD Monosco SD Color Pattern HD Moving SD Colour Bar MPEG SD Moving 005 006 007 008 001 002 003 004 Link operation Info While watching DTV you can check the extended programme information on...

Страница 42: ...installation to set channels automatically To watch the analogue TV select Auto installation from Setup menu See page 19 1 DTV Digital TV When the TV accesses to DTV mode for the first time you need to run the auto search To scan all available services in your area follow the procedures below After setting the channels you can select a channel using CHr s or 0 9 on the remote control unit See page ...

Страница 43: ...EPG is set to No only EPG data for the current channel will be updated Selecting EPG to Yes will result in higher power consumption Selecting EPG to No will save power consumption NOTE Approximately 16W for 15 30 minutes depending on number of channels tuned after power off from remote control EPG data will not update if the TV is turned off from the mains power switch EPG cannot be selected when ...

Страница 44: ...een 1 Press c d to select the time span you want to search Continue to press d to display programmes in the next time span 2 Press a b to select the desired programme If a or b are displayed on the left of the services continue to press a b to display next or previous screen H Close the EPG screen Press EPG again Selecting a programme 3 Check programme information Press a b c d to select the progr...

Страница 45: ...7 43 4 Search a programme in a category Press G 1 Press a b to select the desired genre and then press ENTER 2 Press a b to select a programme you want to watch and then press ENTER 3 5 Search for a programme by date time Press Y 1 Press c d to select the desired time span and then press ENTER 2 Press a b to select the desired programme and then press ENTER 3 NOTE When you select a programme outsi...

Страница 46: ... zone and then press ENTER 5 6 Press b c d to select View setting 3 Press a b to select Individual setting and then press ENTER 4 NOTE This function lets you select the right time zone in case the time displayed in the EPG does not match the local time of your area When the country setting is set to Australia this function is available When the country setting is set to Singapore or New Zealand th...

Страница 47: ...DMI devices You can select which HDMI device to operate using OPTION Controlling the AQUOS LINK compatible audio system You can adjust the volume and select the sound mode of the AQUOS LINK compatible audio system NOTE Point the remote control toward the TV not to the connected HDMI device Video noise may occur depending on the type of HDMI certified cables used Make sure to use a HDMI certified cab...

Страница 48: ...able commercially available HDMI certified cable HDMI certified cable HDMI certified cable AQUOS BD Player AQUOS LINK compatible audio system AQUOS BD Player AQUOS LINK Setup Press OPTION and the Link operation screen displays 1 Press a b to select AQUOS LINK setup and then press ENTER 2 AQUOS LINK Auto power on If this is activated the One Touch Play function is enabled While the TV is in standby mo...

Страница 49: ...elect AQUOS LINK setup and then press ENTER 2 Press a b to select Selecting channel key and then press ENTER 3 Connection for using Audio return channel You need to use ARC compatible cables devices and connect to the INPUT4 terminal to activate this function The connection method is the same as the Connecting an AQUOS BD player only on page 46 Press OPTION and the Link operation screen displays 1...

Страница 50: ... power on off and then press ENTER 2 Every time you press ENTER in Recorder power on off the CEC compatible recorder will be turned on off 3 Recorder power on off This function is for turning of the CEC compatible recorder on off NOTE You can go to Top menu title list from Link operation in the menu screen Press OPTION and the Link operation screen displays 1 NOTE You can go to Recorder power on o...

Страница 51: ...operation manual of the AQUOS LINK compatible audio system for details 3 1 Press a b to select Change audio output device and then press ENTER 2 Press a b to select Change audio output device and then press ENTER 2 Press OPTION and the Link operation screen displays 1 Press a b to select Media change and then press ENTER Selecting media type for CEC compatible recorder If your recorder has multipl...

Страница 52: ...ut the audio and picture from an HDMI output device on the TV select INPUT4 INPUT5 INPUT6 or INPUT7 by switching the input source HDMI output device Selected items Description Enable Disable Set whether or not to use WIDE MODE based on signal recognition including an HDMI signal Settings when using HDMI output devices HDMI cable commercially available Press c d to select Setup 3 Press a b to selec...

Страница 53: ...lect Setup 3 Press a b to select Input label and then press ENTER 6 Labelling input sources CH list Menu INPUT Exit Enter INPUT2 INPUT1 INPUT3 INPUT4 INPUT5 DVD INPUT7 Home network USB Not switchable Switchable Switchable Switchable Switchable Switchable Switchable Switchable Switchable Link operation Repeat the above until the name is fully spelt out and then press MENU The name can be 6 characte...

Страница 54: ...lect Colour system and then press ENTER 4 Press a b to select a compatible video signal system of your equipment and then press ENTER 5 Auto PAL SECAM NTSC3 58 NTSC4 43 PAL 60 You can change the colour system to one that is compatible with the image on the screen NOTE Factory preset value is Auto If Auto is selected colour system for input signal is automatically set If an image does not display c...

Страница 55: ...elect Option Press MENU and the MENU screen displays 1 3 Press a b to select the desired item and then press ENTER After you select Off or Standby press c d to select Yes and then press ENTER 5 2 Press c d to select Setup 4 Press a b to select Illumination and then press ENTER Selected items Description Off The LED is not illuminated Standby The LED is illuminated while the TV is in standby mode W...

Страница 56: ...available RGB cable Commercially available HDMI Connection PC PC INPUT 4 5 6 7 INPUT 5 HDMI certified cable ø 3 5 mm stereo minijack cable DVI HDMI cable Audio select for connecting a PC When using the INPUT3 PC terminal you must select which terminal uses the AUDIO R L jack for analogue audio input Go to MENU s Setup s Option s Terminal setting s PC input s Audio select Selected items Description...

Страница 57: ... for view and then press ENTER Input Signal Cinema Normal 1024g768 For viewing wide screen programs The top and bottom of the image is slightly cropped Keeps the original aspect ratio in a full screen display Full Dot by Dot An image fully fills the screen Detects the resolution of the signal and displays an image with the same number of pixels on the screen Input Signal Full Dot by Dot An image fu...

Страница 58: ...kers with vertical stripes Phase Adjusts when characters have low contrast or when the image flickers Adjusting the PC image automatically Adjusting the PC image manually Connecting a PC Press c d to select Yes and then press ENTER Auto Sync starts 7 NOTE Auto Sync is likely to succeed when an input PC image has wide vertical stripes e g pattern with high contrast stripes or cross hatched It may fa...

Страница 59: ...S 232C connector The TV operates according to the received command and sends a response message to the PC Do not send multiple commands at the same time Wait until the PC receives the OK response before sending the next command Command format Parameter Input the parameter values aligning left and fill with space s for the remainder Be sure that four values are input for the parameter When the input...

Страница 60: ...D T D W _ _ _ _ DTV CHANNEL DOWN AV MODE SELECTION A V M D 0 _ _ _ TOGGLE A V M D 1 _ _ _ STANDARD A V M D 2 _ _ _ MOVIE A V M D 3 _ _ _ GAME A V M D 4 _ _ _ USER A V M D 5 _ _ _ DYNAMIC Fixed A V M D 6 _ _ _ DYNAMIC A V M D 7 _ _ _ PC A V M D 8 _ _ _ x v Colour A V M D 1 0 0 _ AUTO VOLUME V O L M _ _ VOLUME 0 60 POSITION H P O S _ H POSITION AV fnn nn H P O S _ H POSITION PC fnn nn V P O S _ V PO...

Страница 61: ...hes as shown to the upper right If you select a programme with no Teletext signal No Teletext available is displayed The same message displays during other modes if no teletext signal is available TELETEXT TELETEXT When viewing the teletext information Press CHr to increase the page number Press CHs to decrease the page number Button functions Colour Red Green Yellow Blue You can select a group or...

Страница 62: ...avian Turkish German Spanish Italian Greek Cyrillic English Russian Estonian Czech German Slovenian Croatian Ukrainian Lettish 3 4 Press b c d to select View setting Press a b to select Individual setting and then press ENTER Initial teletext page setting If you set the language of the initial page this page is displayed for the first time after pressing m for teletext in DTV mode it will start fro...

Страница 63: ...le screen NOTE Subtitle will not be displayed when the service does not contain subtitle information Displaying Subtitles You can display subtitles as they are transmitted Teletext function Switching subtitle languages Refer to Switching subtitle languages on page 26 Using the MHEG 5 application Some services bring you programmes with the MHEG application encoded letting you experience DTV interac...

Страница 64: ...ere is only one drive in the connected USB device or there is only one Home network server connected to the TV 16 is the maximum number of USB drives and 10 is the maximum number of Home network servers that can be displayed Press ENTER 3 CAUTION Do not use a USB extension cable when connecting a USB device to the USB terminal of the TV Using a USB extension cable may prevent the TV from performin...

Страница 65: ...ion panel You can call up this operation panel by pressing CONTROL on the remote control unit or select Control USB from Option s Option for view Reverse fast forward continues from one file to another during continuous playback H Viewing video Video_01 wmv 0 00 05 0 03 34 0 00 05 538 Video_01 wmv Previous Next REW FWD Play Pause Back Guide off On Stop Resume jump Video mode Folder 1 Folder 2 Folde...

Страница 66: ...en selecting a photo thumbnail Display the photo in full screen a b c d Cursor Select a desired item B button Go to the USB menu in the USB mode Go to the Home network menu in the Home network mode R button Select deselect photos shown in the slide show in the USB mode Move to the parent folder in the Home network mode G button Selecting BGM This is not available in the Home network mode Y button ...

Страница 67: ...rate USB device USB Memory USB card reader Mass Storage class File system FAT FAT32 Photo file format JPEG jpg DCF2 0 compliant Music file format MP3 mp3 Bitrate 32 k 40 k 48 k 56 k 64 k 80 k 96 k 112 k 128 k 160 k 192 k 224 k 256 k 320 kbps Sampling frequency 32 k 44 1 k 48 kHz DivX setup This is the function to confirm your registration code Press a b to select DivX R setup and then press ENTER 4 1...

Страница 68: ...34 NOTE Some menu items may not be displayed depending on the selected input source Audio Auto volume Page 38 Treble Page 38 Bass Page 38 Balance Page 38 SRS TS HD Page 38 Bass enhancer Page 38 Reset Page 38 Clear voice Page 38 Programme info Page 39 Wide mode Page 32 Control USB Page 63 Screen effect Channel selecting effect Page 53 Programme title display Page 29 Position Page 36 Link operation ...

Страница 69: ...d See page 51 Is the picture adjustment correct See pages 34 to 36 Is the antenna connected properly See page 12 Is On selected in Audio only See page 25 No sound Is the volume too low See page 20 Make sure that headphones are not connected See page 10 The TV sometimes makes a cracking noise This is not a malfunction This happens when the cabinet slightly expands and contracts according to changes...

Страница 70: ...epeat steps 1 to 8 to change to HOME mode Download setup The TV automatically determines whether a new software version is available when the TV is in standby mode Go to Menu s Setup s View setting s Individual setting s Standby search s Download setup Selected item Description Yes Automatically searches for new software updates available when the TV is in standby mode No Does not search for updat...

Страница 71: ...ware developed by the University of California Berkeley and its contributors libjpeg This software is copyright 1991 1996 Thomas G Lane Portions of this software are based in part on the work of the Independent JPEG Group Portions copyright 2004 Intel Corporation 69 Appendix Updating your TV via USB This function allows you to update to the latest software using a USB device You must update the so...

Страница 72: ... 1080P 24Hz INPUT 7 HDMI HDMI input 480I 576I 480P 576P 720P 50Hz 720P 60Hz 1080I 50Hz 1080I 60Hz 1080P 50Hz 1080P 60Hz 1080P 24Hz DIGITAL AUDIO OUTPUT Optical Digital audio output RS 232C 9 pin D Sub male connector ETHERNET 10 100 Home network connector USB USB OUTPUT Ø 3 5 mm jack Audio output OSD language English Simplified Chinese Arabic Power requirement AC 110 240 V 50 60 Hz Power consumptio...

Страница 73: ...7 659 48 404 890 6 503 2 Dimensional drawings 400 400 211 1127 734 444 785 51 1023 4 577 6 540 340 39 158 106 67 39 71 Unit mm Appendix LC 40LE820X LC 46LE820X 40LE820X_en_au indd 71 40LE820X_en_au indd 71 2010 06 18 16 13 06 2010 06 18 16 13 06 ...

Страница 74: ...ional drawings Continued Unit mm Appendix LC 52LE820X 1157 400 1260 540 340 39 39 106 158 67 653 484 861 811 50 400 172 72 40LE820X_en_au indd 72 40LE820X_en_au indd 72 2010 06 18 16 13 06 2010 06 18 16 13 06 ...

Страница 75: ...CR etc from the terminals Detach the four caps at the 4 locations on the rear of the TV 73 1 2 2 1 3 1 Unfasten the 4 screws used to secure the stand in place 2 Detach the stand from the TV Hold the stand so it will not drop from the edge of the base area Remove the screws at the 4 locations on the rear of the TV Loosen the screw used to secure the stand cover and remove the cover 4 2 1 1 Pinch th...

Страница 76: ...ional about using a SHARP recommended AN 37AG2 AN 37P30 or AN 52AG4 bracket to mount the TV to the wall Carefully read the instructions that come with the bracket before beginning work Appendix NOTE Detach the cable clamps on the rear of the TV when using the optional mount bracket Hanging on the wall AN 37AG2 AN 37P30 and AN 52AG4 wall mount bracket See the bracket instructions for details Vertic...

Страница 77: ...d both CHr and VOL k on the TV simultaneously until the message appears on the screen Press MENU and the MENU screen displays 1 Press c d to select Setup 2 Press a b to select Individual setting and then press ENTER 4 Press a b to select Password and then press ENTER 5 Press b c d to select View setting 3 NOTE To set the password again refer to Password setting for the child lock on page 28 and fo...

Страница 78: ...76 Memo 40LE820X_en_au indd 76 40LE820X_en_au indd 76 2010 06 18 16 13 11 2010 06 18 16 13 11 ...

Отзывы: