background image

Using external equipment

Displaying an external      
equipment image

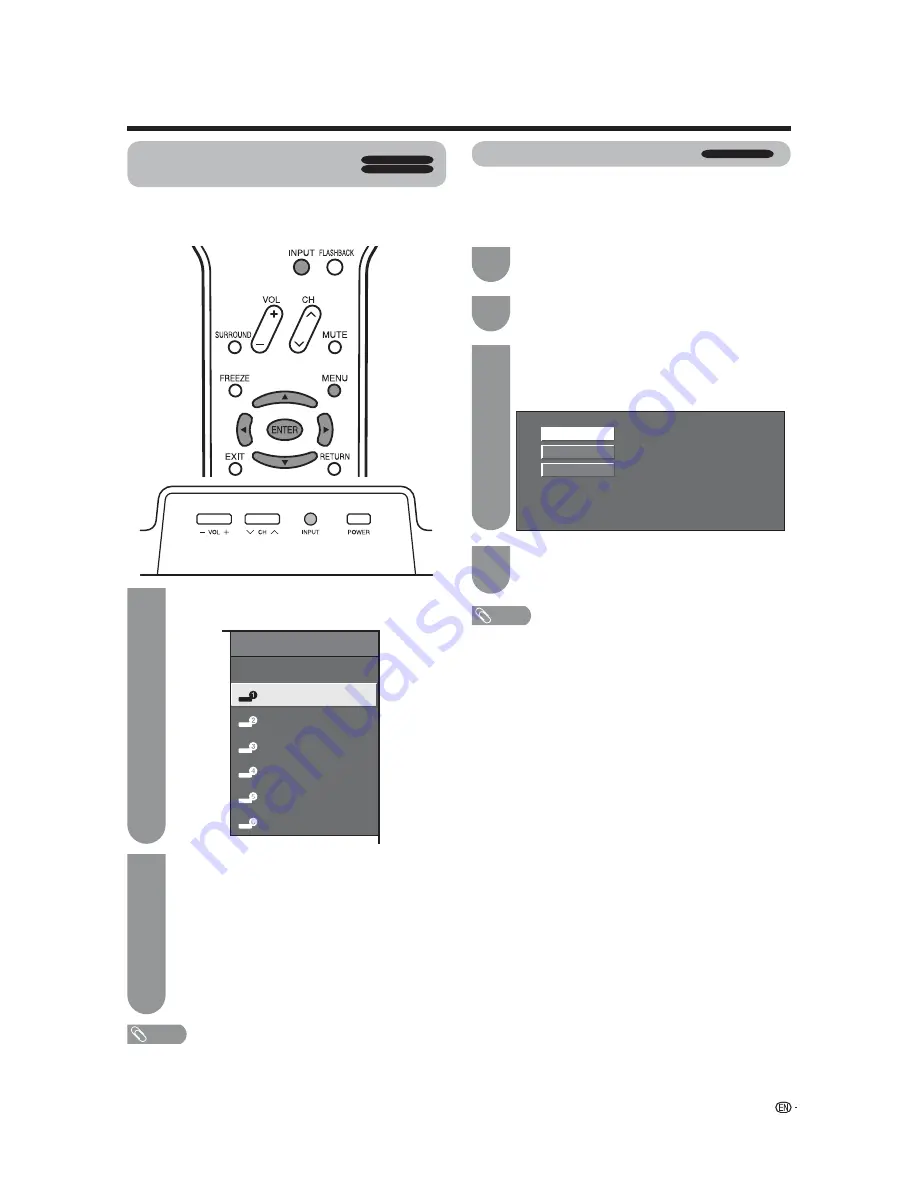
To view external source images, select the input 
source from 

INPUT

 on the remote control unit or on 

the TV.

Input Select

If the image does not come in clearly from the external 
equipment connected to INPUT 1 or 2 (LC-42HT3U 
only), you may need to change the input signal type 
setting on the “Input Select” menu.

Press 

a

/

b

 to select the signal type you want 

to set, and then press 

ENTER

.

•  If the selected signal type is incorrect, images are 

not displayed or displayed without any color.

Press 

MENU

 to display the MENU screen, and 

then press 

c

/

d

 to select “Option”.

Press 

a

/

b

 to select “Input Select”, and then 

press 

ENTER

.

NOTE

•  Refer to your external equipment operation manual for the 

signal type.

•  If you set INPUT 1 or 2 (LC-42HT3U only) to Auto, the TV 

will automatically select the input signal.

•  Setting INPUT 1 or 2 (LC-42HT3U only) signal selection to 

“Auto” when other equipment is connected will result in the 
following connection priority.

INPUT 1 or 2 (LC-42HT3U only):


1

 COMPONENT VIDEO


2

 VIDEO

Press 

MENU

 to exit.

•  The setting is stored and can be selected on the 

“INPUT SOURCE” menu.

NOTE

•  See pages 33 and 34 for external equipment connection.

Press 

INPUT

.

•  A list of selectable sources appears.

Press 

INPUT

 again to select the input source.

•  An image from the selected source automatically 

displays.

• Each time 

INPUT

 is pressed, the input source 

toggles.

•  You can also select the input source by pressing 

a

/

b

.

•  If the corresponding input is not plugged in, you 

cannot change the input. Be sure to connect the 
equipment beforehand.

1

2

1

3

2

4

INPUT SOURCE

TV

INPUT1

INPUT2

INPUT3

INPUT4

INPUT5

INPUT6

Auto

COMPONENT

VIDEO

PPV TV

NORMAL TV

NORMAL TV

51

Содержание Aquos LC 32HT3U

Страница 1: ...control unit Télécommande Unidad de control remoto AN 32HTRC ENGLISH FRAN Ç AIS ESPAÑOL OPERATION MANUAL FOR HOTEL OPERATOR MODE D EMPLOI POUR HOTELIER MANUAL DE OPERACIÓN PARA EMPRESAS HOTELERAS AN 32HTRC AN H06RCU LC 32HT3U LC 37HT3U LC 42HT3U LC 32HT3U LC 37HT3U LC 42HT3U ...

Страница 2: ...C SHOCK DO NOT REMOVE COVER OR BACK NO USER SERVICEABLE PARTS INSIDE REFER SERVICING TO QUALIFIED SERVICE PERSONNEL 1 ENGLISH Remote Replicator AN H06RCU Remote control unit AN 32HTRC OPERATION MANUAL FOR HOTEL OPERATOR This operation manual is for LODGENET ONCOMMAND NXTV nSTREAMS and SeaChange users This operation manual explains how to set or adjust the TV settings with the Remote Replicator AN ...

Страница 3: ...However there is no guarantee that interference will not occur in a particular installation If this equipment does cause harmful interference to radio or television reception which can be determined by turning the equipment off and on the user is encouraged to try to correct the interference by one or more of the following measures Reorient or relocate the receiving antenna Increase the separation...

Страница 4: ...he apparatus has been exposed to rain or moisture does not operate normally or has been dropped Additional Safety Information 15 Power Sources This product should be operated only from the type of power source indicated on the marking label If you are not sure of the type of power supply to your home consult your product dealer or local power company For products intended to operate from battery p...

Страница 5: ...25 Remote Replicator 26 Part names 26 Inserting the battery 26 Storing the settings from the TV 27 Transferring the settings to the TV 27 Storing the settings from the TV for NXTV users only 27 Transferring the settings to the TV for NXTV users only 27 Configuration memory banks 27 DIAGNOSTICS mode PPV TV only 27 Other settings for the PPV TV mode 29 PPV TV menu 29 TV Mode 29 Reset 29 Function menu...

Страница 6: ...2 Useful adjustment settings 53 Auto Sync adjustment for Analog PC input mode only 53 Fine Sync adjustment 53 Language setting 54 Image position 54 Reset 54 Input Label 55 Sleep Timer 55 View Mode for 4 3 Programs 56 View Mode for HD Programs 56 View Mode for PC input mode 57 Advanced Option setting 58 Audio Only 58 Digital Noise Reduction 58 Output Select 58 Color System 58 Program Title Display ...

Страница 7: ...operators only and should not be used by hotel guests TV modes index The diagram below explains the TV modes of the LC 32HT3U LC 37HT3U LC 42HT3U models PPV TV mode This mode has two modes MASTER mode and ROOM mode MASTER mode Allows hotel operators to set or adjust the TV ROOM mode This mode is for hotel guests Normal TV mode The TV functions as a normal TV See page 29 Explanation of the remote c...

Страница 8: ...ect the TRANSPORT terminal of the TV to the TRANSPORT RJ 11 connector of the Remote Replicator with the supplied RJ 11 cable For NXTV users perform steps on page 27 before connecting the TV and the Remote Replicator RJ 11 cable Press LEARN on the Remote Replicator to store the TV settings in the Remote Replicator See pages 26 and 27 Disconnect the RJ 11 cable from the TV TV with the master setting...

Страница 9: ...ers the Normal TV mode when it is turned on again PPV TV PPV System TV Mode Room Mode Function Menu Setup PPV TV LODGENET Default Channel 2 Default Volume 20 Reset CH Re Map Selected item Description PPV TV Sets and adjusts the TV and communicates with the PPV terminal box Normal TV Functions as a normal TV 6 Use the remote control unit to set or adjust the TV TV with the master settings See pages...

Страница 10: ...licator to turn on the TV again Function Menu Setup You can select the menu items to display on the Function menu See page 30 The Function menu can be displayed by pressing the TV FUNCTION button on the LODGENET remote control unit 1 Repeat steps 1 and 2 in PPV System 2 Press a b to select Function Menu Setup and then press ENTER 3 Press a b to select the desired item and then press ENTER to selec...

Страница 11: ...ver the TV setting when the TV is connected to the PPV terminal box ONLINE The TV returns to the default channel when the TV is turned on and is not connected to the PPV terminal box STAND ALONE Default Volume Sets the default volume or turns the Auto adjustment on or off for when the TV is turned on The Auto adjustment sets the volume to a suitable level depending on the previously used volume se...

Страница 12: ...4 CH Re Map Sets the channel order logical channel to your preferred order 1 Press MENU and the MENU screen displays 2 Press c d to select PPV TV 3 Press a b to select CH Re Map and then press ENTER 4 Press a b to select CH Set and then press ENTER 5 Press a b c d to select the Logical CH you want to set and then press ENTER NOTE For resetting all logical channels to the factory preset values sele...

Страница 13: ...nal 4 3 programs in their normal format S Stretch Smart stretch Suitable for stretching 4 3 programs to fill the screen Zoom Suitable for viewing wide screen 2 35 1 anamorphic DVDs in full screen Stretch This mode is useful for 1 78 1 DVDs When viewing 1 85 1 DVDs stretch mode will still show very thin black bands at the top and bottom of the screen You can set other menu items such as Brightness i...

Страница 14: ...n on the TV again 1 Repeat steps 1 and 2 in PPV System 2 Press a b to select Default Channel and then press ENTER 3 Press a b to select Analog Digital and then press ENTER 4 Press c d to select Analog or Digital and then press ENTER 5 Press a b to select Analog or Digital and then press ENTER Default Channel Sets the default channel 6 Input the default channel number by using 0 9 and then press EN...

Страница 15: ...NTER 4 For Maximum Volume press c d to set the volume For R C Buttons TV Buttons and TV INPUT Button press c d to select Respond or No Respond and then press ENTER Selected item Description Maximum Volume Set the maximum volume in the ROOM mode R C Buttons Select Respond to enable or No Respond to disable the functions of the remote control unit TV Buttons Select Respond to enable or No Respond to...

Страница 16: ...o exit NOTE Depending on the system version you can assign a label using the hotel server When you change the input name for INPUT 1 through INPUT 6 in the Label Input setting the input name you have labeled will not change even if you change the Language setting CH Re Map Sets the channel order logical channel to your preferred order 1 Press MENU and the MENU screen displays 2 Press c d to select...

Страница 17: ...table for viewing wide screen 2 35 1 anamorphic DVDs in full screen Stretch This mode is useful for 1 78 1 DVDs When viewing 1 85 1 DVDs stretch mode will still show very thin black bands at the top and bottom of the screen You can set other menu items such as Brightness in the PPV TV mode See pages 41 to 67 When you are finished setting the menu items perform steps 3 to 8 on page 7 to complete the...

Страница 18: ... 3 4 Default Channel Sets the default channel Press c d to select Analog or Digital and then press ENTER Repeat steps 1 and 2 in PPV System Press a b to select Default Channel and then press ENTER Press a b to select Analog Digital and then press ENTER 1 2 3 4 Press MENU to exit Press a b to select Analog or Digital and then press ENTER Input the default channel number by using 0 9 and then press ...

Страница 19: ...ENTER Repeat steps 1 and 2 in Default Volume Press a b to select Room Mode and then press ENTER Press a b to select the desired item and then press ENTER 1 2 3 4 Selected item Description Maximum Volume Set the maximum volume in the ROOM mode R C Buttons Select Respond to enable or No Respond to disable the functions of the remote control unit TV Buttons Select Respond to enable or No Respond to d...

Страница 20: ... Channel 22 1 Press 0s2s2s0s1sENTER Repeat the steps 5 and 6 until all desired logical channels are set 7 Press MENU to exit 8 View Mode You can set the picture size for when the TV is turned on 1 Press VIEW MODE The View Mode menu displays 2 Press VIEW MODE or a b while the View Mode menu is still on the screen You can sequentially select a View Mode that has its own aspect ratio View Mode Side B...

Страница 21: ...ENTER 1 2 Press a b to select the desired item and then press ENTER to select On or Off 3 Selected item Description Language You can select a language from English French and Spanish for On Screen Display See page 30 View Mode You can select the screen size See page 30 Input Select You can select the input source See page 30 Parental CTRL You can set the secret number See pages 62 to 67 Press MENU...

Страница 22: ... the factory preset values select Reset in step 4 and then press ENTER Room Mode You can set Maximum Volume R C Buttons TV Buttons and TV INPUT Button for the ROOM mode previously used volume setting Selected item Description Maximum Volume Set the maximum volume in the ROOM mode R C Buttons Select Respond to enable or No Respond to disable the functions of the remote control unit TV Buttons Selec...

Страница 23: ... d to select Yes and then press ENTER Repeat the steps 5 and 6 until all desired logical channels are set Press MENU to exit 7 8 View Mode You can set the picture size for when the TV is turned on 1 Press VIEW MODE The View Mode menu displays 2 Press VIEW MODE or a b while the View Mode menu is still on the screen You can sequentially select a View Mode that has its own aspect ratio View Mode Side...

Страница 24: ...t CH Re Map Default Channel Sets the default channel Repeat steps 1 and 2 in PPV System Press a b to select Default Channel and then press ENTER 1 2 Press a b to select Analog Digital and then press ENTER Press c d to select Analog or Digital and then press ENTER 3 4 Press a b to select Analog or Digital and then press ENTER 5 Input the default channel number by using 0 9 and then press ENTER The ...

Страница 25: ...ustment items to the factory preset values select Reset in step 4 and then press ENTER Room Mode You can set Maximum Volume R C Buttons TV Buttons and TV INPUT Button for the ROOM mode Selected item Description Maximum Volume Set the maximum volume in the ROOM mode R C Buttons Select Respond to enable or No Respond to disable the functions of the remote control unit TV Buttons Select Respond to en...

Страница 26: ... d to select Yes and then press ENTER Repeat the steps 5 and 6 until all desired logical channels are set Press MENU to exit 7 8 View Mode You can set the picture size for when the TV is turned on 1 Press VIEW MODE The View Mode menu displays 2 Press VIEW MODE or a b while the View Mode menu is still on the screen You can sequentially select a View Mode that has its own aspect ratio View Mode Side...

Страница 27: ... MASTER mode when the TV is turned off The menu screen displays when the TV is turned on in the MASTER mode or the ROOM mode The TV is turned off and enters the PPV TV mode when the TV is in the Normal TV mode 9 DIAGNOSTICS button Perform operational tests 10 MEMORY SELECT button Select the memory bank to store or transfer data 11 TRANSPORT RJ 11 connector Connect to the TV when storing or transfe...

Страница 28: ...will not respond when TEACH is pressed The data transfer process is displayed on the screen 1 3 2 4 The DONE indicator lights up and a message is displayed on the screen after the data transfer is complete 5 Press MASTER to turn on the TV in the MASTER mode Press TEACH A message appears and then disappears in a few seconds 2 1 Repeat steps 1 to 5 in Storing the settings from the TV When you connec...

Страница 29: ...de the analog and digital Air Cable channel lists will be copied Channel SKIP settings will also be copied For digital channel lists the maximum number of channels that can be copied is 300 The channels made available from Channel Search or tuning channels in the source TV of the copied channel list will all be copied After copying all the channels that could be tuned in the source TV will be tuna...

Страница 30: ...icator only stores the TV settings that differ from the factory presets To transfer the data to other TVs faster perform Reset and then set up the TV settings Repeat steps 1 and 2 in TV Mode Press a b to select Reset and then press ENTER Other settings for the PPV TV mode 1 3 2 1 3 2 Press MENU to exit 4 Press c d to select Normal TV and then press ENTER When you select Normal TV enter 2433 for th...

Страница 31: ...ommands not to display the Parental CTRL menu Sleep Timer and Parental CTRL settings are effective for 24 hours The other settings will be canceled when the TV is turned off Press FUNCTION to display the Function menu Press c d to select Function 1 2 1 3 2 4 Other settings for the PPV TV mode Function Parental CTRL Language Sleep Timer View Mode English Closed Caption Off S Stretch Input Select Op...

Страница 32: ... When pressed all buttons on the remote control unit will light The lighting will turn off if no operations are performed within about 5 seconds This button is used for performing operations in low light situations 16 VIEW MODE Selects the screen size See pages 56 and 57 17 ENT Jumps to a channel after selecting with the 0 9 buttons 18 FLASHBACK Returns to the previous channel or external input mo...

Страница 33: ...e remote control unit Remote Replicator The remote control unit Remote Replicator may not work properly if the remote control sensor on the TV is under direct sunlight or strong lighting In such cases change the angle of the lighting or the TV or operate the remote control unit Remote Replicator closer to the remote control sensor Remote control unit Remote Replicator Remote control sensor 17n 5 m...

Страница 34: ...lu ray disc player HD DVD player DVD player Digital TV STB Connecting a VCR game console or camcorder A VCR game console camcorder and other audiovisual equipment can be conveniently connected using the INPUT 1 to 3 terminals When using S VIDEO cable commercially available VCR Game console Camcorder When using composite cable commercially available VCR Game console Camcorder Using Digital Audio Ou...

Страница 35: ... SVGA XGA 1024 x 768 WXGA 1360 x 768 70 Hz 60 Hz 72 Hz 75 Hz 56 Hz 60 Hz 72 Hz 75 Hz 60 Hz 70 Hz 75 Hz 60 Hz O O O O O O O O O O O DDC is a registered trademark of Video Electronics Standards Association Power Management is a registered trademark of Sun Microsystems Inc VGA and XGA are registered trademarks of International Business Machines Corp PC Resolution Horizontal Frequency Vertical Frequen...

Страница 36: ...the PPV TV mode to the Normal TV mode See page 44 for performing EZ Setup from the Setup menu Depending on the Room Mode setting see pages 11 14 18 21 and 24 press MASTER or ROOM on the Remote Replicator to turn on the TV Turning off the power Press POWER on the TV or TV POWER on the remote control unit The TV enters standby and the image on the screen disappears The POWER indicator on the TV turn...

Страница 37: ...h and Spanish Channel search Channel auto search makes the TV look for all channels viewable in the set area 1 2 Press a b to select the desired language listed on the screen and then press ENTER Press c d to select Air or Cable Press ENTER to enter the setting Example Antenna setting Make sure what kind of connection is made with your TV when selecting Air or Cable 3 When Air is selected in Anten...

Страница 38: ... again to switch back to the currently tuned channel NOTE FLASHBACK will not work if no channel has been changed after the TV is turned on Method 3 Using remote control buttons 0 9 DOT to select channels for VHF UHF CATV DIGITAL To select a 1 or 2 digit channel number e g Channel 5 Press 5sENT NOTE When you enter 0 9 only channel selection will be made if there is no operation within a few seconds...

Страница 39: ...E on the remote control unit Mutes the current sound output Press MUTE M will be displayed on the screen for 30 minutes and the sound is silenced NOTE Within 30 minutes of pressing MUTE mute can be canceled by using one of the methods below Mute will be canceled if you press VOLk l or MUTE Mute will be canceled after 30 minutes have passed However the TV will not suddenly output a loud sound as th...

Страница 40: ...hows and concerts in dynamic stereo sound SAP broadcasts Receive TV broadcasts in either MAIN or SAP sound MAIN sound The normal program soundtrack either in mono or stereo SAP sound Listen to a second language supplementary commentary or other information SAP is mono sound If stereo sound is difficult to hear Obtain a clearer sound by manually switching to fixed mono sound mode 2 Air ANALOG Audio M...

Страница 41: ...to the adjustment screen for this item 2 Item in brackets This indicates the current setting for the item 3 Item displayed in white This indicates an item can be selected 4 Item displayed in gray This indicates that the item cannot be selected There are various reasons why items cannot be selected but the main reasons are as follows Nothing is connected to the selected input terminal The function ...

Страница 42: ... 58 Caption Setup Page 61 No Signal Off Page 50 No Operation Off Page 50 Audio Setup Page 50 Icons Indicates the menu item can be set or adjusted in the PPV menu Indicates the menu item can be set or adjusted in the Normal TV menu Indicates the menu item can be set or adjusted in both the PPV menu and Normal TV mode For LODGENET and nSTREAMS users only PPV TV TV Mode Page 29 PPV System Pages 9 13 ...

Страница 43: ...54 Language Page 54 Treble Page 49 Bass Page 49 Balance Page 49 Surround Page 49 Reset Page 49 Digital Noise Reduction Page 58 HDMI Setup Page 52 No Signal Off Page 50 No Operation Off Page 50 For LODGENET and nSTREAMS users only Function Sleep Timer Page 30 Parental CTRL Page 30 Closed Caption Page 30 Language Page 30 View Mode Page 30 Input Select Page 30 Option Input Signal Page 30 Auto Sync Pa...

Страница 44: ... Page 49 Reset Page 49 Audio Only Page 58 Digital Noise Reduction Page 58 Input Select Page 51 Output Select Page 58 Color System Page 58 Caption Setup Page 61 Program Title Display Page 58 Favorite CH Page 46 No Signal Off Page 50 No Operation Off Page 50 Audio Setup Page 50 For HDMI DVI OPC Page 47 Backlight Page 47 Contrast Page 47 Brightness Page 47 Color Page 47 Tint Page 47 Sharpness Page 47...

Страница 45: ...e See page 40 for setting a secret number Press c d to select Air or Cable Press ENTER to enter the setting Press a b to select Air Cable and then press ENTER Channel search Channel auto search makes the TV look for all channels viewable in the set area Repeat steps 1 and 2 in Antenna setting in Channel Setup Press a b to select CH Search and then press ENTER NOTE If no channel is found confirm the...

Страница 46: ... digit secret number here See page 62 for setting a secret number Press a b to select CH Memory and then press ENTER Channel memory setting Press MENU to display the MENU screen and then press c d to select Setup Press a b to select Antenna Setup DIGITAL and then press ENTER Channel Strength The channel signal strength can also be checked separately Repeat steps 1 and 2 in Signal Strength in Anten...

Страница 47: ... delete and then press ENTER Press c d to select Yes and then press ENTER 1 2 4 3 1 2 4 3 Air 3 A B C D Using FAVORITE CH on the remote control unit Using Favorite CH on the menu screen You can also set your favorite channels in Option on the MENU screen Select the channel you want to register as a favorite channel 1 Press MENU to display the MENU screen and then press c d to select Option Press a...

Страница 48: ...nding light When set to On Display OPC effect displays on the screen while the OPC adjusts the screen brightness Press a b to select a specific adjustment item Press c d to adjust the item to the desired level Press MENU to display the MENU screen and then press c d to select Picture Press MENU to display the MENU screen and then press c d to select Picture Press a b to select OPC Press c d to sele...

Страница 49: ...ange of the OPC sensor s automatic adjustments can be set according to your preferences The adjustment range of the OPC sensor can be set to a maximum of e16 and a minimum of f16 NOTE The range of OPC settings are active only when the OPC is set to On The maximum setting cannot be set to a smaller number than the minimum setting The minimum setting cannot be set to a bigger number than the maximum...

Страница 50: ...y be required on your DVD player In this case please refer to the operation manual of your DVD player Press MENU to display the MENU screen and then press c d to select Audio Press a b to select a specific adjustment item Press MENU to display the MENU screen and then press c d to select Audio Press a b to select Surround and then press ENTER Press c d to select On and then press ENTER 1 2 3 1 2 3 ...

Страница 51: ... select No Operation Off and then press ENTER Press c d to select Enable and then press ENTER Five minutes before the power shuts down the remaining time displays every minute Digital Setup This setting allows you to optimize the settings of Digital broadcasting Press MENU to display the MENU screen and then press c d to select Digital Setup Press a b to select Audio Setup and then press ENTER Bas...

Страница 52: ...type If you set INPUT 1 or 2 LC 42HT3U only to Auto the TV will automatically select the input signal Setting INPUT 1 or 2 LC 42HT3U only signal selection to Auto when other equipment is connected will result in the following connection priority INPUT 1 or 2 LC 42HT3U only 1 COMPONENT VIDEO 2 VIDEO Press MENU to exit The setting is stored and can be selected on the INPUT SOURCE menu NOTE See pages...

Страница 53: ... display the MENU screen and then press c d to select Setup 1 2 Press MENU to exit Press a b to select the Input INPUT 4 INPUT 5 or INPUT 6 you wish to skip and then press ENTER Press c d to select Yes and then press ENTER 3 4 5 6 Press MENU to exit NOTE Refer to your external equipment operation manual for the signal type Audio Select is only available for INPUT 5 When connecting an HDMI DVI conv...

Страница 54: ... a b to select the specific adjustment item Press c d to adjust the item to your desired position 3 4 5 No Yes 30 NOTE When Auto Sync is successful Completed displays If not Auto Sync failed Auto Sync may fail even if Completed displays Auto Sync may fail if the computer image has low resolution has unclear black edges or is moved while executing Auto Sync Be sure to connect the PC to the TV and sw...

Страница 55: ...10 V Pos a20 b20 0 0 Press a b to select the desired language listed on the screen and then press ENTER Press MENU to display the MENU screen and then press c d to select Setup Press a b to select Language and then press ENTER 1 3 2 Press MENU to exit 4 Press a b to select H Pos or V Pos Press c d to adjust the item to the desired position NOTE For resetting adjustments to the factory preset value...

Страница 56: ...U to exit 5 Sleep Timer 1 2 Press SLEEP The remaining time displays when the sleep timer has been set Each time you press SLEEP the remaining time switches as shown below When set the time automatically starts counting down If you want to adjust the sleep timer you can press SLEEP twice then change the time setting Five minutes before the time expires the remaining time displays every minute NOTE ...

Страница 57: ...e menu displays The menu lists the View Mode options selectable for the type of video signal currently being received Side Bar Suitable for viewing conventional 4 3 programs in their normal format S Stretch Smart stretch Suitable for stretching 4 3 programs to fill the screen Zoom Suitable for viewing wide screen 2 35 1 anamorphic DVDs in full screen 1 2 View Mode for HD Programs Stretch mode is av...

Страница 58: ...ple Example Screen size images Input signal Normal Zoom Dot by Dot Stretch Keeps the original aspect ratio in a full screen display For viewing wide screen programs The top and bottom of the image is cropped Detects the resolution of the signal and displays an image with the same number of pixels on the screen An image fully fills the screen 4 3 Detects the resolution of the signal and displays an ...

Страница 59: ...ss a b or c d to select the desired setting and then press ENTER Press MENU to display the MENU screen and then press c d to select Option Press a b to select a specific adjustment item and then press ENTER Press MENU to exit Skip this step for Audio Only Program Title Display Select the CH display when changing channels for digital broadcasting Selected item Description On Audio is output without ...

Страница 60: ...different AV MODE item for each input mode For example select STANDARD for TV input and DYNAMIC for INPUT 1 Enhanced Picture Contrast technology detects the source video characteristics and smoothly adjusts the screen brightness accordingly to realize deeper black levels Press MENU to exit 4 NOTE You can only select the Input Signal on the Setup menu when receiving one of the 2 input signals liste...

Страница 61: ...losed caption settings When the program contains no closed caption displays in the closed caption information If the language code e g ENG is not found on Digital TV programs will be shown Four kinds of closed caption service CC1 CC2 Text1 Text2 are potentially available but a broadcast may contain none or only some of these services at the discretion of the program provider Useful adjustment sett...

Страница 62: ...resetting adjustments to the factory preset values press a b to select Reset and then press ENTER The default value depends on the broadcasting station Selectable items available for Font Style Press MENU to display the MENU screen and then press c d to select Option Press a b to select Caption Setup and then press ENTER Useful adjustment settings 1 3 4 2 Press MENU to exit 5 Selected item Descrip...

Страница 63: ...control function Press c d to select On or Off and then press ENTER Select On to enable and Off to disable Parental CTRL NOTE You can skip steps 1 and 2 above while in the Parental CTRL screen The V Chip DTV Only will only be selectable when a new rating system can be downloaded via digital broadcasting in the U S Useful adjustment settings 1 3 4 2 6 Input the same 4 digit number on the Reconfirm s...

Страница 64: ...ecret No and then press ENTER Input the old 4 digit secret number by using 0 9 Press c d to select Yes and then press ENTER Your secret number is cleared Press a b to select Secret No Clear and then press ENTER Repeat steps 1 and 2 in Setting a secret number The secret number setting menu displays Changing the secret number Allows you to change your current secret number Input the 4 digit secret n...

Страница 65: ...an also be set to block MPAA rated movies Voluntary movie rating system MPAA TV Parental Guidelines a If you select PG 13 this will automatically block the higher ratings R NC 17 and X NOTE Voluntary movie rating system only uses an age based rating Useful adjustment settings Rating Description G PG PG 13 R NC 17 X Age General audiences All ages admitted Parental guidance suggested Some material m...

Страница 66: ...t be selectable from the menu if you do not first configure your secret number See page 62 Press a b to select V Chip and then press ENTER Press a b to select MPAA and then press ENTER When setting an individual content based rating item do as follows 1 Press d or ENTER to access blocked content items from the currently selected age based rating item 2 Press a b to select an individual item and then...

Страница 67: ...hysical verbal or emotional Parental Guidance Intended for a general audience but may not be suitable for younger children under the age of 8 because it could contain controversial themes or issues Over 14 Years Could contain themes where violence is one of the dominant elements of the storyline but it must be integral to the development of plot or character Language usage could be profane and nud...

Страница 68: ...ratings Input the 4 digit secret number by using 0 9 Press a b to select Parental CTRL and then press ENTER Secret number setting menu displays only when Secret No is set See page 62 V Chip and Status will not be selectable from the menu if you do not first configure your secret number See page 62 Press a b to select V Chip and then press ENTER Press MENU to display the MENU screen and then press c ...

Страница 69: ...ol unit Press FREEZE again to cancel the function Other viewing options Freezing images Allows you to capture and freeze a moving image that you are watching Press FREEZE A moving image is captured Presetting manufacturer codes After the LED for your device lights up press FUNCTION and DISPLAY at the same time to enter the code registration mode The LED will blink Press FUNCTION until the LED for ...

Страница 70: ...L CODE NUMBER Other viewing options VCR BRAND REMOTE CONTROL CODE NUMBER DVD LD BRAND REMOTE CONTROL CODE NUMBER CATV SAT BRAND NOTE Numbers marked with are SAT codes all others are CATV codes AUDIO BRAND REMOTE CONTROL CODE NUMBER 69 ...

Страница 71: ...g immediately before 4 CH r s Press CHr or CHs to tune in a higher or lower channel Some manufacturers do not preset FLASHBACK NOTE CABLE and SAT cannot be selected at the same time SAT control buttons 1 SOURCE POWER Turns the cable converter power on and off 2 0 9 DOT Press a button or buttons that corresponds to the channel that you wish to watch 3 ENTER a b c d ENTER Press to activate the selec...

Страница 72: ... the remote control unit is set to DVD Press INPUT until the input connected to the DVD player is selected The following 1 to 10 can be used to control the DVD player 1 L Pressing quickly once takes you to the start of the next chapter Each time you press it you move ahead to the start of the next chapter 2 K Pressing quickly once takes you to the start of the chapter currently playing Each time y...

Страница 73: ...er set See page 55 Check the power control settings See page 50 The unit s internal temperature has increased Remove any objects blocking vent or clean No picture Is connection to other components correct See pages 33 and 34 Is correct input signal source selected after connection See page 51 Is the correct input selected See page 51 Is picture adjustment correct See pages 47 to 48 Is On selected ...

Страница 74: ...et the secret number clear the secret number using the following procedure Press and hold both CHr and VOLk on the TV simultaneously until the message appears on the screen Press MENU to display the MENU screen and then press c d to select Setup Press a b to select EZ Setup CH Setup Parental CTRL or Reset and the Secret number input screen displays 1 3 2 Setup Option Secret No a a a a ...

Страница 75: ...SHARP ELECTRONICS CORPORATION Sharp Plaza Mahwah New Jersey 07430 2135 SHARP CORPORATION TINS D140WJZZ 07P08 NA WG ...

Отзывы: