background image

18

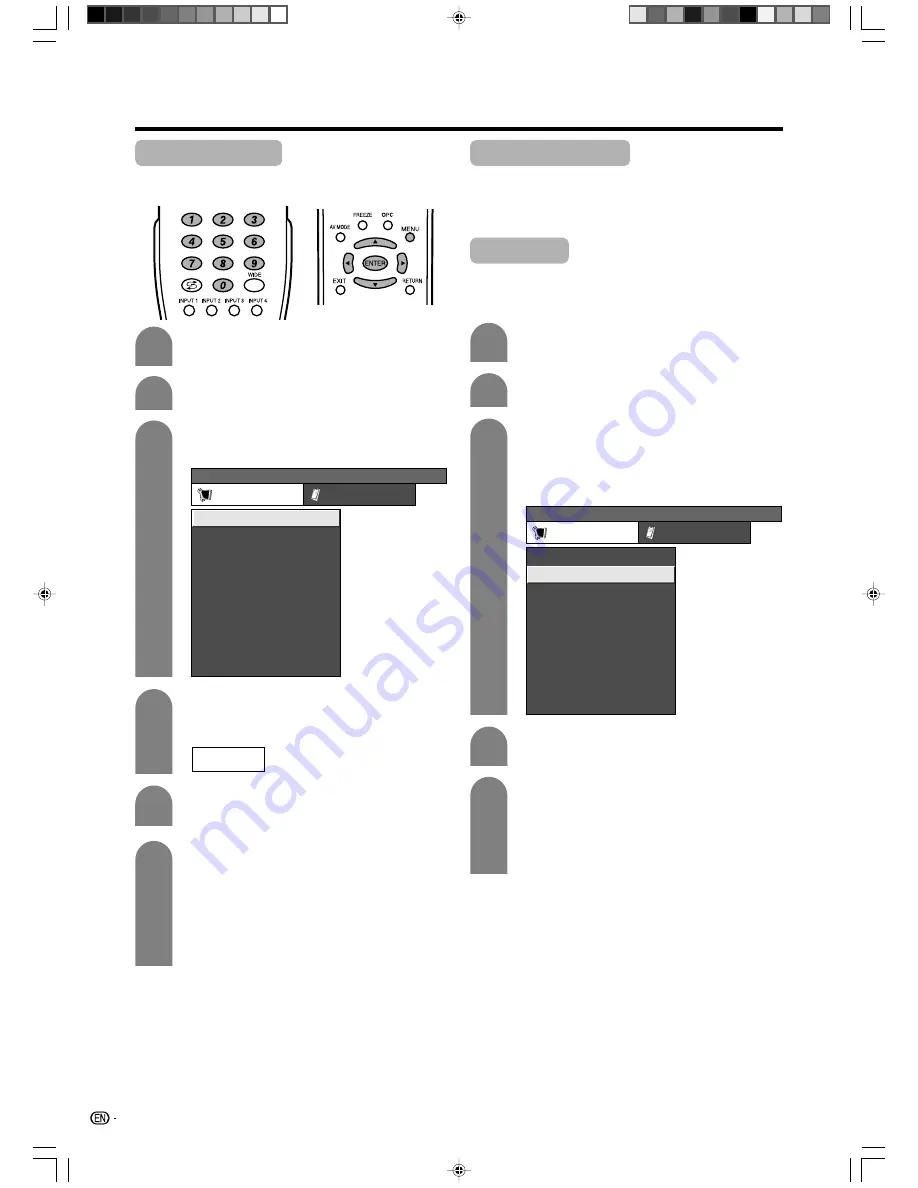
Basic adjustment settings

Auto installation

You can run auto installation again, even after setting
up the preset channels.

Press 

MENU

 and the MENU screen displays.

1

2

5

3

Press 

c

/

d

 to select “Setup”.

MENU    

[Setup ... Auto Installation]

Setup

Option

Child Lock

Input Label

Auto Installation

Programme Setup

Position

Language

Text Language

4:3 Mode

WSS

6

Press 

a

/

b

 to select “Yes”, and then press

ENTER

.

Press 

a

/

b

 to select the desired language

listed on the screen, and then press 

ENTER

.

Press 

a

/

b

 to select the desired sound

system, and then press 

ENTER

.

You do not need to do anything during the
auto search.
“Search is completed.” is displayed. Press

MENU

 to exit.

Press 

a

/

b

 to select “Auto Installation”, and

then press 

ENTER

.

4

If you have already set the password, enter
it here.

• See page 27 for setting a password.

Programme setup

You can run the auto search procedure again at any
time by accessing the Setup menu and Programme
Setup. Channels can be tuned automatically or
manually.

Press 

MENU

 and the MENU screen displays.

Press 

c

/

d

 to select “Setup”.

1

2

3

4

Press 

a

/

b

 to select “Programme Setup”,

and then press 

ENTER

.

If you have already set the password, enter
it here.

• See page 27 for setting a password.

MENU    

[Setup ... Programme Setup]

Setup

Option

Child Lock

Input Label

Auto Installation

Programme Setup

Position

Language

Text Language

4:3 Mode

WSS

5

Press 

a

/

b

 to select “Yes”, and then press

ENTER

.

Press 

a

/

b

 to select the desired sound

system, and then press 

ENTER

.

“Search is completed.” is displayed. Press

MENU

 to exit.

Auto search

You can also automatically search by performing the
procedure below. This is the same function as
programme auto search in auto installation.

Press 

a

/

b

 to select “Auto Search”, and then

press 

ENTER

.

LC-AW5X_16-21

9/12/06, 10:34 AM

18

Содержание Aquos LC-32AW5X

Страница 1: ...LCD COLOUR TELEVISION OPERATION MANUAL LC 32AW5X LC 37AW5X MODEL LC AW5X_FCover 9 12 06 10 35 AM 1 ...

Страница 2: ... 14 Simple button operation for changing volume sound 15 Sleep timer 15 Still image 15 Basic adjustment settings 16 Menu operation buttons 16 On Screen Display 16 Menu items 17 Auto installation 18 Programme setup 18 Auto search 18 Manual setting for each channel 19 Search tuning 19 Fine tuning 19 Colour system 19 Sound system Broadcasting system 20 Skipping channels 20 Sort 20 Label 21 Erase Prog...

Страница 3: ...p 34 Useful features 35 Teletext function 35 Teletext language setting 36 Using external equipment 37 Displaying an external equipment image 37 Displaying a DVD image Example 37 Connecting a VCR 37 Connecting a DVD player 38 Connecting a game console or camcorder 38 Connecting an HDTV tuner 39 Appendix 40 Troubleshooting 40 RS 232C port specifications 41 Specifications 43 Optional accessory 43 Dim...

Страница 4: ...n is provided or the manufacturer s instructions are followed The LCD panel used in this product is made of glass Therefore it can break when the product is struck forcefully or with a sharp object If the LCD panel is broken be careful not to be injured by broken glass Heat sources Keep the product away from heat sources such as radiators heaters stoves and other heat generating products including...

Страница 5: ...on manual are for explanation purposes and may vary slightly from the actual operations The illustrations used throughout this manual are based on LC 32AW5X Page 6 AC cord Remote control unit AAA size battery g2 Page 12 Page 5 Operation manual Cable clamp Page 6 Safety restraints Page 7 Restraining band Screw for band Clamps Screws for clamps Cable clamp Page 6 LC AW5X_01 05 9 12 06 10 33 AM 4 ...

Страница 6: ...eriod of time remove the batteries from it Inserting the batteries Before using the TV for the first time insert two AAA size batteries supplied When the batteries become depleted and the remote control fails to operate replace the batteries with new AAA size batteries Using the remote control unit Use the remote control unit by pointing it towards the remote sensor window Objects between the remo...

Страница 7: ...ernal equipment to the TV 2 AC cord See pages 8 and 37 39 for connecting antennas and external equipment such as VCR and DVD player AC outlet 3 Bundling the cables and closing the terminal cover CAUTION TO PREVENT RISK OF ELECTRIC SHOCK DO NOT TOUCH UN INSULATED PARTS OF ANY CABLES WITH THE AC CORD CONNECTED Cable clamp Place the TV close to the AC outlet and keep the power plug within reach Cable...

Страница 8: ...oning such as a blanket over a table Fix the TV to the table by the band with a screw commercially available Use a screw commercially available whose shape is compatible with the band 3 4 Transfer the product to the table where you intend to fix the TV CAUTION As this product is heavy use a table that is wide enough to support the product and capable of withstanding the product s weight The table ...

Страница 9: ...e used for coaxial cable Connecting to the AC outlet NOTE Always turn off the power of the TV when connecting the AC cord Disconnect the AC cord from the AC outlet if the TV will not be used for a long period of time AC outlet Antenna cable commercially available Room antenna terminal 75 ohm type Rear view To antenna terminal Standard DIN45325 plug IEC169 2 75 ohm coaxial cable round cable LC AW5X...

Страница 10: ... used to secure the cover in place 3 Unfasten the four screws used to secure the stand in place CAUTION This TV should be mounted on the wall only with the AN 37AG2 SHARP wall mount bracket The use of other wall mount brackets may result in an unstable installation and may cause serious injuries Installing the Liquid Crystal Television requires special skill that should only be performed by qualif...

Страница 11: ...djustments page 26 do not affect the audio of connected headphones You can set the volume to different levels for each input source 30 Volume display when headphones are plugged in POWER indicator OPC sensor POWER On Off button TV VIDEO button Volume up down buttons Channel up r down s buttons Remote control sensor OPC Optical Picture Control See page 22 SLEEP timer indicator OPC indicator Headpho...

Страница 12: ...ames TV Rear RS 232C terminal INPUT 2 terminals Antenna input terminal INPUT 1 terminals MONITOR OUTPUT terminals AC INPUT terminal INPUT 3 HDMI terminals INPUT 4 HDMI terminal LC AW5X_06 12 9 12 06 10 33 AM 11 ...

Страница 13: ...DARD MOVIE GAME USER DYNAMIC See page 22 a b c d Cursor Select a desired item on the setting screen See page 16 EXIT Return to the default screen k Reveal hidden for TELETEXT TELETEXT mode Display hidden characters See page 35 SUBTITLE for TELETEXT To turn the subtitles on and off See page 36 v Top Bottom Full TELETEXT mode Set the area of magnification See page 35 Subpage Display the Teletext sub...

Страница 14: ...period of time be sure to remove the AC cord from the AC outlet Minor power is consumed when the unit is in standby mode Simple button operations for changing channels You can change channels in several ways Using CHr son the remote control unit Press CHr to increase the channel number Press CHs to decrease the channel number NOTE CHr s on the TV operates the same as CHr son the remote control uni...

Страница 15: ...CH AB and MONO Using MPX on the remote control unit Monaural mode When receiving a monaural signal Each time you press MPX the mode switches between NICAM MONO and MONO In the TV mode of A2 TV broadcasts When receiving a stereo signal Each time you press MPX the mode switches between STEREO and MONO Stereo mode Bilingual mode Monaural mode MONO 99 BBC2 When receiving a bilingual signal Each time y...

Страница 16: ...s setting Changing the volume You can change the volume on the TV or on the remote control unit To increase the volume press VOLk k k k k To decrease the volume press VOLl l l l l Sleep timer Allows you to set a time when the TV automatically switches to standby Each time you press SLEEP the remaining time switches as shown below Press SLEEP Remaining time displays when sleep timer has been set Sl...

Страница 17: ... selected 3 Item displayed in grey This indicates that the item cannot be selected There are various reasons why items cannot be selected but the main reasons are as follows 1 Nothing is connected to the selected input terminal 2 The function is not compatible with the current input signal NOTE The screens in the operation manual are for explanation purposes some are enlarged others cropped and ma...

Страница 18: ...1 Child Lock Page 27 Input Label Page 28 Position Page 28 WSS Page 29 4 3 Mode Page 29 Language Page 31 Text Language Page 36 AV Mode Page 26 Treble Page 26 Bass Page 26 Balance Page 26 Audio Only Page 31 DNR Page 31 Input Select Input1 Page 32 Blue Screen Page 33 Colour System Page 33 Power Control No Signal Off Page 33 No Operation Off Page 33 HDMI Setup Signal Type Page 34 Colour Matrix Page 34...

Страница 19: ... page 27 for setting a password Programme setup You can run the auto search procedure again at any time by accessing the Setup menu and Programme Setup Channels can be tuned automatically or manually Press MENU and the MENU screen displays Press c d to select Setup 1 2 3 4 Press a b to select Programme Setup and then press ENTER If you have already set the password enter it here See page 27 for se...

Страница 20: ...ng the background picture as a reference 1 2 Fine Colour System Sound System Skip Search 179 25 MHz Instead of the method above you can also set by directly entering the frequency number of the channel with 0 9 When setting a frequency on the Fine screen the last figure of the frequency needs to be 0 or 5 Fine tuning 1 2 Search tuning Press a b c d to select the channel you want to edit and then p...

Страница 21: ...t here See page 27 for setting a password 3 NOTE Check the sound system if the sound output were not correct Press a b to select the optimum sound system and then press ENTER 3 Press a b c d to select the channel you want to edit and then press ENTER The selected channel information will be displayed Press a b to select Skip and then press ENTER Skip menu displays 1 2 Fine Search Colour System Sou...

Страница 22: ...en displays Press c d to select Setup 1 2 3 Press a b to select Programme Setup and then press ENTER If you already set the password enter it here See page 27 for setting a password Label Channels can be labelled freely Press MENU and the MENU screen displays Press c d to select Setup 1 2 3 Press a b to select Label and then press ENTER 4 6 7 Press a b to select Yes and then press ENTER Press a b ...

Страница 23: ...rent AV MODE item for each input mode For example select STANDARD for TV input and DYNAMIC for VIDEO input Description For a highly defined image in a normally bright room For a movie Lowers image brightness for easier viewing Allows the user to customise settings as desired You can set the mode for each input source For a clear cut image emphasising high contrast for sports viewing Selected item ...

Страница 24: ...justed when OPC is set to On or On Display Adjustments items MENU Picture Picture Audio Contrast OPC AV Mode STANDARD Off Brightness Colour Tint Sharpness Advanced Reset 30 0 0 0 0 Backlight 6 The screen dims For less contrast For less brightness For less colour intensity Skin tones become purplish For less sharpness Backlight Contrast Brightness Colour Tint Sharpness NOTE Select Advanced and then...

Страница 25: ...djustment items to factory preset values press a b to select Reset and then press ENTER Description This is a standard to adjust the colour either more reddish or more bluish in tone Increases or decreases the saturation of a selected colour A higher value makes the image brighter A lower value makes the image darker Selected item C M S Hue C M S Saturation C M S Value C M S Hue R Y G C B M Reset ...

Страница 26: ...ENTER Repeat steps 1 to 3 in Film mode NOTE The picture is progressive scan when Film Mode is On Film mode Automatically detects a film based source originally encoded at 24 25 frames second depending on the vertical frequency analyses it then recreates each still film frame for high definition picture quality Press a b to select Film Mode and then press ENTER Press a b to select On and then press...

Страница 27: ...ion cbutton For weaker treble For weaker bass Decrease audio from the right speaker Selected item Treble Bass Balance dbutton For stronger treble For stronger bass Decrease audio from the left speaker Press MENU and the MENU screen displays NOTE For resetting all adjustment items to factory preset values press a b to select Reset press ENTER press a b to select Yes and then press ENTER AV mode sel...

Страница 28: ...ange Password Channel Setting Reset New Password Reconfirm 4 Setting a channel Press a b c d to select the channel that you wish to apply the Child Lock and then press ENTER The Child Lock setting becomes effective only when the TV is turned off after the Child Lock is applied Press a b to select Channel Setting and then press ENTER Press a b to select Yes and then press ENTER Yes No Change Passwo...

Страница 29: ...on the settings and or input signals Input Label You can assign each input source a label you like Press MENU and the MENU screen displays 5 Press c d to select Setup Press a b to select Input Label and then press ENTER Press a b to select characters and c d to move to the desired digit to label the input source When you want to change the input label that you have already assigned to the default ...

Страница 30: ...n the broadcast signal contains no WSS information the function will not work even if enabled Picture aspect ratio The WSS signal has 4 3 auto switching that allows you to select between Normal and Panorama Press MENU and the MENU screen displays 1 2 Press a b to select 4 3 Mode and then press ENTER 3 Press a b to select Panorama or Normal and then press ENTER 4 WSS signal 4 3 screen 4 3 mode Norm...

Страница 31: ... input mode Manual Selection Press WIDE The WIDE MODE menu displays The menu lists the wide mode options selectable for the type of video signal currently received Auto Selection If you set WSS and 4 3 Mode in the Setup menu on page 29 the optimum WIDE mode is automatically chosen for every broadcast containing the WSS information WSS menu To enable Auto Selection set WSS in the Setup menu to On S...

Страница 32: ...ess a b to select Audio Only and then press ENTER 1 2 3 Audio Only When listening to music from a music programme you can set the display off and enjoy audio only Description Audio is output without screen image Both screen images and audio are output Selected item On Off NOTE When you make operations that change the picture on the TV such as by changing the input source the Audio Only function is...

Страница 33: ...For setting the signal type of external equipment Selectable item Auto Component Video Input source Input 1 4 Press a b to select Input1 and then press ENTER Input Select Selecting input source Can use for selecting the input source Using TV VIDEO on the TV TV VIDEO allows you to choose from the available input sources Press TV VIDEO on the TV Press TV VIDEO on the TV to select the input source Th...

Страница 34: ...ally shut down if no signal inputs for 15 minutes Press a b to select No Signal Off and then press ENTER Press a b to select Enable and then press ENTER 5 Five minutes before the power shuts down remaining time displays every minute NOTE Disable is factory preset value When a TV programme finishes and the TV receives signal input this function may not operate Press c d to select Option Power contr...

Страница 35: ...select Option Selectable items RGB YCbCr4 4 4 YCbCr4 2 2 Auto ITU601 ITU709 Enable Disable Digital Analogue HDMI Setup items Signal Type Colour Matrix Auto View Audio Select Description Select the video signal type from the HDMI terminal User settings for this item are normally in effect only when the TV is connected with a DVI HDMI conversion cable When connected to an HDMI device the TV automati...

Страница 36: ...programme with no Teletext signal No Teletext available is displayed 1 2 3 RED GREEN YELLOW BLUE TELETEXT When viewing the Teletext information Press CHr to increase the page number Press CHs to decrease the page number NOTE When you turn TELETEXT on and change a Teletext page right after changing channels the relevant page may not be displayed until TV finishes reading all the Teletext informatio...

Страница 37: ...ay Teletext Press to display the subpage as shown below Select the desired subpage by using c d 0 9 directly selects the desired subpage Press to exit the subpage screen Press a b to select receivable teletext broadcasting language in your country and then press ENTER Press MENU and the MENU screen displays Press c d to select Setup Press a b to select Text Language and then press ENTER NOTE Telet...

Страница 38: ...anation here is for the setting when connecting DVD to INPUT1 terminal Displaying a DVD image Example To watch a DVD image select INPUT1 using INPUT1 on the remote control unit or TV VIDEO on the TV Select the desired signal type on Input Select in the Option menu See page 32 The setting is stored and can be selected You can connect many types of external equipment to your TV like a VCR DVD player...

Страница 39: ...e NOTE When using a DVI HDMI conversion adaptor input the Audio Signal from the AUDIO terminal of INPUT 3 Game console Camcorder Composite cable VIDEO AUDIO commercially available Connecting a game console or camcorder A game console camcorder and some other audiovisual equipment are conveniently connected using the INPUT 2 terminals NOTE You can also connect the game console to INPUT 1 terminals ...

Страница 40: ...ting to an HDTV tuner and other audiovisual equipment To watch an image from this input terminal you need to select the input source see page 37 and the input signal type see page 32 Audio cable commercially available When using component cable select Component for Input Select in the menu L R AUDIO Y PB CB PR CR LC AW5X_35 39 9 12 06 10 35 AM 39 ...

Страница 41: ...unit after first turning the power off the TV or unplugging the AC cord and re plugging it in after 1 or 2 minutes Are batteries inserted with polarity e f aligned See page 5 Are batteries worn out Replace with new batteries Are you using it under strong or fluorescent lighting Is a fluorescent light illuminated to remote control sensor Is the image position correct See page 28 Are screen mode adj...

Страница 42: ...s follows Baud rate Parity bit Data length Stop bit Flow control 9 600 bps 8 bits None 1 bit None Appendix Command format Communication procedure Send the control commands from the PC via the RS 232C connector The TV operates according to the received command and sends a response message to the PC Do not send multiple commands at the same time Wait until the PC receives the OK response before send...

Страница 43: ...A 16 9 CINEMA 14 9 TOGGLE ON OFF TOGGLE OFF SLEEP TIMER 30 MIN SLEEP TIMER 1 HOUR SLEEP TIMER 1 HOUR 30 MIN SLEEP TIMER 2 HOUR SLEEP TIMER 2 HOUR 30 MIN WIDE MODE POSITION AUDIO CHANGE SLEEP TIMER MUTE I I I I I I I U U U C F F F F F F D D D D D D D T T T H T T T T T T E E E E E E E E E E A M M M M M M 0 1 2 3 4 5 6 0 1 2 _ 0 1 2 3 4 5 _ _ _ _ _ _ _ _ _ _ _ _ _ _ _ _ _ _ _ _ _ _ _ _ _ _ _ _ _ _ _ ...

Страница 44: ...50Hz 720P 60Hz AUDIO in VIDEO in AUDIO in OSD language English Chinese Arabic Power Requirement AC 110 240 V 50 Hz Front RS 232C 9 pin D sub male connector MONITOR OUTPUT VIDEO out AUDIO out Headphones Ø 3 5mm jack Audio output 37o 94 cm Advanced Super View BLACK TFT LCD 171 W 0 8 W Standby Method IEC60107 21 2 kg without stand 24 5 kg with stand INPUT 4 HDMI HDMI input 480P 580P 1080I 50Hz 1080I ...

Страница 45: ...s Unit mm LC 32AW5X LC 37AW5X Figures within parentheses are for LC 37AW5X 200 200 100 100 200 200 815 932 671 671 100 100 120 120 394 5 464 399 430 700 823 590 655 63 63 5 653 718 5 306 306 LC AW5X_40 44 9 12 06 10 33 AM 44 ...

Страница 46: ... FOR LOCATION ENQUIRIES WITHIN AUSTRALIA REGARDING YOUR LOCAL SHARP APPROVED SERVICE CENTRE VISIT OUR WEBSITE AT www sharp net au OR CALL SHARP CUSTOMER CARE 1300 135 022 SHARP CORPORATION OF AUSTRALIA PTY LTD SPform019 JUNE 2004 LOCAL CALL COST APPLY WITHIN AUSTRALIA SHARP APPROVED SERVICE CENTRE www sharp net nz CONTACT YOUR SELLING DEALER RETAILER OR CALL LC AW5X_45 46 9 12 06 10 35 AM 2 ...

Страница 47: ...buse neglect accidental damage improper voltage liquid spillage vermin infestation software or any alterations made to the product which are not authorised by Sharp Please retain your sales documentation as this should be produced to validate a warranty claim This warranty is in addition to and in no way limits varies or excludes any express and implied rights and remedies under any relevant legis...

Отзывы: