background image


  51

Connecting with External Devices (Continued)

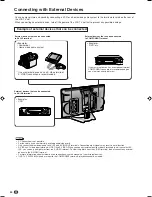
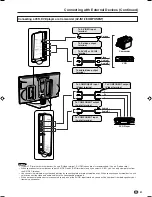
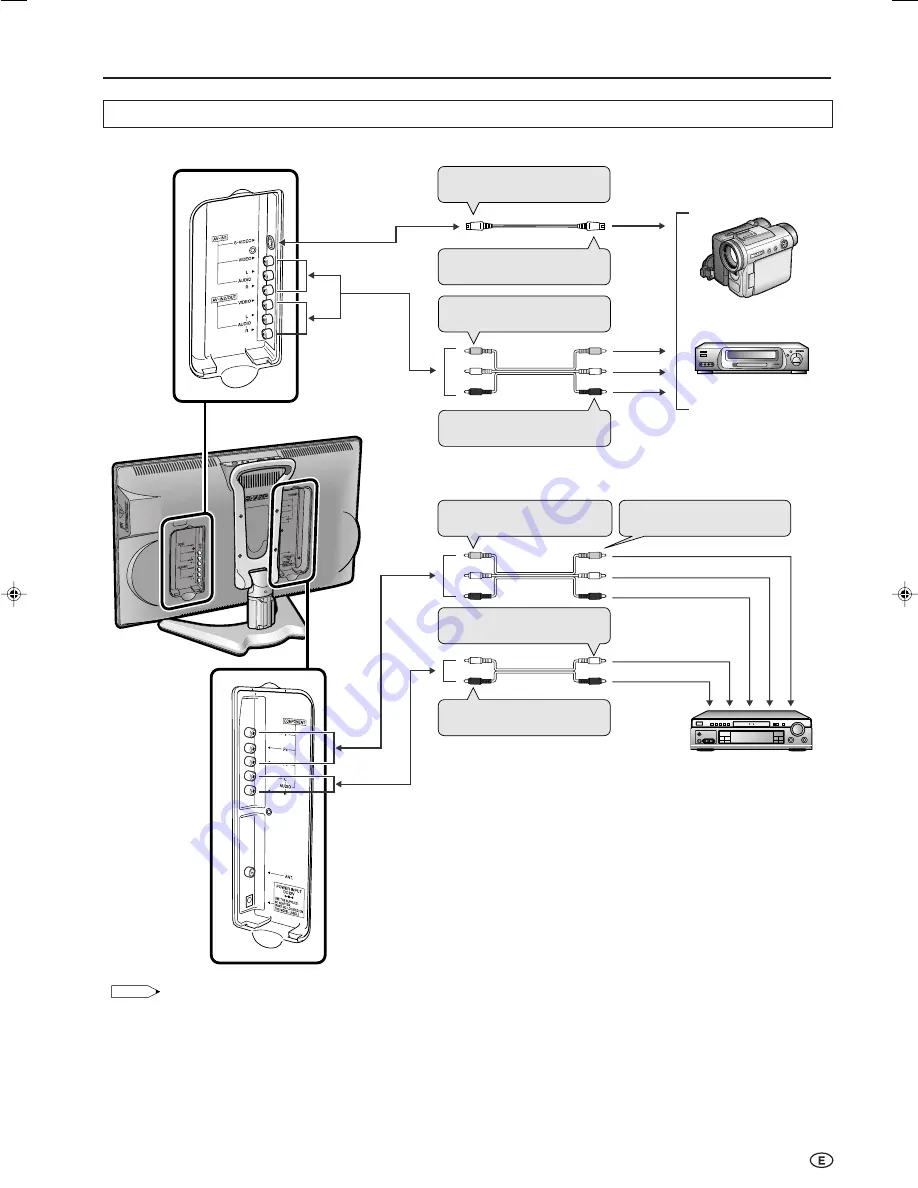
Connecting a VCR, DVD player or a Camcorder (AV-IN1/2/COMPONENT)

NOTE

If your VCR (or other external devices) has an S-Video terminal, S-VIDEO connection is recommended. (Use an S-video cord.)

When you connect external devices to both S-VIDEO and VIDEO terminals (and if you select AV-IN1), you can only view pictures from
the S-VIDEO terminal.

You cannot view multiple or synthesized pictures by connecting two or more external devices. When connecting an external device, use
care to connect the video and audio cables to the corresponding terminals.

When a monaural audio source is connected to only one of the AUDIO input terminals, sound will be heard not from both speakers but
from only one speaker.

To AV-IN1 or AV-IN2 
terminal

To audio/video output 
terminal

To COMPONENT input
(Video) terminal

To COMPONENT output
(Audio) terminal

To COMPONENT input
(Audio) terminal

To COMPONENT output
(Video) terminal

To S-VIDEO input  
terminal

To S-video output  
terminal

Video

S-video

Audio(L)

Audio(R)

Audio(R)

Audio(L)

P

R

P

B

Y

Camcorder

VCR

DVD Player

LC-15_20B5H_E_P50-58.p65

04.1.30, 6:45 PM

51

Содержание Aquos LC-15B5H

Страница 1: ...LC 15B5H LC 20B5H OPERATION MANUAL LCD COLOUR TELEVISION LC 15B5H LC 20B5H OPERATION MANUAL ENGLISH ...

Страница 2: ...cording Playing Back a Memory Card 28 Recording on the Memory Card 28 Playing Back the Memory Card 28 Precautions when Playing Back PC Image Data on the LCD TV Set 28 Recording on a Memory Card Video Setup 29 Rec Mode 29 Pre Recording 29 Recording a TV Programme in Real time 30 Recording as a Motion Picture 30 Easy Recording 30 Setting Timer Recording 31 Adjusting the Clock 31 Timer Rec 31 Checkin...

Страница 3: ...t internal parts For the same reason do not spill water or liquid on the product 10 Servicing Do not attempt to service the product yourself Removing covers can expose you to high voltage and other dangerous conditions Request a qualified service person to perform servicing 11 Repair If any of the following conditions occurs unplug the AC cord from the AC outlet and request a qualified service per...

Страница 4: ...he product on a bed sofa rug or other similar surface since they can block ventilation openings This product is not designed for built in installation do not place the product in an enclosed place such as a bookcase or rack unless proper ventilation is provided or the manufacturer s instructions are followed The LCD panel used in this product is made of glass Therefore it can break when the produc...

Страница 5: ...cessories are provided with the LCD TV set Supplied Accessories Operation manual Remote control AC cord AAA size batteries 2 Antenna cable AC adapter pages 5 and 9 page 5 page 6 page 6 page 6 page 8 Cable holder LC 15B5H LC 20B5H ...

Страница 6: ...rom batteries can cause a rash If chemical leakage is found wipe it off with a cloth The batteries supplied with the LCD TV set may have a shorter operating time due to storage conditions If the remote control is not to be used for an extended period of time remove the batteries from the remote control Preparation Engaging the lower claw with the remote control close the cover Using Remote Control...

Страница 7: ...ehold power outlet Pull down the hook to open the cover Pull down the hook to open the cover ANT Antenna terminal Antenna cable supplied Room antenna terminal 75 ohm type To antenna terminal Plug the headphone mini plug into the HEADPHONE jack located on the front of the LCD TV set NOTE Headphones are not included in the supplied accessories No sound is heard from the main unit speakers when a hea...

Страница 8: ...age 20 POWER indicator POWER indicator lights up green when the power is on and red when in the standby mode the indicator will not light when the main power is off The indicator lights up orange when the wake up timer is set The examples used throughout this manual are based on the LC 20B5H model To change the vertical angle of the LCD TV set tilt the screen up to 5 degrees forward or 10 degrees ...

Страница 9: ...DIO R PB PR COMPONENT Carrying handle Rear View How to fix the cables Pull the cables connected to each terminal through the holes and close the left and right terminal covers Push the cables into the grooves of the support covers Insert the cable holder supplied from above the support cover and fix the cables Terminal cover Cable holder Terminal cover Support cover ...

Страница 10: ... the motion picture playback REC Records the motion picture P 30 Mute Switches the sound on and off P 11 DIS MODE P 19 Channel Select P 11 MENU Displays the TV menu or return to normal screen P 14 VOL P 11 Flashback Returns to the previous channel P 11 RETURN Returns to the previous screen DISPLAY P 30 Press Displays received channel for 10 seconds Channel indicator reduces in size after about 10 ...

Страница 11: ... AV1 AV2 COMPONENT CARD and TV mode each time TV VIDEO is pressed NOTE AV input mode indication remains for 5 seconds AV1 Video equipment connected to the AV1 input terminals The S video input terminal is additionally provided for the AV1 input If both S video terminal and normal video terminals are connected with cables the S video input terminal takes priority AV2 AV2 mode is used to adjust the ...

Страница 12: ...se the selection will not be made Changing channels with CH on the remote control Press CH and the channels change in the order shown below 1 2 3 98 99 0 1 2 3 Press CH and the channels change in the order shown below 3 2 1 0 99 98 3 2 1 Using A A A A A FLASHBACK Press A A A A A to switch the currently tuned channel to the previously tuned channel Press A A A A A again to switch back to the curren...

Страница 13: ...he normal screen Presetting the Channels AUTO Automatically tunes in and presets receivable TV stations Make sure the antenna cable is properly connected Upper control panel 2 1 Press MENU PRESET 1 on the upper part of the LCD TV set for more than 2 seconds The AUTO mode screen appears Auto B G VHF 1 48 25MHz Press VOL PRESET 2 on the upper part of the LCD TV set All the TV stations in your area t...

Страница 14: ...NOTE SYSTEM may not have been set correctly if noise can be heard or if there is no sound In such case reset to Sound system using MENU See page 14 Presetting the Channels MANUAL In a weak reception area or under bad reception conditions Upper control panel 4 1 2 3 5 Press MENU PRESET 1 on the upper part of the LCD TV set for more than 2 seconds The AUTO mode screen appears Press MENU PRESET 1 to ...

Страница 15: ...t item M e n u S e t u p C H s e t u p M e n u S e t u p C H s e t u p A d j u s t s e t t i n g P o s i t i o n C H 1 C o l o u r s y s t e m S E C A M S o u n d s y s t e m B G S k i p O f f F i n e 8 7 1 1 5 M H z N i c a m O f f A 2 O f f SELECT O K ENTER M BACK E EXIT Each time you press the setting for individual items is as mentioned under Selected item Press MENU to exit 1 2 Selected item ...

Страница 16: ... 21 Auto power off 20 Blue Back 20 Reset 20 Page Select mode 27 Video setup 29 34 38 Timer Rec 31 Still setup 41 45 47 48 Format 49 Sound Setup Features Card About Demo in Setup Demo is a function for demonstration display at a shop To turn off the demonstration do the following 1 Press to select Setup in the Menu screen 2 Press to select Demo and press OK 3 Press to select Demo 4 Press to select ...

Страница 17: ... c t u r e 0 0 0 0 0 0 0 0 0 0 0 0 0 0 0 Basic Adjustment Settings 5 2 4 Selected item Contrast Brightness Colour Tint Sharpness d d d d d button For more contrast For more brightness For more colour intensity Skin tones become greenish For more sharpness c c c c c button For less contrast For less brightness For less colour intensity Skin tones become purplish For less sharpness 3 Press to select...

Страница 18: ...en Press to select Picture Press to select Advanced and press OK M e n u P i c t u r e T V A d v a n c e d C o n t r a s t 3 C o n t r a s t 3 6 6 B r i g h t n e s s B r i g h t n e s s 3 3 3 3 C o l o u r C o l o u r 3 3 3 3 T i n t T i n t 3 3 3 3 S h a r p n e s s S h a r p n e s s 1 1 C o l o u r s y s t e m A d v a n c e d R e s e t P i c t u r e 0 0 0 0 0 0 0 0 0 0 0 0 0 0 0 Press to select...

Страница 19: ... to select Reset and press OK 2 Press to select Yes and press OK When you select Out in AV2 In Out you cannot adjust sound settings Basic Adjustment Settings Continued 2 5 On screen Display Language Setting You can select English Chinese or Arabic as the on screen display language Press MENU to display the Menu screen Press to select Setup Press to select Language and press OK M e n u S e t u p L ...

Страница 20: ...ed mode and press OK M e n u S e t u p D i s p l a y m o d e M e n u S e t u p D i s p l a y m o d e S e l e c t e d d e s i r e d i t e m N o r m a l M i r r o r R o t a t e U p s i d e d o w n SELECT O K ENTER M BACK E EXIT Press MENU to exit Directly setting the Rotate Press DIS MODE to display the Rotate screen Each time you press DIS MODE the mode changes as follows You can select the desired...

Страница 21: ...d press OK 1 2 5 2 1 Directly setting the Backlight You can change the setting of Backlight directly Press BACKLIGHT to display the Backlight screen Each time you press BACKLIGHT the mode changes as follows You can select the desired mode B a c k l i g h t B r i g h t B a c k l i g h t N o r m a l B a c k l i g h t A u t o O P C B a c k l i g h t D a r k NOTE The Backlight screen automatically dis...

Страница 22: ... e m O f f 9 m i n 3 m i n 1 2 m i n 6 m i n 1 5 m i n 0 0 0 0 0 Press to select Off 30min 60min 90min 120min or 150min and press OK Press to select Wake up timer and press OK SELECT O K ENTER M BACK E EXIT M e n u F e a t u r e s M e n u F e a t u r e s T i m e r f u n c t i o n S l e e p t i m e r A d j u s t s e t t i n g W a k e u p t i m e r S e t O f f W a k e u p t i m e C h a n n e l C H 1...

Страница 23: ... the LCD TV set returns to the normal mode The setting can be individually selected for each channel number If the sound quality is poor due to a weak signal or other problems during NICAM broadcast reception set the Off position of the NICAM to change the TV sound to monaural Press MENU to display the MENU screen Press to select Setup Press to select CH setup and press OK M e n u S e t u p C H s ...

Страница 24: ... channel number If the sound quality is poor due to a weak signal or other problems during A2 stereo broadcast reception set the Off position of the A2 to change the TV sound to monaural Press MENU to display the MENU screen Press to select Setup Press to select CH setup and press OK M e n u S e t u p C H s e t u p C H s e t u p C l o c k s e t u p D i s p l a y m o d e A V 2 I n O u t L a n g u a...

Страница 25: ...ting copyright laws In addition when using image data that includes third parties since the use of such images without prior permission may constitute an intrusion on the privacy of third parties be sure to refrain from such usage JPEG DCF compliant 640 480 dots SP LP ASF Motion Picture MPEG 4 compliant Sound WMA compliant EP ASF Motion Picture MPEG 4 compliant Sound G 726 compliant SP Size 320 24...

Страница 26: ...Preparing a Memory Card Insert a memory card commercially available into a PC card adapter commercially available Example Inserting the SD memory card into a PC card adapter Notes on Using Memory Cards and PC Card Adapters Please note the following when using memory cards and PC card adapters to avoid corruption of data or malfunction of the LCD TV set If you use a memory card other than the ones ...

Страница 27: ...d Eject button Press the Card Eject button Insert the PC card adapter The Card Eject button PC card adapter The Card Lamp lights up green Press the Card Eject button and remove the PC card adapter When pressed the card eject button pops up The PC card adapter is ejected when the button is pressed again The Card Eject button Confirm the Card Lamp has turned green NOTE If the Card Eject button is no...

Страница 28: ... S e l e c t m o d e M e n u C a r d S e l e c t m o d e S e l e c t e d d e s i r e d i t e m V i d e o S t i l l SELECT O K ENTER M BACK E EXIT Selected mode is displayed Press MENU to exit NOTE Protected files are displayed with the mark Files that could not be read are displayed with an X mark Playing Back Mode S t i l l 1 2 1 3 5 4 1 1 3 5 0 0 0 0 0 0 1 2 3 When no motion picture is present N...

Страница 29: ...still picture Rotate See page 43 Plays a background music while playing back still pictures Audio select See page 44 Deletes unnecessary files or protects the files you want to keep Edit See page 47 48 Precautions when Playing Back PC Image Data on the LCD TV Set Recording formats of image data When recording image data on the LCD TV set the recording formats are as follows When recording motion p...

Страница 30: ...ess to select Card Press to select Video setup and press OK M e n u C a r d V i d e o s e t u p S e l e c t m o d e V i d e o s e t u p T i m e r R e c S t i l l s e t u p F o r m a t C a r d Press to select Pre recording and press OK SELECT O K ENTER M BACK E EXIT M e n u C a r d V M e n u C a r d V i d e o s e t u p R e c m o d e P r e r e c o r d i n g R e p e a t S e l e c t e d d e s i r e d ...

Страница 31: ... recording will be stopped When you select the COMPONENT mode you cannot record a motion picture If the stop time is reached during timer recording the pause mode is switched on but timer recording will continue Easy Recording When pressing REC again during normal recording you can easily switch to timer recording Each time you press REC the recording time changes as follows Lap 0 30 1 00 1 30 2 0...

Страница 32: ...e c S e t u p M e n u C a r d T i m e r R e c S e t u p S e t u p P r o g r a m m e l i s t Press to set Date You can set the date within the next one month or you can select daily or weekly recording SELECT O K ENTER M BACK E EXIT 0 0 M e n u C a r d T i m e r R e c S e t u p M e n u C a r d T i m e r R e c S e t u p A d j u s t t i m e r r e c s e t t i n g A d j u s t t i m e r r e c s e t t i ...

Страница 33: ...ible to record using FIT depending on the remaining capacity of the card Two recordings cannot be programmed simultaneously for FIT Press to select Set and press to select either On Off or Clr SELECT O K ENTER M BACK E EXIT M e n u C a r d T i m e r R e c S e t u p M e n u C a r d T i m e r R e c S e t u p A d j u s t t i m e r r e c s e t t i n g A d j u s t t i m e r r e c s e t t i n g D a t e ...

Страница 34: ...ing the card after saving necessary files to a PC or other external media All data and files are deleted upon format Checking the Recording Mode Press DISPLAY R e m a i n s t i l l 1 7 S P R e m a i n v i d e o 3 5 2 1 5 0 0 0 If you turn the power off using POWER on the remote control while timer recording is set both picture and sound go off at the preset recording start time and then the record...

Страница 35: ...device other than this LCD TV set the Resume or Top selection screen may not display Repeat You can specify one file or all files to replay repeatedly Press CARD to switch to the motion picture mode The recorded motion picture list is displayed 0 0 0 0 0 0 0 0 0 0 0 0 0 0 0 0 0 V i d e o 1 1 V i d e o 1 1 1 3 1 3 0 5 0 4 T h u 1 1 C H 1 3 E P 1 4 1 4 0 5 0 4 F r i 1 1 A V 1 S P 1 4 1 4 0 6 0 4 M o...

Страница 36: ... 3 A V 2 L P 1 6 1 6 0 6 0 4 W e d 1 3 C H 1 5 E P The recorded motion picture list is displayed Press to select the title to playback in slowmotion and press OK Press MENU to exit Press to select Off File or All and press OK 0 0 0 0 0 0 0 0 0 0 0 0 0 0 0 0 0 V i d e o 1 1 V i d e o 1 1 1 3 1 3 0 5 0 4 T h u 1 1 C H 1 3 E P 1 4 1 4 0 5 0 4 F r i 1 1 A V 1 S P 1 4 1 4 0 6 0 4 M o n 1 3 C H 1 5 L P ...

Страница 37: ...ess to select On and press OK SELECT O K ENTER M BACK E EXIT M e n u C a r d V i d e o s e t u p M e n u C a r d V i d e o s e t u p R e c m o d e P r e r e c o r d i n g R e p e a t S e l e c t e d d e s i r e d i t e m S l o w m o t i o n Z o o m E d i t O n O f f E n l a r g e p l a y b a c k i s n o t a v a i l a b l e i n S P L P f i l e Press to select the title to zoom and press OK 0 0 0 0 ...

Страница 38: ...4 5 4 F r i 1 1 A V 1 S P 1 4 5 4 F r i 1 1 A V 1 S P 1 4 6 4 M o n 1 3 C H 1 5 L P 1 4 6 4 M o n 1 3 C H 1 5 L P 1 5 6 4 T u e 1 3 A V 2 L P 1 5 6 4 T u e 1 3 A V 2 L P 1 6 6 4 W e d 1 3 C H 1 5 E P 1 6 6 4 W e d 1 3 C H 1 5 E P 0 0 0 0 0 0 0 0 0 0 0 0 0 0 0 0 0 0 0 0 0 0 0 0 0 0 0 Press to select the file you want to protect and press OK P r o t e c t s e l e c t e d f i l e 1 1 P r o t e c t s ...

Страница 39: ...d i n g R e p e a t S l o w m o t i o n P r o t e c t Z o o m E d i t D e l e t e f i l e D e l e t e a l l Press to select the file you want to delete and press OK D e l e t e s e l e c t e d f i l e 1 1 D e l e t e s e l e c t e d f i l e 1 1 1 3 5 4 T h u 1 1 C H 1 3 E P 1 3 5 4 T h u 1 1 C H 1 3 E P 1 4 5 4 F r i 1 1 A V 1 S P 1 4 5 4 F r i 1 1 A V 1 S P 1 4 6 4 M o n 1 3 C H 1 5 L P 1 4 6 4 M...

Страница 40: ...d Slid e s e sho how w s t a r t A d j u s t s e t t i n g Slid Slid e s e sho how w s e t u p M y p r o g r a m m e R o t a t e I n t e r v a l 5 S e c A u d i o s e l e c t O r d e r N o r m a l S h u t t e r c l i c k R e p e a t O n E d i t I n i t i a l I n d e x My Programme page 42 From a large number of pictures you can select and set up to 32 pictures Up to 32 set pictures can be displaye...

Страница 41: ...rogramme if the number of files during still picture or motion picture recording has exceeded 1 024 they are not displayed in the index but they are played back from My Programme Files that are registered in My Programme but not displayed in the index cannot be deleted from My Programme In that case you can only delete those particular files by first deleting files that are displayed in the index ...

Страница 42: ...s e t u p Slid Slid e s e show w s t a r t A d j u s t s e t t i n g Slid Slid e s e show w s e t u p M y p r o g r a m m e R o t a t e I n t e r v a l 5 S e c A u d i o s e l e c t O r d e r N o r m a l S h u t t e r c l i c k R e p e a t O n E d i t I n i t i a l I n d e x Press to select Repeat Press to select On or Off SELECT O K ENTER M BACK E EXIT M e n u C a r d S t i l l s e t u p M e n u ...

Страница 43: ...ogramme is set using another device it cannot be edited When My Programme is created using this device you can add to it but you cannot edit it Please delete all files if you want to change the order After registering My Programme if the number of files during still picture or motion picture recording has exceeded 1 024 they are not displayed in the index but they are played back from My Programme...

Страница 44: ... BACK E EXIT M e n u C a r d S t i l l s e t u p M e n u C a r d S t i l l s e t u p Slid e show s t a r t Slid e show s e t u p A d j u s t s e t t i n g M y p r o g r a m m e R o t a t e R o t a t e A u d i o s e l e c t S h u t t e r c l i c k R o t a t e E d i t N e x t f i l e The picture will be rotated to left or to right each time OK is pressed NOTE Pictures cannot be rotated during the in...

Страница 45: ...e show s t a r t S e l e c t e d d e s i r e d i t e m Slide show s e t u p M y p r o g r a m m e R o t a t e O f f T V A u d i o s e l e c t S h u t t e r c l i c k A V 1 C O M P O N E N T E d i t A V 2 Press to select the sound to be output and press OK One of the following sound setting can be selected when playing back a card Press MENU to exit NOTE Each time MPX is pressed during playback of ...

Страница 46: ... e t u p F o r m a t C a r d Press to select Shutter click and press OK SELECT O K ENTER M BACK E EXIT M e n u C a r d S t i l l s e t u p M e n u C a r d S t i l l s e t u p Slid e show s t a r t Slid e show s e t u p M y p r o g r a m m e S e l e c t e d d e s i r e d i t e m R o t a t e A u d i o s e l e c t S h u t t e r c l i c k O n O f f E d i t Press to select On and press OK Press MENU to...

Страница 47: ...r input signal can be heard 1 3 Whenever you want to record an image press CAPTURE For protecting the pictures see Protecting Still Picture Files on page 47 NOTE When you try to capture an image from a fast moving picture there may be a small temporal delay in the captured picture The number of remaining pictures only serves as a guide and may differ on the reception conditions and the contents of...

Страница 48: ...o how w s e t u p S e l e c t e d d e s i r e d i t e m M y p r o g r a m m e R o t a t e P r o t e c t A u d i o s e l e c t S h u t t e r c l i c k D e l e t e f i l e E d i t D e l e t e a l l Press to select Protect and press OK P r o t e c t s e l e c t e d f i l e 1 2 1 3 5 4 1 1 3 5 0 0 0 0 0 0 1 3 4 5 Press to select the file you want to protect and press OK P r o t e c t s e l e c t e d f...

Страница 49: ... by deleting files eject and reinsert the card or switch the power off and on again to reread the contents of the card in order to display its contents Up to 1 024 files can be displayed with all motion pictures first followed by still pictures Deleting One Still Picture File This operation deletes one file that have not been set for protecting Perform steps 1 to 4 in Protecting Still Picture File...

Страница 50: ... M BACK E EXIT M e n u C a r d M e n u C a r d F o r m a t F o r m a t c a r d Y e s N o Press OK again to start formatting SELECT O K ENTER M BACK E EXIT F o r m a t c a r d A l l f i l e s v i d e o s t i l l F o r m a t c a r d A l l f i l e s v i d e o s t i l l i n c l u d i n g p r o t e c t e d o n e s i n c l u d i n g p r o t e c t e d o n e s w i l l b e d e l e t e d w i l l b e d e l e...

Страница 51: ... to both terminals and if you select AV IN1 you can only view pictures from the S VIDEO terminal To view the picture from the VIDEO terminal do not connect any external devices to the S VIDEO terminal For more information about external device connections see the manuals of your external devices If HDTV 720P 1080I signals are input to the COMPONENT terminals playback cannot be viewed Example Camco...

Страница 52: ...nnecting two or more external devices When connecting an external device use care to connect the video and audio cables to the corresponding terminals When a monaural audio source is connected to only one of the AUDIO input terminals sound will be heard not from both speakers but from only one speaker To AV IN1 or AV IN2 terminal To audio video output terminal To COMPONENT input Video terminal To ...

Страница 53: ...io systems When using the S VIDEO input for AV IN1 or Y PB and PR input for COMPONENT no video output will be made to the AV output terminal but audio output will be made for connection to external audio systems You can output video and audio data from the LCD TV set through the AV output terminals AV OUT When using as an OUTPUT terminal select Setup in the Menu and set AV2 In Out to Out See page ...

Страница 54: ...c electricity etc may cause improper operation In this case operate the unit after first turning the power of the Display or umplugging the AC cord and re plugging it in after 1 or 2 minutes Reference page Picture There is no picture or sound There is no picture There is no picture from AV IN 1 2 There is no sound Picture is not clear Picture is too light or improp erly tinted The picture is too d...

Страница 55: ...les trains high voltage lines neon lights etc There may be interference between the antenna cable and power cable Try positioning them further apart Is the unit receiving interference from other devices Transmission antennas of radio broadcasting stations and transmission antennas of amateur radios and cellular phones may also cause interference Use the unit as far apart as possible from devices t...

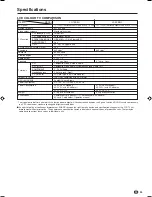
Страница 56: ...CF format OSD LANGUAGE English Chinese Arabic Power requirement DC 12 V AC 110 240 V 50 60 Hz Power Consumption 39 W 0 6 W Standby 61 W 0 9 W Standby AC 200V with AC adapter AC 200V with AC adapter 32 W DC 12V 54 W DC 12V Weight 5 7 kg w o accessories 9 2 kg w o accessories Accessories Remote control Batteries 2 Antenna cable AC adapter AC cord Cable holder Operation manual The typical period of t...

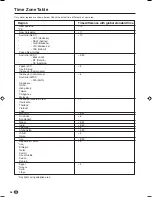
Страница 57: ... South Korea Indonesia Eastern area Indonesia Central area Australia AWST WA Perth Singapore China Hong Kong Taiwan Philippines Malaysia Indonesia Western area Cambodia Thailand Vietnam Laos Myanmar Sri Lanka Bangladesh Nepal India Pakistan Afghanistan U A E Oman Iran Republic of Yemen Iraq Ethiopia Qatar Kuwait Saudi Arabia Sudan Bahrain Egypt Greece Syria Libya Daylight saving adoption area Time...

Страница 58: ...57 Unit mm 310 178 307 231 213 363 including rubber foot 526 307 56 58 63 207 151 354 including rubber foot 62 100 100 LC 15B5H Dimensional Drawings ...

Страница 59: ...58 Dimensional Drawings Continued LC 20B5H Unit mm 68 80 244 178 403 3 300 8 261 452 including rubber foot 673 384 212 393 59 450 including rubber foot 47 100 100 ...

Отзывы: