background image

11

1

18

19

20

21

4

3

2

5

23

24

8

7

6

9

25
26

28
29

15

14

13

12

11

10

16
17

27

22

1

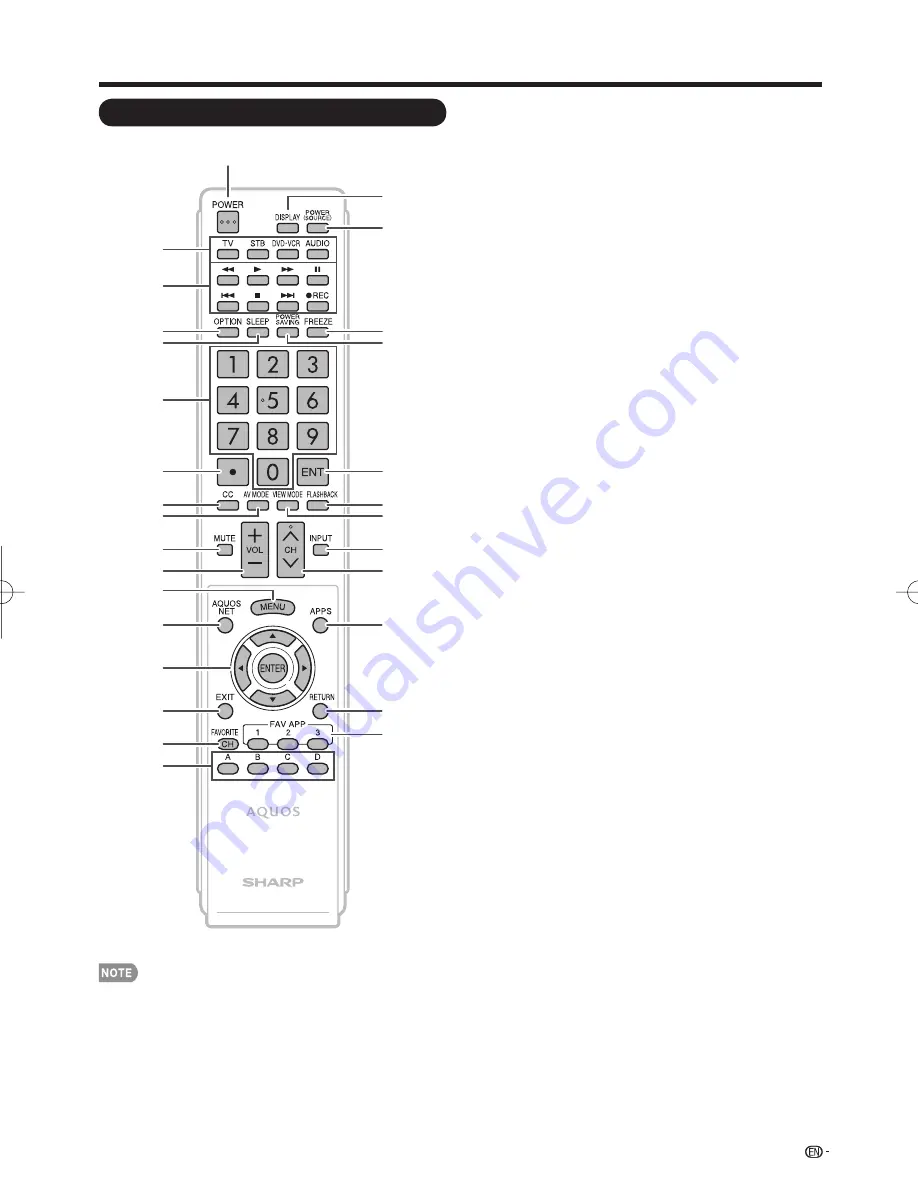
POWER:

 Switch the TV power on or enter standby. (See 

page 17.)

2

TV

,

STB

,

DVD•VCR

,

AUDIO:

 Switches the remote 

control for TV, STB, DVD, BD, VCR and AUDIO operation. 
(See pages 44 to 45 for details.)


* To enter the code registration mode, you need to press 

an appropriate button (

STB

,

DVD

VCR

 or 

AUDIO

) and 

DISPLAY

 at the same time.

3

External equipment operational buttons: 

Operate the 

external equipment.

4

OPTION:

 Display the Link Operation Menu screen. This 

button will function only when AQUOS LINK is used. (See 
pages 46 to 49 for details.)

5

SLEEP:

 Set the sleep timer. (See page 19.)

6

0

9:

 Set the channel. (See page 19.)

7

• (DOT):

 (See pages 19 and 44.)

8

CC:

 Display captions from a closed-caption source. (See 

page 21.)

9

AV MODE:

 Select an audio or video setting. (See page 20.)

10 MUTE:

 Mute the sound. (See page 19.)

11 VOL

k

/

l

:

 Set the volume. (See page 19.)

12 MENU:

 Display the menu screen. (See page 23.)

13 AQUOS NET:

 Switches the display to the Sidebar 

Widget, TV

k

Web, Web or TV screen. (See pages 55 to 

61 for details.)

14

a

/

b

/

c

/

d

,

ENTER:

 Select a desired item on the screen.

15 EXIT:

 Turn off the menu screen.

16 FAVORITE CH:

 Set the favorite channels. (See page 32.)

17 A

,

 B

,

 C

,

 D:

 Select 4 preset favorite channels in 4 different 

categories. (See page 32.)


While watching, you can toggle the selected channels by 
pressing

A

,

B

,

C

 and 

D

.

18 DISPLAY:

 Display the channel information.

19 POWER (SOURCE):

 Turns the power of the external 

equipment on and off.

20 FREEZE:

 Set the still image. Press again to return to 

normal screen. (See page 19.)

21 POWER SAVING:

 Select Power Saving settings. (See 

page 20.)

22 ENT:

 Jumps to a channel after selecting with the 

0

9

buttons.

23 FLASHBACK:

 Return to the previous channel or external 

input mode. (See page 19.)

24 VIEW MODE:

 Select the screen size. (See pages 22 and 

50.)

25 INPUT:

 Select a TV input source. (TV, COMPONENT, 

VIDEO, PC IN, HDMI 1, HDMI 2, HDMI 3, HDMI 4, USB)
(See pages 12 and 20.)

26 CH

U

/

V

:

 Select the channel. (See page 19.)

27 APPS:

 Display the application window. (See page 20.)

28 RETURN:

 Return to the previous menu screen.

29 FAV APP 1, 2, 3:

 You can assign your favorite 

applications to these buttons. (See page 33)

Remote Control Unit

•  When using the remote control unit, point it at the TV.

Part Names

LC-52̲60LE920UN̲E̲01.indd   11

LC-52̲60LE920UN̲E̲01.indd   11

2010/06/04   17:14:33

2010/06/04   17:14:33

Содержание AQUOS 10P06-MX-NM

Страница 1: ...equipment IMPORTANT Veuillez lire ce mode d emploi avant de commencer à utiliser l appareil IMPORTANTE Lea este manual de operación antes de comenzar a operar el equipo LC 52LE920UN LC 60LE920UN LIQUID CRYSTAL TELEVISION TÉLÉVISEUR ACL TELEVISOR CON PANTALLA DE CRISTAL LÍQUIDO OPERATION MANUAL MODE D EMPLOI MANUAL DE OPERACIÓN ENGLISH FRANÇAIS ESPAÑOL ENGLISH FRANÇAIS ESPAÑOL ...

Страница 2: ......

Страница 3: ...SIDE REFER SERVICING TO QUALIFIED SERVICE PERSONNEL TO PREVENT ELECTRIC SHOCK MATCH WIDE BLADE OF PLUG TO WIDE SLOT FULLY INSERT CAUTION CAUTION This product satisfies FCC regulations when shielded cables and connectors are used to connect the unit to other equipment To prevent electromagnetic interference with electric appliances such as radios and televisions use shielded cables and connectors f...

Страница 4: ... Compliance Statement This device complies with part 15 of the FCC Rules Operation is subject to the following two conditions 1 This device may not cause harmful interference and 2 this device must accept any interference received including interference that may cause undesired operation Wireless Radio For product available in the USA Canada market only channel 1 11 can be operated Selection of ot...

Страница 5: ...tion 15 Power Sources This product should be operated only from the type of power source indicated on the marking label If you are not sure of the type of power supply to your home consult your product dealer or local power company For products intended to operate from battery power or other sources refer to the operating instructions 16 Overloading Do not overload wall outlets extension cords or ...

Страница 6: ...plifiers that produce heat The Liquid Crystal panel is a very high technology product with 2 073 600 pixels giving you fine picture details Occasionally a few non active pixels may appear on the screen as a fixed point of blue green or red Please note that this does not affect the performance of your product Lightning For added protection for this television equipment during a lightning storm or w...

Страница 7: ...s product Don t allow children to climb on or play with furniture and television sets Don t place flat panel displays on furniture that can easily be used as steps such as a chest of drawers Remember that children can become excited while watching a program especially on a larger than life flat panel display Care should be taken to place or install the display where it cannot be pushed pulled over o...

Страница 8: ...istening to Music and Watching Videos 39 Photo Mode 40 41 Music Mode 42 Video Mode 42 43 USB Memory Device Compatibility 43 Other Viewing Options Presetting Remote Control Function 44 Operating the Connected Equipment 44 45 Using AQUOS LINK Controlling HDMI Equipment Using AQUOS LINK 46 48 Link Operation Menu 48 49 Using a PC Displaying a PC Image on the Screen 50 Adjusting the PC Image 51 Setting...

Страница 9: ...tand perform the steps in reverse order Supplied Accessories Make sure the following accessories are provided with the product Remote control unit g1 Page 8 AAA size battery g2 Page 9 Stand unit g1 Page 7 Cable clamp g1 Page 8 LC 52LE920UN Operation manual g1 Connection guide g1 Wireless LAN USB adapter g1 Page 54 Always use the AC cord supplied with the TV The illustrations above are for explanat...

Страница 10: ... the lighting or the TV or operate the remote control unit closer to the remote control sensor IMPORTANT IF THE UNIT DOES NOT POWER ON UNPLUG THE TELEVISION FROM THE OUTLET AND REPEAT THE INSTALLATION STEPS IF YOU STILL ENCOUNTER NO POWER PLEASE CONTACT US AT 1 800 BE SHARP QUICK INSTALLATION TIPS 1 Attach your antenna to the back of the television See page 9 2 Connect the AC plug for the televisi...

Страница 11: ...nt types Different types of batteries have different characteristics Do not mix old and new batteries Mixing old and new batteries can shorten the life of new batteries or cause chemical leakage in old batteries Remove batteries as soon as they are worn out Chemicals that leak from batteries that come in contact with skin can cause a rash If you find any chemical leakage wipe thoroughly with a clo...

Страница 12: ...32C terminal Antenna Cable in COMPONENT terminals DIGITAL AUDIO OUTPUT terminal HDMI 3 terminal HDMI 4 terminal HDMI 1 terminal ARC Audio Return Channel PC IN terminal AUDIO IN terminal shared for PC IN and HDMI 1 2 VIDEO terminal AUDIO OUT terminal USB 1 terminal USB 2 terminal ETHERNET terminal HDMI 2 terminal 1 1 1 See pages 12 to 16 and 46 for external equipment connection 2 See page 51 for de...

Страница 13: ... screen See pages 55 to 61 for details 14 a b c d ENTER Select a desired item on the screen 15 EXIT Turn off the menu screen 16 FAVORITE CH Set the favorite channels See page 32 17 A B C D Select 4 preset favorite channels in 4 different categories See page 32 While watching you can toggle the selected channels by pressing A B C and D 18 DISPLAY Display the channel information 19 POWER SOURCE Turn...

Страница 14: ...cts Page 13 Terminal on the TV Cable Terminal on external equipment Image Quality Ø 3 5 mm to 3 RCA AV cable or QCNW A702WJZZ from SHARP Component video cable Audio cable HDMI certified cable Ø 3 5 mm stereo minijack cable DVI HDMI conversion cable HD Quality Standard Quality AUDIO DVI OUT Page 13 Page 14 Page 14 1 Press INPUT The CH List screen displays 2 Press a b to select the input source You ...

Страница 15: ...ports high resolution video input Blu ray disc player DVD player HD cable satellite set top box HDMI OUT Back panel vertical inputs HDMI certified cable To enjoy 1080p display capability connect your external equipment using an HDMI certified cable or a component cable and set the equipment to 1080p output Supported Audio format Linear PCM sampling rate 32 44 1 48kHz When you connect external equi...

Страница 16: ...tput See page 13 for connecting a Blu ray disc player DVD player or an HD cable satellite set top box to the HDMI terminal Connecting a VCR Game Console Camcorder or Cable Satellite Set top Box When using Composite cable VIDEO Game console VCR Camcorder Cable Satellite set top box Back panel vertical inputs commercially available ø 3 5 mm to 3 RCA AV cable or QCNW A702WJZZ from SHARP or RCA to RCA...

Страница 17: ...e terminal DIGITAL AUDIO INPUT OPTICAL Back panel vertical inputs Optical fiber cable Depending on the connected equipment audio will not output from the DIGITAL AUDIO OUTPUT terminal in HDMI connection In this case set the audio formats of the connected equipment to PCM 32 44 1 48 kHz When using audio cable ANALOG AUDIO IN Back panel vertical inputs Audio cable See page 30 for details on the Outp...

Страница 18: ... OUT AUDIO Back panel vertical inputs DVI HDMI conversion cable Ø 3 5 mm stereo minijack cable When using a DVI HDMI conversion cable you should make an analog audio connection In this case in addition to connecting a DVI HDMI conversion cable to the HDMI 1 terminal connect a Ø 3 5 mm stereo minijack cable to the AUDIO IN terminal and set Audio Select to HDMI Analog See page 51 When using analog R...

Страница 19: ...t the antenna cable to the TV See page 9 3 Plug in the AC cord to the AC outlet See page 8 Language Language setting Select from among 3 languages English French and Spanish 1 Press a b to select the desired language listed on the screen and then press ENTER Language TV Location Antenna Cable STB Air Cable English Español Français CH Search Completed TV Location Select Home or Store for the locati...

Страница 20: ...en select Cancel and then press ENTER Completed 6 The settings confirmation screen is displayed Confirm the information displayed on the screen and then press ENTER Examples of the settings confirmation screen When one or more channel is received after Antenna Cable was selected in step 3 and a search was carried out OK Language English TV Location Home Anntena Cable STB Antenna Cable Air Cable Air S...

Страница 21: ...tomatically goes out after 30 minutes If you are using the freeze function and a broadcast activates the V CHIP BLOCK the freeze function will be canceled and a V CHIP BLOCK message will appear You can have the same settings by choosing Freeze on the menu items See page 29 Changing Channels You can change channels in several ways Method 1 Using CHr s on the remote control unit or on the TV Method ...

Страница 22: ...reset values No adjustments are allowed You can select a different AV MODE item for each input mode For example select STANDARD for TV input and DYNAMIC for COMPONENT When you play games GAME is recommended for AV MODE You cannot set GAME or PC when the TV is connected to the Internet or when the input source is USB You can have the same settings by choosing AV MODE on the menu items See page 25 D...

Страница 23: ...s 1 2 or 1 4 displayed 1 2 means the first of two services Example If a program has three services Digital CC ENG CC1 and Text1 the closed caption display will toggle in this sequence 1 3 ENG 2 3 CC1 3 3 Text1 Off The CC button keeps a record of the last service selected in its memory If the last closed caption mode e g 1 3 ENG you selected is not available for the next program or on another chann...

Страница 24: ...ving a 720p signal Suitable for stretching 4 3 programs to fill the screen Suitable for viewing wide screen 2 35 1 aspect ratio programs in full screen When using Dot by Dot or Full Screen it is possible to see noise or bars around different outer portions of the screen Please change view mode to correct this You can have the same settings by choosing View Mode on the menu items See page 29 For 4 ...

Страница 25: ...the next step or complete the setting RETURN Press to return to the previous step Menu options differ in the selected input modes but the operating procedures are the same The screens in the operation manual are for explanation purposes some are enlarged others cropped and may vary slightly from the actual screens The order of explanations for each menu item in the following pages is not necessari...

Страница 26: ...ges 33 35 Wall Mount Audio Setup Page 33 FAV APP Key Assign Page 33 Reset Page 33 Information Identification Page 36 Digital Caption Info Page 36 Software Update Pages 36 38 Manual Update Pages 36 38 Auto Update Setting Page 36 Netflix Help Page 63 Vudu Help Page 65 Picture Settings AV MODE Changing Pic Quality Page 25 OPC Page 25 Backlight Page 25 Contrast Page 25 Brightness Page 25 Color Page 25 T...

Страница 27: ...or either more reddish or more bluish in tone C M S Saturation Increases or decreases the saturation of a selected color C M S Value A higher value makes the image brighter A lower value makes the image darker For resetting all adjustment items to the factory preset values press a b to select Reset and then press ENTER Picture Settings Adjusts the picture to your preference with the following pict...

Страница 28: ...site Video Component 480i and analog broadcasts air and cable On Screen Display Menu Film Mode 3 2 pull down Automatically detects a film based source originally encoded at 24 frames second analyzes it then recreates each still film frame for high definition picture quality Advanced High Advanced Low Select a desired level to remove jerkiness from film contents Standard Detects analyzes converts f...

Страница 29: ...the factory preset values press a b to select Reset press ENTER press a b to select Yes and then press ENTER Auto Volume Different sound sources sometimes do not have the same loudness level such as a program and its commercial breaks The Automatic Volume Control Auto Volume reduces this problem by equalizing levels High Reducing the loudness gaps among different sound sources strongly Middle Low ...

Страница 30: ...ced appears on the screen Off This function does not work Power Saving does not function when you set AV MODE to AUTO or DYNAMIC Fixed You cannot select a different Power Saving item for each AV MODE When Power Saving is set the OPC settings for all AV Modes will automatically change If you set OPC to On when Power Saving is set to Standard then the Power Saving setting will change to Advanced Whe...

Страница 31: ... Audio Allows you to change the audio when multiple audio is available for the program you are watching MTS SAP stereo mode The TV has a feature that allows reception of sound other than the main audio for the program This feature is called Multi channel Television Sound MTS The TV with MTS can receive mono sound stereo sound and Secondary Audio Programs SAP The SAP feature allows a TV station to ...

Страница 32: ...our external equipment operation manual for the signal type When connecting a DVI HDMI conversion adapter cable to the HDMI terminal the image may not come in clearly Output Select Allows you to select what controls the audio output Fixed Sound via speaker is adjusted with VOLk l on the remote control unit or VOLl k on the TV Sound via the AUDIO OUT terminal is not adjustable and outputs at a cons...

Страница 33: ...Button Control Lock All buttons on the TV except POWER are locked When RC Control Lock or Button Control Lock is selected a confirmation screen appears On Locks the operation buttons Off No adjustment To unlock the buttons on the remote control by using the touch sensor panel of the main unit see page 23 1 Press MENU to display the MENU screen and then press VOLl k to select System Options 2 Press ...

Страница 34: ...h item If no channel is found confirm the type of connection made with your TV and try EZ Setup again If you select Analog Search Start and initiate the channel search the CH Memory for Cable Digital will be deleted Broadcasting Setup CH Setup If Initial Installation does not memorize all the channels in your region follow the instructions below to manually memorize the channels Air Cable Make sur...

Страница 35: ...e settings cannot be restored to normal you can reset the settings to the factory preset values If you have already set the Secret No input the 4 digit secret number here The Channel Setup settings will not be changed The Language settings will not be changed The Secret number settings will not be changed The TV Location settings will not be changed Individual Setup Secret No Allows you to use a s...

Страница 36: ...nts strongly cautioned Some material may be inappropriate for children under 13 R Restricted Under 17 requires accompanying parent or adult guardian age varies in some jurisdictions NC 17 No one 17 and under admitted X X is an older rating that is unified with NC 17 but may be encoded in the data of older movies Voluntary movie rating system only uses an age based rating TV Parental Guidelines Exa...

Страница 37: ...esent within the context of the theme 18 Adults Intended for viewers 18 years and older and might contain depictions of violence which while related to the development of plot character or themes are intended for adult viewing Could contain graphic language and portrayals of sex and nudity Canadian French Ratings Example MPAA TV Guidelines Can French Ratings Can English Ratings 8ans 13ans 16ans 18...

Страница 38: ...te Digital Caption Info Information Information Example 3 Input the 4 digit secret number by using 0 9 Software Update Enter your Secret No 4 Press a b to select Manual Update or Auto Update Setting and then press ENTER The operations thereafter vary depending on the setting Manual Update Select the method for manually updating the software Network Update Downloads the update file via the network a...

Страница 39: ...rd CAUTION Do not unplug the AC cord while the software is being updated 4 When the software is successfully updated a screen is displayed indicating that the update process is completed Press ENTER The TV restarts and it takes a while until the system update is completed Do not unplug the AC cord OK Press OK to restart the TV and complete the update Wait several minutes and do not unplug the AC c...

Страница 40: ...SB memory device and retry software update OK There is more than one software file in the USB memory device Confirm that only the software update file is in the USB memory device OK On Screen Display Menu 5 Press ENTER to start updating OK Press OK to restart the TV and complete the update Wait several minutes and do not unplug the AC cord Example 50 Now updating Do not unplug AC cord CAUTION Do n...

Страница 41: ...lay varies depending on the type of data recorded in the USB memory device You cannot enter this mode when a USB memory device is not inserted into the TV VIEW MODE is fixed during the Photo or Music mode During Video mode you can select Auto or Original When displaying the data with the APPS 1 Press APPS to display the application window 2 Press c d to select USB Media and then press ENTER You ca...

Страница 42: ...red Rotate the photo by 90 degrees to the left B green Rotate the photo by 90 degrees to the right C blue Reveal hide the Guide Display Rotating photos only applies to the temporarily selected item and this setting is not saved Slide Show The photos displayed on the thumbnail selection screen are displayed as a slide show Buttons for slide show operation Buttons Description RETURN Return to the th...

Страница 43: ...c RETURN Return to the previous process A red Select the music to be played back Press this button to add or remove a checkmark B green Stop music C blue Play Pause music D yellow Display the USB MENU screen 4 Press RETURN to display the thumbnail selection screen and then press C to start the slide show and the background music All of the music files are selected by default Set Reset All Slide Sh...

Страница 44: ...Auto Play remove all the checkmarks from all the music files 3 Press C to play back the music If no music files have been selected Cannot playback the audio file is displayed and the music is not played back automatically Video Mode video 5 video 4 video 2 video 1 video 3 VIDEO_01 avi VIDEO_02 divx VIDEO_03 divx VIDEO_04 avi VIDEO_05 divx VIDEO_06 divx VIDEO_07 avi 3 42 4 55 4 08 4 20 3 55 4 26 4 ...

Страница 45: ...he code at http www divx com 1 Press MENU to display the menu screen 2 Press c d to select Initial Setup and then press ENTER 3 Press a b to select DivX Setup and then press ENTER DivX VOD registration You can find your registration code on this menu You need to register the TV at http www divx com before playing the DivX content DivX VOD deregistration You can find your deregistration code on thi...

Страница 46: ...winds the tape and allows picture search VCR Hold down to go in reverse DVD BD 4 H Stops the tape transport VCR Playback stops when pressed With some DVD Blu ray disc players pressing the button twice may open the disc tray DVD BD 5 K Pressing quickly once takes you to the start of the chapter currently playing Each time you press it you move back to the start of the previous chapter DVD BD 6 0 9 ...

Страница 47: ...EER PROSCAN RCA SAMSUNG SHARP SONY TOSHIBA YAMAHA ZENITH 24 31 36 26 26 28 24 37 26 38 30 33 35 25 25 39 29 34 23 32 41 42 27 40 26 24 26 REMOTE CONTROL CODE NUMBER DVD BD LD BRAND Depending on the brand the codes of some BD players may not be supported ANVISION CABLE STAR EAGLE G INSTRUMENT GERROLD JERROLD MAGNAVOX MOTOROLA OKA SIGMA PANASONIC PHILIPS PIONEER RANDTEK RCA S ATLANTA VIEWSTAR ZENITH...

Страница 48: ...ng equipment and one AV amplifier can be connected using this system These operations affect the HDMI equipment selected as the current input source If the equipment does not operate turn on the equipment and select the appropriate input source using INPUT Connected AQUOS LINK compatible devices can be operated without changing the settings of the remote control unit OPTION button will function on...

Страница 49: ... are connected this function allows you to set the recorder for recording when you press EREC on the TV s remote control unit Press a b to select the recorder for recording When an AQUOS LINK compatible audio system or other equipment is connected between the TV and recorder Sub is displayed Using AQUOS LINK Channel Select Key This function can be set for each input terminal On The remote control ...

Страница 50: ... the recorder connected to HDMI 1 is selected for recording Press EREC to start recording When you are viewing a broadcast received with the AQUOS LINK compatible recorder selected in Selecting Recorder recording to the AQUOS recorder of the broadcast being viewed starts When you are viewing a broadcast received with equipment other than the AQUOS LINK compatible recorder selected in Selecting Rec...

Страница 51: ...s each time you press ENTER in Change Media of Device Select the media to be operated by the player Using AQUOS LINK Timer Recording You can call up the AQUOS LINK compatible recorder s EPG and preset timer recordings using the TV s remote control 1 Press OPTION to display the Link Operation Menu screen 2 Press a b to select Link Booking Rec Book and then press ENTER The recorder s EPG is displaye...

Страница 52: ... signal type You can have the same settings by choosing View Mode on the menu items See page 29 Example Screen size images Input signal Normal Zoom Stretch Dot by Dot 4 3 Keeps the original aspect ratio in a full screen display For viewing widescreen programs The top and bottom of the image is cropped An image fully fills the screen Detects the resolution of the signal and displays an image with t...

Страница 53: ...because the screen position variable ranges may be asymmetrical The screen position variable ranges depend on the View Mode or the signal type The ranges can be seen on the position setting screen Setting Audio Input Audio Select This function sets the terminal to output the computer audio The adjustment items vary depending on the input source Select the input source corresponding to the terminal...

Страница 54: ...en UXGA is being input AV Only available when 1080i p is being input 9 Only available when 720p is being input 10 11 Available when USB Video Netflix or VUDU is used Toggle 1 COMPONENT 2 VIDEO 3 PC IN 4 HDMI 1 5 HDMI 2 6 HDMI 3 7 HDMI 4 0 Toggle 1 STANDARD 2 MOVIE 3 GAME 4 USER 5 DYNAMIC Fixed 6 DYNAMIC 7 PC 8 x v Color 100 AUTO Volume 0 60 Only PC mode 0 180 Only PC mode 0 40 0 Toggle AV 1 Side Ba...

Страница 55: ...range of useful information including tips on using your AQUOS and a frequently asked questions section Connecting to the Internet To connect your TV to the Internet you must have a broadband Internet connection If you do not have a broadband Internet connection consult the store where you purchased your TV or ask your Internet service provider or telephone company When an Internet connection is m...

Страница 56: ...ection by other devices you may not be able to establish a connection In this case disable the stealth mode on the access point A wireless LAN connection and performance cannot be guaranteed for all residential environments In the following cases the wireless LAN signal may be poor or drop or the connection speed may become slower When used in buildings made with concrete reinforced steel or metal...

Страница 57: ... and make the necessary settings 5 Press a b to select Push button and then press ENTER To configure the setting via PC select PIN code Follow the on screen instructions and the operation manual of the access point to configure the settings 6 Select Next to complete the settings The connection process starts and the WPS button on the access point can be pressed 7 Press the WPS button on the access p...

Страница 58: ... TV Web Web TV When you are not connected to the Internet a network function explanation screen is displayed The services displayed vary depending on circumstances 2 Press a b to select a title and then press ENTER The web page for the selected title is displayed The service details vary depending on circumstances 3 Press EXIT to return to the normal TV screen If you start up the Sidebar Widget wh...

Страница 59: ...ctly enters prediction candidate 1 B green Directly enters prediction candidate 2 C blue Directly enters prediction candidate 3 D yellow Enters a space Caps Off Caps On Caps Lock If alphabet is selected in Character Set this switches characters between uppercase and lowercase Each time you press ENTER the character type switches as shown below Caps Off all the characters are lowercased Caps On onl...

Страница 60: ...s displayed You can also opt to delete all the cookies at once See page 61 To users who access the Internet from a PC When you access the Internet from this TV the procedures may not be the same as regular browser based access on a PC You cannot download files You cannot view a history of the pages you have visited You cannot change the startup page displayed when you press AQUOS NET Pop up window...

Страница 61: ...ookmarks Displays the Browser menu Using Tabs You can use tabs to view up to 3 web pages at the same time Each page appears in a separate tab and you can switch between the tabs 1 Press B on the remote control unit to display the Tab menu You can also display the Tab menu by clicking in the toolbar Selected item Description Select This Displays the web page in the selected tab Close This Tab Close...

Страница 62: ...ote control unit to display the toolbar 2 Press c d to select in the toolbar and then press ENTER Your bookmarks list is displayed 3 Press a b to select the title you want to edit from the bookmarks list and then press A on the remote control unit The Bookmarks menu appears 4 Select Display by Address or Display by Title in the Bookmarks menu and then press ENTER Rearranging displayed items 1 Pres...

Страница 63: ... this option a message is displayed when you move from a protected page to an unprotected page To change this setting remove the tick select Save Setting and then press ENTER Root Certificates CA Certificates Displays the list of certificates To disable a certificate select the certificate to be disabled and press A to display the sub menu Select Disable and then press ENTER Disabled certificates ar...

Страница 64: ...lick Help at the top of the page Netflix is only available in the U S Illustrations are examples and may differ from the actual Netflix screens The display and operations may change as a result of a software update Use Netflix without configuring a proxy server Part or all of Netflix may not be available when connecting to the Internet via a proxy server Settings for Watching Netflix Content on the TV 1...

Страница 65: ...rental controls for your instant Queue go to Netflix com YourAccount The time required to display the instant Queue screen varies depending on the Internet connection status and the number of titles in the instant Queue 9 The title you selected is displayed To return to the step 8 press a Press a b to select play and then press ENTER or d to start playback The screen of the TV After a period of tim...

Страница 66: ... 5 Mbps to 9 Mbps VUDU Movies is only available in the US Illustrations are examples and may differ from the actual VUDU screens VUDU is not available when connecting to the Internet via a proxy server Getting Started From the VUDU app screen you can view trailers of the latest movies and up to date information on DVD or you can access other Internet applications Internet application content is su...

Страница 67: ... cannot be accessed If you are able to access other network services e g AQUOS Net from your device but are not able to access VUDU please contact VUDU Customer Care at 1 888 554 VUDU 8838 If you are not able to access any network services e g AQUOS Net from your device please consult the appropriate section of this operation manual or contact your device manufacturer for assistance The activation...

Страница 68: ...limited to power failure other Internet connection or failure to configure your device properly Sharp its directors officers employees agents contractors and affiliates shall not be liable to you or any third party with respect to such failures or maintenance outages regardless of cause or whether or not it could have been avoided ALL THIRD PARTY CONTENT OR SERVICES ACCESSIBLE VIA THIS DEVICE IS P...

Страница 69: ...make sure to turn off the TV Before performing work spread cushioning over the base area to lay the TV on This will prevent it from being damaged To attach the stand perform the above steps in reverse order LC 60LE920UN Before attaching detaching the stand Before performing work make sure to turn off the TV 2 1 Loosen the screw used to secure the stand cover and remove the cover 1 Unfasten the fou...

Страница 70: ...l mount brackets may result in an unstable installation and may cause serious injuries Installing the TV requires special skill that should only be performed by qualified service personnel Customers should not attempt to do the work themselves SHARP bears no responsibility for improper mounting or mounting that results in accident or injury Using an optional bracket to mount the TV You can ask a qu...

Страница 71: ...the audio output of the connected external equipment Is the volume too low or muted When external equipment is connected via an HDMI cable you may need to configure the audio to be output through the HDMI cable When audio is not output from external equipment connected to the PC IN or HDMI 1 terminal check the Audio Select setting Page 51 Even when external equipment is connected using an HDMI cer...

Страница 72: ...3 Check the settings of Internet Setup Pages 55 to 56 Some Internet functions used on a PC are not available from the TV The TV has only limited functions compared with regular PC browsers Page 58 Troubleshooting Error Message The example of an error message displayed on a screen Error code Possible Solution Failed to receive broadcast E202 Check the antenna cable Check that the antenna is correct...

Страница 73: ...he ENERGY STAR are designed to protect the environment through superior energy efficiency and LC logo mark are registered trademarks of SHARP Corporation This product is embedded with LC Font technology which was developed by SHARP Corporation for clearly displaying easy to read characters on LCD screens However other fonts are used for some screen pages too x v Color and are trademarks of Sony Co...

Страница 74: ... Music Video mode Software update USB 2 Photo Music Video mode Software update Back panel horizontal inputs COMPONENT COMPONENT in ANT CABLE 75 q Unbalance F Type g 1 for Analog VHF UHF CATV and Digital AIR CABLE RS 232C 9 pin D sub male connector OSD language English French Spanish Power Requirement AC 120 V 60 Hz Power Consumption 180 W 0 5 W Standby with AC 120 V 230 W 0 5 W Standby with AC 120...

Страница 75: ...eaning they have priority of the bands 5250 5350 MHz and 5650 5850 MHz and these radars could cause interference and or damage to LE LAN devices Specification Product Name Dual Band 802 11n USB2 0 Adapter Standard IEEE 802 11a b g n Host Interface USB 2 0 Frequency Band 2412 2484 MHz 5 150 5 850 GHz Security Static WEP 64 128 bit key Index 1 only WPA PSK TKIP WPA2 PSK AES Modulation DBPSK 1Mbps DQP...

Страница 76: ...t 2000 Epinions Inc libjpeg This software is copyright 1991 1998 Thomas G Lane Portions of this software are based in part on the work of the Independent JPEG Group OpenSSL Copyright 1998 2008 The OpenSSL Project This product includes software developed by the OpenSSL Project for use in the OpenSSL Toolkit http www openssl org SSLeay Copyright 1995 1998 Eric Young eay cryptsoft com This product in...

Страница 77: ...onstitute full satisfaction of all claims whether based on contract negligence strict liability or otherwise Sharp does not warrant nor shall Sharp be liable or in any way responsible for Products which have been subject to abuse including but not limited to improper voltage accident misuse negligence lack of reasonable care alteration modification tampering misuse improper operation or maintenanc...

Страница 78: ...76 ...

Страница 79: ...1 64 67 1 35 64 39 49 5 8 1260 25 23 32 653 19 1 16 484 15 3 4 400 56 21 32 1439 52 17 32 1334 2 38 25 64 975 35 61 64 913 29 41 64 752 6 21 1 2 546 22 27 32 580 15 3 4 400 2 29 64 62 4 49 64 121 1 9 16 39 7 6 55 64 174 14 1 2 368 2 41 64 67 4 13 64 106 7 1 9 16 39 7 15 3 4 400 33 29 32 861 31 15 16 811 1 63 64 50 6 25 32 172 15 3 4 400 21 17 64 540 45 9 16 1157 ...

Страница 80: ...0UN OPERATION MANUAL MODE D EMPLOI MANUAL DE OPERACIÓN SHARP ELECTRONICS CORPORATION Sharp Plaza Mahwah New Jersey 07495 1163 SHARP CORPORATION Printed in Mexico Imprimé au Mexique Impreso en México TINS E586WJZZ 10P06 MX NM ...

Отзывы: