background image

[6] SIMULATION

1. Entering the simulation mode

Perform the following procedure to enter the simulation mode.
Clear key 

 Exposure mode select key 

 Clear key 

 Exposure

mode select key 

 Main code 

 Start key 

 Sub code 

 Start key

2. Cancelling the simulation mode

When the all clear key is pressed, the simulation mode is cancelled.
When the interruption key is pressed, the process is interrupted and the
screen returns to the sub code entering display.

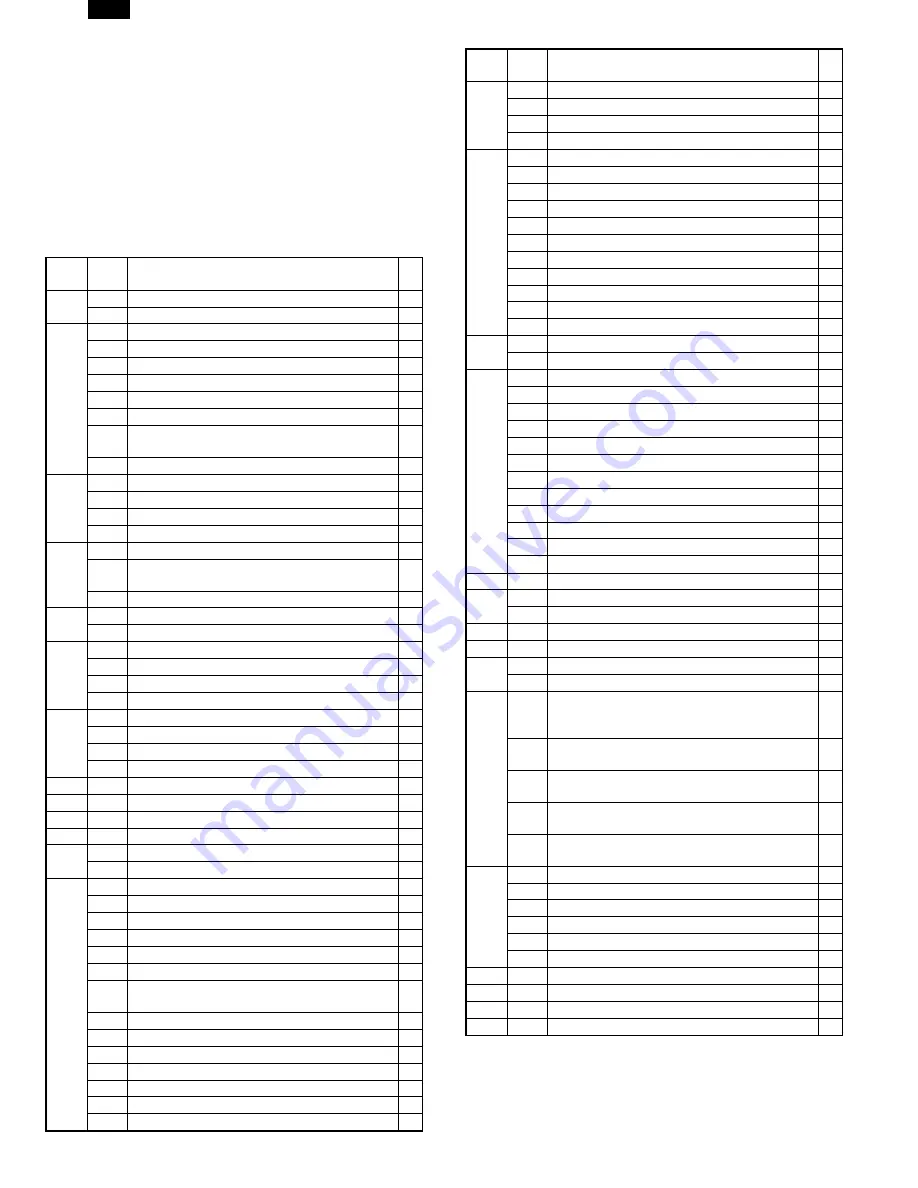
3. List of simulations

Main 
code

Sub 

code

Contents

1

1

Mirror unit operation check

2

Optical system sensor operation check

2

1

SPF aging

B

2

SPF sensor operation check

B

3

SPF motor forward rotation operation check

B

4

SPF motor reverse rotation operation check

B

8

SPF paper feed solenoid operation check

B

9

RSPF reverse solenoid operation check

A

10

RSPF paper exit gate solenoid operation
check

A

11

SPF PS release solenoid operation check

B

3

2

Shifter job separator sensor operation check

D

3

Shifter operation check

D

4

Job separator operation check

A

11

Shifter home position check

D

5

1

Operation panel display check

2

Heater lamp lighting check, cooling fan motor
operation check

3

Copy lamp lighting check

6

1

Paper feed solenoid operation check

10

Main cassette semi-circular roller drive

7

1

Aging with warmup time display

4

Warmup saving

6

Intermittent aging

8

Warmup time display

9

1

Duplex motor forward rotation operation check

A

2

Duplex motor reverse rotation operation check

A

4

Duplex motor rotation speed adjustment

A

5

Duplex motor switchback time adjustment

A

10

Toner motor operation check

14

Trouble (except for U2) cancel

16

U2 trouble cancel

20

1

Maintenance counter clear

A

21

1

Maintenance cycle setting

A

2

Mini maintenance cycle setting (Japan only)

A

22

1

Maintenance counter display

A

2

Maintenance preset value display

A

3

JAM memory display

4

Total JAM counter display

5

Total counter display

6

Developing counter display

A

7

Developing preset counter value display
(Japan only)

A

8

SPF counter display

B

9

Paper feed counter display

12

Drum counter display

14

Copier ROM version display

15

Trouble memory display

16

Duplex print counter display

A

17

Copy counter display

Main 
code

Sub 

code

Contents

22

18

Printer counter display

C

19

Electronic sort counter display

D

20

FAX print counter display

A

21

Scanner counter display

24

1

JAM memory, JAM counter clear

2

Trouble memory clear

4

SPF counter clear

B

5

Duplex counter clear

A

6

Paper feed counter clear

7

Drum counter clear

8

Copy counter clear

9

Printer counter clear

C

10

Electronic sort counter clear

D

11

FAX print counter clear

A

13

Scanner counter clear

25

1

Main motor operation check

10

Polygon motor operation check

26

1

Option switch display

3

Auditor setting

5

Counter mode setting

6

Destination setting

10

Model name setting

22

Language setting

30

CE mark conformity control setting

32

Fan rotation duty change state setup

38

Cancel of stop at dram life over

A

42

Transfer timing adjustment

50

Black-white reversion function setup

B

51

Sort/Group copy temporary stop function setup

D

30

1

Machine sensor operation check

41

2

OC document sensor adjustment

A

3

Document sensor light reception level display

A

42

1

Developing counter clear

A

43

1

Fusing temperature setting

46

1

Copy density level adjustment

2

FAX density level adjustment

A

48

1

Main scanning (front/rear) direction
magnification ratio adjustment (Copy/FAX/OC-
SPF common)

2

OC mode sub scanning direction
magnification ratio adjustment in copying

5

SPF mode sub scanning direction
magnification ratio adjustment in copying

B

6

OC mode sub scanning direction
magnification ratio adjustment in FAX

A

7

SPF mode sub scanning direction
magnification ratio adjustment in FAX

A

50

1

Copy image lead edge position adjustment

10

Paper off center adjustment

13

OC mode document off center adjustment

16

SPF mode document off center adjustment

B

18

Duplex memory reverse position adjustment

A

19

RSPF rear edge void adjustment

B

51

2

Resist amount adjustment

63

1

Shading data check

64

1

Self printing mode

67

14

Printer Flash ROM Data Download

C

A: Not used in the AL-1600/1610/1620/1621 and

AL-1640/1650/1670.

B: Can be used only in the AL-1620/1621 and AL-1650/1670.
C: Can be used only in the AL-1640/1650/1670.
D: Can be used only in the AL-1670.

AL-1670

6 – 1

Содержание AL-1640 - B/W Laser - Copier

Страница 1: ...LLING THE PRINTER DRIVER 8 1 9 SETTING AND ADJUSTMENTS 9 1 10 CONFIGURATION REPORT AND TEST PAGE 9 2 11 DISASSEMBLY AND ASSEMBLY 11 1 12 FLASH ROM VERSION UP PROCEDURE 12 1 CONTENTS Parts marked with are important for maintaining the safety of the set Be sure to replace these parts with specified ones for maintaining the safety and performance of the set SHARP CORPORATION This document has been pu...

Страница 2: ...NG SOM ÖVERSKRIDER GRÄNSEN FÖR LASERKLASS 1 CAUTION VORSICHT ADVARSEL ADVERSEL VARNING VARO INVISIBLE LASER RADIATION WHEN OPEN AND INTERLOCKS DEFEATED AVOID EXPOSURE TO BEAM UNSICHTBARE LASERSTRAHLUNG WENN ABDECKUNG GE FFNET UND SICHERHEITSVERRIEGELUNG BERER CKT NICHT DEM STRAHL AUSSETZEN USYNLIG LASERSTR LING VED BNING N R SIKKERHEDSAFBRYDERE ER UDE AF FUNKTION UNDGA UDSAETTELSE FOR STR LING USY...

Страница 3: ...n 10MB Standard provision 10MB Standard provision E Sort PWB Scan one Print multi No Standard provision 1 Standard provision 1 Standard provision 1 Standard provision 1 Standard provision 1 Standard provision Original detection Platen No No No No No No No Electric Sort No No No No No No Standard provision SPF No No Standard provision Standard provision No Standard provision Standard provision APS ...

Страница 4: ...ulti bypass tray AL 1650 1670 2 cassette Multi bypass tray Paper feed capacity 50 80 g m2 equivalent AL 1640 250 1 cassette 100 Multi bypass tray AL 1650 1670 250 2 cassette 100 Multi bypass tray Remaining quantity detection Cassette Empty detection available Manual tray Empty detection available 1 Paper tray section Paper feed size 11 17 8 5 14 8 5 11 8 5 11 R 8 5 5 5 Side front Front Paper feed ...

Страница 5: ...Message display Printer condition only User program Total counter Available Not available N Machine composition 1 Supply parts Part name Toner developer cartridge AL 160 TD B Drum cartridge AL 160 DR O Other specifications Photoconductor type OPC Organic Photo Conductor Photoconductor drum dia 30 mm Copy lamp Xenon lamp Developing system Dry 2 component magnetic brush development Charging system S...

Страница 6: ...0 2 Tray 1 only B Printer driver specifications 1 System OS PCL IBM PC AT Microsoft Windows 3 1 Available Microsoft Windows 95 Available Microsoft Windows 98 Available Microsoft Windows NT4 0 Available 2 Kinds of printer drivers Printer driver name Name on PC screen PCL5e for Windows 3 1 95 98 SHARP AL 1600 Series PCL5e PCL5e for Windows NT4 0 PCL6 for Windows 95 98 SHARP AL 1600 Series PCL6 PCL6 ...

Страница 7: ...dicates that the printer is off line and data cannot be transferred or printed Make settings from the operation panel in this mode Note however that you cannot make settings if the Data Remaining message is displayed Lit Indicates that the printer is on line and data can be transferred and printed DATA light Extinguished Indicates that there is no data being received or processed Lit Indicates tha...

Страница 8: ...COM 10 C5 DL Custom The number of trays supported depends on each model When printing with the multi bypass tray the printer board cannot recognize the set paper direction and therefore it regards that the short side of paper would be set vertical transport direction to make data C Tray selection Paper handling is controlled on the copier side The printer board sends the Video I F command to the d...

Страница 9: ...100 300 8200 0 Legal 8400 5100 8160 120 100 300 8200 0 Letter 6600 5100 6360 120 100 300 6400 0 Invoice 5100 3300 2860 120 100 300 4900 0 Foolscap 7800 5100 7560 120 100 300 7600 0 Folio 7800 4980 7560 120 100 300 7600 0 Executive 6300 4350 6060 120 100 300 6100 0 COM 10 5700 2474 3460 120 100 300 5500 0 C5 5408 3826 5172 118 100 300 5208 0 DL 5196 2598 4960 118 100 300 4996 0 Unit Dots 600DPI Top...

Страница 10: ...SWC 20 Incised 901 Bold SWC 21 Incised 901 Italic SWC 22 Aldine 430 Original Garamond SWC 23 Aldine 430 Original Garamond Bold SWC 24 Aldine 430 Original Garamond Italic SWC 25 Aldine 430 Original Garamond Bold Italic SWC 26 Audrey Two SWC 27 Flareserif 821 SWC 28 Flareserif 821 Extra Bold SWC 29 Swiss 721 SWM 30 Swiss 721 Bold SWM 31 Swiss 721 Oblique SWM 32 Swiss 721 Bold Oblique SWM 33 Dutch 80...

Страница 11: ...1 With rotation 50 11 17 8 5 5 5 With rotation 50 11 17 8 5 5 5 Without rotation 50 11 17 8 5 5 5 With rotation 50 Blinking Without rotation 8 5 14 74 8 5 14 8 5 11 With rotation 58 8 5 14 8 5 5 5 With rotation 58 8 5 14 8 5 5 5 Without rotation 58 8 5 14 8 5 5 5 With rotation 50 Blinking Without rotation 8 5 11 97 8 5 11 8 5 11 Without rotation 61 8 5 11 8 5 5 5 Without rotation 61 8 5 11 8 5 5 5...

Страница 12: ...lay 14 Copier ROM version display 15 Trouble memory display 16 Duplex print counter display A 17 Copy counter display Main code Sub code Contents 22 18 Printer counter display C 19 Electronic sort counter display D 20 FAX print counter display A 21 Scanner counter display 24 1 JAM memory JAM counter clear 2 Trouble memory clear 4 SPF counter clear B 5 Duplex counter clear A 6 Paper feed counter cl...

Страница 13: ...ge void adjustment Used only in the AL 1620 1621 and AL 1650 1670 After completion of warmup shading is performed and currently set value is displayed 50 1 99 Key operation Feed Exposure up key Return Exposure down key Moved to Home Position Magnification ratio display key Key operation Memory reverse position adjustment value Copy quantity keys Key operation Display Adjustment mode select Exposur...

Страница 14: ...0 Printer PWB communication trouble Protocol C 81 Printer PWB communication trouble Parity C 82 Printer PWB communication trouble Overrun C 84 Printer PWB communication trouble Framing C 88 Printer PWB communication trouble Time out C H2 00 Thermistor open detection H3 00 Heat roller abnormally high temperature H4 00 Heat roller abnormally low temperature L1 00 Mirror base feed trouble L3 00 Mirro...

Страница 15: ...to your environment 1 Installing onto Windows 95 This printer is compatible with plug play If your computer is incom patible with plug play refer to Installing onto Windows 95 98 without Using the Plug Play Function 1 Turn the computer on and start Windows 95 Note Depending on which version of Windows you are using the display examples in this step may differ from those on your system Either the U...

Страница 16: ... the printer drivers by checking Display a list of all the drivers in a specific location and clicking the Next button 3 Click the Have Disk button 4 Insert the SHARP Software CD ROM into the CD ROM drive type R WinXX and click the OK button 5 Choose the appropriate printer driver from those listed below and click the Next button PCL6 Printer Driver SHARP AL 1600 Series PCL6 PCL5e Printer Driver S...

Страница 17: ...or details The following steps use the example of a local printer 6 Click the Have Disk button 7 Insert the SHARP Software CD ROM into the CD ROM drive type R WinXX and click the OK button 8 Choose the appropriate printer driver from those listed below and click the Next button PCL6 Printer Driver SHARP AL 1600 Series PCL6 PCL5e Printer Driver SHARP AL 1600 Series PCL5e Note It is recommended that...

Страница 18: ... change the printer name enter a new name in the space provided 2 If the program displays Do you want your Windows based programs to use this printer as the default printer check Yes 3 Click the Next button 10 Make the appropriate settings for your environment When using print sharing choose Shared and enter a share name If necessary for your environment select Windows 95 from the list of operatin...

Страница 19: ...ppears 4 Press the Left or Right arrow key to change the setting The current value is marked with an asterisk 5 After choosing the required value press the ENTER key The new value is registered MENU MENU MENU Interface Menu I O Time Out 60 second ONLINE ITEM Resolution 600 Main Menu Smoothing On Paper Source Auto Paper Size Copies 1 Orientation A4 Portrait Emulation PCL Toner Save Off Test Printin...

Страница 20: ...the paper where data will be printed If this size is different from the paper size present in the tray the size set on the operation panel takes precedence Depending on where the printer was purchased the default value is either A4 or Letter Orientation Portrait Landscape Sets the page orientation for printing Specify Portrait to print the paper with its long side longer edge vertical Specify Land...

Страница 21: ...B4 B4 Short Edge Feed A3 A3 Short Edge Feed A5 A5 Long Edge Feed A6 A6 Short Edge Feed Unknown Other size EXTRA No Paper No paper available on this tray No Tray There is a problem with this tray Tray Open This tray is opened except Bypass Tray or Tray is lifting up a Manual paper feed tray Value Suitable paper size Example Letter 8 1 2 11 Default Depends on the size of paper set on the manual pape...

Страница 22: ... 11 Disassembly and assembly A Printer Board B E sort PWB only AL 1670 A Printer board B E sort PWB Only AL 1670 M3x6 M3x6 M3x6 M3x6 M3x6 M3x6 M3x6 M3x6 M3x6 M3x6 M3x6 AL 1670 11 1 ...

Страница 23: ...p at the rear of the machine 4 Connect the serial connector 5 Turn on the power of the machine The machine enters the download mode All LED lamps are turned off The machine accepts no key operations 6 Execute mainte Vxxx exe on the PC Use mainte_vxxx exe ver 1 04 or later 7 Communication port communication speed setting Select Comport in the option menu and select the most suitable item with consi...

Страница 24: ...rints 2 Connect the PC and the copier with the parallel cable 3 Turn on the power 4 Execute SIM 67 14 Erase Flash Data is displayed on the LCD 5 Press the ENTER key on the copier s operation panel Now Erasing is displayed on the LCD 6 After deletion of data Please Send Data is displayed on the LCD and the machine enters the ready state for data input 7 Download the program file Note Never turn off...

Страница 25: ...edgments Windows and Windows NT are trademarks of Microsoft Corporation in the U S A and other countries IBM and PC AT are trademarks of International Business Machines Corporation PCL is a trademark of Hewlett Packard Company Pentium is a registered trademark of Intel Corporation All other trademarks and copyrights are the property of their respective owners SHARP CORPORATION Digital Document Sys...

Отзывы: