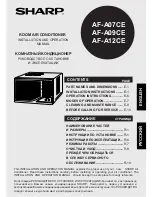
Sharp AF-A07CE Operation- Скачать руководство пользователя страница 8

INDOOR TEMP.

OUTDOOR TEMP.

upper limit

32˚C  D.B.

43˚C  D.B.

COOLING

23˚C  W.B.

-

lower limit

21˚C  D.B.

21˚C  D.B.

15˚C  W.B.

-

D.B. = Dry-bulb      W.B. = Wet-bulb

A built-in protective device might pre-
vent the unit from operating when used
out of this range.

Condensation might form on the air out-
let when the unit operates continuously
in the COOL mode when the humidity is
over 80 percent.

POWER CORD REPLACEMENT

WARNING: For replacement, use only the manufacturer specified power cord.
Replacemant should be conducted by a qualified technician or a serviceman. Consult your dealer
for detailed information concerning replacement of the power cord.

E-6

OPERATION INSTRUCTIONS

PRECAUTIONS

OPERATION INSTRUCTIONS

VENTILATE THE ROOM PERIODICALLY DURING USE, ESPECIALLY IF GAS APPLIANCES ARE
USED.

ALWAYS USE A FUSE WITH THE PROPER AMP RATING

Never use wire,  pins  or  anything other than the proper fuse.  The product may be damaged and
fire or other hazards may be resulted.  In replacing a blown fuse, or if there is the problem of
constant fuse blowing, contact your dealer or our service center.

WAIT FOR 3 MINUTES BEFORE RESTARTING THE COOLING OPERATION

Whenever you turn the air conditioner OFF, wait for at least  three  (3)  minutes  before restarting
the unit.
If you restart the air conditioner within three minutes, a protective device in the unit may cause
the air conditioner to shut off.  This protective device will prevent cooling operation for about  5
minutes.

POWER SUPPLY  VOLTAGE

If the power supplied to the unit is not within plus / minus 10 % of the specified rating, the unit may
not function and the fuse may blow.

NOTES ON OPERATION

WATER IN THE BOTTOM TRAY

Water will be collected at the bottom  tray of the unit.  This is normal condition.  Water condenses
on the evaporator coil in the front part of the unit and is channeled to the rear where it  is picked
up by the condenser fan.  The water is blown onto the condensor coil fins, this creates a
"splashing" sound which is normal.  When the tray is filled up with water, excessive water will be
drained outside through a grooved channel in the tray.

OPERATING TEMPERATURE RANGE

IF A POWER FAILURE OCCURS DURING OPERATION, MAKE SURE TO TURN OFF THE AIR
CONDITIONER

After resumption of power supply, restart the air  conditioner .  If  the  power  was  off  for less
than  three minutes, make sure to wait for at least three minutes before restarting the unit.
If the air conditioner is not turned off during a power failure, the resumption of power supply
will cause excessive voltage.  The air conditioner will be over-loaded and will not operate for
about 5 minutes.

TO STOP THE UNIT, TURN THE SELECTOR KNOB TO THE "OFF" POSITION.

NOISE LEVEL

As the surrounding environment is comparatively silent at night, noise from the air conditioner
may be louder at night than in the day time. If you feel that noise of the air conditioner is too loud,
switch the "SELECTOR" knob to the "LOW COOL" position.

Содержание AF-A07CE Operation-

Страница 1: ...DES OF OPERATION E 7 CLEANING AND MAINTENANCE E 9 BEFORE CALLING FOR SERVlCE E 10 ENGLISH СТРАНИЦА СОДЕРЖАНИЕ НАИМЕНОВАНИЕ ЧАСТЕЙ И РАЗМЕРЫ R 1 ИНСТРУКЦИИ ПО УСТАНОВКЕ R 1 ИНСТРУКЦИИ ПО ЭКСПЛУАТАЦИИ R 6 РЕЖИМЫ РАБОТЫ R 7 ОЧИСТКА И УХОД R 9 ПРЕЖДЕ ЧЕМ ОБРАЩАТЬСЯ В СЛУЖБУ СЕРВИСНОГО ОБСЛУЖИВАНИЯ R 10 РУССКИЙ В настоящем РУКОВОДСТВЕ ПО УСТАНОВКЕ И ЭКСПЛУАТАЦИИ объясняется как правильно пользоваться В...

Страница 2: ......

Страница 3: ...h requirements of Directives 89 336 EEC and 73 23 EEC as amended by 93 68 EEC We reserve the right to change the materials and specifications without notice AF A12CE INSTALLATION INSTRUCTIONS The long GOLD SCREW is used to secure the cabinet to the mounting frame The short GOLD SCREW is used to secure the drain tray to the cabinet The DRAIN TRAY is attached to the cabinet in case drainage is neces...

Страница 4: ...ight LOCATION Live brown Grounding wire green yellow More than 40cm 16 About 1cm 3 8 Air inlet Air outlet Air inlet More than 20cm 8 Air inlet Air outlet More than 40cm 16 Air inlet More than 20cm 8 For safe trouble free operation connect the power cord of the unit to a properly rated independent circuit with a time delay fuse or a circuit breaker See chart for proper amp ratings for each model FU...

Страница 5: ... pull it towards you Fig 3 Angle Fig 4 Chassis Front panel Fig 3 Air filter Front panel Fig 2 Fig 1 Grille 1 Open the grille Fig 1 by gently pulling the arrow marked portion Remove the air filter Fig 2 from the front panel Unscrew the screw fixing the front panel to the chassis Fig 2 Keep the screw as it will be used later CAUTION Do not open the grille extremely wide or provide stress to the open...

Страница 6: ...e splashing sound of the non drain func tion remove the rubber cap on the bottom of the chassis Cut the rubber cap in cross working from the bottom and remove the rubber pieces with a plier Fig 6 A hose of an appropriate length have to be attached to the drain tray s drain outlet Fig 7 3 1 4 2 Install the cabinet into the installation opening Fig 8 Secure the cabinet to the mounting frame using th...

Страница 7: ... Louver link Crank shaft Front panel Front panel back view Fig 12 Fig 13 Grille Fig 14 Front panel Secure the chassis to the cabinet usingthescrewandangleremoved in step 2 Push the angle into the gap between the chassis and the cabinet Hook the angle to the slit of the cabinet next screw it on to the chassis Fig 11 Openthegrilleandsecurethefront panel with the screw removed in step 1 Fig 14 Replac...

Страница 8: ...ut off This protective device will prevent cooling operation for about 5 minutes POWER SUPPLY VOLTAGE If the power supplied to the unit is not within plus minus 10 of the specified rating the unit may not function and the fuse may blow NOTES ON OPERATION WATER IN THE BOTTOM TRAY Water will be collected at the bottom tray of the unit This is normal condition Water condenses on the evaporator coil i...

Страница 9: ...ir conditioner as shown in the chart at right for efficient performance SELECTOR HIGH COOL VENTILATION LEFT CLOSED position THERMOSTAT 8 9 or 10 SELECTOR KNOB Use to select the desired mode PART NAMES Both the fan and cooling operation are off This setting can be used to circulate air whenever cooling is not desirable The air conditioner will perform fan operation at medium speed Fan operates at m...

Страница 10: ...ool air The louvers will be stopped at the position when the switch is turned off You can also use the switch to adjust the Left Right air flow adjustment louvers to the desired position Never attempt to move the Left Right air flow adjustment louvers manually or manually force the louver movement to stop during swing operation The AUTO SWING switch will not activate the louvers when the SELECTOR ...

Страница 11: ...RE INSTALL THE FILTER Fit the top hooks and then hook the bottom of the air filter Close the grille firmly Never operate the unit without installing the filter or the grille open It may be resulted in serious damage to the unit 2 CAUTION Do not open the grille extremely wide or provide stress to the opened grille The grille may come off or the grille shaft may get damaged If the grille should come...

Страница 12: ...lever set in the RIGHT OPEN position The lever should be set in the LEFT CLOSED position during cooling operation Are the windows exposed to direct sunlight Close curtains or blinds to minimize the heat in the room Are the windows or doors open Close all windows and doors for maximum cooling effect Is the power cord loosened or disconnected Is the fuse blown or has the circuit breaker been tripped...

Страница 13: ...ИНСТРУКЦИИ ПО УСТАНОВКЕ Длинный ПОЗОЛОЧЕННЫЙ ВИНТ используется для закрепления корпуса на мон тажной раме Короткий ПОЗОЛОЧЕННЫЙ ВИНТ используется для крепления дренажного поддона к корпусу ДРЕНАЖНЫЙ ПОДДОН крепится к корпусу в том случае когда водосбор необходим в районах с высокой влажностью воздуха или если Вам не нравится шум плеска воды создаваемый при работе в бездренажном режиме Подробные ин...

Страница 14: ...скное отверстие Более 40 см Воздухоприемник Более 20 см Для безопасной и надежной работы шнур питания устройства следуетподключитькнезависимойэлектрическойцеписплавким предохранителем рассчитаннымнасоответствующеезначение тока или через автоматический выключатель Значение тока в амперах для каждой из моделей приведено в таблице ПРЕДОХРАНИТЕЛЬ ЗАЗЕМЛЕНИЕ AF A07CE AF A09CE AF A12CE ПРЕДУПРЕЖДЕНИЕ ЭТ...

Страница 15: ...я панель Рис 3 Воздушный фильтр Передняя панель Рис 2 Рис 1 Решетка 1 Открытьрешетку Рис 1 потянув за место указанное стрелкой и не прилагая при этом большого усилия Вынутьвоздушныйфильтр Рис 2 из передней панели Открутить винт крепящий пе реднюю панель к шасси Рис 2 Сохранить этот винт поскольку он будет использован позже ОСТОРОЖНО Не следует открывать решетку слишком широко или прилагать усилия ...

Страница 16: ...стию дренажногоподдонаследуетприкрепить шланг нужной длины Рис 7 3 1 4 2 Вставить корпус в монтажный проем Рис 8 Прикрепить корпус к монтажной раме с помощью 9 длинных позоло ченных винтов 2 5 см Рис 8 Шасси Резиновый колпачок Рис 6 Рис 7 Корпус Дренажный поддон Корпус Рис 8 Уплотнение ПРЕДУПРЕЖДЕНИЕ При выполнении этого шага следует убедиться что корпус наклонен назад примерно на 1 см Рис 9 Если ...

Страница 17: ...нь кулисы Передняя панель Передняя панель вид сзади Рис 12 Рис 13 Решетка Рис 14 Передняя панель Прикрепить шасси к корпусу с помощьювинтаиуголка снятых при выполнении шага 2 Вжать уголок в зазор между шасси и корпусом Зафиксировать уголок в прорези корпуса а затем прикрепить его винтом к шасси Рис 11 Открыть решетку и закрепить переднюю панель с помощью винта удаленногопривыполнении шага 1 Рис 14...

Страница 18: ...АТАЦИИ ЕСЛИ ВО ВРЕМЯ РАБОТЫ ПРОИЗОШЛО НАРУШЕНИЕ ЭНЕРГОСНАБЖЕНИЯ ТО СЛЕДУЕТ УБЕДИТЬСЯ ЧТО КОНДИЦИОНЕР ВЫКЛЮЧЕН После возобновления подачи электропитания следует повторно включить кондиционер Если питание было отключено менее трех минут то необходимо сделать перерыв не менее трех минут перед повторным пуском устройства Если кондиционер не был выключен при прекращении подачи электропитания то возобно...

Страница 19: ... HIGH COOL VENTILATION ЛЕВОЕ положение CLOSED ЗАКР THERMOSTAT 8 9 или 10 РУЧКА SELECTOR ПЕРЕКЛЮЧАТЕЛЬ РЕЖИМА Повернуть для выбора желаемого режима работы НАИМЕНОВАНИЕ ДЕТАЛЕЙ Оба режимы работы вентилирование и охлаждение выключены Этоположениеможноиспользоватьдляциркуляциивоздуха всякий раз когда охлаждение воздуха не является желательным В режиме вентилирования кондиционер работает при средней ск...

Страница 20: ...ажденного воздуха При установке переключателя в положение OFF ВЫКЛ жалюзиостановятсявопределенномположении Можнотакжевоспользоваться этим переключателем для установки жалюзей регулировки потока воздуха Вправо Влево в желаемом положении Никогда не пытайтесь вручную переместить эти жалюзи или остановить рукой их движение во время колебаний Переключатель AUTO SWING не включит движение жалюзей когда р...

Страница 21: ...етку Никогда не эксплуа тировать устройство без установленного фильтра илисоткрытойрешеткой Этоможетстатьпричиной серьезного повреждения устройства 2 ОСТОРОЖНО Не следует открывать решетку слишком широко или прилагать усилия к открытой решетке Она может отделиться или стержни решетки могут быть повреждены Если решетка отделилась то можно поставить ее обратно на место в соответствии с указаниями пр...

Страница 22: ... охлаждения Не установлен ли рычажок VENTILATION в ПРАВОЕ положение OPEN ОТКР Этот рычажок должен быть установлен в ЛЕВОЕ положение CLOSED ЗАКР во время режима охлаждения Не находятся ли окна под воздействием прямых солнечных лучей Опустите шторы или занавески для сведения к минимуму жары в комнате Не открыты ли окна или двери Закройте все окна и двери для достижения максимального эффекта охлажден...

Страница 23: ...Jcfrf 6 Ygjzby Dj bcgjkztzbt Cnfnmb Pfrjzf Hjccbqcrjq Atlthfwbb J pfobnt ghfd gjnht bntktq 6 f nfröt Erfpf Ghfdbntkmcndf Hjccbqcrjq Atlthfwbb 1 jn b zy u7 ecnfzfdkbdftncy chjr ckeö s lfzzjq vjltkb ktn c vjvtznf ghjbpdjlcndf ghb eckjdbb bcgjkmpjdfzby d cnhjujv cjjndtncndbb c bzcnherwbtq gj ärcgkefnfwbb b ghbvtzytvsvb ntüzbxtcrbvb cnfzlfhnfvb7 ...

Страница 24: ...SHARP ELECTRONICS CORPORATION SHARP CORPORATION Osaka Japan Printed in Thailand TINSEA328JBRZ 02CO TL 1 ...

Отзывы: