background image

Picture or Sound adjustment

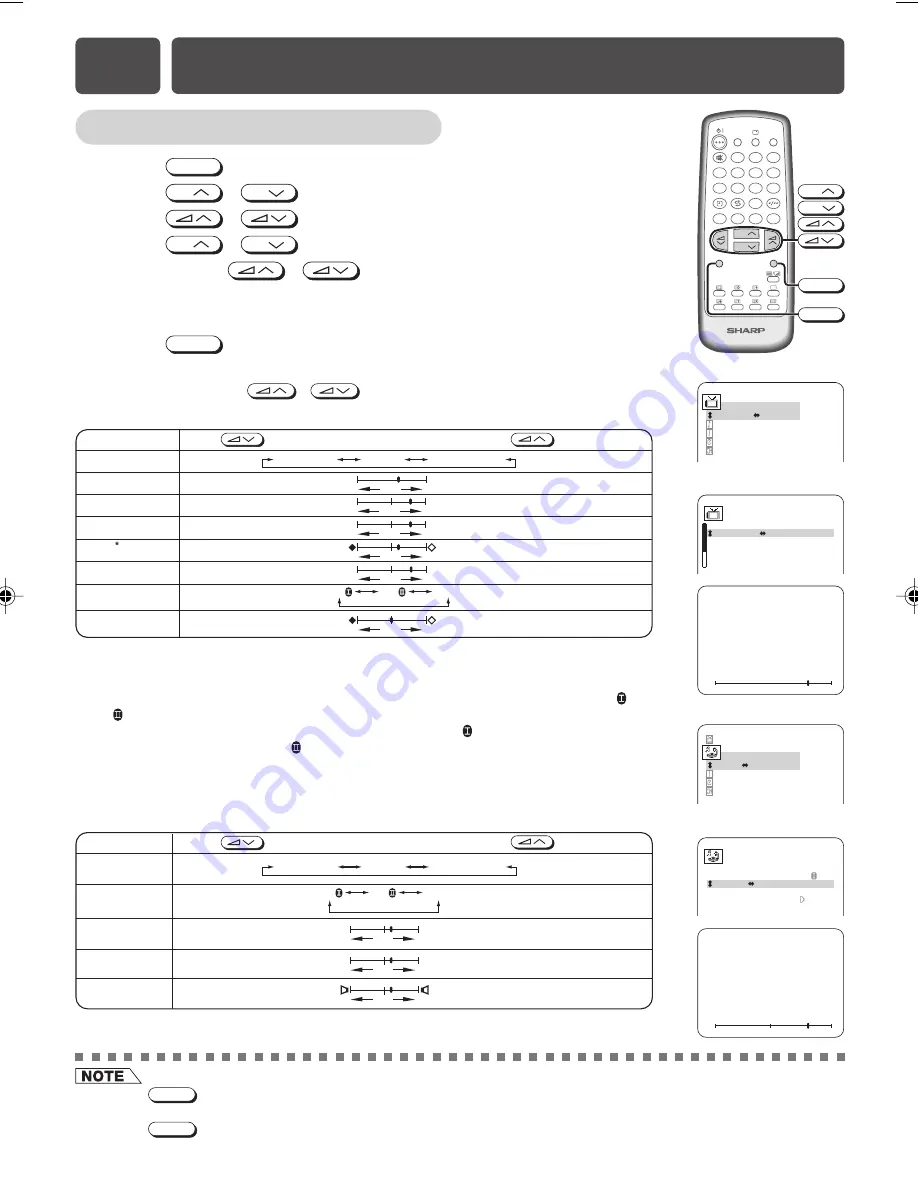
The following table lists the adjustment items shown in the PICTURE/SOUND menu and how

they change as you press 

 / 

.

*: TINT can only be selected and adjusted when receiving NTSC broadcasts.
• Auto Noise Reduction (ANR)

Noise might be generated on images when playing deteriorated video tapes or when
receiving broadcasts with relatively weak signals. In these cases, set ANR to “ON ” or
“ON ” to reduce the noise. However, when receiving good images without noise, you can
get better image quality by turning OFF this feature. If ON  is selected and the image is still
with noise, please switch to ON .

• WHITE TEMP can only be adjusted on PICTURE menu.

• The CONTRAST, COLOUR, BRIGHTNESS, TINT, SHARPNESS and WHITE

TEMP setting can be set differently for individual AV Mode setting.

!

Press 

MENU

 to call MENU screen.

@

Press 

CH

 / 

CH

 to select “PICTURE” or “SOUND”.

#

Press 

 / 

 to display PICTURE or SOUND menu.

$

Press 

CH

 / 

CH

 to select adjustment items.

%

Adjust using 

 / 

.

• Wait for approximately three seconds to return to PICTURE/SOUND menu.

^

Repeat steps 4 and 5 above to adjust other items.

&

Press 

MENU

 until normal screen appears.

• Pressing 

NORMAL

 while a PICTURE/SOUND selection is displayed, only the selected mode is reset to the standard

(factory-setting) position.

• Pressing 

NORMAL

 while a PICTURE/SOUND menu screen is displayed will reset the individual AV Mode setting to

the standard (factory-setting) position.

E8

SETTING AND ADJUSTMENT (Continued)

[ PICTURE menu screen ]

[ SOUND menu screen ]

PICTURE menu table

SOUND menu table

• The SURROUND, TREBLE, BASS and BALANCE setting can be set differently for

individual AV Mode setting.

ON

ON

OFF

CONTRAST

AV MODE 

Selected item

Press

Press

COLOUR

BRIGHTNESS

TINT

SHARPNESS

To decrease contrast

For less colour intensity

For less brightness

To move tint toward red

For less sharpness

To increase contrast

For more colour intensity

For more brightness

To move tint toward green

For more sharpness

-                          +

-                          +

-                          +

-                          +

WHITE TEMP

To more reddish  

background

To more bluish background

ANR

(See note below)

DYNAMIC

SOFT

STANDARD

SURROUND

ON

ON

TREBLE

BASS

To decrease treble

To decrease bass

To increase treble

To increase bass

-                          +

-                          +

BALANCE

To shift balance 
toward left 

To shift balance toward right 

OFF

Selected item

Press

Press

AV MODE 

DYNAMIC

SOFT

STANDARD

LANGUAGE

TV/VIDEO

SURROUND

CH

CH

NORMAL

TV/TEXT

1

2

3

4

5

6

7

8

0

9

MENU

B

A

C

D

MPX

MENU

NORMAL

CH

CH

SOUND
FEATURE
TIMER
CH-SETTING

PICTURE

AV MODE

DYNAMIC

CONTRAST

    50

COLOUR

     0

BRIGHTNESS

   +10

TINT
SHARPNESS

   –10

CONTRAST

50

-

+

PICTURE

SOUND

FEATURE
TIMER
CH-SETTING

AV MODE

DYNAMIC

SURROUND

   ON

TREBLE

   +10

BASS

   –20

BALANCE

    20

TREBLE

+10

-

+

21K-FD5RU(09-12)EN

7/12/05, 6:19 PM

9

Содержание 21K-FD3RU

Страница 1: ...NS C150WJZZ 05P12 MSP E6 BASIC OPERATION Turn on the power On screen display language selection Channel selection Adjusting volume E7 PRESETTING CHANNELS Auto channel tuning Manual channel tuning E8 SETTING AND ADJUSTMENT Channel setting Picture or Sound adjustment E9 TIMER SETTING Off timer On timer Reminder on screen timer E10 FEATURES Blue screen Child lock Text E11 USEFUL FEATURES Channel Time...

Страница 2: ...Ventilation Do not place this TV set in a confined area such as on a bookshelf or in a built in case Leave adequate space behind the TV for proper ventilation Servicing To reduce the risk of electric shock do not remove the back of the cabinet This TV set contains dangerous voltage Power cord protection To prevent electrical shock do not subject the AC power cord to damage by bending or twisting i...

Страница 3: ...a via a VCR E3 CONNECTING AND WATCHING DVD If your outdoor antenna uses a 300 ohm twin lead flat feeder connect a 300 ohm to 75 ohm impedance converter and plug it into the antenna jack at the rear of the set Connecting the video terminals DVD input terminals DVD player COMPONENT IN VIDEO Y Y or Y Y PB CB PB CB or B Y Pb PR CR PR CR or R Y Pr Watching DVD Press TV VIDEO to select COMPONENT DVD inp...

Страница 4: ...p down buttons Selects the channels Tunes or sets the channels MENU PRESET button Tunes the channels Used for MENU setup Power indicator Power can be turned on by the remote control when the indicator is dimly lit Infrared sensor window Receives the infrared wave from the remote control Video input terminal AV 2 IN Connects to a camcorder video game etc Audio input terminals AV 2 IN Connects to a ...

Страница 5: ...screen display language LANGUAGE Calls the MENU screen MENU Displays the channel and timer settings on the screen Infrared transmitter window Aim this window at the infrared sensor window on your TV set Turns the TV on or to Standby mode Returns to previously viewed channel Switches between TV broadcasts and A V input programmes TV VIDEO Switches between one or two digit mode channel selection Adj...

Страница 6: ... 98 99 AV1 or COMPONENT AV2 0 1 2 Press CH and channels change as shown below 1 0 AV2 AV1 or COMPONENT 99 98 2 1 0 With the number buttons on remote control To select a one digit channel such as 5 press 5 If 5 is indicated press to select one digit input and then press 5 again To select a two digit channel such as 15 press to select the two digit input Press 1 and then press 5 Behind the door Chan...

Страница 7: ...ET twice to display MANUAL mode screen Pressing MENU PRESET changes the screen as shown below Press CH CH or number buttons to select channel position Press on TV set to locate channel you wish to preset to current channel position Search is initiated and when a TV signal is received during the search the search stops Repeat steps 3 and 4 above to preset channel positions for other broadcasts Pres...

Страница 8: ...trong enough for the selected channel the effect is negligible and may produce instability In such a case select OFF Press MENU until normal screen appears When you select AV1 AV2 for the channel position the CH SETTING menu changes as shown on the right and the colour mode changes in the following order Switching COLOUR system Set the system to AUTO for normal TV reception The AUTO mode automatic...

Страница 9: ...de is reset to the standard factory setting position Pressing NORMAL while a PICTURE SOUND menu screen is displayed will reset the individual AV Mode setting to the standard factory setting position E8 SETTING AND ADJUSTMENT Continued PICTURE menu screen SOUND menu screen PICTURE menu table SOUND menu table The SURROUND TREBLE BASS and BALANCE setting can be set differently for individual AV Mode ...

Страница 10: ...d set the VOLUME Press until normal screen appears Press to put TV set into Standby mode Power indicator will flash to indicate On Timer is set When the preset length of time setting has passed the power turns on and a picture appears on the screen The ON TIMER speaker volume gradually increases from zero to preset volume On timer Automatically turns power on after a set length of time has passed ...

Страница 11: ...lue if a broadcast signal is not received The Reminder also works in the Standby mode Power is automatically turned on five minutes before the preset length of time expires The TV set automatically returns to the Standby mode approximately 1 minute if no buttons are pressed on the TV set or remote control The Reminder is cancelled if POWER on the TV set is pressed or if the power is otherwise inte...

Страница 12: ...s turned off and on again To turn OFF or to change setting of CHILD LOCK mode While CHILD LOCK ON screen appear Enter 4 digits PASSWORD using Number buttons 0 9 on the remote control For example 0000 Press to clear the entered number If the wrong PASSWORD is entered PASSWORD INCORRECT screen will appear Input the PASSWORD again in this case If you forget your PASSWORD please input 2398 to enter th...

Страница 13: ...Germany 1 Holland Swedish Denmark Finland 1 Norway Sweden Italian Italy 1 French France 1 French German Belgium 1 French Switzerland 1 German Italian Spanish Iceland Portugal Spain 1 Latin Croatia 2 Serbo Croat Czech Czech Republic 2 Romanian Romania 2 Language Use Country TEXT No Polish Poland 3 Estonian Estonia 3 Lettish Latvia Lithuanian 3 Russian Cyrillic Bulgaria Russia 3 Cyrillic Serbia 3 Tu...

Страница 14: ... Silences the sound Press The channel previously viewed returns to the screen Example After switching from channel 5 to channel 7 is pressed the channel will change to channel 5 Press again to return to channel 7 Channel recall Switches back to the channel you were watching just before the current channel LANGUAGE TV VIDEO SURROUND CH CH NORMAL TV TEXT 1 2 3 4 5 6 7 8 0 9 MENU B A C D MPX Number b...

Страница 15: ...rround sound Produces a virtual surround sound from the TV s speakers SURROUND ON SURROUND ON SURROUND OFF LANGUAGE TV VIDEO SURROUND CH CH NORMAL TV TEXT 1 2 3 4 5 6 7 8 0 9 MENU B A C D MPX MPX SURROUND E12 NICAM A2 STEREO SYSTEM BROADCASTS Only for 21K FD5RU Enables selection of reception mode when receiving a NICAM I B G or D K signal Stereo Each time you press MPX the mode switches between ST...

Страница 16: ...A2 ON 15 NICAM ƒ When NICAM A2 in set to OFF on the CH SETTING menu MPX cannot be used to change the audio mode stereo and bilingual settings The setting can be selected individually for each channel position NICAM I National and regional broadcast system used in the UK and Hong Kong NICAM B G National and regional broadcast system used in Singapore Malaysia and New Zealand NICAM D K National and ...

Страница 17: ...uch as the answers to a quiz Press a second time to hide the displayed information Press a third time to return to the start of the sequence Time button In TV mode When a TV signal with Teletext data is received press to display the real time information on the top right area of the screen In Teletext mode When a selected Teletext page has hidden sub pages you can see them by performing the follow...

Страница 18: ...o Audio Video out terminals To Audio Video in terminals Yellow To VIDEO White To AUDIO L Red To AUDIO R For playback of monaural audio connect the external source to the audio input left terminal on the front or rear of the TV set MONO to hear the same sound from both speakers The audiovisual cords required to connect the TV set with video equipment may differ from those shown in the above diagram...

Страница 19: ...utlet power OFF Antenna not connected to terminal at the back of the TV set If outside antenna is used check for broken wires Check for local interference Adjust COLOUR control Check batteries in the remote control Try fine tuning to correct Contrast setting in picture mode might be all the way to the minus side Press the NORMAL button on the remote control to correct Increase the volume Problems ...

Страница 20: ...er Playback PAL 5 5 MHz 60 Hz Using RF in terminals PAL 6 0 MHz 60 Hz PAL 6 5 MHz 60 Hz NTSC 3 58 4 5 MHz 50 Hz Reception Channels PAL B G VHF E2 E12 ch SECAM B G UHF E21 E69 ch PAL D K VHF C1 C12 ch R1 R12 ch SECAM D K K1 UHF C13 C57 ch R21 R69 ch PAL I VHF B J ch UHF 21 69 ch Hong Kong NTSC VHF 2 13 ch U S 1 12 ch Japan UHF 14 69 ch U S 13 62 ch Japan CATV S1 S20 ch S21 S41 ch Hyper Receiving Fr...

Страница 21: ...Note ...

Страница 22: ...SHARP CORPORATION ...

Отзывы: