13VT-K100/150
13VT-CK10
40
ADJUSTMENT OF THE VCR ELECTRICAL CIRCUITRY
Notes:
»
Before the adjustment:
Electrical adjustments described here are often required after replacement of electronic components and mechanical
parts such as video heads.
Check that the mechanism and all electric components are in good working condition prior to the adjustments,
otherwise adjustments can not be completed.
»
Instruments required:
Dual-trace oscilloscope
Blank video cassette tape
Screwdriver for adjustment
Color bar generator
DC voltmeter
Alignment tape (VROATSV), (VROBBZGS)
»
Adjustment of the VCR should be done in the TV/VCR combinated style. But there is a function to cut off the high
voltage of TV. Namely, you can check only VCR part by taking the socket of K710 off P708 in PWB-A. Therefore
you can use function on the occasion of checking and adjusting VCR part.
SERVO CIRCUIT ADJUSTMENT
ADJUSTMENT OF HEAD SWITCH-
ING POINT
Measuring
Dual-trace oscilloscope
instrument
Mode
Playback
Cassette
Alignment tape (VROATSV)
Test point
TP2207 (Video Out) to CH1
TP3302 (Trigger) to CH2
Control
Remote Control
Specification
5.5 ± 0.5H (lines)
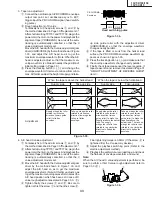
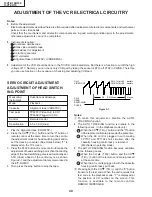
1. Play the alignment tape.(VROATSV.)
2. Press the CH
"
(TR
—
) button and the "0" button of
remote control at the same time to turn the set into
the adjustment mode for head switching point and to
set the tracking to center. (See Notes below) "T" is
displayed on the TV screen.
3. Press the PLAY button of remote control to make the
adjustment of head switching point, then the leading
edge of the head switching pulse is automatically set
5.5H (lines) ahead of the vertical sync as shown
Figure 2-1 and the adjustment data is memorezed in
the E
2
P-ROM IC.
4. Then press the stop button to stop the tape.
Notes:
1
To make this adjustment, disable the AUTO
TRACKING function.
»
The AUTO TRACKING function is disable in the
following cases. (In the playback mode only.)
a When the CH
"
(TR
—
) button and the "0" button
of the remote control are pressed at the same time.
b When the AC cord is plugged in with making
TP7701 and TP7702 short circuited, after the
cassette housing control ass'y is removed.
(Mechanism operating mode)
»
The AUTO TRACKING function becomes available
in the following cases.
a When the CH
'
(TR
±
) button and the CH
"
(TR
—
) button of the remote control are pressed
at the same time.
b When the AC cord is plugged in with the cassette
housing control ass'y put back.
2
Pressing both the CH
"
(TR
—
) and the "0" button
transmits the test code. When the unit receives this
test code in the playback mode, "T" is displayed at
the position of CH number on the screen. This
function is available to the remote controls
RRMCG1330PESA/SB.
Figure 2-1.
5.5
}
0.5H(Iines)
V-sync.
CH-2
HEAD
SWITCHING
PULSE
CH-1
VIDEO OUT
CH-1:1V/div 50
˚
sec/div
CH-2:2V/div 50
˚
sec/div

