Shark 100BT Скачать руководство пользователя страница 2


Doc

#    

E145753   V.1.04     


             QS - 2

                        Shark® 100BT Quickstart

Electro 

Industries/GaugeTech

The Leader In Power Monitoring and Smart Grid Solutions

Electro 

Industries/GaugeTech

The Leader In Power Monitoring and Smart Grid Solutions

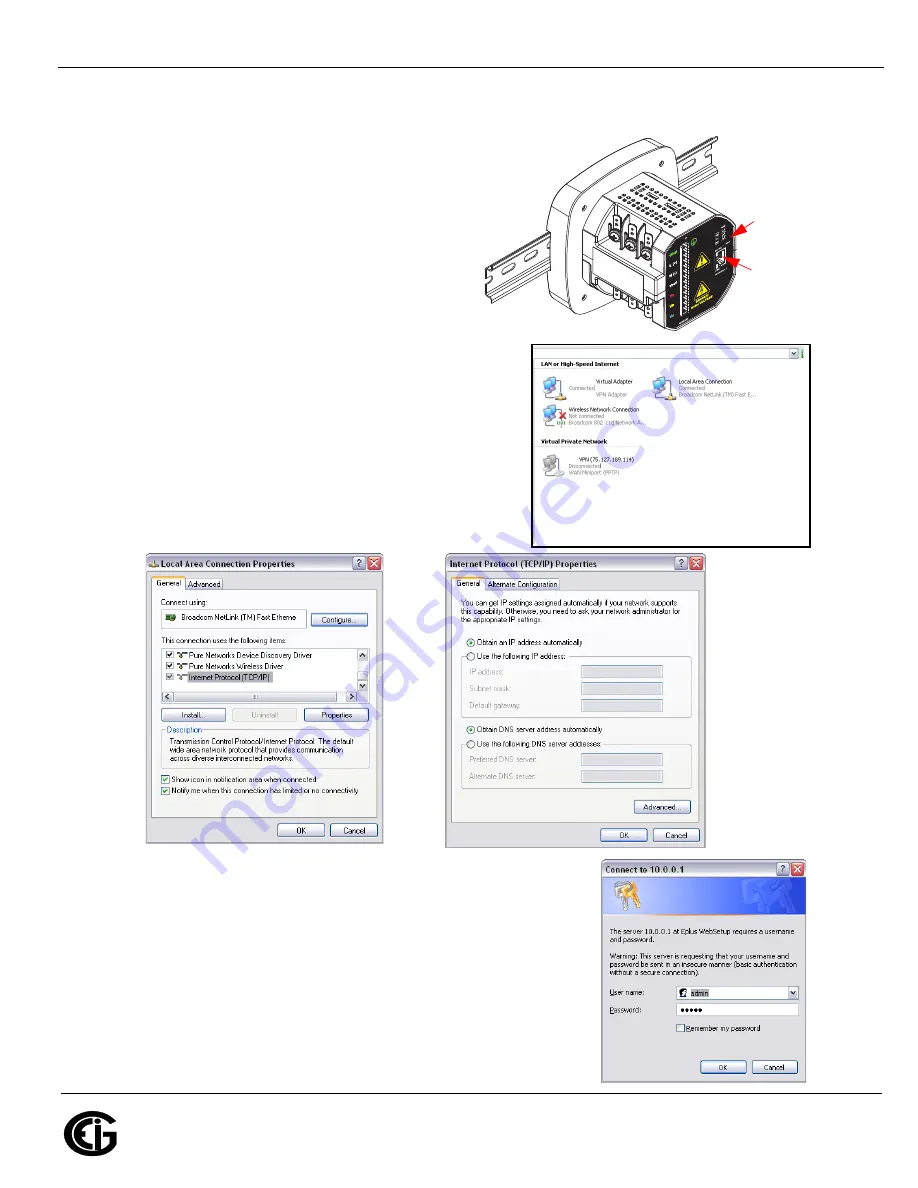
Communication Wiring

: The Shark® 100BT has 

an RJ45 port on its backplate, which accommodates

a standard Ethernet cable.

Factory Default Settings: 

The Factory Default IP 

parameters programmed in the INP10 card are:

  IP Address: 10.0.0.1

  Subnet Mask: 255.255.255.0

Set up Ethernet Communication with a PC

: You 

need to establish communication between your PC 

and the meter in order to configure the meter’s IP 

address so that it will communicate on your Network.

1.Select 

Start>Control Panel>Network Connections

   You will see the screen shown on the right.

2.Right-click on the Local Area Connection you will use to 

   communicate with the meter and select 

Properties

. You 

   will see the screen below, on the left.

3.Select Internet Protocol [TCP/IP] and click the 

Properties


   button. You will see the screen below, on the right.

4.Click Use the Following IP Address radio button and enter: 

   IP Address:10.0.0.100 

   Subnet Mask:255.255.255.0

5.Click 

OK

 and then 

Close 

to close the two screens.

6.Connect the meter’s RJ45 port to your PC’s Ethernet port using a

   standard Ethernet cable.

7.Open your web browser, type http://10.0.0.1. in the address bar

   and press 

Enter

. You will see the screen shown on the right.

  Reset
  Button
  

  Connect
  Ethernet
    cable
    here

Содержание 100BT

Страница 1: ...I LO LO LO 3 52 8 90cm 0 62 1 61cm 12 10cm 4 78 2 31cm 0 91 4 16 10 60cm DINInstallation Release clip 100BT Dimensions DIN Rail with black lc HI LO lb HI LO la HI LO Earth Ground L Power Supply Connection N L GND N Vref Va Vb Vc LINE LOAD CT Shorting Block FUSES 3 x 0 1A FUSE 3A C C B B A A N N lc HI LO lb HI LO la HI LO Earth Ground Earth Ground L Power Supply Connection N L GND N Vref Va Vb Vc L...

Страница 2: ... address so that it will communicate on your Network 1 Select Start Control Panel Network Connections You will see the screen shown on the right 2 Right click on the Local Area Connection you will use to communicate with the meter and select Properties You will see the screen below on the left 3 Select Internet Protocol TCP IP and click the Properties button You will see the screen below on the ri...

Страница 3: ...age shown below on the right 11 Click in the IP Address field and change the meter s factory set IP address 10 0 0 1 to an IP address in the same subnet as your Network Contact your System Administrator if you are unsure of the address to use 12 Click OK at the bottom of the webpage 13 Click Activate Configuration on the left side of the webpage to display the screen shown on the right 14 Click Co...

Страница 4: ... PT Numerator x PT Multiplier Current Full Scale CT Numerator x CT Multiplier IMPORTANT Specify Primary and Secondary Voltage in Full Scale NOT Ratios Example CT Settings 200 5 Amps set the Ct n value as 200 Ct S value as 1 800 5Amps set the Ct n value as 800 Ct S value as 1 2000 5 Amps set the Ct n value as 2000 Ct S value as 1 10 000 5 Amps set the Ct n value as 1000 Ct S value as 10 Example PT ...

Отзывы: