background image

7

Safety wires

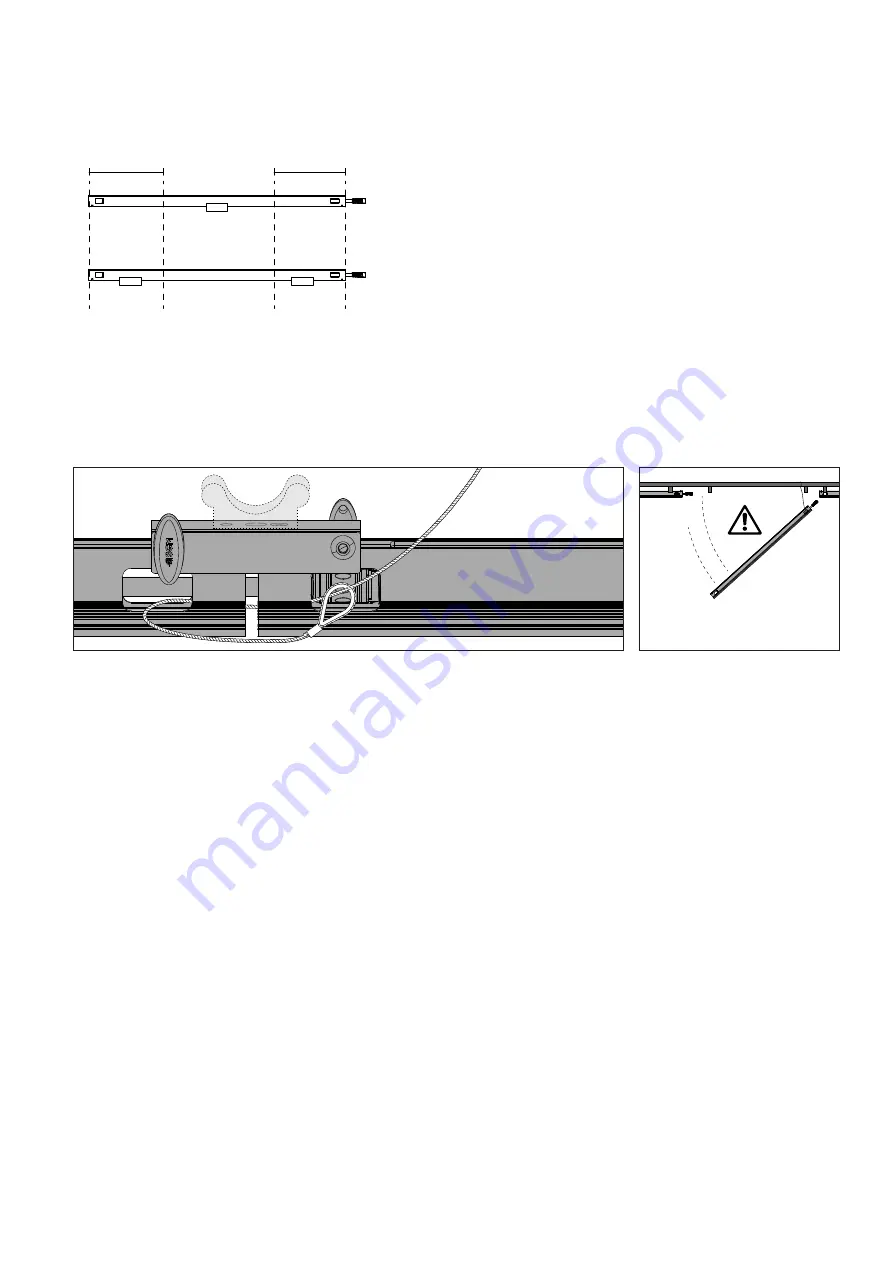
The safety wire should be installed at the highest point on the VPL to minimize the fall distance. When installing VPLs in ceilings or 

any horizontal plane with people below, make sure to install one safety wire in both ends of the VPL (See figure 6). If the fixtures 

are installed as an extension of each other, one safety wire can be attached to two adjacent fixtures (See figure 5).

Figure 5: Attaching safety wire through the holes in the VPL profiles. 

Figure 4: Bracket guide-line, if the bracket is closer 

to than 300mm to the edge, two brackets are advised.

Figure 6: Attach the safety wire in 

both sides.

Temporary installations

The Touring Bracket is designed for temporary installations and rental applications. It is a versatile bracket, which can be adapted 

to trusses rigged in any direction. A VPL Single Touring bracket can carry a SGM VPL 1220-20 if it is placed no more than 300mm 

away from the VPL's end (see figure 4). 

Attach to suitable truss

NOTE!

The VPLs should always be properly fixed and not hung in the cables.

Always install a safety wire on both ends when using VPLs in a ceiling installation.

one bracket

two brackets

300mm

300mm

Содержание VPL1220-20

Страница 1: ...USER MANUAL LED VIDEO PIXEL LINEAR VPL1220 20 VPL1220 20 VPL610 20 VPL610 20 VPL305 20 VPL305 20...

Страница 2: ...o use or reliance on the information contained in this manual The SGM logo the SGM name and all other trademarks in this document pertaining to SGM services or SGM products are trademarks owned or lic...

Страница 3: ...ting the VPL series 9 VP Power Data Joiner 9 Connect to AC power 9 Cable lengths 10 VP Connector 10 Installing the fixtures 11 Replacing a fixture 11 De mounting 11 Replacing 12 Configuring the device...

Страница 4: ...ion before touching it WARNING Take measures to prevent burns and fire Do not look directly at the light source from close range Take precautions when working at height to prevent injury due to falls...

Страница 5: ...cted UV and corrosion resistant Uses Power and Data in one cable with no need for external power supplies or drivers Art Net and sACN compatible Has 16 bit control with real time remote monitoring and...

Страница 6: ...ent installations The VPL Touring Bracket P N 83060633 see figure 2 is perfect for temporary installations It has a snap on sliding bracket for quick release and easy setup designed as a versatile ite...

Страница 7: ...ket guide line if the bracket is closer to than 300mm to the edge two brackets are advised Figure 6 Attach the safety wire in both sides Temporary installations The Touring Bracket is designed for tem...

Страница 8: ...vity wax CAUTION Always wear appropriate personal protection according to the Cavity wax producers instructions Figure 7 Orientations of a corner lying flat or sideways Grounding of fixtures When inst...

Страница 9: ...must be fitted with a grounded connector intended for exterior use For permanent installations have a qualified electrician to wire the mains cable directly to a suitable branch circuit The junction s...

Страница 10: ...copper wire should be 9 11mm See figure 16 4 Mount the crimping pins and use the VP Crimping tool see figure 17 to securely fasten them The power cables use AWG 16 pins while the data pins use AWG 26...

Страница 11: ...the VPL into the installed bracket Remember to tighten the bolts Step 1 Loosen the bolts while holding the profile and begin the disassembly in the single hole Step 2 Remove the VPL by carefully twist...

Страница 12: ...N The internal protocol for VPLs is SGM VP Net which have a bandwidth limit of 100Mb Lenses The direct view of the VPLs can be modified with snap on lenses Opal Black Smoked Clear No Lens Opal With no...

Страница 13: ...box with a magnet Confirm that the power is switched on that the cables are plugged in and the power connector is inserted and turned to its locked position No data to the fixture The fixture reacts...

Страница 14: ...eaning the optical silicone may be needed to achieve the maximum light output after exposure to dust sand or dirt Whenever necessary clean the VPL using a soft cloth dampened with water For a thorough...

Страница 15: ...joiner P N 83062049 VPL Dual installation bracket P N 83060635 VPL Single installation bracket P N 83060634 VPL Touring bracket P N 83060633 VP Power inserter P N 83062047 VP Connector End cap P N 83...

Страница 16: ...2014 30 EU EMC Directive Conforms to 2011 65 EU RoHS2 Directive Certified to CAN CSA Std CSA E60598 1 Ed 2 Certified to CAN CSA Std CSA E598 2 17 98 Ed 1 Approvals and certifications The information i...

Страница 17: ..._______________________________________________________ ______________________________________________________________________________________________________ _________________________________________...

Страница 18: ...SGM Light A S Sommervej 23 8210 Aarhus V Denmark Tel 45 70 20 74 00 info sgmlight com www sgmlight com...

Отзывы: