background image

 
SFF time P-ATX V2.1 manual 


 10


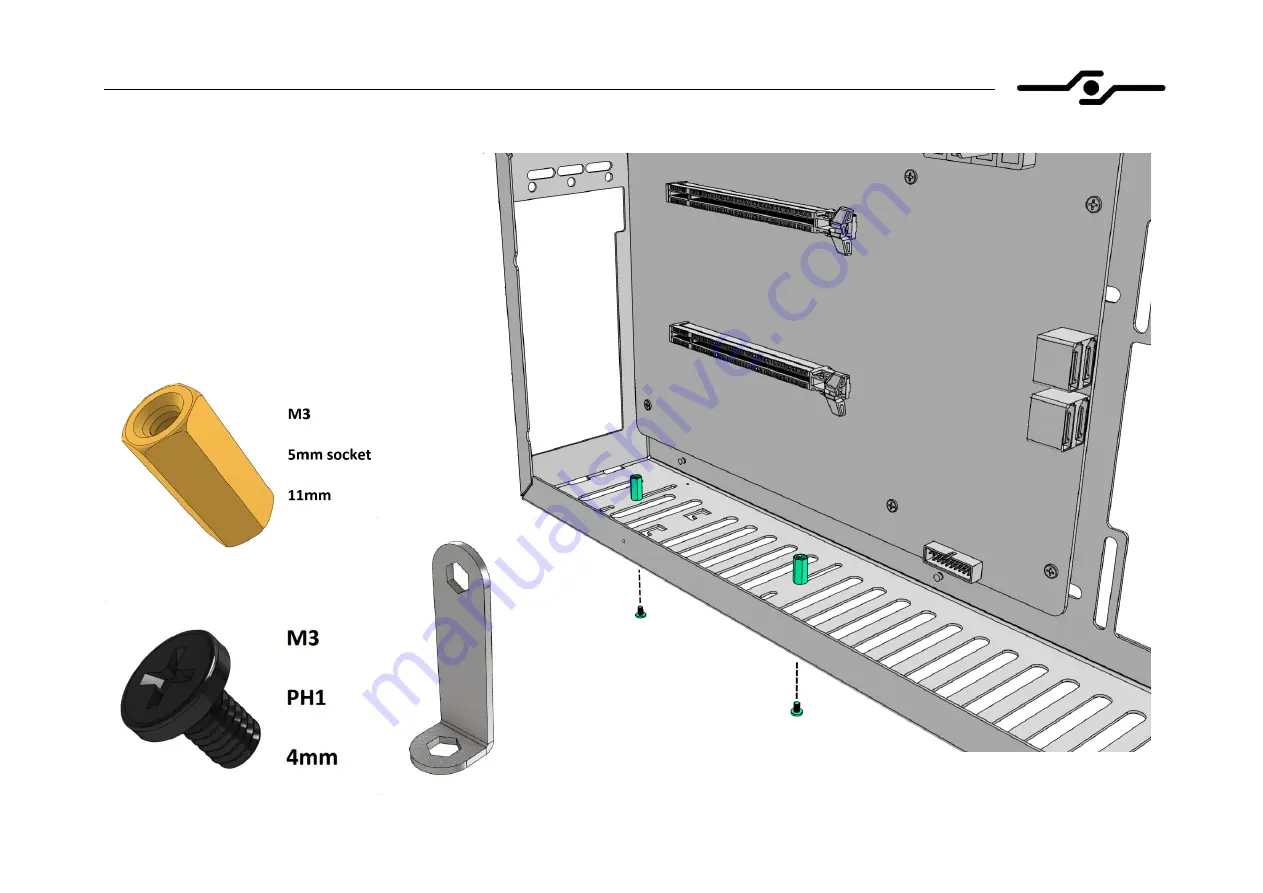
8. Installing GPU riser cable 

– preparing standoffs (part 1)


install the standoffs the same way as 
motherboard standoffs, using screwdriver 
and provided tool 

position the standoffs according to your 
GPU thickness; if using 2-slot GPU, place 
the standoffs closer to the left side of the 
case, and if using 3-slot GPU closer to the 
right side of the case. You can also adjust 
the GPU position after installation 

Содержание P-ATX V2

Страница 1: ...SFF TIME P ATX V2 1 MANUAL...

Страница 2: ...any doubts about choosing your components or steps in this manual please contact us via email on info sfftime com and we will be glad to assist you Important notes always use the correct screwdriver...

Страница 3: ...SFF time P ATX V2 1 manual 2 Included with case PSU bracket GPU bracket 92 mm fan adapter AC bracket and grommet Hex tool Mounting hardware...

Страница 4: ...ng the case removing side panels part 1 your case will come with side panels and HDD bracket attached you need to remove them before putting other components into the case unscrew six bolts that hold...

Страница 5: ...SFF time P ATX V2 1 manual 4 2 Preparing the case removing side panels part 2 push side panels towards the back side of the case approximately 1 cm lift panels upwards away from the case...

Страница 6: ...SFF time P ATX V2 1 manual 5 3 Preparing the case removing HDD bracket part 1 unscrew the nut that holds HDD bracket using provided tool or with 5 5 mm socket or wrench and save it for later use...

Страница 7: ...e P ATX V2 1 manual 6 4 Preparing the case removing HDD bracket part 2 slide the HDD bracket towards the top of the case and lift it up remove the washer that sits under the bracket and save it for la...

Страница 8: ...for ITX or DTX motherboard If you are going to install larger motherboard please install additional standoffs see next page to install standoffs you need a standoff and bolt that holds it screw the s...

Страница 9: ...manual 8 6 Installing the motherboard preparing standoffs part 2 following pictures show standoff configurations for different motherboard sizes always install correct standoffs otherwise you could da...

Страница 10: ...drives and CPU air cooler if using one install the IO shield align the motherboard on the standoffs screw the motherboard down using provided bolts after installing the motherboard connect internal U...

Страница 11: ...e way as motherboard standoffs using screwdriver and provided tool position the standoffs according to your GPU thickness if using 2 slot GPU place the standoffs closer to the left side of the case an...

Страница 12: ...manual 11 9 Installing GPU riser cable preparing standoffs part 2 if using 3 slot GPU that is taller than 130 mm use shorter 6mm long standoffs position the standoffs all the way to the right like sh...

Страница 13: ...riser cable riser and bolts install the male end of the riser into the motherboard screw down the female end of the riser onto previously installed standoffs depending on your configuration you may n...

Страница 14: ...anual 13 11 Installing the GPU GPU bracket before installing GPU you need to attach GPU bracket to the GPU like shown on the picture put a washer under the bolt that holds the GPU bracket screw down G...

Страница 15: ...SFF time P ATX V2 1 manual 14 12 Installing the GPU GPU install the GPU into the riser be sure that it is fully seated...

Страница 16: ...SFF time P ATX V2 1 manual 15 13 Installing the GPU bolts put a washer under the bolt that holds the GPU bracket screw down GPU bracket to the case with two screws...

Страница 17: ...n the flat surface take the power supply mounting bracket and put in next to power supply like shown on the picture bottom of the power supply bracket and power supply should be on the same level scre...

Страница 18: ...before installing the power supply into the case insert the AC plug into the connector on the power supply like shown on the picture please take care of the PSU bracket orientation part with the notc...

Страница 19: ...SFX power supply bolts screw the power supply bracket to the case from the front and the back side of the case using four provided countersunk screws please note that these screws are different than...

Страница 20: ...DD bracket using provided screws like shown on the picture you only need to screw down drives on one side for 3 5 drives use larger silver colored screws for 2 5 drives use smaller black screws instal...

Страница 21: ...SFF time P ATX V2 1 manual 20 18 Installing hard drives washer before installing HDD bracket into the case put the washer on the stud like shown on picture this is the washer you removed in step 4...

Страница 22: ...ling hard drives into the case put HDD bracket with hard drives in the case like shown on the picture slide the assembly towards the bottom of the case making sure that all of three HDD bracket s tabs...

Страница 23: ...SFF time P ATX V2 1 manual 22 20 Installing hard drives nut secure HDD bracket using the nut you removed in step 3 you can use provided tool or 5 5 mm socket...

Страница 24: ...installed after installing all the main components you can attach other cables such as PSU or SATA you can now proceed to install side panels and the stand installation of water cooling radiators is c...

Страница 25: ...side panels left panel install left side panel following instructions from step 2 but in reverse order secure the panel using two or three bolts bolt on the bottom side towards rear of the case is rec...

Страница 26: ...g side panels right panel install right side panel following instructions from step 2 but in reverse order secure the panel using two or three bolts bolt on the bottom towards rear of the case is reco...

Страница 27: ...2 1 manual 26 24 Installing the stand rear slots lay the case on its top side align the slots on the stand to the tabs on the bottom of the case like shown on the picture push the stand towards the fr...

Страница 28: ...on the bottom side of the case bend the stand by a few mm towards the front side of the case and while it s bent like that push in down towards the bottom of the case and release the pressure stand sh...

Страница 29: ...lease write to us at info sfftime com be sure to check out our website sfftime com to see the updates and new case designs you can find instructions for mounting the water cooling radiators and altern...

Страница 30: ...rt 1 optionally you can install water cooling radiator in the position otherwise occupied by hard drives place the radiator in a position shown on the picture and screw it to the case using four provi...

Страница 31: ...manual 30 28 Installing the water cooling radiator 120mm radiator part 2 attach the 120mm fan to the radiator using bolts provided with the radiator always use correct length bolts otherwise you could...

Страница 32: ...2mm fan part 1 if you want to use dual slot GPU longer than 245mm and shorter than 270mm with 120mm radiator you can mount the 92mm fan to the 120mm radiator using included bracket attach the bracket...

Страница 33: ...32 30 Installing the water cooling radiator 120mm radiator with 92mm fan part 2 attach the assembly to the 120mm radiator like shown on the picture using two provided M3 or 6 32 bolts and one bolt pr...

Страница 34: ...P ATX V2 1 manual 33 31 Installing the water cooling radiator 120mm radiator with 92mm fan part 3 this picture shows 267mm long or 10 5 reference length dual slot GPU next to the 120mm radiator with...

Страница 35: ...or 92mm radiator part 1 to install the 92mm radiator you need to use the provided bracket attach the bracket to the case with M3 bolts and standoffs used as nuts like shown on the picture use the prov...

Страница 36: ...er cooling radiator 92mm radiator part 2 place the radiator in a position shown on the picture and screw it to the case with one bolt and to the bracket using another bolt depending on the threads on...

Страница 37: ...SFF time P ATX V2 1 manual 36 34 Installing the water cooling radiator 92mm radiator part 3 attach the 92mm fan to the radiator using bolts provided with the radiator...

Страница 38: ...f the case you can install it outside with only the cable secured to the case to do that use provided AC bracket and cable grommet remove the AC connector from the case put the grommet around the cabl...

Отзывы: