background image

1

Table of Contents

1. Important Safety Instructions 

2

2. Overview 

2

3. Feature Identification 

3

4. Enclosure Installation 

4


4.1 Preparation 

4


4.2 Unpacking 

4

5. Enclosure Configuration 

5


5.1 Door Locks 

5


5.2 Cable Access and Management 

5


5.3 Mounting Rails 

5


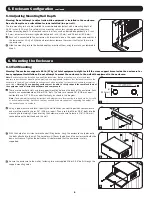
5.4 Adjusting Mounting Rail Depth 

6

6. Mounting the Enclosure  

6


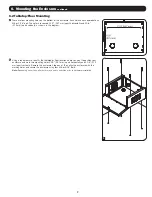
6.1 Wall Mounting 

6


6.2 Tabletop/Floor Mounting 

7

7. Equipment Installation 

8


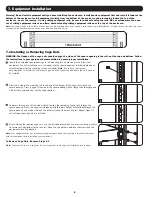
7.1 Installing or Removing Cage Nuts 

8

8. Storage and Service 

9

9. Warranty and Product Registration 

9

Español 10
Français 19

PROTECT YOUR INVESTMENT!

Register your product for quicker service and ultimate peace of mind. 

You could also win an ISOBAR6ULTRA surge protector—a $100 value!

www.tripplite.com/warranty

Security DVR Lockbox Enclosure

Model: SRDVRLB

Owner’s Manual

1111 W. 35th Street, Chicago, IL 60609 USA • www.tripplite.com/support

Copyright © 2015 Tripp Lite. All trademarks are the sole property of their respective owners.

Содержание SRDVRLB

Страница 1: ...ounting 7 7 Equipment Installation 8 7 1 Installing or Removing Cage Nuts 8 8 Storage and Service 9 9 Warranty and Product Registration 9 Español 10 Français 19 PROTECT YOUR INVESTMENT Register your product for quicker service and ultimate peace of mind You could also win an ISOBAR6ULTRA surge protector a 100 value www tripplite com warranty Security DVR Lockbox Enclosure Model SRDVRLB Owner s Man...

Страница 2: ...g the load or on a level floor that is able to bear the weight of the enclosure all equipment that will be installed in the enclosure and any other enclosures and or equipment that will be installed nearby For permanent wall mounting be sure to securely fasten the enclosure to the building structure before operation Use caution when cutting packing materials The enclosure could be scratched causin...

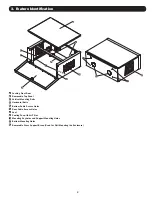
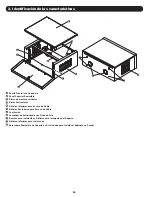
Страница 3: ...ting Rails D Horizontal Rails E Bottom Cable Access Holes F Rear Cable Access Holes G Vent H Cooling Fan with Air Filter I Mounting Keyholes and Support Mounting Holes J Bottom Mounting Holes K Removable Cross Support Brace Used for Wall Mounting the Enclosure A D B C H I I F C K E G J ...

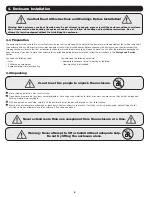
Страница 4: ...emely heavy Do not attempt to unpack move or install the enclosure without assistance Use extreme caution when handling the enclosure and be sure to follow all handling and installation instructions Do not attempt to install equipment without first stabilizing the enclosure 4 1 Preparation The enclosure must be installed in a structually sound area that is able to bear the weight of the enclosure ...

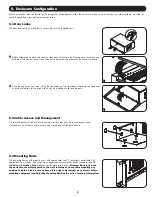
Страница 5: ... management To uncover a cable access hole simply pop out the desired cap Before installation plan the location and arrangement of components within the enclosure Make sure all mounting rails are reversed or adjusted for depth depending on your equipment configuration 5 3 Mounting Rails The enclosure comes with mounting rails with square holes for 19 rackmount compatible DVR equipment To install y...

Страница 6: ...ly Use appropriate fasteners not included to secure the enclosure to the wall Use suitable mounting means when installing to cinder block concrete drywall or wood studs Warning The supporting surface must be able to safely support the combined load of the equipment and all attached hardware and components 1 There are two keyhole slots and two support mounting holes on the back of the enclosure Eac...

Страница 7: ...ally as shown in the diagram 2 Using a tape measure identify the tabletop or floor location where you want to position your enclosure and mark two mounting holes 21 9 557 mm apart horizontally and 10 8 275 mm apart vertically Remove the enclosure s top panel Then align the enclosure with the marking holes and secure the enclosure using four M8 or 5 16 bolts Note Depending on surface pilot holes ma...

Страница 8: ...here you plan to install your equipment You will install cage nuts included into the square openings in order to provide an attachment point for the mounting screws included Note Consult your equipment documentation to determine how many cage nuts will be required and where they will need to be installed 2 From the inside of the mounting rail insert one of the flanges of the cage nut through the s...

Страница 9: ...s and you may have other rights which vary from jurisdiction to jurisdiction WARNING The individual user should take care to determine prior to use whether this device is suitable adequate or safe for the use intended Since individual applications are subject to great variation the manufacturer makes no representation or warranty as to the suitability or fitness of these devices for any specific a...

Страница 10: ...la profundidad del riel 15 de montaje 6 Instalación del Gabinete 15 6 1 Instalación en Pared 15 6 2 Instalación sobre Mesa Piso 16 7 Instalación de equipos 17 7 1 Instalación o extracción de las 17 tuercas de jaula 8 Almacenamiento y servicio 18 9 Garantía 18 English 1 Français 19 Gabinete con Caja de Seguridad para DVR Modelo SRDVRLB Manual del propietario 1111 W 35th Street Chicago IL 60609 USA ...

Страница 11: ... todos los equipos que se instalarán en él y cualquier otro rack y o equipos que se instalarán cerca Para instalación permanente en pared asegúrese de fijar el gabinete a la estructura del edificio antes de la operación Corte el material de embalaje con precaución El rack podría rayarse causando daños que no están cubiertos por la garantía Guarde los materiales de embalaje para utilizarlos en el f...

Страница 12: ...icios Inferiores para Acceso de Cable F Orificios Posteriores para Acceso de Cable G Ventilación H Ventilador de Enfriamiento con Filtro de Aire I Ranuras para instalación y Orificios para Instalación del Soporte J Orificios Inferiores para Instalación K Abrazadera Removible de Soporte en Cruz Usada para Instalar el Gabinete en Pared A D B C H I I F C K E G J ...

Страница 13: ...ias antes de la instalación Advertencia Los racks pueden ser extremadamente pesados No intente desembalarlo moverlo ni instalarlo sin ayuda Use máxima precaución al manipularlo y asegúrese de seguir todas las instrucciones de manipulación e instalación No intente instalar equipos sin estabilizar primero el rack 4 1 Preparación El rack se debe instalar en una zona estructuralmente sana que pueda so...

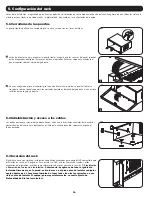
Страница 14: ...orificio para acceso de cable solamente expulse el tapón deseado Antes de la instalación asegúrese de planificar la ubicación y distribución de los componentes dentro del rack Asegúrese de que todos los rieles de montaje estén al revés o ajustados según la profundidad de acuerdo a la configuración del equipo 5 3 Inversión del rack El gabinete viene con rieles de instalación con orificios cuadrados...

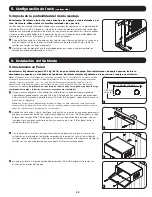
Страница 15: ...delas etc no incluidos para asegurar el gabinete a la pared Use los elementos de instalación apropiados para instalar en bloques de hormigón concreto tablaroca o entramado de madera Advertencia La superficie de soporte debe ser capaz de soportar la carga combinada del equipo y todos los accesorios y componentes instalados 1 Hay dos ranuras pequeñas y dos orificios de instalación en la parte poster...

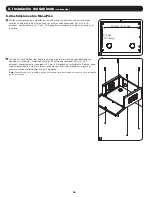
Страница 16: ...do una cinta métrica identifique la ubicación sobre una mesa o el piso donde desea posicionar su gabinete y marque dos orificios de instalación separados 557 mm 21 9 pulgadas horizontalmente y separados 275 mm 10 8 pulgadas verticalmente Retire el panel superior del gabinete Entonces alinee el gabinete con los orificios marcados y asegure el gabinete usando cuatro tornillos M8 o 5 16 pulgada Nota ...

Страница 17: ...nea instalar los equipos Instalará tuercas en jaula incluidas en las aberturas cuadradas para obtener un punto de fijación para los tornillos de montaje incluidos Nota Consulte la documentación de su equipo para determinar cuántas tuercas en jaula necesitará y dónde debe instalarlas 2 Desde la parte interior del riel de montaje inserte una de las bridas de la tuerca de jaula a través de la abertur...

Страница 18: ...xclusión o limitación de los daños incidentales o indirectos de modo que las limitaciones o exclusiones antes mencionadas pueden no corresponder en su caso Esta garantía le otorga derechos legales específicos y usted puede tener otros derechos que varían de una jurisdicción a otra ADVERTENCIA Antes de usar este dispositivo cada usuario debe ocuparse de determinar si es apto adecuado o seguro para ...

Страница 19: ...ondeur 24 des rails de montage 6 Montage de l enceinte 24 6 1 Montage mural 24 6 2 Montage sur table au plancher 25 7 Installation de l équipement 26 7 1 Installation ou retrait des 26 écrous à cage 8 Entreposage et entretien 27 9 Garantie 27 English 1 Español 10 Enceinte de boîtier de sécurité DVR Modèle SRDVRLB Manuel du propriétaire 1111 W 35th Street Chicago IL 60609 USA www tripplite com supp...

Страница 20: ... de supporter la charge ou sur un plancher plat qui est capable de supporter le poids de l enceinte et de tout le matériel qui sera installé dans l enceinte et toute autre enceinte et ou équipement qui sera installé à proximité Pour montage mural permanent s assurer de fixer le boîtier à la structure du bâtiment avant l utilisation Faites preuve de prudence lors de la découpe des matériaux d embal...

Страница 21: ...zontaux E Trous d accès aux câbles inférieurs F Trous d accès aux câbles arrière G Évents H Ventilateur de refroidissement avec filtre à air I Trous de serrure de montage et trous de montage du support J Trous de montage inférieurs K Entretoise d appui transversal amovible utilisée pour le montage mural du boîtier A D B C H I I F C K E G J ...

Страница 22: ...Les enceintes peuvent être extrêmement lourdes N essayez Ne tentez pas de les déballer de les déplacer ou de les installer sans assistance Soyez extrêmement prudent lorsque vous manipulez l enceinte et assurez vous de suivre toutes les manipulations et les instructions d installation N essayez pas d installer des équipements sans avoir d abord stabilisé l enceinte 4 1 Préparation L enceinte doit ê...

Страница 23: ...vrir le trou d accès aux câbles sortir simplement le capuchon concerné Avant l installation assurez vous de planifier l emplacement et l agencement des composants dans l enceinte Assurez vous que tous les rails de montage sont inversés ou ajusté pour la profondeur en fonction de la configuration de votre équipement 5 3 Rails de montage L enceinte est dotée de rails de montage avec des trous carrés...

Страница 24: ...montage appropriés pour une installation sur des blocs de béton de mâchefer du béton des cloisons sèches ou des colombages en bois Avertissement La surface d appui doit pouvoir supporter sans risque la charge combinée de l équipement et de tout le matériel et composants attachés 1 Il y a deux fentes de trou de serrure et deux trous de montage de support à l arrière de l enceinte Chaque trou de clé...

Страница 25: ... l aide d un ruban à mesurer identifier l emplacement sur la table ou le plancher où l enceinte sera placée et marquer deux trous de montage espacés de 557 mm 21 9 po sur la plan horizontal et de 275 mm 10 8 po sur le plan vertical Retirer le panneau supérieur de l enceinte Aligner ensuite l enceinte avec les trous de montage et retenir l enceinte en place à l aide de quatre boulons M8 ou de 5 16 ...

Страница 26: ...tage où vous prévoyez installer votre équipement Vous installerez les écrous à cage inclus dans les ouvertures carrées afin de fournir un point d attache pour les vis de montage incluses Remarque Consultez votre documentation pour déterminer combien d écrous à cage seront nécessaires et où ils devront être installés 2 À partir de l intérieur du rail de fixation insérez l une des brides de l écrou ...

Страница 27: ...implicite ou d autre l exclusion ou la limitation des dommages fortuits ou consécutifs les limitations ou exclusions susmentionnées peuvent ne pas s appliquer à vous La présente garantie vous donne des droits juridiques spécifiques et vous pouvez jouir d autres droits qui varient d une juridiction à une autre AVERTISSEMENT Avant out usage l utilisateur doit déterminer si ce dispositif est adapté e...

Страница 28: ...28 1111 W 35th Street Chicago IL 60609 USA www tripplite com support 15 07 408 93 33FE_RevB ...

Отзывы: