background image


Instruction Manual for Spirit & Spirit Tab-Tension Series In-Ceiling Electric 

Warnings 


1. Do not attempt to take apart or modify the screen. If any problems occur please contact 

your local dealer. 

2. The screen is designed to be transported, stored, and operated in the horizontal position. 

Do not stand the screen up on its end vertically for any extended period of time. 

3. Do not clean the screen case with water - only dust the screen to avoid electric shock. 
4. Make sure the brackets used are firmly secured to the wall or ceiling to avoid any damage. 
5. Make sure fixing screws are tight to avoid any damage. 
6. When installing electric motors use a professional or contact your local dealer. Incorrect 

connection of wires may result in shorts or fires. 

7. Fluorescent lights may cause interference with infrared signal. 
8. Be careful not to scratch or damage the screen surface while handling it. 
9. Do not write or draw on screen surface. Do not poke, fold, or tear screen material. 
10. Do not use detergents or harsh chemicals to clean screen material. A soft cloth and mild 

soap can clean dust and dirt off the screen material. A cotton cloth can be used to gently 
wipe dust off of the screen.  

11. For coated screens, simply dust the screen with a clean, dry, lint-free cloth. You may also 

blow dust off of the screen with a leaf blower. If the screen gets something on it that 
cannot be dusted or blown off, clean it using a damp cloth in a dabbing motion. DO NOT 
WIPE A COATED SCREEN WITH WATER. 

12. Retract the screen after each use. 
13. To prevent unnecessary damage, the assembly and maintenance of the screen should be 

done by adults. 


12 


Содержание SE1610 Series

Страница 1: ...Series In Ceiling Electric MODELS SE43 SE169 SE1610 ST43 ST169 ST1610 Thank you for purchasing a Severtson projection screen Before use please read the instructions carefully After installation store...

Страница 2: ...Instruction Manual for Spirit Spirit Tab Tension Series In Ceiling Electric Overview Parts Included 1...

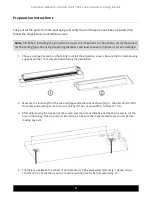
Страница 3: ...install the projection screen Be sure that no load bearing supports will be cut or compromised during the installation 2 Measure the total length of the case w flanges attached A as shown Fig 1 Subtr...

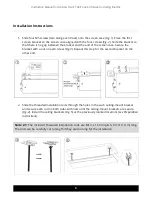
Страница 4: ...the bracket with a nut on each screw Fig 3 Repeat this step for the second bracket on the other end 2 Slide the threaded installation rods through the holes in the each ceiling mount bracket and secu...

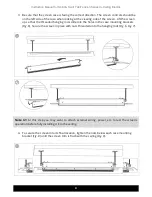
Страница 5: ...t the threaded hanging rods slide into the holes in the case mounting brackets Fig 6 Secure the screen in place with nuts threaded onto the hanging rods Fig 6 Fig 7 Note 3 1 At this step you may want...

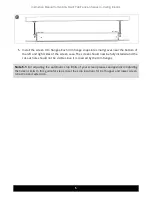
Страница 6: ...nd right sides of the screen case The screen should now be fully installed and the cut out hole should not be visible since it is covered by the trim flanges Note 5 1 For adjusting the automatic stop...

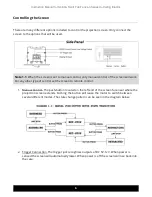
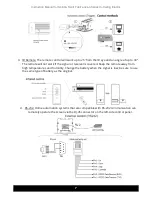
Страница 7: ...ill work For any other type of control set the screen to remote control 1 Manual Control The push button located on the left end of the screen face near where the projection screen extends Pushing the...

Страница 8: ...e will not work if the signal or receiver is covered Keep the remote away from high temperatures and humidity Change the battery when the signal is low be sure to use the same type of battery as the o...

Страница 9: ...Instruction Manual for Spirit Spirit Tab Tension Series In Ceiling Electric 8...

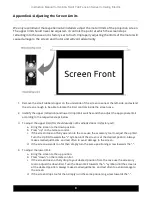
Страница 10: ...s below 3 To adjust the upper limit this should usually not be adjusted since it is factory set a Bring the screen to the down position b Press up on the remote control c If the screen does not fully...

Страница 11: ...Tension This section is only for applicable models tab tensioned models beginning with ST The tension of the screen may need to be adjusted occasionally if the screen begins to appear wavy 1 Use a fl...

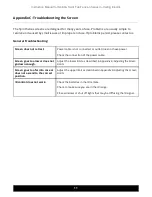
Страница 12: ...wer cable is not connected or outlet does not have power Check the connection of the power cable Screen goes too low or does not go down enough Adjust the lower limit as described in Appendix A Adjust...

Страница 13: ...wires may result in shorts or fires 7 Fluorescent lights may cause interference with infrared signal 8 Be careful not to scratch or damage the screen surface while handling it 9 Do not write or draw...

Отзывы: