17
∙
The use of an extension-lead reel causes
a loss of power, possibly combined with
a subsequent heat build-up in the cable.
It is therefore necessary to unwind the
cable completely from the reel. A reel
may be used in a protected outdoor area,
but it must be of a type approved for this
purpose.
∙
Caution:
Do not move the grill when it
is in use. Before carrying, transporting
or storing the grill, ensure that is has
suf
fi
ciently cooled down.
∙
Ensure that the grill is not stored
outdoors, or in any other location where
it might be subjected to extremes of
temperature or high humidity.
∙
No responsibility is accepted if damage
results from improper use, or if these
instructions are not complied with.
∙
This product complies with all binding CE
labelling directives.
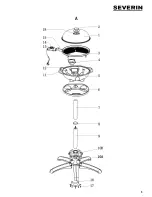
Overview and parts included
(see diagram
A
at the beginning of this
manual)
1. Hood
2. Hood
handle
3. Grill
plate
4. Fat collection tray
5. Grill
pan
6. Storage
tray
7. Vertical support (long)
8. Decorative
ring
9. Vertical support (short)
10. A - Base feet
10. B - Base
11. Grill pan handle
12. Opening for thermostat connection
13. Indicator light
14. Plug-type thermostat with temperature
control and power cord
15. Thermostat connection
16. Fixing plate
17. Screws
18. Integral hood thermometer
Before using for the
fi
rst time
∙
Remove any packaging materials and
stickers from the appliance and grill plate.
∙
Clean the grill plate with warm soapy
water and dry thoroughly.
∙
Wipe all other parts with a damp cloth
and dry thoroughly.
Grill assembly
∙
Prior to assembly, check that all parts are
complete in accordance with the section
Overview and parts included
.
∙
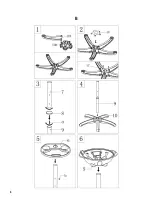
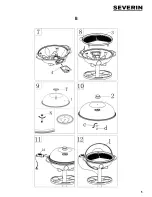
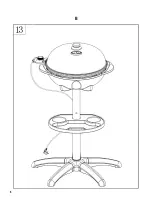
To assemble, refer to the illustrations
B
at
the beginning of this manual:
1. Push the feet (10A) into the base (10B)
until they are heard locking into place.
2. Fit
the
fi
xing plate (16) to the base, and
secure it with the screws (17).
3. Screw the threaded bolt (a) halfway
into the short vertical support (9). Fit
the decorative ring (8) and then attach
the longer vertical support (7) to the
bolt, and screw it tight.
4. Turn the base (assembled in steps
1 and 2) over and insert the vertical
support (with the shorter part facing
down) into the base.
5. Insert the screw (b) into the vertical
support (7) and attach the storage tray.
6. Fit the grill pan (5) to the vertical
support.
Содержание PG 8541
Страница 3: ...3 A ...
Страница 4: ...4 B ...
Страница 5: ...5 B ...
Страница 6: ...6 B ...
Страница 88: ...88 ...

