104 x 142 mm
13
∙ Place the cutting&shredding blade on
the cutting&shredding disk.
Cutting: The blades are facing up
Shredding: The blades are facing down
Note: The disks are protruding from the
bowl.
∙ Place the cutting&shredding attachment
onto the bowl and turn clockwise to lock.
The dispenser chute is on the left side of
the appliance.
∙ Place a suitable container under the
dispenser chute.
∙ Insert the plug into the wall outlet and
use the rotary control to select the
required power setting.
∙ Load the food into the feeder chute
and insert the pestle. Guide the pestle
slowly downwards, without applying firm
pressure. Do not put your fingers into
the chute.
∙ The processed food is collected inside
the container.
∙ Remove the pestle and, if required, add
more food.
∙ After use, turn the appliance off and
disconnect it from the mains.
∙ Unlock and take off the individual
components.
Mincing / chopping - Herbs, onions etc
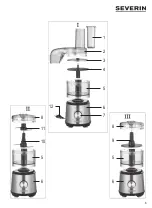
∙ See fig. II.
∙ Place the bowl onto the drive unit and
turn clockwise to lock, so that the two
triangular symbols
are aligned.
∙ Fit the smaller blade unit on the larger
one and turn anti-clockwise ( → ),
until it is heard locking into place.
∙ Fit the cutting blade unit onto the drive
shaft.
∙ Chop the food roughly and load it,
observing the ‘Max’ fill level.
∙ CAUTION: The blades are very sharp.
When handling the blades, always hold
them by their upper protective plastic
covering.
∙ Place the lid on the processing bowl and
turn it clockwise until it locks into place.
∙ Insert the plug into the wall outlet and
use the rotary control to select the
required power setting.; process the
food until it has reached the required
consistency.
Hint: Chopping food usually takes
only a few seconds. We recommend
setting the rotary control to P and
processing the food in brief bursts.
∙ After processing, always switch off
and remove the plug from the wall
socket first before removing the lid.
Carefully remove the blade unit and the
processed food, then unlock and detach
the bowl.
∙ When processing further food after the
first cycle, make sure that the drive shaft
at the bottom of the bowl is free of food
residue before refitting the blade unit.
Emulsifying / blending - Cream, egg
white, mayonnaise
∙ See fig. III.
∙ Place the bowl onto the drive unit and
turn clockwise to lock, so that the two
triangular symbols
are aligned.
∙ Fit the emulsifying disk onto the drive
shaft.
∙ Put the ingredients into the bowl.
Fill quantities:
Содержание KM 3865
Страница 3: ...3 1 8 2 11 3 5 10 4 5 6 7 6 8 9 12 5 6 ...


