Sentry Surveillance RealEyes 17 Series Скачать руководство пользователя страница 10

Creating a Backup 

There are multiple ways to create a backup but we will go over the best, most efficient way of doing so 
using your RealEyes system.  

While in the Video Log you can either press the letter B on the keyboard or select the backup option in the 
menu by going to the Toolbar icon 

 in the top right and then clicking on the tools icon   in the tool 

bar. Click on Backup in the menu.  

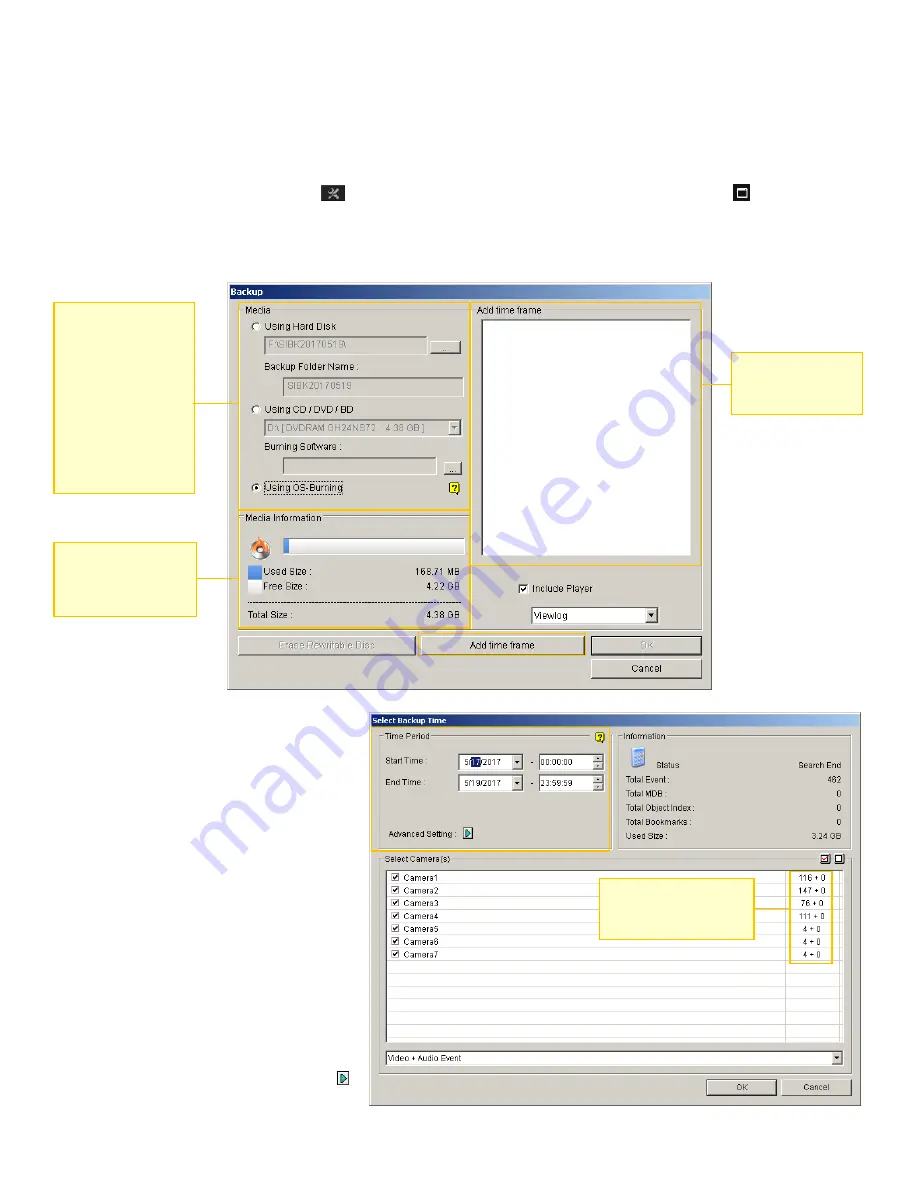
The Backup window will open up and should look like this:  


The first thing you want to do is add 
the time frames you want to add in. 
Click on the Add Time Frame button 
and the box to the right will open. 

Remember when we brought up in the 
beginning on how you want to mark 
footage to never recycle? One of the 
great functions of that is to make it 
easier to select your footage that you 
want to back up.  

First you want to select your dates. 
Click on the drop down button next to 
the date to open a calendar. Do that 
for both the Start Time date and the 
End Time date.  

Click on the Advanced Setting button  
and a box like at the top of the next 
page opens. 


Here, you select the 
media type you wish 
to save to in this 
section. USB drives, 
CD-Rs, and DVD-Rs 
are all supported. 

While you can use 
CD-RW and DVD-RW 
it is strongly not 
recommended. 

Shows how much 
space is available for 
the selected media 

Displays the 
footage you have 
selected for backup.  

Shows how many video 
and audio clips available 
for each camera. 

Содержание RealEyes 17 Series

Страница 1: ...RealEyes Series 17 NVR Manual http www sentrysurveillance com...

Страница 2: ...irst look at your system you should see a screen very similar to the one above There are only a few key features you may use regularly First look at your top toolbar to familiarize yourself with some...

Страница 3: ...era system Zooming In and Out To view one of the cameras in full screen you can either double click the left mouse button on the camera you wish to expand or click the Zoom button located in the top r...

Страница 4: ...e first one Instant Play allows you do a quick review of the last 10 seconds to the last 5 minutes When you click on it a menu will open Select the appropriate time frame you want to view 10 sec 30 se...

Страница 5: ...to a flash drive or burnable CD or DVD later on You can also directly save the files to a USB drive Click on Computer in the left column and you ll see the disks available in the main window USB driv...

Страница 6: ...erased mark the footage so it is never recycled The second reason is that it makes it a lot easier to create a backup of the footage to a CD DVD or external drive To do this place your mouse over the...

Страница 7: ...date you want to view To change dates click on the date located in the bottom left corner The calendar opens as shown on the right Click on the Arrows pointing left and right to change the month You...

Страница 8: ...t as the time progresses 2 Previous Frame Recorded footage is recorded in frames per second This allows you to go through each individual frame in reverse at your own pace 3 Rewind Plays footage backw...

Страница 9: ...g After that click on the Mode B button This lets you place a second yellow line as your end time You ll also notice that it places the times in the boxes located next to the A B buttons in the naviga...

Страница 10: ...ember when we brought up in the beginning on how you want to mark footage to never recycle One of the great functions of that is to make it easier to select your footage that you want to back up First...

Страница 11: ...at media and where you want to save the backup footage In the image above I have gone ahead and select Using Hard Disk This is for backing up to a USB drive usually a flash drive but you can also use...

Страница 12: ...and effort when doing a backup Use the Add Time Frame button at the bottom and use the same exact steps outlined previously used to save to a USB drive After you add your times and have your disc inse...

Страница 13: ...y through Friday 8 00 AM to 5 30 PM ET Our technical support staff is waiting and happy to help with any problems you may have with your system Contact Us Toll Free 1 800 228 8909 Atlanta GA 770 592 0...

Отзывы: