background image

User Configured Device Display

The user configured device display can be used to show a variety of information at a glance. This includes: IP Address, 

Scanner Logic status, Wireless/Wi-Fi status, and the status of selected parameters (i.e. if they are in alarm). If the user 

configured device display is disabled, then the Scanner 3300 touch screen will simply show a summary of Flow Run 1 

and Flow Run 2.

IP Address

The IP address used to connect with a Scanner 3300 via the web interface is displayed at the top left of the user config

-

ured device display. The IP address is assigned when a user connects the device to the network for the first time. If no 

address appears in the user configured device display, check for a problem with the Ethernet connection.

Status Indicators (Glyphs)

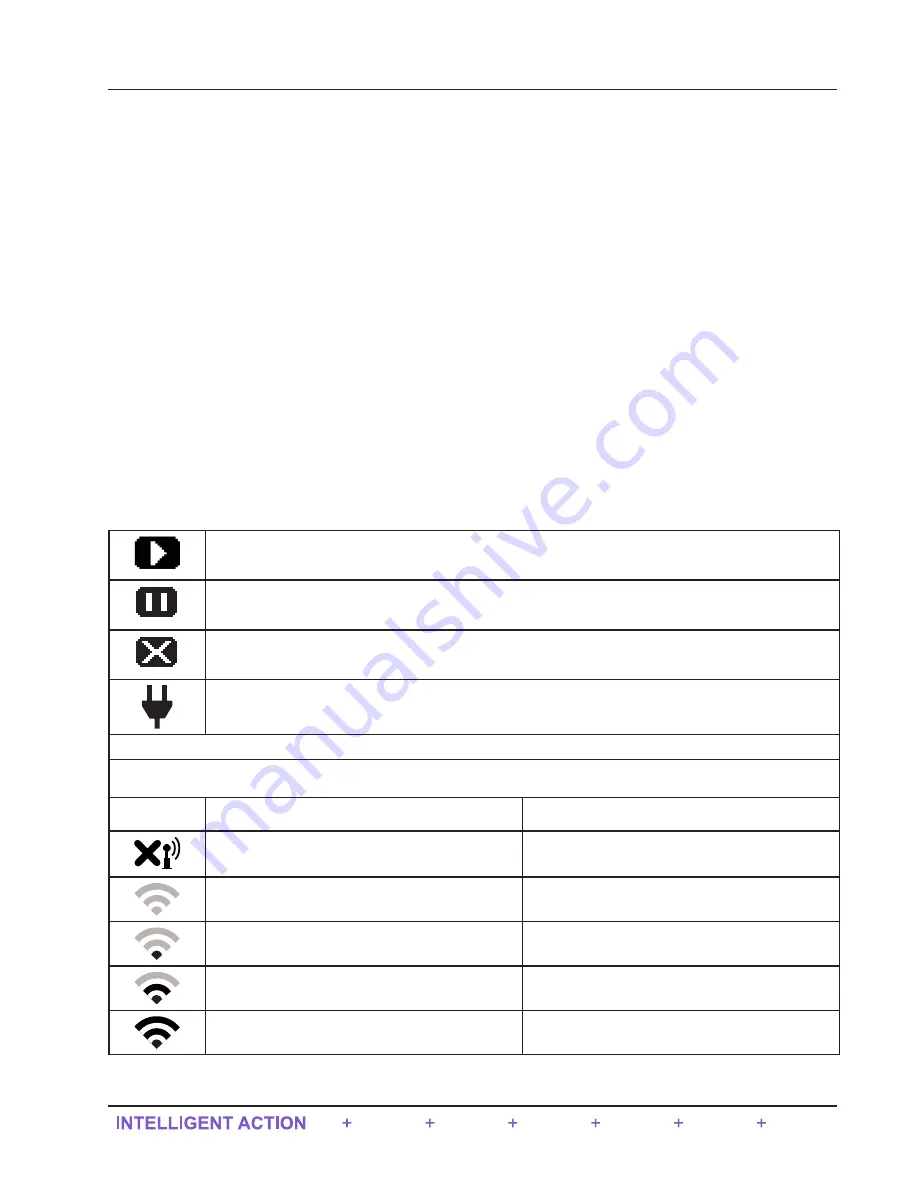
When the user configured device display is enabled, a row of pictorial status indicators or “glyphs” appears in the top 

right corner of the user configured device display. You can use these glyphs to quickly assess the status of the touch dis

-

play, wireless connectivity, and power connectivity once you become acquainted with the symbols and their meanings 

(

Figure 4.2, page 64


and


Table 4.1—User Configured Device Display Status Glyph Definitions

).

Additionally, glyphs indicating the parameter status appear to the left of the parameter reading. You can use these glyphs 

to quickly identify the status of a parameter (fail, locked, high- or low-system alarm, etc.) See 

Table 4.2—Parameter Sta

-

tus Glyph Definitions, page 

66

 for more information about the parameter status glyphs.

Table 4.1—User Configured Device Display Status Glyph Definitions

Scanner Logic -

 RUN.

Scanner Logic -

 STOP.

Scanner Logic -

 FAIL.

External Power. 

An external power source has been detected.

Wireless Communications Status

*By default, this glyph will represent the Wireless Mesh Network. However, if Wi-Fi is present, then Wi-Fi will take over 

from the wireless module and this glyph will represent Wi-Fi signal strength instead.

Wireless Mesh Network

Wi-Fi Signal Strength

The wireless transmitter is disabled.

Not applicable.

No mesh nodes are configured.

Wireless Mesh is controlling the signal.

At least one mesh node is configured but none are 

operational.

0 < Wi-Fi signal strength < 30

One or more mesh nodes are configured and at 

least one is operational.

0 < Wi-Fi signal strength < 75

Multiple mesh nodes are configured and all are 

operational.

75 < Wi-Fi signal strength < 100 (Full signal 

strength)

65

Scanner 3300 EFM 

 Section 4

Содержание 3300 EFM

Страница 1: ...QRATE Scanner 3300 EFM Hardware Installation Operation Maintenance Manual Manual No 50343919 01 Rev 8...

Страница 2: ...r incorrect function of the instrument or connected equipment Important Indicates actions or procedures which may affect instrument operation or may lead to an instru ment response which is not planne...

Страница 3: ...pliance 26 IC Radio Frequency Compliance 27 Radio Frequency Compliance Labeling 27 Antenna Installation Options 28 Direct Mount Antenna 28 Remote Mount Antenna for Pole Outside Diameters up to 2 Inche...

Страница 4: ...face 63 Kiosk Display Navigation 63 Power Button 63 Enable Disable User Configured Device Display Button 64 Configure Display Button 64 Web Interface Button 64 User Configured Device Display 65 IP Add...

Страница 5: ...hive Logs A 2 Viewing and Sharing Downloaded Data A 2 Appendix B Firmware Configuration Scanner Logic and Modbus Register Map Uploads B 1 Firmware Uploads B 1 Configuration Uploads B 1 Register Map Up...

Страница 6: ...This page intentionally left blank v Scanner 3300 EFM Table of Contents...

Страница 7: ...upported calculations The Scanner 3300 kiosk touch display when the device is connected via Ethernet or Wi Fi allows the user to fully con figure the Scanner 3300 directly through the display This sim...

Страница 8: ...Battery Support Processors Dual Core ARM Cortex M4 Dual Core ARM Cortex M4 Co Processor M4 Core Processor Speed 96 MHz 100 MHz Memory 2 18 Mbyte RAM 97 5 Mbyte Non Volatile 8 18 Mbyte RAM 129 5 Mbyte...

Страница 9: ...e ratings and symbols Figure 1 2 Device serial tag Hardware Options The following hardware options are available for customizing the Scanner 3300 to your specific needs panel mounting kit and wireless...

Страница 10: ...Kit It is recommended that the Scanner 3300 is panel mounted Figure 1 3 For installation instructions see Panel Mounting the Scanner 3300 page 24 Figure 1 3 Scanner 3300 panel mounted 4 Section 1 Sca...

Страница 11: ...is in a vertical position well above ground level and positioned away from large structures that could interfere with signal transmission and reception Sensia s direct mount antenna is rated for a ma...

Страница 12: ...he cable length is adequate to connect to both the antenna and the coupler See Specifications page 8 for additional details The installation of the antenna coupler antennas and antenna cable must meet...

Страница 13: ...h position is ignored The configuration lock feature must be enabled via the AD MINISTRATION GENERAL SECURITY page of the Scanner 3300 Web Interface For more information see the Scanner 3300 Web Inter...

Страница 14: ...tions indicator Parameter status indicators Configurable background dark or light and scroll frequency Touch screen used for advancing the display simulating LCD and additional data connecting to the...

Страница 15: ...ule available with or without external antenna See Table 1 2 Hardware Options page 13 Wired RS 485 Two dedicated ports 1 and 2 and one shared RS 485 RS 232 port 3 Software selectable 120 termination r...

Страница 16: ...ure and static pressure inputs for rangeability RTD Inputs 2 channels 100 platinum RTD with 2 wire 3 wire or 4 wire interface Range 40 C to 427 C 40 F to 800 F excluding RTD uncertainty Accuracy 0 2 C...

Страница 17: ...aximum output load resistance s supply volts 8 0 0 02 Maximum voltage 30 VDC D A resolution 16 bits Calibration zero and full scale via software Programmable output alarm value for use during loss of...

Страница 18: ...the advanced display on the front of the device Configure calibrate and maintain flow runs inputs outputs and gas streams Poll real time data Download data View daily logs and up to 7 days of interva...

Страница 19: ...e Standing Wave Range VSWR 2 0 typical at center 1 5 Connector SMA N female brass nickel plated connector cable required for connection to SMA Height 25 6 mm 1 01 in 800 mm 32 28 in Shape Elbow right...

Страница 20: ...and register names for SCADA integration Firmware specific templates Auto generates protocol manual for printing or uploading to the web interface ScanFlash Uploads firmware BIN configuration SRF Sca...

Страница 21: ...uring section and where the fluid can be considered as single phase In addition each of these devices can only be used within specified limits of pipe size roughness diameter ratio and Reynolds number...

Страница 22: ...ve density gas gravity and content of carbon dioxide and nitrogen This method detailed in AGA 8 and ISO 12213 3 is based on the SGerg 88 equation The Gross Characterization method should only be used...

Страница 23: ...ater and Steam This calculation should be used when the steam is assumed to be at the sat uration temperature at a given flowing pressure Only a pressure input is required Providing a steam quality me...

Страница 24: ...timated liquid flow is accumulated Crude Oil Shrinkage Factor This correction factor allows users who are measuring crude oil to automatically correct their liquid volume measurements for the effects...

Страница 25: ...This page intentionally left blank 19 Scanner 3300 EFM Section 1...

Страница 26: ...The user may use copper conductors for wiring Wiring Precautions Ensure all wiring between the hazardous location where the multi variable transmitter is installed and the non hazard ous location wher...

Страница 27: ...ng configuration that will best accommodate process connections and field wiring connections If a side port MVT and manifold is required typically only for compensated liquid and steam applications an...

Страница 28: ...nt kit MVT MVT adapter Pole mount kit 6 00 152 4 6 95 176 5 6 56 166 6 9 60 243 8 Figure 2 1 MVT with a standard bottom port multi variable transducer and manifold on a 2 in pole 22 Section 2 Scanner...

Страница 29: ...to panel mount the Scanner 3300 Figure 2 3 and Figure 2 4 page 24 Figure 2 2 Scanner 3300 mounted on panel 4 080in 103 63mm 7 459in 189 46mm 2X 201in 5 11mm THRU 19 000in 482 60mm 7 875in 200 03mm 4...

Страница 30: ...he rack 3 Slide the Scanner 3300 enclosure into the allocated slot in the panel 4 Using the included hardware securely fasten the Scanner 3300 to the panel 5 Using the terminals and terminal numbers l...

Страница 31: ...nt antennas installed on Scanner 3300 The installation of the antenna coupler antennas and antenna cable for the SmartMesh wireless must meet the require ments shown in Figure 2 6 page 26 and Figure 2...

Страница 32: ...S MODULE INSIDE SCANNER 3300 ENCLOSURE Figure 2 7 Installation requirements for a remote mount antenna FCC Radio Frequency Compliance Scanner 3300s that include the optional SmartMesh radio module com...

Страница 33: ...aration between the equipment and receiver Connect the equipment to an outlet on a circuit different from that used with the receiver Consult the dealer or an experienced radio TV technician for help...

Страница 34: ...le following the instructions below 1 Position the antenna with the shiny metal base against a vertical pole and the capped end of the antenna vertical in the air Note the N female cable connector at...

Страница 35: ...2 10 left The U bolts will pass through the widest panel of the L bracket 3 Position the antenna against the bracket so that the shiny metal base is touching the bracket and the capped end of the ant...

Страница 36: ...ement devices and associated communications gauge impulse lines and cabling API MPMS Chapter 21 1 Section 1 8 Requirements for calibrating and verifying the accuracy of electronic gas measurement devi...

Страница 37: ...axial flow turbine flow meters for measurement of natural gas typically 2 in and larger bore diameter in which the entire gas stream flows through the meter rotor API MPMS Chapter 21 1 Section 1 7 Ins...

Страница 38: ...eter and constructed of material compatible with the fluid being measured For most applications the bore should be no smaller than 1 4 in 6 mm and preferably 3 8 in 10 mm in diameter The internal diam...

Страница 39: ...etween the threaded pressure tap orifice flange connector and the non threaded manifold This adapter can be a one piece sta bilizer often preferred for added strength and stability or a short heavy wa...

Страница 40: ...on the side of the enclosure and a Sensia pole mount kit See Multi Variable Transmitter Mounting page 20 for detailed mounting instructions 3 Install tubing and fittings to connect the manifold assemb...

Страница 41: ...ter A MVT can be mounted directly to a gas turbine meter for measuring natural gas A pipe adapter and union are attached to the MVT allowing a direct connection to the turbine meter An external pressu...

Страница 42: ...asuring gas in accordance with AGA 7 cal culations Figure 2 14 shows an installation in which the pressure input is provided by the MVT The setup of the meter run and plumbing configurations can vary...

Страница 43: ...es of the transducer Installation Procedure Remote Connection to a Turbine Meter The Scanner 3300 can be directly connected to a gas turbine meter for measuring gas in accordance with AGA 7 calcula ti...

Страница 44: ...or the analog inputs is provided on page 56 6 Install the RTD assembly in the thermowell Route the RTD assembly cable through the conduit and connect it to the terminals on the Scanner 3300 A wiring d...

Страница 45: ...n length insulate them Elbows and bends should not form any traps in which liquid can accumulate Hot legs should be sloped along their entire length to allow liquids to drain back into the pipe Cold L...

Страница 46: ...orts high low H L L H Mounting adapter Figure 2 16 Direct mount steam run installation IMPORTANT When measuring steam process connections must be designed to eliminate air pockets This is achieved by...

Страница 47: ...en the equalizer and bypass block valves on the block manifold Ensure the vent valve is closed c Remove the corresponding high pressure or low pressure vent screw from the side of the MVT and insert a...

Страница 48: ...ethod can be used with an orifice meter as well CAUTION When measuring steam process connections must be designed to eliminate air pockets This is achieved by making sure all tubing in the cold legs s...

Страница 49: ...st point in the system typically the MVT using the following steps a Open the blowdown valve or remove the filling plug from one of the pipe tees condensate pots b Open the equalizer and bypass block...

Страница 50: ...constructed of material compatible with the fluid being measured For most applications the bore should be no smaller than 1 4 in 6 mm and preferably 3 8 in 10 mm in diameter The internal diameter sho...

Страница 51: ...pe to seal the threads 3 Align the bolt holes in the MVT and manifold and install bolts to mate these components to the football flanges using o rings as appropriate Torque the bolts to the manufactur...

Страница 52: ...ons 2 Mount the MVT to a 2 in pipe using the mounting bosses on the side of the enclosure and a Sensia pole mount kit See Multi Variable Transmitter Mounting page 20 for detailed mounting instructions...

Страница 53: ...rough 7e for the other leg g Proceed to step 9 7 If a fluid other than the process fluid is to be used bleed air from the lines as follows a Make sure the shut off valves in the tubing near the pressu...

Страница 54: ...r pressure inputs For optimum performance ensure that the turbine and MVT installation complies with the industry recommendations listed below Install the turbine flowmeter in the meter run such that...

Страница 55: ...This page intentionally left blank 49 Scanner 3300 EFM Section 2...

Страница 56: ...ble and cable glands must be rated for 80 C To wire the Scanner 3300 for operation complete the following field connections 1 The terminal board is at the rear of the enclosure All wiring connections...

Страница 57: ...56 P 57 58 AIN 5 PIN 1 21 P 22 23 AIN 6 PIN 2 47 P 48 49 AIN 7 PIN 3 50 P 51 52 f Connect analog output wiring to AOUT 1 HART Future and AOUT 2 as required Wiring on page 59 and specifications on pag...

Страница 58: ...in Section 18 156 of the Canadian Electrical Code for installations within Canada Local wiring ordinances may also apply All field wiring must have a wire range of 22 to 14 AWG and terminal block scr...

Страница 59: ...always on always off or set to warm up the transducer before powering it The output of the transmitter supply may also be programmed to 8 5 to 24 VDC for each of these inputs This is not limited by th...

Страница 60: ...se Pulse inputs 1 2 and 3 on the terminal board may be configured through the web interface for an input for high ampli tude pulse frequency signals such as signals from a turbine meter equipped with...

Страница 61: ...r use in any flow run An alog Inputs 1 to 4 can be configured through the web interface for 0 to 5 V or 1 to 5 V Alternatively they can be used to log measurements from any device with a compatible an...

Страница 62: ...igure 3 10 A IN 1 2 3 4 5 6 7 P 0 to 20 mA or 4 to 20 mA analog input Internal 240 between and 0 to 20 mA or 4 to 20 mA Transmitter 9 to 30 VDC Power Supply External Supply Scanner Supply A IN 1 2 3 4...

Страница 63: ...ed to 60 mA DIO 5 and DIO 6 are non isolated and are limited to 500 mA DIO 5 and DIO 6 can be wired for use with an internal pull up resistor or with a customer supplied resistor When the internal pul...

Страница 64: ...Scanner 3300 Web Interface User Manual for information on configuring and calibrating zero and full scale values The load resistance vs loop supply voltage graph below shows the minimum voltage requir...

Страница 65: ...h a maximum frequency of 500 Hz Wire as shown in Figure 3 16 Because DIO 1 to 4 are isolated they can be used with any other feature on the Scanner 3300 A two conductor cable from the Scanner 3300 to...

Страница 66: ...tes desired The mode RS 485 or RS 232 is automatically detected by the hardware Note Not all RS 485 devices including converters identify A and B terms consistently If communications are not establish...

Страница 67: ...web browser and for transmitting data over two TCP ports The TCP ports support Modbus TCP and Modbus over TCP protocols and can be configured individually assigned to unique port numbers using the web...

Страница 68: ...This page intentionally left blank 62 Section 3 Scanner 3300 EFM...

Страница 69: ...evice Display enabled Kiosk Display Navigation The kiosk display has two primary functions to display real time measurements and or flow runs and to configure the Scanner 3300 through the web interfac...

Страница 70: ...selected real time measurements as well as status information for the device When enabled The kiosk display will show the user configured device dis play and will either show or cycle between Flow Run...

Страница 71: ...anings Figure 4 2 page 64 and Table 4 1 User Configured Device Display Status Glyph Definitions Additionally glyphs indicating the parameter status appear to the left of the parameter reading You can...

Страница 72: ...t setting is 10 seconds The configurable range of values is 0 to 600 seconds 10 minutes Message Display Mode Figure 4 3 illustrates the standard progression as parameters cycle through display groups...

Страница 73: ...addresses are subject to change over time the frequency of such changes is controlled by corporate network settings Static IP addresses are unchanging which helps protect user access to the device bu...

Страница 74: ...eat step 4 Important Changing the administrative password after the initial login is strongly recommended See the Security section of the Scanner 3300 Web Interface User Manual for instructions on cha...

Страница 75: ...port for assistance Adding Security to the WiFi Connection Wi Fi security is disabled at the factory during initial modem configuration but users can enable security by logging into the modem web brow...

Страница 76: ...This page intentionally left blank 70 Section 4 Scanner 3300 EFM...

Страница 77: ...replaced without the need to remove the enclosure from the rack Display Assembly Replacement Procedure The Scanner 3300 display circuit is installed in a compartment Figure 5 1 of the enclosure and r...

Страница 78: ...sembly shown in Figure 5 2 Four screws securing the display board to the plate Figure 5 2 Screws attaching the Scanner 3300 display assembly to the plate and main enclosure 3 Gently remove the display...

Страница 79: ...ut the old display assembly aside 6 Remove packaging from the new display assembly ensuring the new display assembly is protected from static 7 Connect the SAS cable to the new display assembly and ti...

Страница 80: ...This page intentionally left blank 74 Section 5 Scanner 3300 EFM...

Страница 81: ...04 Panel Mounting 5U Panel Scanner 3300 For wireless components see Table 6 2 Wireless Components page 75 CSA Approved Parts 1 9A 21 XX YY see Table 6 4 RTD and Cable Assemblies page 76 Assembly RTD a...

Страница 82: ...9A 1100 1025B 30 Assembly RTD and Cable Weatherproof Div 2 30 ft Cable 6 in Probe 1 9A 21 05 06 Model 21 RTD CSA Explosion proof 5 ft Cable 7 625 in Probe for 6 in Thermowell 1 9A 21 05 12 Model 21 RT...

Страница 83: ...0 in the field for the purpose of troubleshooting or repairs can damage the internals and cables beyond repair Sensia does not warranty damage resulting from field replacement of Scanner 3300 parts Ta...

Страница 84: ...This page intentionally left blank 78 Section 6 Scanner 3300 EFM...

Страница 85: ...6 Type cd archives and click Enter to access the parent level of the directory This directory contains three folders of SDF files full recent and events 7 Type cd file type for example cd full to sele...

Страница 86: ...ice and D type of log D for daily or I for interval Scanner 3300 Event Archive Example S3300_EA_Full sdf where EA Event Archive Slave Device Event Archive Slave01_SE01_Full sdf where SE01 slave archiv...

Страница 87: ...This page intentionally left blank A 3 Scanner 3300 EFM Appendix A...

Страница 88: ...in a file that can be later uploaded to a Scanner 3300 right click the SCANNER 3300 CONFIGURATION FILE link then click Save link as Rename the file and or change the location where the file will be s...

Страница 89: ...com Measurement Types Flow Computing and Automation choose Scanner Model 3300 Flow Comput er and click the link for the software install Important To upload firmware to the Scanner 3300 you must have...

Страница 90: ...the device to retrieve the version information The Results log will display the updated version information if the new firmware is loaded and the reconnection is successful Note Verification may fail...

Страница 91: ...This page intentionally left blank B 4 Appendix B Scanner 3300 EFM...

Страница 92: ...Appendix C Scanner 3300 Panel Cutout 4 080in 103 63mm 7 459in 189 46mm 2X 201in 5 11mm 4 658in 118 33mm C 1 Scanner 3300 EFM Appendix C...

Страница 93: ...This page intentionally left blank C 2 Appendix C Scanner 3300 EFM...

Страница 94: ...n 200 03mm 4 5U 625in 15 88mm 625in 15 88mm 500in 12 70mm 4X R 250in R6 35mm 250in 6 35mm 625in 15 88mm 625in 15 88mm 500in 12 70mm 625in 15 88mm 625in 15 88mm 500in 12 70mm 625in 15 88mm 625in 15 88m...

Страница 95: ...This page intentionally left blank C 4 Appendix C Scanner 3300 EFM...

Страница 96: ...exclusive remedy in any case of action whether in con tract tort breach of warranty or otherwise arising out of the sale or use of any products software supplies or materials is expressly limited to...

Страница 97: ......

Страница 98: ......

Страница 99: ......

Страница 100: ......

Страница 101: ...NADA Sensia Oil Gas Technical Development Shanghai Company Limited No 1801 Hongmei Road Shanghai 200233 P R China Sensia LLC 7000 Nix Drive Duncan Oklahoma 73533 8733 USA Sensia LLC 200 Westlake Park...

Отзывы: