background image

9

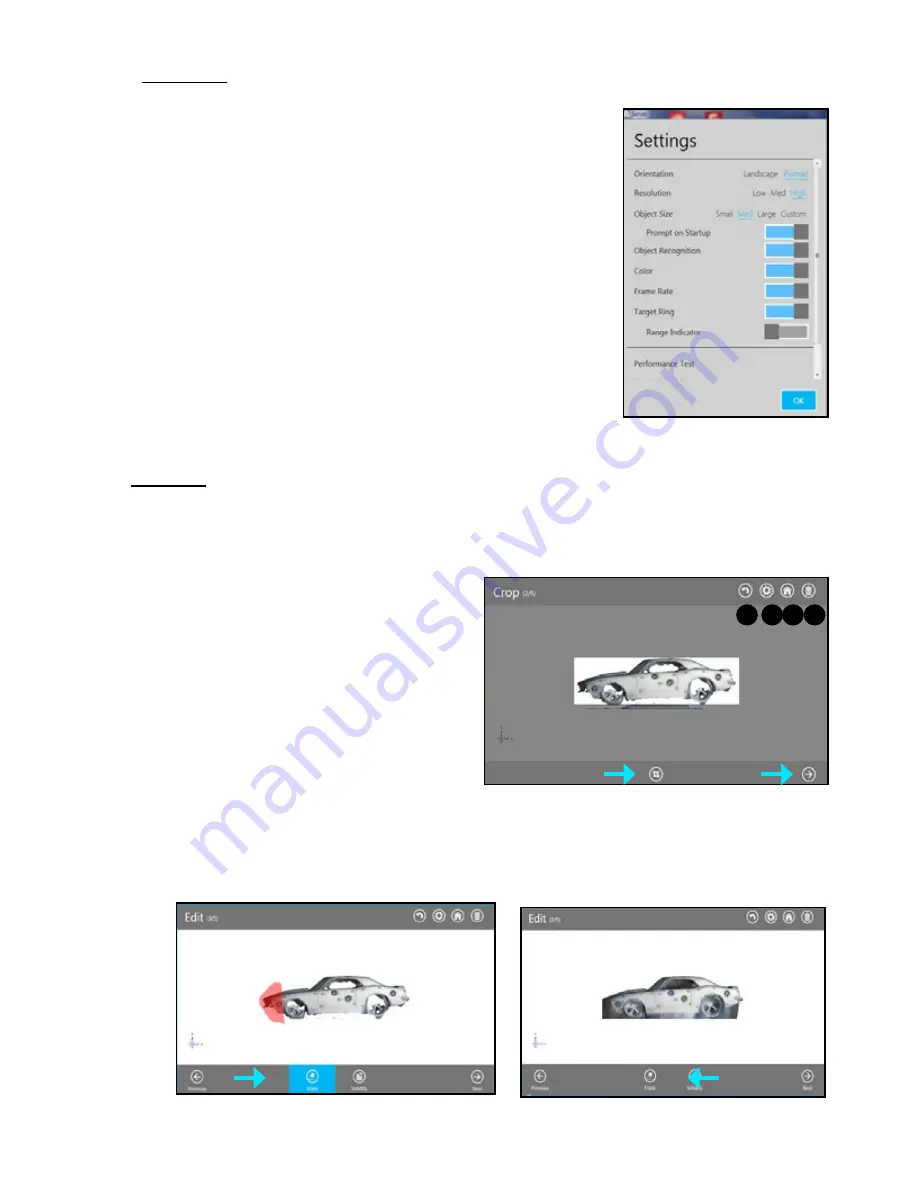
Crop Tool

•  Once the scan is completed, clicking 

Next

 will take 

you to the 

Crop 

screen . If you need to crop your scan, 

use the cursor to drag a window around the part of the 

scan that you wish to keep. When you are finished, 

click on the 

Crop 

button to remove the part of the scan 

that you wanted to delete . If an error occurred while 

cropping, simply click 

Undo 

(arrow button) and your 

scan will return to its original state . Click 

Next

 to go to 

the 

Edit

 screen .

Crop Tool Bar: 

The tool bar located at the top of the screen provides options when editing your current scan .  

Undo

 (

A

erases the last change done on the scan; 

Settings 

(B) shows the settings for the current work flow; 

Home

 (

C

) lets you 

return the view to the initial position or 

Start Over

 (

D

), delete the scan so that you can start over .

Scan Settings
•  Orientation-

 toggle between landscape and portrait scan view 

orientation .

•  Resolution

- determines the density of the scan data acquired; higher 

resolution will yield denser scans but can slow down the capture 

speed .

•  Object Size

- determines the size of the scan volume; you can set this 

according to the size of the object you are scanning. 

• 

Prompt on Startup: you can toggle the object selection screen 

on or off at start up .

•  Color-

  Toggle the acquisition of color from the scanner; when this is 

off, scanning speed is higher,

•  Frame Rate

- toggles the on-screen display of frames per second; 

useful for gauging your computer’s capability .

•  Target Range

- toggles the display of the cross-hairs on your screen; 

it can be useful for keeping the scanner pointed at the center of the 

object being scanned .

• 

Range Indicator

- Provides visual guidance if you get to close or 

too fat to the object being scanned .

A B C D

Erase / Solidify Tools

•   Use the 

Erase 

tool to remove unwanted portions of your scan . Move the cursor over the area that you want to 

erase and let go of your mouse button; the unwanted portion will be removed . 

•   The 

Solidify

 tool will make your scan print-ready as a closed, watertight model . 

Edit Tools 

Содержание 117304

Страница 1: ...1 Sense 3D Scanner User Guide See inside for use and safety information ...

Страница 2: ...nts 5 Windows Requirements 5 Data Interface 5 Electrical 5 Operating Environment 5 AT A GLANCE 5 WHATS INCLUDED 6 UNPACKING YOUR SCANNER 6 LINK YOUR SENSE 3D SCANNER TO YOUR CUBIFY ACCOUNT 6 DOWNLOAD YOUR SENSE SOFTWARE 7 ACTIVATE YOUR SENSE 3D SCANNER 7 SCANNING YOUR FIRST PERSON OR OBJECT 8 Scan Tool Bar 8 Scan Settings 9 Edit Tools 9 Crop Tool Bar 9 Crop Tool 9 Erase Solidify 9 Enhance Tools 10...

Страница 3: ...o you including the respective User Guide 3D Systems will promptly repair or replace the Scanner if required to make it free of defects during the warranty period This warranty excludes repairs required during the warranty period because of abnormal use or conditions such as riots floods misuse neglect or improper service by anyone except 3D Systems or its authorized service provider The warranty ...

Страница 4: ... 0 5m 0 9mm Depth Resolution 0 5m 1mm CAUTION Indicates something may happen that could cause loss of data damage to equipment or could cause personal injury SAFETY GUIDELINES Follow all safety rules in this section and observe all cautions and warnings in this guide To avoid damage to the laser projector do not open the Sense 3D Scanner casing Doing so will void your warranty It is important that...

Страница 5: ... screen resolution 4 GB available hard disk space SUPPORTED OPERATING SYSTEMS Windows 7 32 bit or 64 bit Windows 8 32 bit or 64 bit DATA INTERFACE USB 2 0 USB Cable connection to computer ELECTRICAL Maximum Power Consumption 2 25 Watts OPERATING ENVIRONMENT Room Temperature 10 40 C 5 12 9 cm 5 AT A GLANCE A C B E D A Depth Image CMOS C Infrared Laser Projector D Comfort Grip Handle B Color Image C...

Страница 6: ...n Cubify today to discover create and share all things 3D If you have an existing account log on to Cubify com to register your scanner and to download your Sense Software Let s activate your scanner by clicking on the Sense 3D scanner and selecting the Activate tab Enter your serial number you will find it on the bottom of your scanner Click Activate a 4 digit activation pin code will display and...

Страница 7: ...was created on your desktop Plug your scanner s USB connector into the USB port on your computer and click on you Sense icon to open the software If you have never activated your 4 digit pin code click on Get activation code from Cubify com and retrieve your code from My Devices in your account If you have your 4 digit activation pin code click on I have an activation code You can also retrieve yo...

Страница 8: ...oose the appropriate size for your object to begin your scan Small objects less than 16 Medium object less than 40 Large objects less than 80 11 Scan Tool Bar The tool bar located at the top of the screen provides options to set your Settings A for the current scan Home B lets you return the view to the initial position or Start Over C delete the scan so that you can start the it over A B C 5 Slow...

Страница 9: ...es the density of the scan data acquired higher resolution will yield denser scans but can slow down the capture speed Object Size determines the size of the scan volume you can set this according to the size of the object you are scanning Prompt on Startup you can toggle the object selection screen on or off at start up Color Toggle the acquisition of color from the scanner when this is off scann...

Страница 10: ...e it as a stl ply or an obj These file formats will work on any 3D modeling printer If you have a 3D printer available on your network you can choose your printer and open your saved file in the printer s client software Upload your scan to Share and Cloud Print on Cubify com If you have the Cube Software installed the software will open automatically showing your scan on the Cube s automated prin...

Страница 11: ...11 3D Systems Inc 333 Three D Systems Circle Rock Hill SC 29730 Cubify com 2013 3D Systems Inc All rights reserved pn 391235 Rev A ...

Отзывы: