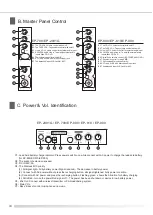
B. Master Panel Control
C. Power & Vol. Identification
05
04
T-1 . Tape Recorder With Auto Reverse
T1. EJECT MODE: To slot TAPE or draw it out.
T2. DIGITAL COUNTER: LCD counter with back light.
T3. RESET MODE: Reset digit counter.
T4. SPEED ADJUSTMENT: Fast to play mode.
T5. PLAY MODE SELECTOR:
T6. STOP MODE: Removing cassette to press stop while it is playing.
T7. FAST FORWARD PLAY MODE: Fast to play when pressing
this mode.
T8. FORWARD PLAY MODE: To play forward mode by pressing.
T9. REVERSE SIDE MODE: To play reverse mode by pressing.
T10. REWIND MODE: Rewind tape play mode.
T11. RECORD MODE
Note On Unit Operation :
Make sure the recorder is turned off by pressing the stop mode before turning off the main
power switch control. The cassette operating switch is the second switch located on the right hand
side, turn anti-clockwise to reduce volume and switch off.
※
For:EP-700 / 800 / 810 / 900
Multipurpose Wireless Microphone Digital Class-D PA Speaker System
T-2 . Tape Location of Controls
T1. EJECT MODE: To slot TAPE or draw it out.
T2. DIGITAL COUNTER: 4digit LCD counter with back light.
T3. RESET MODE: Reset the 4 digit counter.
T4. SPEED ADJUSTMENT: Fast to play mode.
T5. PLAY MODE SELECTOR:
T6. FAST FORWARD PLAY MODE: F.WD: Fast forward in a cycle
T7. FORWARD PLAY MODE: To play forward mode by pressing.
T8. STOP MODE: Removing disc before press stop while it is playing.
T9. REVERSE SIDE MODE: To play reverse side mode by pressed stop mode.
T10. REWIND MODE: Fast reverse in a cycle
T11. RECORD MODE
NOTE ON UNIT OPERATION:
Make sure the recorder is turned off by pressing the stop mode before turning off the main
power switch control. The cassette operating switch is the second switch located on the right hand
side, turn anti-clockwise to reduce volume and switch off.
※
For:EP-2001G
EP-700/EP-2001G
EP-800/EP-810/EP-900
B1. The CD VOL: Volume control with on/off.
B2: The TAPE VOL.: Tape volume control with on/off.
B3. Line in VOL: Volume control for external audio input.
B4. 6.3Φ/RCA Audio Line in: To amplify external audio
inputs likes CD, DVD.
B5. Digital Echo volume control. (EP-700/EP-2001G NO)
B6. The volume control for wired MIC.
B7. The Wireless Microphone Priority.
B8. 6. 3O and XLR2 wire Microphone input jack.
B9. The balanced input XLR Jack for MIC.
C1. Lead Acid battery charge indicator: Press power switch to on while connect with AC power to charge the lead acid battery.
(for EP-800/EP-810/EP-900)
C2. The socket of extension speaker.
C3. DC IN 24V/3A
C4. The Wireless MIC priority
(1).
All signal light-- Fully battery power Signal reduced
—
The decrease
in battery power
(2).
Connect
with
AC
power
without
press
the
recharging
button
,
all signal lightened: Fully power condition.
.
(3).
Connect with AC power and press the recharging button
,
Flashing green
:
shows the Situation for battery charging
(4).
Solid Red- turn on the power.Red signal off -
-
The power has been shut down
or device in low battery power.
C5.: Mix Out.: Connect with wireless transmitter or PA broadcasting system.
C6.: Main VOL.
C7.: Bass: Bass of control microphone and music.
B1. The CD VOL: Volume control with on/off.
B2: The TAPE VOL.: Tape volume control with on/off.
B3. Line in VOL: Volume control for external audio input.
B4. 6.3Φ/RCA Audio Line in: To amplify external audio
inputs likes CD, DVD.
B5. The volume control for wired MIC..
B6. 6. 3O and XLR2 wire Microphone input jack.
B7. The balanced input XLR Jack for MIC.
OFF
CHARGE
L
.
A
.
B ATT
ON
C1
C2
C3
C4
C5
C6
C7
C8
EP-2001G / EP-700/EP-800 / EP-810 / EP-900
LINE IN
B1
B2
B3
B4
B5
B6
B7
ON
OFF
WIRELESS MIC.
PRIORITY
LINE IN
B1
B2
B3
B4
B5
B6
B7
B8
B9
Содержание EP-2001G series
Страница 2: ......


