background image

Recommendations on antenna mounting

39

Option 2: Combining multiple links to one AWM 2/
AWM 4

With this variant, you can use passive antenna splitters (SL PASC 2 or
SL PASC 4) together with the AWM 2 or AWM 4 to combine the antenna
signals from multiple receivers. This reduces the number of antenna cables
required to a minimum.

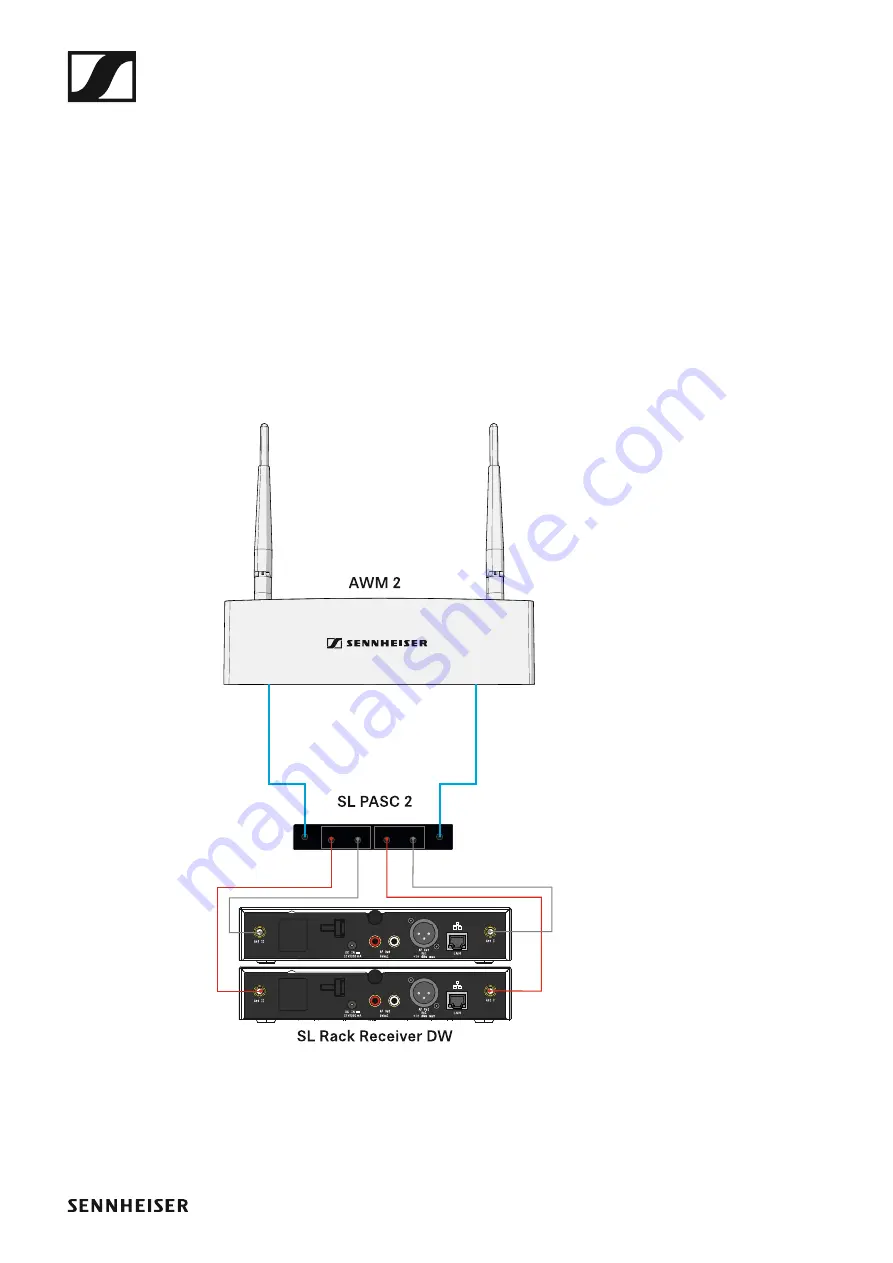
Combining up to 2 links using the AWM 2 and the SL PASC 2

The following illustration shows an example of how to combine up to 2 links
with one AWM 2 antenna wall mount. This reduces the number of antenna
cables required from 4 to 2.

Please observe the information below on the length of the extension ca-
bles („Signal loss due to extension cables and antenna splitters“).

SL RACK RECEIVER DW ANTENNA II

1

2

3

4

1

2

4

SL RACK RECEIVER DW ANTENNA II

SL RACK RECEIVER DW ANTENNA I

ANT II

ANT I

1

2

2

1

Cables for connecting the SL PASC 2 to the 
SL Rack Receiver DW are supplied with the 
SL PASC 2.

Use the following Sennheiser cables 
for connecting the AWM 2 to the SL 
PASC 2:

CL 5 (5 m / 16.4 ft) 
   art. no. 505976

CL 10 (10 m / 32.8 ft)
   art. no. 506263

Содержание SpeechLine Digital Wireless Series

Страница 1: ...TML functions and element That is why this PDF document might not contain all the content and interactive elements of the HTML instruction manual We recommend using the complete and interactive HTML i...

Страница 2: ...on about planning a complete SpeechLine Digital Wireless system see SpeechLine Digital Wireless System planning You can find instruction manuals for all products in the SpeechLine Dig ital Wireless se...

Страница 3: ...hLine Digital Wireless has an automatic fre quency management feature that automatically searches for free frequen cies on site thus eliminating the need for time consuming frequency planning in advan...

Страница 4: ...werful instru ment of communication we know It allows us to convince people to impart knowledge and to voice opinions thoughts and views as well as emotions That is why it is so important that none of...

Страница 5: ...link and provide maximum transmission reliability in every application and all day long The micro phones and the receiver of the SpeechLine Digital Wireless series are de signed for optimum speech in...

Страница 6: ...sed in presentations meetings or telephone conferences Presentations In the case of a presentation held before a large audience such as in an au ditorium or a large conference room it is essential tha...

Страница 7: ...an audio system which enhances speech intelligibility In large conference rooms in particular a speaker seated at one end is difficult to understand at the other end When the speaker turns in differen...

Страница 8: ...national teams As a telephone alone can only offer inadequate speech transmission for all participants in the room the SpeechLine Digital Wireless system can easily be connected to an ex isting teleco...

Страница 9: ...an be heard loud and clear If necessary the receiver s output level can be manually adapted to the input of the mixing console or amplifier Automatic interference management The system immediately rea...

Страница 10: ...to replace or recharge the accupack during operation The battery life is about 15 hours enough for even a very long conference day Intelligent energy management using adaptive transmission power maxim...

Страница 11: ...d for manual frequency setting and the automatic inter ference management guarantees maximum transmission reliability The user friendly pairing function ensures a reliable connection between trans mit...

Страница 12: ...l The audio mix is also available digitally via Dante which allows an ex tension of the existing setup without exchanging the DSP Due to the bidirectional communication between receiver and transmitte...

Страница 13: ...hone capsule The MME 865 1 has excellent presence and high feed back rejection and is specially designed for speech applications Thanks to its easy handling the handheld transmitter is available to th...

Страница 14: ...gs need to be adjusted on the transmitter The transmitter s LC display indicates the link name the battery status and the reception quality The functions of the bodypack transmitter have been reduced...

Страница 15: ...and 133 S DW is ex tremely versatile and suited for a wide range of applications The SL Tablestand 133 S DW can be charged either wirelessly or via USB The CHG 2W wireless charging base for two mobile...

Страница 16: ...ution for ad hoc press conferences or panel discussions in any environ ment The SL Tablestand 153 S DW can be charged either wirelessly or via USB The CHG 2W wireless charging base for two mobile devi...

Страница 17: ...nge of applications The SL Boundary 114 S DW can be charged either wirelessly or via USB The CHG 2W wireless charging base for two mobile devices is available separately The SL Boundary 114 S DW is de...

Страница 18: ...two trans mitters of the SpeechLine Digital Wireless series A bi color LED at each charging slot provides information on the current charge status The char ger has universal charging slots for chargin...

Страница 19: ...and the SL Hand held DW The four LEDs on each charging slot indicate the current charging status The versatile network interface is compatible with IPv4 and IPv6 for seamless integration The Sennheise...

Страница 20: ...a wireless charging base that provides convenient wireless charging The CHG 2W charging base is compatible with the SL Tablestand 133 S DW the SL Tablestand 153 S DW and the SL Boundary 114 S DW For i...

Страница 21: ...SL Headmic 1 headset microphone is a head worn microphone with an adjustable frame that wraps around the neck The unobtrusive design of the microphones lets the audience focus on the speaker The micr...

Страница 22: ...le from the receiver e g when the receiver has to be installed invisibly or when the receiver position is not the best antenna position for optimum reception The AWM 2 can be easily mounted on a micro...

Страница 23: ...from the receivers e g when the receivers have to be installed invisibly or when the receiver position is not the best antenna position for optimum reception The AWM 4 can be easily mounted on a micr...

Страница 24: ...ibute the antenna signals from up to 2 SpeechLine Digital Wireless ra dio links In combination with the AWM 2 or AWM 4 remote antennas the number of required antenna cables is reduced to a minimum The...

Страница 25: ...ibute the antenna signals from up to 4 SpeechLine Digital Wireless ra dio links In combination with the AWM 2 or AWM 4 remote antennas the number of required antenna cables is reduced to a minimum The...

Страница 26: ...5 m article no 505976 CL 10 R SMA antenna cable for AWM 2 10 m article no 506263 CL 1 PP R SMA antenna cable for AWM 4 1 m article no 507425 CL 5 PP R SMA antenna cable for AWM 4 5 m article no 50742...

Страница 27: ...ant information about country specific fre quency variants correct use of transmission power and recommendations for space usage Planning Using Antennas important information that you need to take int...

Страница 28: ...one links you plan to in stall These aspects are crucial for any project regardless of size In this part of the documentation we would like to offer some advice on how to proceed when planning a Speec...

Страница 29: ...nes the maximum number of links per range which can be used in the 1 9 GHz frequency band 3 EU Variant 3 UK Variant 3 AU Variant Main countries and regions Power supply Wireless links per reception ra...

Страница 30: ...regions Power supply Wireless links per reception range Frequency range USA Canada up to 10 Main countries and regions Power supply Wireless links per reception range Frequency range Japan up to 4 Mai...

Страница 31: ...pped and used Determine the audio equipment for each room i e the desired number of SpeechLine Digital Wireless links Check if there are other devices e g DECT devices using the 1 9 GHz frequency band...

Страница 32: ...her devices used The following charts indicate the possible combinations of systems de pending on country specific conditions see also Country Specific Vari ants Europe Indonesia India UK Hong Kong Si...

Страница 33: ...operation depending on spectrum used by other systems exceeds available spectrum SpeechLine Digital Wireless Links per range adjustable 4 3 2 1 0 4 3 2 1 0 TeamConnect Wireless Systems within range of...

Страница 34: ...tems Also observe the information provided under Shared use of the 1 9 GHZ frequency band Determine the type of installation i e where and how the microphone receivers are to be installed Determine wh...

Страница 35: ...Option 1 remotely mounted using the AWM 2 for one receiver or the AWM 4 for two receivers Option 1 Connecting the AWM 2 or AWM 4 antenna wall mount directly to the receiver s Option 2 remotely mounted...

Страница 36: ...for remote mounting the antennas We recom mend the following four options in the specified order Option 1 Connecting the AWM 2 or AWM 4 antenna wall mount directly to the receiver s Option 2 Combining...

Страница 37: ...a loss of transmission power depending on the cable length You can compensate this signal loss by configuring the transmission pow er of the receiver accordingly Observe the following minimum transmis...

Страница 38: ...or on the AWM 2 antenna wall mount If possible group the antennas as follows All A antennas from the receivers ANT I sockets in one group accord ing to the aforementioned requirements All B antennas...

Страница 39: ...n using multiple AWM 2 AWM 4 antenna wall mounts make sure that the distances between all antennas are equal If possible position the antennas so that there is a direct line of sight without obstacles...

Страница 40: ...mple of how to combine up to 2 links with one AWM 2 antenna wall mount This reduces the number of antenna cables required from 4 to 2 Please observe the information below on the length of the extensio...

Страница 41: ...all antenna sockets ANT II of all receivers respectively to one of the two antennas of the AWM 2 If you are using only 3 of the 4 connec tions on the antenna splitter you should close the unused conn...

Страница 42: ...s of one link of the AWM 4 If you are not using all connections on the antenna splitter you should close the unused connec tions with a terminating resistor 50 to minimize interfering signals and maxi...

Страница 43: ...level We recommend the following cable lengths in combination with the an tenna splitter Receiver to splitter 1 m splitter to AWM 2 4 1 m Receiver to splitter 1 m splitter to AWM 2 4 5 m Receiver to s...

Страница 44: ...f you wish to install the antennas together with the receivers in a rack we recommend mounting the antennas on the front side of the rack using the GA 4 mounting kit Always leave 1 U of space between...

Страница 45: ...they point at a 180 degree angle away from the receiver Run all cables close to the receivers to prevent the cables from inter fering with the antenna reception Use the cable grip For best system perf...

Страница 46: ...ver or the antenna wall mounts so that such reflection effects are avoided If you have a reflecting ceiling this can be achieved by positioning the antennas closer to the ceiling Blocking effects from...

Страница 47: ...Recommendations on antenna mounting 46 Rule of thumb for distance from the blocking area Example Blocking range Free range ratio 1 1...

Страница 48: ...y startup and a reliable maximum range The Multi Room Mode allows you to adjust the transmission power to al low for a considerably larger number of links These adjustment options make SpeechLine Digi...

Страница 49: ...oom When installing SpeechLine Digital Wireless devices in one room all devic es in all other rooms must be switched off Install all receivers in a room in one rack see Installing receivers in a rack...

Страница 50: ...ynchronize with the master receiver Adjust all the receivers to the same transmission power as the master receiver Switch all receivers off and on again Make sure the master receiver re mains switched...

Страница 51: ...igital Wireless Instruction manual This manual provides detailed information about installation and usage of the individual products in the SpeechLine Digital Wireless series SL Rack Receiver DW SL MC...

Страница 52: ...SpeechLine Digital Wireless Instruction manual 51 SL Boundary 114 S DW Pairing Walk Test SL Headmic 1 MKE 1 CHG 2 CHG 4N CHG 2W...

Страница 53: ...SpeechLine Digital Wireless Instruction manual 52 AWM 2 AWM 4 SL PASC 2 SL PASC 4...

Страница 54: ...ce management guarantees maximum transmission reliability The user friendly pairing function ensures a reliable connection between trans mitter and receiver Network integration enables the receiver to...

Страница 55: ...ss to open the menu or to confirm the entry or selection 4 ESC button Short press to navigate to the next higher level in the menu or to exit a menu item without confirming new settings or entries Lon...

Страница 56: ...on has been long pressed The receiver establishes a radio link to a transmitter whose PAIR button has also been long pressed lights up yellow The received transmitter has been muted with the MUTE swit...

Страница 57: ...For the cable of the power supply unit See Connecting the receiver to the power supply system 9 DC IN socket For the power supply s hollow jack plug See Connecting the receiver to the power supply sys...

Страница 58: ...ncluded power supply unit NT 12 4 C or NT 2 3 to connect the receiver to the power supply system If you use the NT 2 3 power supply unit Slide the supplied country adapter onto the power supply unit T...

Страница 59: ...e power supply unit into the wall socket Connecting an amplifier or mixing console to the receiver The unbalanced audio output RCA and the balanced audio output XLR at the rear of the receiver are con...

Страница 60: ...ormation on controlling a system in the network using the Sennheiser Control Cockpit software refer to the instruction manual of the software Please note that the host PC on which the Sennheiser Contr...

Страница 61: ...king with auto matically generated IP addresses please observe the following informa tion Set the Mode to Automatic in the receiver s Network Settings menu Ensure that the host PC on which the Sennhei...

Страница 62: ...d Or Activate the mDNS function in the receiver s Network Settings menu factory setting deactivated Restart the receiver Once restarted the receiver is automatically detected in the Sennhe iser Contro...

Страница 63: ...ver on a flat horizontal surface The device feet will adhere reliably to the receiver only after some time Avoid moving the receiver during this time ATTENTION Risk of staining furniture surfaces The...

Страница 64: ...nd ANT II as shown Align the rod antennas vertically antennasConnecting the AWM 2 AWM 4 remote antenna to the receiver Instead of the supplied rod antennas you can also connect a remote anten na to th...

Страница 65: ...leak age currents When rack mounted a receiver can be damaged by excessive heat or me chanical stress Make sure that the temperature within the rack does not exceed the permissible temperature limit...

Страница 66: ...andheld Set R SL Headmic Set R SL Lavalier Set R The GA 4 mounting kit consists of Fastening the mounting angles to install a receiver To fasten the mounting angles Unscrew and remove the two recessed...

Страница 67: ...ng kit to the mounting angle of the receiver as shown Make sure to use the correct side the one with the round holes of the blanking plate to secure it to the mounting angle Only insert the two small...

Страница 68: ...To mount the rod antennas to the front of the rack Connect the included antenna cables to the antenna sockets at the rear of the receiver Pass the other ends of the antenna cables through the antenna...

Страница 69: ...ved recessed head screws To mount the jointing plate Place the two receivers side by side upside down onto a flat surface Secure the jointing plate to the receiver using the six recessed head screws a...

Страница 70: ...cted sound profile If no sound profile is selected nothing is displayed here 2 MUTE status display The received transmitter is not muted but can be muted at any time The received transmitter is muted...

Страница 71: ...activated The lock mode is cur rently activated Long press the jog dial to temporarily deac tivate the lock mode If no padlock icon is displayed the lock mode function is deactivated See The System Se...

Страница 72: ...you turn the jog dial to the left from the home screen the secondary home screen appears 11Audio output level of the receiver 12Pick up pattern of the microphone used 13Status of the low cut filter ON...

Страница 73: ...the menu item without storing changes to the settings Press the ESC button for 3 seconds Returns to the home screen Press the jog dial Changes from the home screen to the operating menu Calls up the...

Страница 74: ...SL Rack Receiver DW 73 The menu structure of the receiver Version Firmware Version 2 6 10...

Страница 75: ...equalizer for manually adjusting the sound settings Sensitivity Automatic The audio sensitivity is automatically adjusted during speech 0 dB 30 dB The audio sensitivity can be manually adjusted in inc...

Страница 76: ...nd SL Tablestand 133 153 S DW only Auto Lock On The automatic lock mode is activated If no button is actuated on the receiver for approx 10 seconds the lock mode is automatically activat ed Long press...

Страница 77: ...vates mDNS to reduce the data volume transferred across the network This option is recommended for larger systems Enabled Activates mDNS to allow for automatic device detection This option is recommen...

Страница 78: ...nput of the name of the room in which the receiver is set up Serial Number Displays the serial number and the hardware version of the receiver The Help menu The Help menu at menu level 1 allows you to...

Страница 79: ...2 or 4 channels is the per fect addition to the SpeechLine Digital Wireless series Thanks to its unob trusive design the Multi Channel Receiver can be installed quickly and easily in any room whether...

Страница 80: ...To restore the factory settings Hold for 5 seconds 4 Dante I PoE Ctrl RJ 45 socket Digital audio output see Connecting the receiver PoE supply Power over Ethernet see Putting the receiver into op era...

Страница 81: ...interface is also used for control and configuration via the network and for Power over Ethernet supply The following variants are possible To configure the variants you need the Audinate Dante Contro...

Страница 82: ...rol Cock pit software see Controlling and monitoring the receiver via the net work In your network you can either use a switch that provides PoE or a PoE injector Analog Out PoE Ctr l Rese t PoE Analo...

Страница 83: ...audio output provides the signals from the individual channels 4 for the SL MCR 4 DW and 2 for the SL MCR 2 DW as well as the sum signal of the channels You can configure in the Sennheiser Control Co...

Страница 84: ...alog Out out put You can configure in the Sennheiser Control Cockpit whether the sum signal is mixed automatically or manually see Controlling and monitoring the receiver via the network Analog Out An...

Страница 85: ...them identify possible hazards and take appropriate safety measures When mounting the product observe and follow all local national and international regulations and standards The following mounting...

Страница 86: ...d the ceiling Screw the mounting frame to the wall using four suitable screws and anchors Make sure that the mounting frame is aligned correctly The top marking on the mounting frame must not point do...

Страница 87: ...se screws and anchors that are appropriate for the particular characteristics of your wall Use the included drilling template to mark the drill holes for ceiling mounting Maintain a minimum distance o...

Страница 88: ...SL MCR DW 87 Insert the receiver into the mounting frame as shown until you hear it click into place...

Страница 89: ...until you hear it click into place CAUTION Danger from falling objects If you mount the receiver improperly on the stand the stand and re ceiver may tip over This can cause personal injury and damage...

Страница 90: ...w the mounting frame onto the VESA mount as shown using four suitable screws Insert the receiver into the mounting frame as shown until you hear it click into place Follow the installation and safety...

Страница 91: ...ontrolling and monitoring the receiver via the network Controlling and monitoring the receiver via the net work To configure and use the receiver you need the free Sennheiser Control Cockpit control s...

Страница 92: ...ter the power supply is switched on The device is starting approx 20 seconds Afterwards the status in formation is displayed All four LEDs light up green during startup even with the two channel varia...

Страница 93: ...the Control Cock pit The LED of the received transmitter also flashes A channel s LED is yellow The received transmitter has been muted with the MUTE switch A channel s LED is flashing yellow The rec...

Страница 94: ...r is updated using the Sennheiser Control Cockpit software You can find more information about this procedure in the software help within the software itself or from the Sennheiser Documentation app o...

Страница 95: ...rophone capsule The MME 865 1 has excellent presence and high feed back rejection and is specially designed for speech applications Thanks to its easy handling the handheld transmitter is available to...

Страница 96: ...rophone capsule can be unscrewed and replaced by one with a dif ferent pick up pattern 2 Display panel See Displays on the display panel of the SL Handheld DW 3 MUTE switch The handheld transmitter ca...

Страница 97: ...switch to the position MIC 4 ON OFF button with status LED Short press to switch the handheld transmitter on Long press to switch the handheld transmitter off LED see Meaning of the status LED on the...

Страница 98: ...nsmitter 4 6 step display for the RF signal level Displays the current level of the RF signal Starting up and using the handheld transmitter Removing inserting the accupack or the optional battery pac...

Страница 99: ...B 10 battery compartment Please observe correct polarity when inserting the batteries To insert the accupack or the battery compartment Slide the accupack or the battery compartment onto the handheld...

Страница 100: ...screen appears on the display panel see Displays on the display panel of the SL Handheld DW The status LED indicates the current status of the receiver see Meaning of the status LED on the handheld tr...

Страница 101: ...PAIR button has been long pressed The handheld transmitter es tablishes a radio link to a receiver whose PAIR button has also been long pressed lights up yellow The handheld transmitter has been mute...

Страница 102: ...phone capsule during transmission this will change the pick up pattern of the microphone and consequently the sound Only hold the handheld transmitter by its body Hold the handheld transmitter approx...

Страница 103: ...mic 1 or MKE 1 Thanks to the bi directional communication between the transmit ter and the receiver no settings need to be adjusted on the transmitter The transmitter s LC display indicates the link n...

Страница 104: ...e bodypack transmitter can be muted with the MUTE switch This only mutes the audio signal The radio link remains active and the transmitter remains operational The MUTE switch can be deactivated in th...

Страница 105: ...optional B 30 battery compartment See Removing inserting the accupack or the optional battery pack 9 PAIR button Short press to identify the paired transmitter Long press to pair with a different tran...

Страница 106: ...splay of the accupack or battery capacity Graphically displays the current charge status of the accupack or the batteries If you use the accupack the remaining operating time is displayed in hours 3 R...

Страница 107: ...irst use The accupack can either be charged with the optional CHG 2 or CHG 4N chargers see The CHG 2 charger or The CHG 4N charger or with the supplied USB cable To remove the accupack or the battery...

Страница 108: ...he headset microphone to the bodypack transmitter Only connect the clip on microphone or the headset microphone recom mended by Sennheiser These microphones are optimized for the bodypack transmitter...

Страница 109: ...the handheld transmitter on Short press the ON OFF button The home screen appears on the display panel see Displays on the display panel of the SL Bodypack DW The status LED indicates the current stat...

Страница 110: ...PAIR button has been long pressed The bodypack transmitter es tablishes a radio link to a receiver whose PAIR button has also been long pressed lights up yellow The bodypack transmitter has been muted...

Страница 111: ...SL Tablestand 133 S DW is ex tremely versatile and suited for a wide range of applications The SL Tablestand 133 S DW can be charged either wirelessly or via USB The CHG 2W wireless charging base for...

Страница 112: ...e charge level 5 Alignment LED Lights up when the SL Tablestand 133 S DW is correctly positioned for charging on the CHG 2W charging base 6 BA 40 accupack See Removing inserting the BA 40 accupack 7 U...

Страница 113: ...n either be charged with the optional CHG 2W charging base see The CHG 2W charging base or with the supplied USB cable To remove the accupack Pull the unlock button away from the accupack and pull the...

Страница 114: ...able stand via USB To charge the table stand via USB Connect the USB cable s Micro USB plug to the Micro USB socket of the accupack Plug the other end of the USB cable into a USB power supply unit The...

Страница 115: ...uring charging You can find more information about the CHG 2W wireless charging base under The CHG 2W charging base Charging the table stand with a wireless Qi charging base from a third party manufac...

Страница 116: ...S DW 115 Meaning of the charge level LEDs on the table stand The charge level LEDs indicate the charge level of the SL Tablestand 133 S DW At 100 charge the SL Tablestand 133 S DW has an operating ti...

Страница 117: ...ose neck microphone We recommend using the MEG 14 40 goose neck microphone This micro phone is optimally suited for the table stand To connect the goose neck microphone Plug the goose neck microphone...

Страница 118: ...tching the table stand on off To switch the table stand on Press the ON OFF button for 1 second The button lights up green when a goose neck microphone is connect ed To switch the table stand off Pres...

Страница 119: ...tton for 1 second The button lights up red In Push to talk mode the audio signal is muted by default and is only activated while the ON OFF button is pressed In Push to mute mode the audio signal is a...

Страница 120: ...erfect solution for ad hoc press conferences or panel discussions in any environ ment The SL Tablestand 153 S DW can be charged either wirelessly or via USB The CHG 2W wireless charging base for two m...

Страница 121: ...e charge level 5 Alignment LED Lights up when the SL Tablestand 153 S DW is correctly positioned for charging on the CHG 2W charging base 6 BA 40 accupack See Removing inserting the BA 40 accupack 7 U...

Страница 122: ...n either be charged with the optional CHG 2W charging base see The CHG 2W charging base or with the supplied USB cable To remove the accupack Pull the unlock button away from the accupack and pull the...

Страница 123: ...able stand via USB To charge the table stand via USB Connect the USB cable s Micro USB plug to the Micro USB socket of the accupack Plug the other end of the USB cable into a USB power supply unit The...

Страница 124: ...uring charging You can find more information about the CHG 2W wireless charging base under The CHG 2W charging base Charging the table stand with a wireless Qi charging base from a third party manufac...

Страница 125: ...S DW 124 Meaning of the charge level LEDs on the table stand The charge level LEDs indicate the charge level of the SL Tablestand 153 S DW At 100 charge the SL Tablestand 153 S DW has an operating ti...

Страница 126: ...e neck microphone We recommend using the MEG 14 40 L II goose neck microphone This mi crophone is optimally suited for the table stand To connect the goose neck microphone Plug the goose neck micropho...

Страница 127: ...tching the table stand on off To switch the table stand on Press the ON OFF button for 1 second The button lights up green when a goose neck microphone is connect ed To switch the table stand off Pres...

Страница 128: ...nd The button lights up red when the audio signal is muted In Push to talk mode the audio signal is muted by default and is only activated while the ON OFF button is pressed In Push to mute mode the a...

Страница 129: ...a wide range of applications The SL Boundary 114 S DW can be charged either wirelessly or via USB The CHG 2W wireless charging base for two mobile devices is available separately The SL Boundary 114 S...

Страница 130: ...ent LED Lights up when the SL Boundary 114 S DW is correctly positioned for charging on the CHG 2W charging base 5 BA 40 accupack See Removing inserting the BA 40 accupack 6 USB cable 7 Micro USB sock...

Страница 131: ...ack can ei ther be charged with the optional CHG 2W charging base see The CHG 2W charging base or with the supplied USB cable To remove the accupack Pull the unlock button away from the accupack and p...

Страница 132: ...hone via USB To charge the boundary microphone via USB Connect the USB cable s Micro USB plug to the Micro USB socket of the boundary microphone Plug the other end of the USB cable into a USB power su...

Страница 133: ...h blue during charging You can find more information about the CHG 2W wireless charging base under The CHG 2W charging base Charging the boundary microphone with a wireless Qi charging base from a thi...

Страница 134: ...te the charge level of the SL Boundary 114 S DW At 100 charge the SL Boundary 114 S DW has an operating time of about 10 hours Switching the boundary microphone on off To switch the boundary microphon...

Страница 135: ...nd The button lights up red In Push to talk mode the audio signal is muted by default and is only activated while the ON OFF button is pressed In Push to mute mode the audio signal is active by defaul...

Страница 136: ...Pairing 135 Pairing The Pairing function enables you to identify devices that have already been paired or connect new devices Return to first page of the instruction manual...

Страница 137: ...ckpit SL Rack Receiver DW Short press the PAIR button of the receiver or of the transmitter or Press the Find button of the desired device from the device list in the Control Cockpit Identify appears...

Страница 138: ...st in the Control Cockpit The message This is Name appears on the transmitter s display only SL Handheld DW and SL Bodypack DW The status LEDs for the relevant channel will flash green for 10 seconds...

Страница 139: ...ed The Press pair on receiver message appears on the display panel of the transmitter SL Handheld DW and SL Bodypack DW only Once the radio link is successfully established Paired appears on the displ...

Страница 140: ...r SL Handheld DW and SL Bodypack DW only Once the radio link is successfully established Paired appears on the display panel of the transmitter only for SL Handheld DW and SL Bodypack DW and the statu...

Страница 141: ...manual Performing a walk test with the SL MCR DW in the Control Cockpit To perform a walk test in the Control Cockpit Switch on the transmitter and the receiver of the radio link you want to check In...

Страница 142: ...tings tab You can find more information under Multi room mode Performing a walk test with the SL Rack Receiver DW in the Control Cockpit To perform a walk test in the Control Cockpit Switch on the tra...

Страница 143: ...mitter and the receiver of the radio link you want to check In addition switch on all other devices that you want to use in the op erating environment From the receiver s System Settings menu select t...

Страница 144: ...re medial measures If possible reposition the receivers so that there is always a direct line of sight between the receiver antennas and the paired transmitter If possible remove obstacles between the...

Страница 145: ...ree applications Its adjust able neckband is visually unobtrusive and very comfortable to wear The SL Headmic 1 is available in black and beige The pick up pattern is omni di rectional Return to first...

Страница 146: ...e impaired in its function when you bend or turn it Frequent alternate bendings close to the microphone cap sule can also damage the microphone boom and possibly reduce the ad justability of the micro...

Страница 147: ...The SL Headmic 1 headset microphone 146 capsule is fitted to the clip 5 on the desired side of the neckband Press the microphone boom into the two clips 3 and 4...

Страница 148: ...our head ATTENTION Damage to the microphone boom The microphone boom can break or be impaired in its function when you bend or turn it Positioning the microphone towards the corner of the mouth To ind...

Страница 149: ...1 headset microphone 148 Adjusting the neckband The neckband is adjustable in width and ensures an optimum fit Change the length of the neckband by moving the ear hooks until a snug but comfortable f...

Страница 150: ...rophone cannot be positioned close to the mouth if the sound is too muffled or if you want to increase the speech in telligibility Slide the MZC 2 frequency response cap over the microphone capsule un...

Страница 151: ...ide the SL MZW 1 windshield over the MZC 2 frequency response cap Attaching the connection cable to clothing The MZQ 02 clip is available as an accessory Press the connection cable into the cable glan...

Страница 152: ...to the SL Bodypack DW Connect the jack plug of the SL Headmic 1 to the 3 5 mm jack socket MIC LINE of the bodypack transmitter Lock the jack plug by screwing down the coupling ring When the jack plug...

Страница 153: ...plications ENG The MKE 1 is fitted with a very thin only 1 mm yet extremely rugged cable making this microphone an ideal partner for all live sound applications Features Sub miniature microphone High...

Страница 154: ...tion against the ingress of moisture Slip the cap of your choice onto the microphone until it locks into place Attaching the microphone Depending on the area of application you can attach the MKE 1 in...

Страница 155: ...nect the jack plug of the MKE 1 to the MIC LINE jack socket 3 5 mm of the bodypack transmitter Lock the jack plug by screwing down the coupling ring When the jack plug is not firmly locked crackling n...

Страница 156: ...r has universal charging slots for charging both handheld and bodypack transmitters Return to first page of the instruction manual Product overview 1 Charge level LEDs lights up green The accupack is...

Страница 157: ...supply system Connect the cable end of the power supply unit to the socket at the base of the charger Guide the cable through one of the cable guides at the base of the char ger so that the charger is...

Страница 158: ...he charging contacts facing downwards into the charger Make sure to insert the transmitter the correct way round The STAND BY button of the bodypack transmitter has to point in the direction of the ch...

Страница 159: ...ack DW and the SL Hand held DW The four LEDs on each charging slot indicate the current charging status The versatile network interface is compatible with IPv4 and IPv6 for seamless integration The Se...

Страница 160: ...er supply unit With hollow jack plug for connection to the CHG 4N charger 4 Power cord EU US UK or AU variant 5 Network reset button See Controlling and monitoring the CHG 4N charger over the net work...

Страница 161: ...ply system To connect the CHG 4N charger to the power supply system Connect the cable end of the power supply unit to the socket at the base of the charger Guide the cable through the cable guide at t...

Страница 162: ...The CHG 4N charger 161 Connect one end of the power cord to the power supply unit and the other end to the wall socket...

Страница 163: ...pack in the CHG 4N charger Insert the transmitter with installed accupack into one of the charger s four charging slots Make sure the charging contacts face downward Make sure to insert the transmitte...

Страница 164: ...k charge level 33 An error has occurred A corresponding error mes sage is displayed in the Sennheiser Control Cock pit software The firmware of the CHG 4N is being updated This LED status is display o...

Страница 165: ...te that the host PC on which the Sennheiser Control Cockpit Service is installed must be in the same network as the devices that are to be monitored and controlled Connecting the CHG 4N charger to the...

Страница 166: ...ally rather than a static configuration After several minutes all chargers in the network will receive a link local address in the range of 169 254 x x The CHG 4N charger is automatically detected in...

Страница 167: ...econfigured according to one of the procedures described above and mDNS has been deactivated you can add the charger manually using the Add Device function in the Sennheiser Control Cock pit To add th...

Страница 168: ...ntrol Cockpit software You can find more information about this pro cedure in the software instruction manual in the Sennheiser Documenta tion app or in the download area of the Sennheiser website at...

Страница 169: ...S DW Return to first page of the instruction manual Product overview 1 Charging surface for wireless energy transfer For the SL Tablestand 133 S DW and SL Tablestand 153 S DW units 2 Socket for power...

Страница 170: ...ystem Connect the cable end of the power supply unit to the socket at the base of the charger Make sure you insert the plug all the way You should feel it lock into place Guide the cable through one o...

Страница 171: ...blestand 133 S DW and SL Tablestand 153 S DW as well as the wire less boundary microphone SL Boundary 114 S DW To charge a device Place the device on one of the two charging surfaces The blue status L...

Страница 172: ...he charging surfac es The two blue status LEDs on the charging surfaces provide the following status information Flashing normally the device is charging Flashing rapidly excess temperature warning Fl...

Страница 173: ...be installed invisibly or when the receiver position is not the best antenna position for optimum reception The AWM 2 can be easily mounted on a microphone stand or permanently installed on a wall You...

Страница 174: ...of the antenna cables in place 4 Antenna housing for antenna cable routing 5 Screw down cover of the antenna housing removable for mounting and antenna cable routing 6 4 recessed head screws for screw...

Страница 175: ...suitable for all applications where the antennas are to be positioned further away from the receiver Unscrew and remove the four screws from the base of the antenna wall mount and remove the cover To...

Страница 176: ...SMA sockets Use the elongated mounting holes to mount the antenna wall mount to a wall or screw the antenna wall mount onto a microphone stand with a 3 8 thread The antenna cables can be run from the...

Страница 177: ...able ends fitted with the R SMA sockets through the cable notch provided at the rear bottom edge of the antenna housing Do not kink the antenna cables and when running the cables make sure not to bend...

Страница 178: ...crew the antenna wall mount onto a microphone stand with a 3 8 thread The antenna cables can be run from the rear panel of the antenna hous ing directly trough a wall When wall mounting the antenna wa...

Страница 179: ...s have to be installed invisibly or when the receiver position is not the best antenna position for optimum reception The AWM 4 can be easily mounted on a microphone stand or permanently installed on...

Страница 180: ...The AWM 4 antenna wall mount 179 Product overview 1 Antennas 2 Connections for Link I receiver 1 3 Connections for Link II receiver 2...

Страница 181: ...The AWM 4 antenna wall mount 180 Connecting and mounting the AWM 4 Attaching the antennas Screw the four supplied rod antennas onto the housing as shown...

Страница 182: ...econd re ceiver to the connections LINK II of the AWM 4 You can find additional information on possible setups using the AWM 4 and general recommendations on antenna usage under Rec ommendations on an...

Страница 183: ...4 antenna wall mount 182 Mounting the AWM 4 on a stand or on the wall You can either screw the AWM 4 onto a standard microphone stand or use the existing holes in the housing to mount it on the wall a...

Страница 184: ...ennas the number of required antenna cables is reduced to a minimum The rack re ceivers are connected to the SL PASC 2 using the supplied SMA R cables Return to first page of the instruction manual Co...

Страница 185: ...ennas the number of required antenna cables is reduced to a minimum The rack re ceivers are connected to the SL PASC 4 using the supplied SMA R cables Return to first page of the instruction manual Co...

Страница 186: ...ntenna splitters in a rack This chapter describes how to install a single antenna splitter or two an tenna splitters side by side in a rack GA 4 mounting kit To install the antenna splitter in a rack...

Страница 187: ...led ends of the mounting angles point forward Installing the antenna splitter in a rack To install the antenna splitter in a rack Screw the front panel from the GA 4 mounting kit onto the antenna spli...

Страница 188: ...ntenna splitters Fasten the mounting angles to the outer facing sides of the antenna splitters using the previously removed recessed head screws To mount the jointing plate Place the two antenna split...

Отзывы: